Physical Address
304 North Cardinal St.
Dorchester Center, MA 02124
Physical Address
304 North Cardinal St.
Dorchester Center, MA 02124
A practical guide to the contemporary bathroom remodel decisions that actually change how a space looks — from floating vanities to frameless enclosures.
Most people believe a contemporary bathroom remodel requires gutting everything back to the studs. Renovation contractors repeat it. Budget estimates reinforce it. Here is what they are not telling you. After 12 years in architectural renovation, I have completed dozens of bathroom renovation projects. In most of them, 70% of the transformation came from four or five targeted changes — not a full demolition. The secret is not spending more money. It is understanding which moves actually shift the look of a room and which are expensive busywork. These 15 contemporary bathroom remodel ideas draw on the decisions that genuinely change how a space reads. They span every price point from a careful DIY weekend to a full professional fit-out.
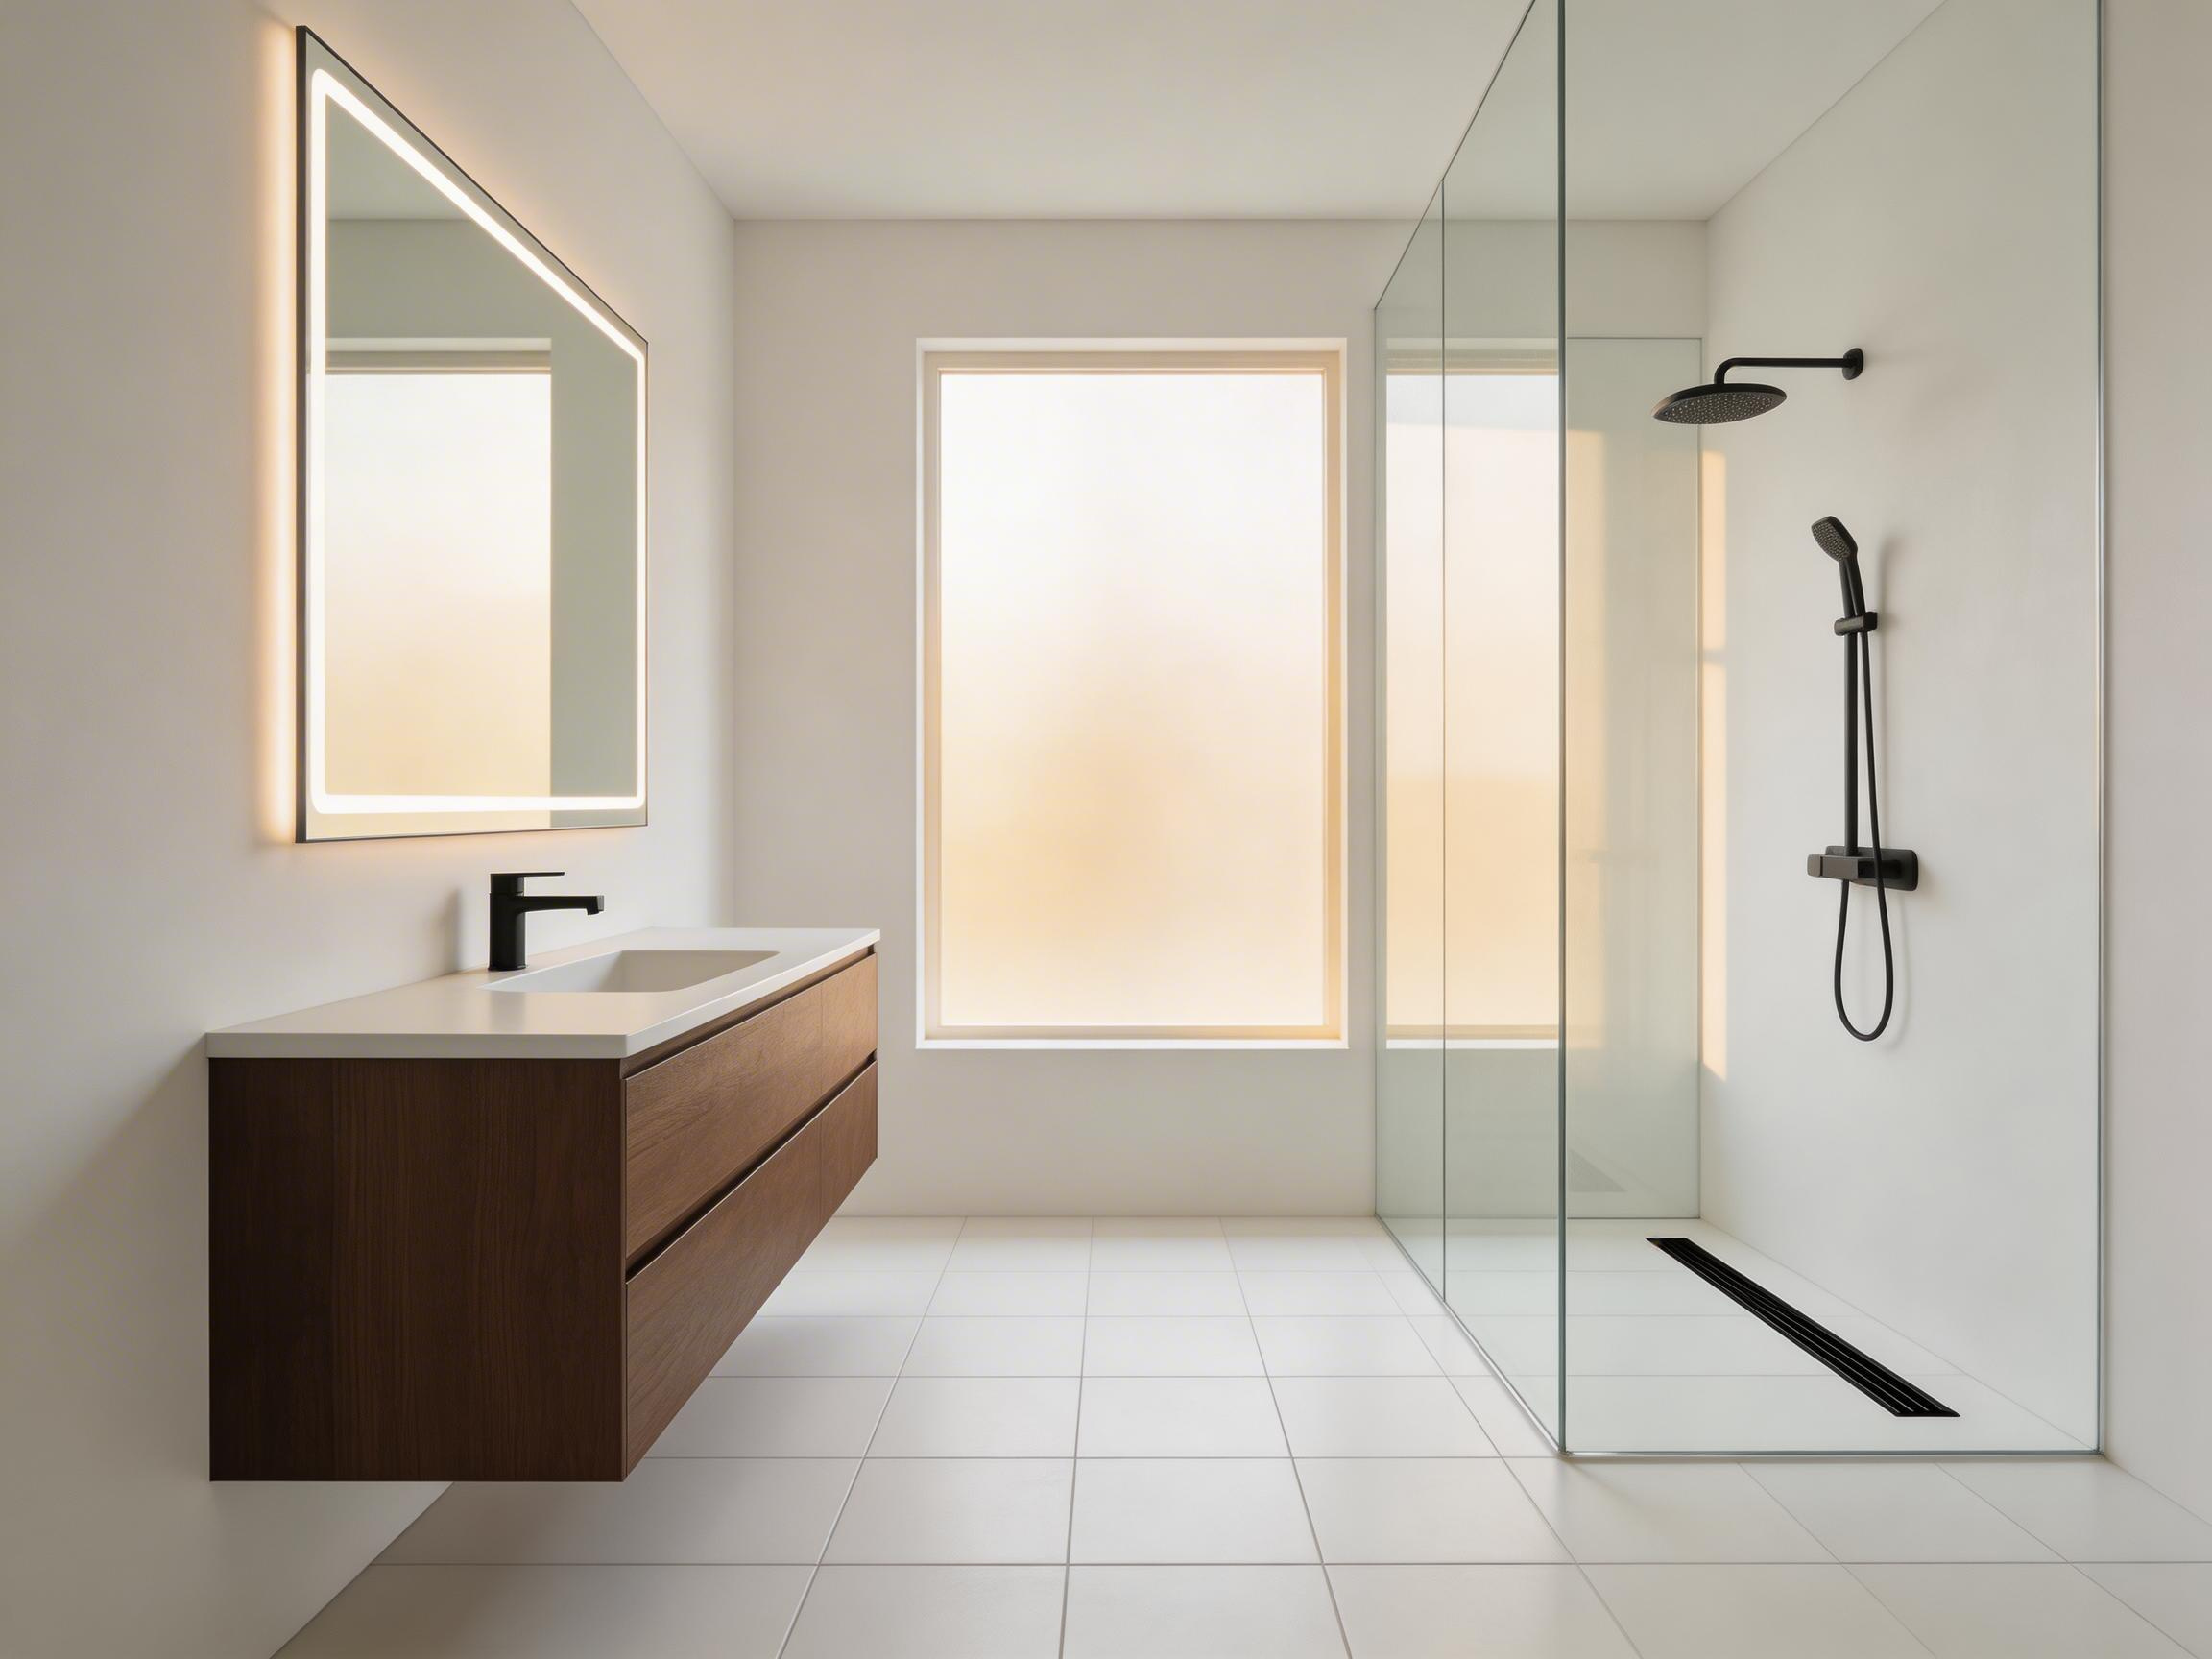
Swapping a floor-mounted vanity for a wall-hung unit is the single highest-impact move in most renovation projects. The vanity is the first thing your eye finds when you walk into a bathroom. Changing its relationship to the floor changes the whole spatial feel of the room. A floating vanity mounted 16–18 inches above the finished floor reveals a continuous sweep of tile underneath. That strip of visible floor makes even a compact bathroom read as larger.
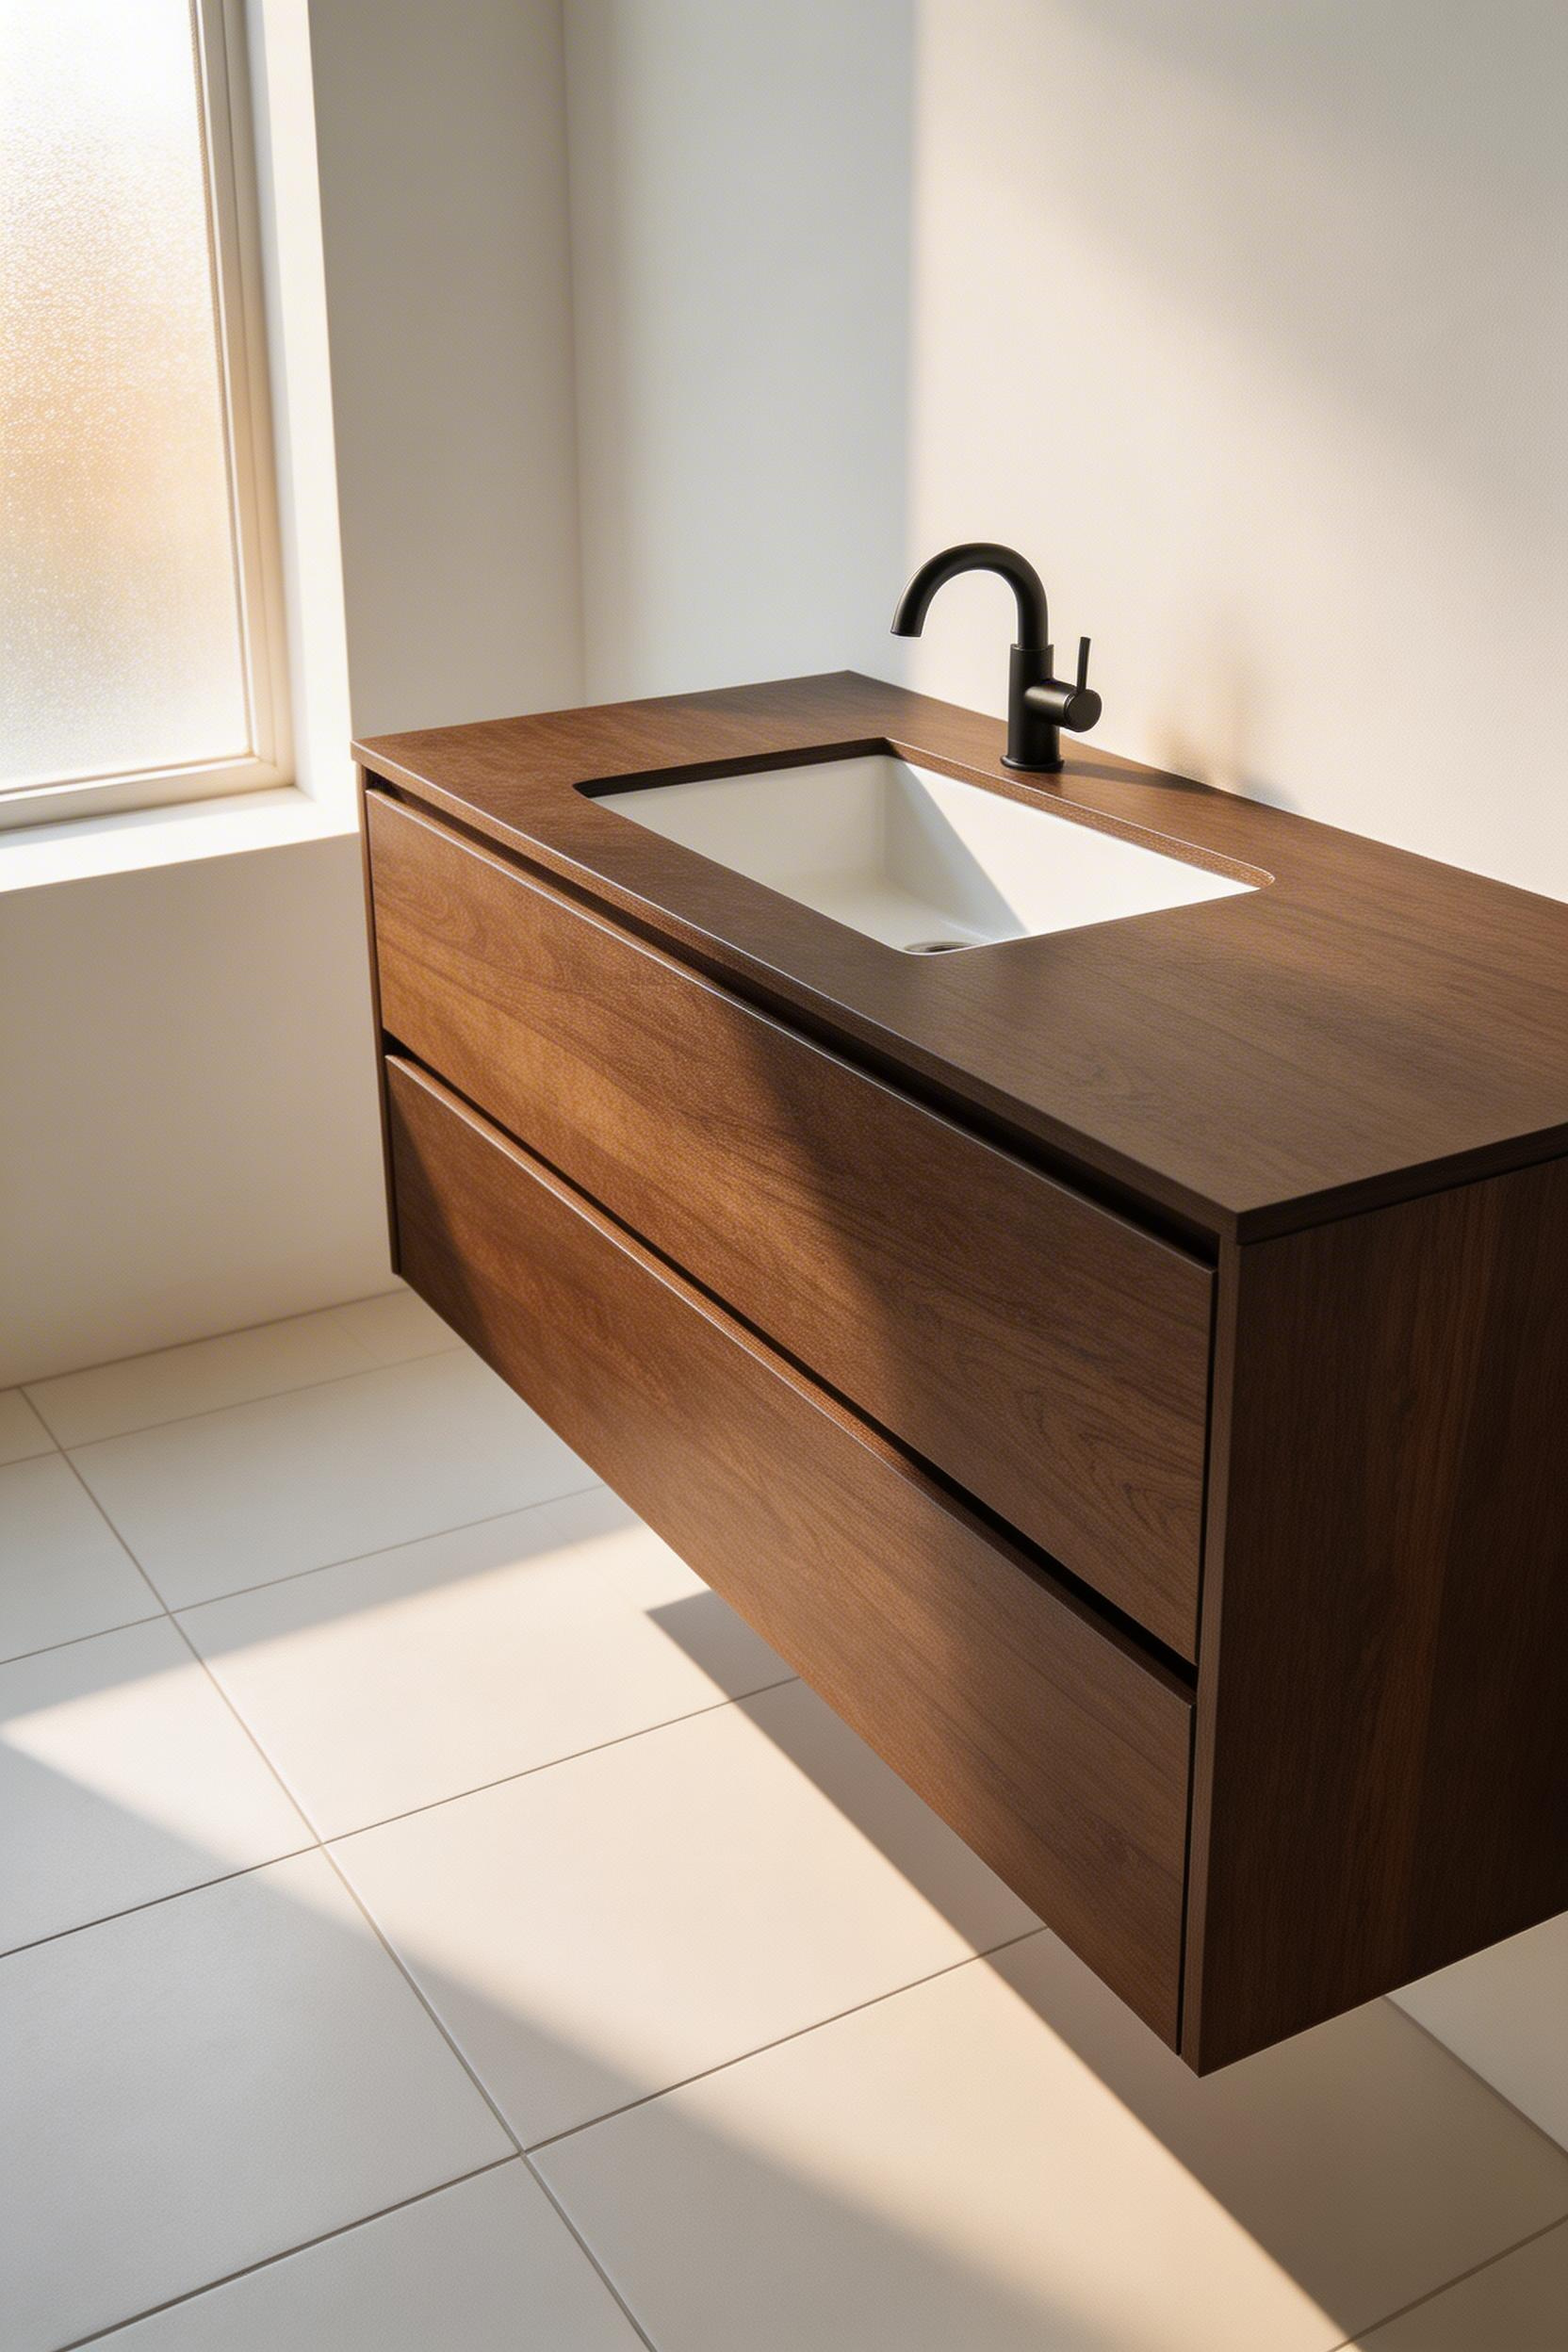
The detail most online guides skip is the plumbing relocation. In a standard retrofit, the P-trap and drain stub-out must move upward by 6–8 inches to clear the base of a wall-hung unit. That is a plumbing rough-in change, not a cosmetic swap. Plan for it and budget accordingly. The wall also needs solid blocking between studs, rated for at least 150–200 lbs. That carries the vanity weight plus the load of someone leaning against the sink edge.
Standard floating vanity depth is 18–21 inches. However, in a bathroom under 5 feet wide, dropping to a 16-inch-deep unit creates meaningful clearance without sacrificing under-sink storage. The IKEA GODMORGON 24-inch wall-mounted vanity ($349–$429) is a solid budget-conscious starting point. For a mid-range option with better carcass quality, the Kohler Tailored Vanity in matte white ($1,100–$1,400) is a strong choice. It comes pre-drilled for an undermount sink and includes soft-close drawers. At the upper end, James Martin Vanities’ Glenbrooke 48-inch in dark oak ($1,800–$2,200) ships with an integrated sink top and represents excellent quality-to-price ratio.
Before committing in an older home, check whether your wall is load-bearing and whether the plumbing stack runs inside it. Both can double the installation cost and timeline if missed at the planning stage. I have seen more than one renovation blown out on budget by a single undiscovered stack in the vanity wall.
Large-format porcelain tile — 24×48 inches or larger — reduces grout joint frequency by up to 75% compared to a standard 12×12 installation. Grout lines are what the eye uses to measure a room’s scale. Fewer lines read as more space. It is one of those design moves that photographs well and also looks good in person. There is a sound technical rationale behind it too.
The installation requirement that most bathroom tile guides gloss over: large-format tiles need a deflection-free substrate. The tile industry standard (TCNA F101) requires an L/720 deflection limit for tiles over 15 inches. That is twice as strict as the standard for smaller tiles. In older homes, subfloor prep is almost always necessary. Budget an extra $3–$5 per square foot for self-levelling compound or cement board. The final result will look considerably more expensive than the tile price alone would suggest.
MSI’s Calacatta Marbella 24×48 porcelain ($4.49/sqft) is widely available, rectified, and gives a realistic marble look without marble’s maintenance demands. For a subtle concrete effect with slip-resistant rating (R9) that works on both wall and floor, Emser Tile’s Craft Bianco 32×32 runs $6.20/sqft. At the premium end, a Laminam Oxide Nero slab (100x300cm) at around $28/sqft installed achieves near-zero grout lines. The 3mm thickness requires a specialised adhesive and an experienced installer. Also worth knowing: rectified tiles allow joints as narrow as 1/16 inch. At that width, the grout is barely visible and the floor reads almost as a single continuous surface.
Converting a tub-shower combo to a frameless walk-in shower is the most consistently rewarding structural change in a full renovation. It frees 5–8 square feet of usable floor area. It also removes the visual interruption of a curtain or framed enclosure and brings the room into alignment with what contemporary design actually looks like.
Worth addressing directly: if this bathroom is the only one in the home with a bathtub, removing it can reduce resale appeal. Buyers with young children will notice its absence. NAR data puts cost recovery for walk-in shower conversions at 60–67% nationally. In higher-value markets, that rises to 70–80%. If you are renovating for long-term use rather than immediate sale, the daily comfort improvement is significant. If you are preparing to sell, consider whether a second bathroom retains tub access.
The practical minimum for a walk-in shower is 36×48 inches. Smaller than that and the space feels more like a phone box than a shower. A 48×48 footprint allows a full turning radius and is worth the extra 12 inches if the floor plan permits. For waterproofing, Schluter KERDI membrane or RedGard liquid membrane behind tiles is the professional standard — minimum 6-inch return up all walls. The DreamLine Elegance frameless pivot door ($590–$750) in a 56–60-inch opening is the most widely specified mid-range glass panel for a contemporary bathroom remodel. It includes reversible hinge direction and 3/8-inch tempered glass.
Matte black fixtures became the defining hardware choice for contemporary bathroom design from around 2019, and they are holding well. The reason they work so well is the same reason they are used in high-end hospitality design. They create strong, readable contrast against pale tile and white walls. They also avoid the mirrored reflectivity of polished chrome, which shows every water mark.
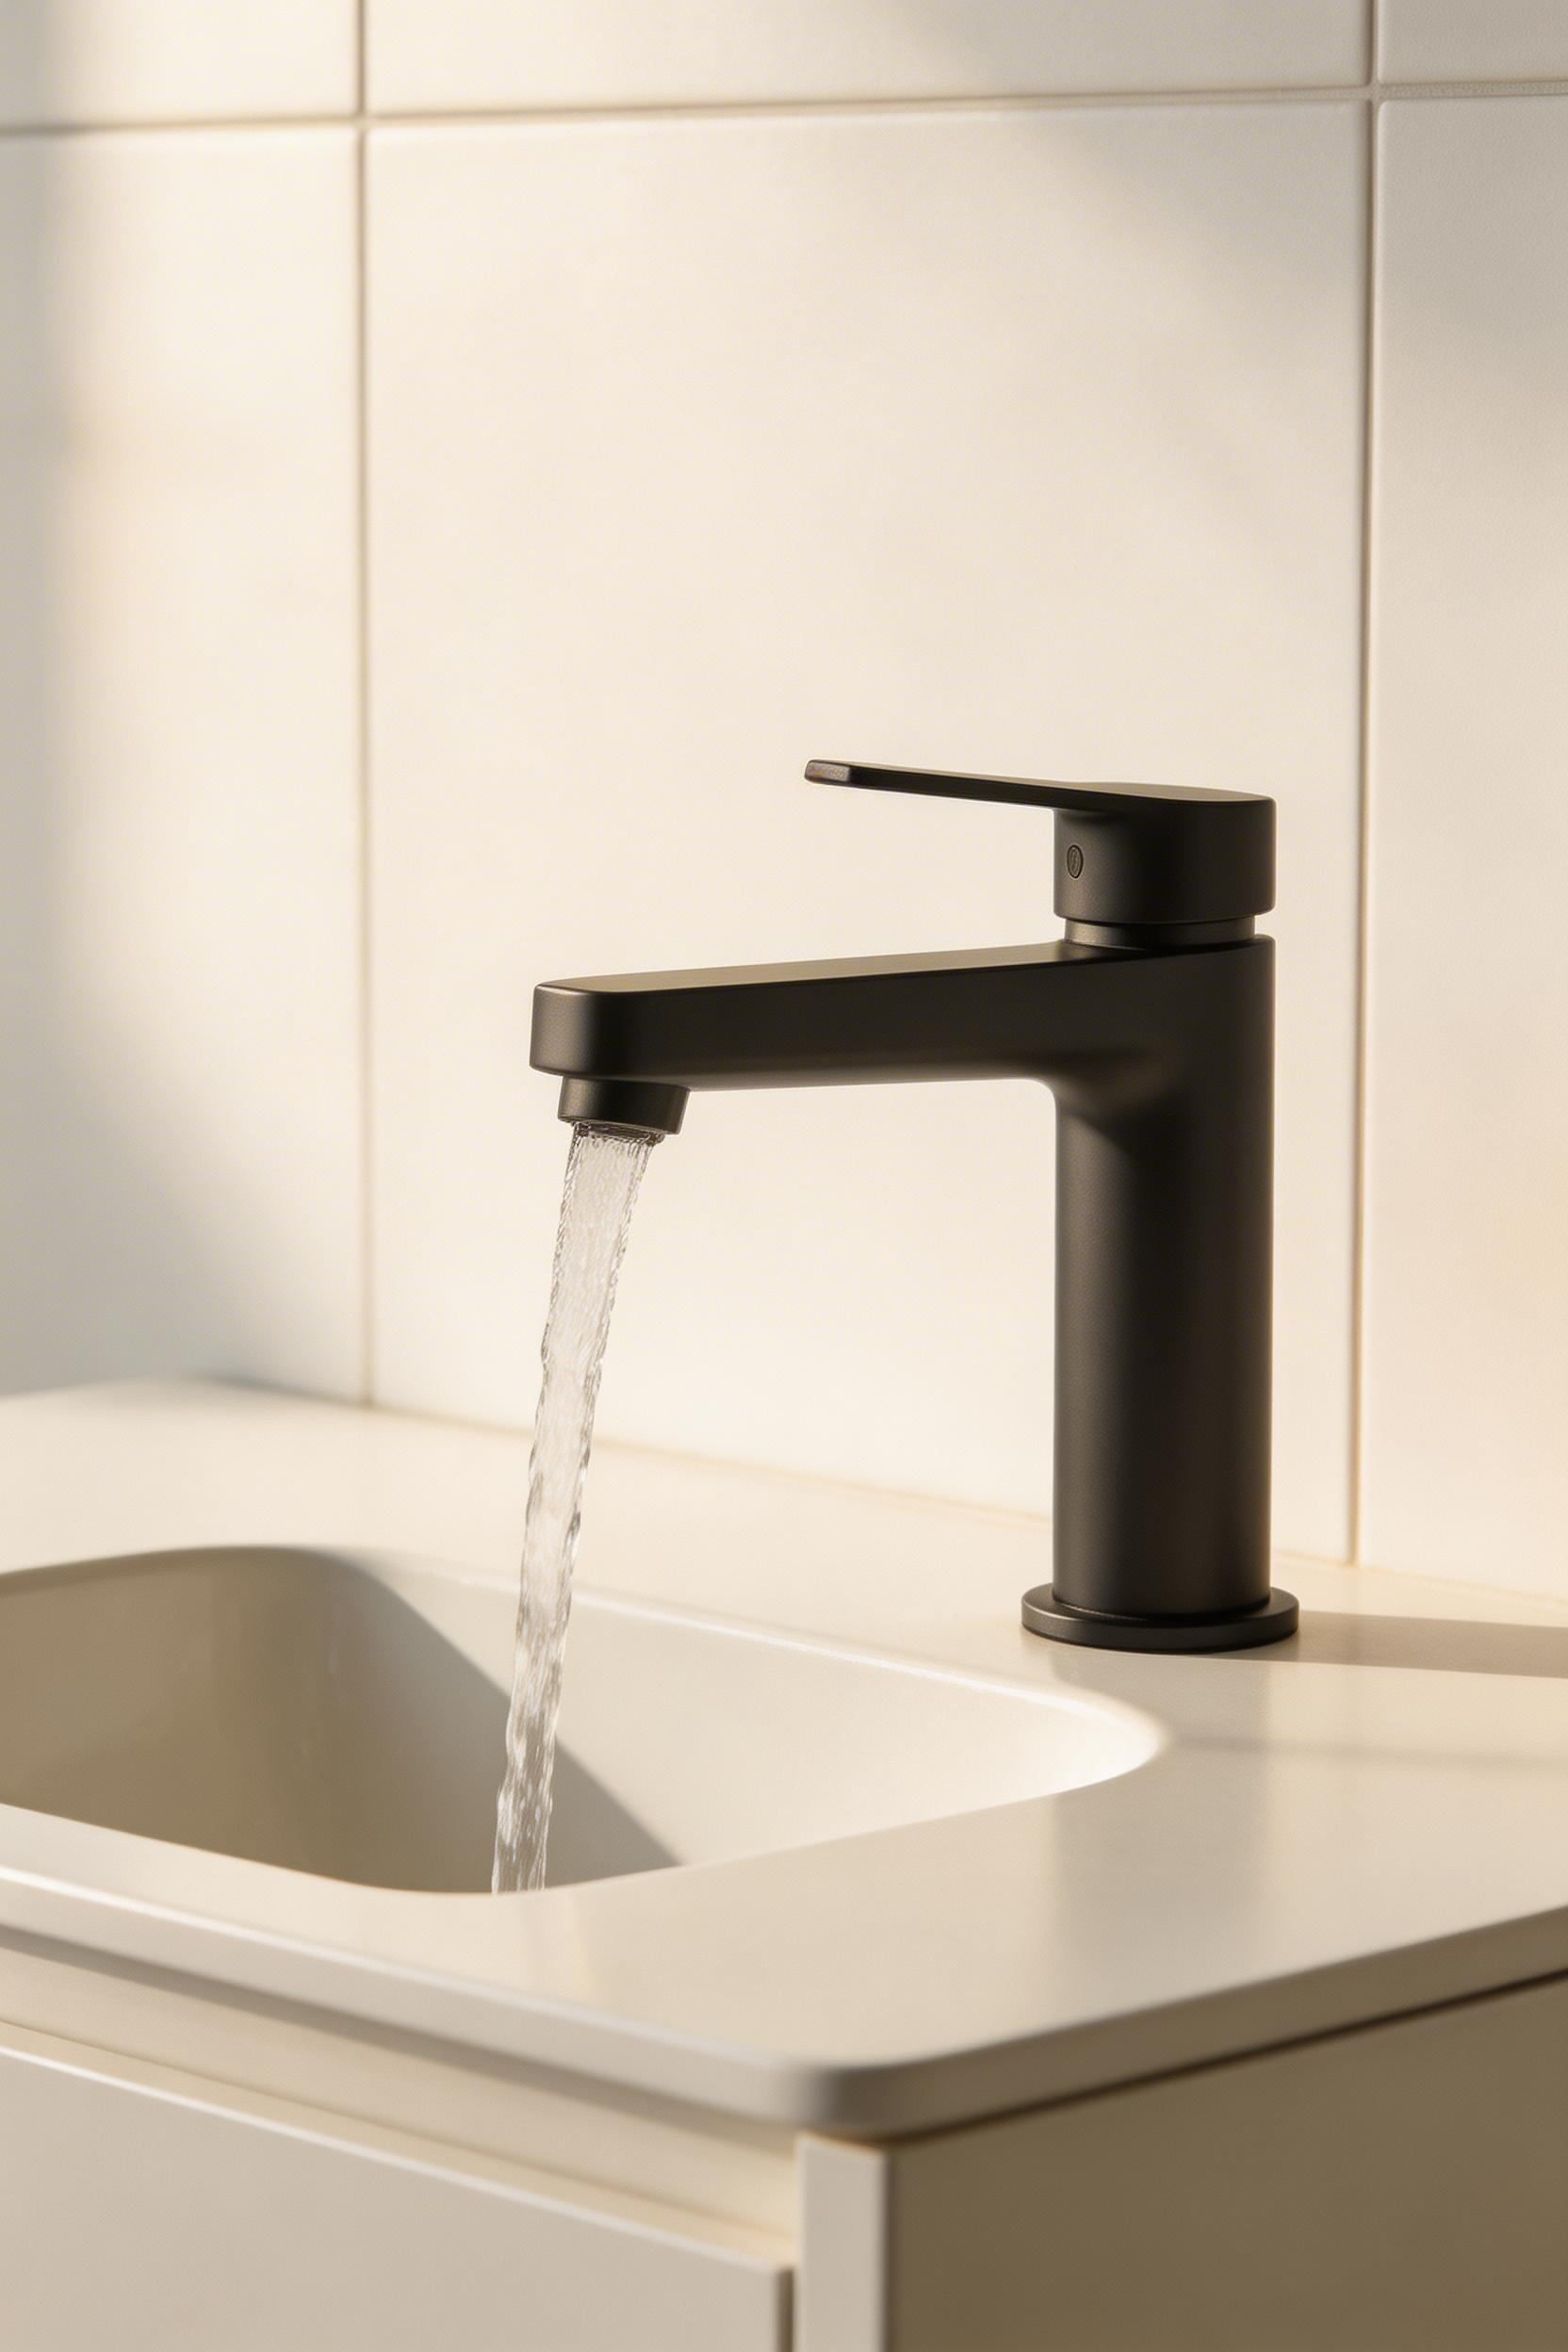
The matte black finish on quality plumbing hardware is applied through PVD (Physical Vapour Deposition). This vacuum-coating process bonds a thin layer of metallic compound onto the brass or zinc substrate. PVD hardness runs 2,000–3,000 HV on the Vickers scale. A standard electroplated chrome finish sits at 200–400 HV. The practical difference is that PVD holds up to daily cleaning and hard water significantly better. Look for a lifetime finish warranty — Moen, Delta, and Kohler all offer this on their PVD products.
The Moen Weymouth Widespread Bathroom Faucet in matte black ($280–$320) is a solid mid-range option. It has solid brass construction, WaterSense certification at 1.2 GPM, and a lifetime limited warranty. For the shower, the Delta Trinsic Single-Handle Shower Trim in matte black ($185–$230) is a practical choice. It pairs directly with a Delta MultiChoice universal valve rough-in if you already have one. At the premium end, the Grohe Rainshower 310 SmartConnect overhead rain head ($420–$490) is worth the spend. Silicone spray nozzles resist limescale buildup, and the EcoJoy flow limiter is included.
One practical note: buy all your matte black fixtures from the same manufacturer. Even within the matte black family, Moen’s tone reads cooler and Kohler’s reads warmer. That difference is visible when hardware sits next to fittings in the same room.
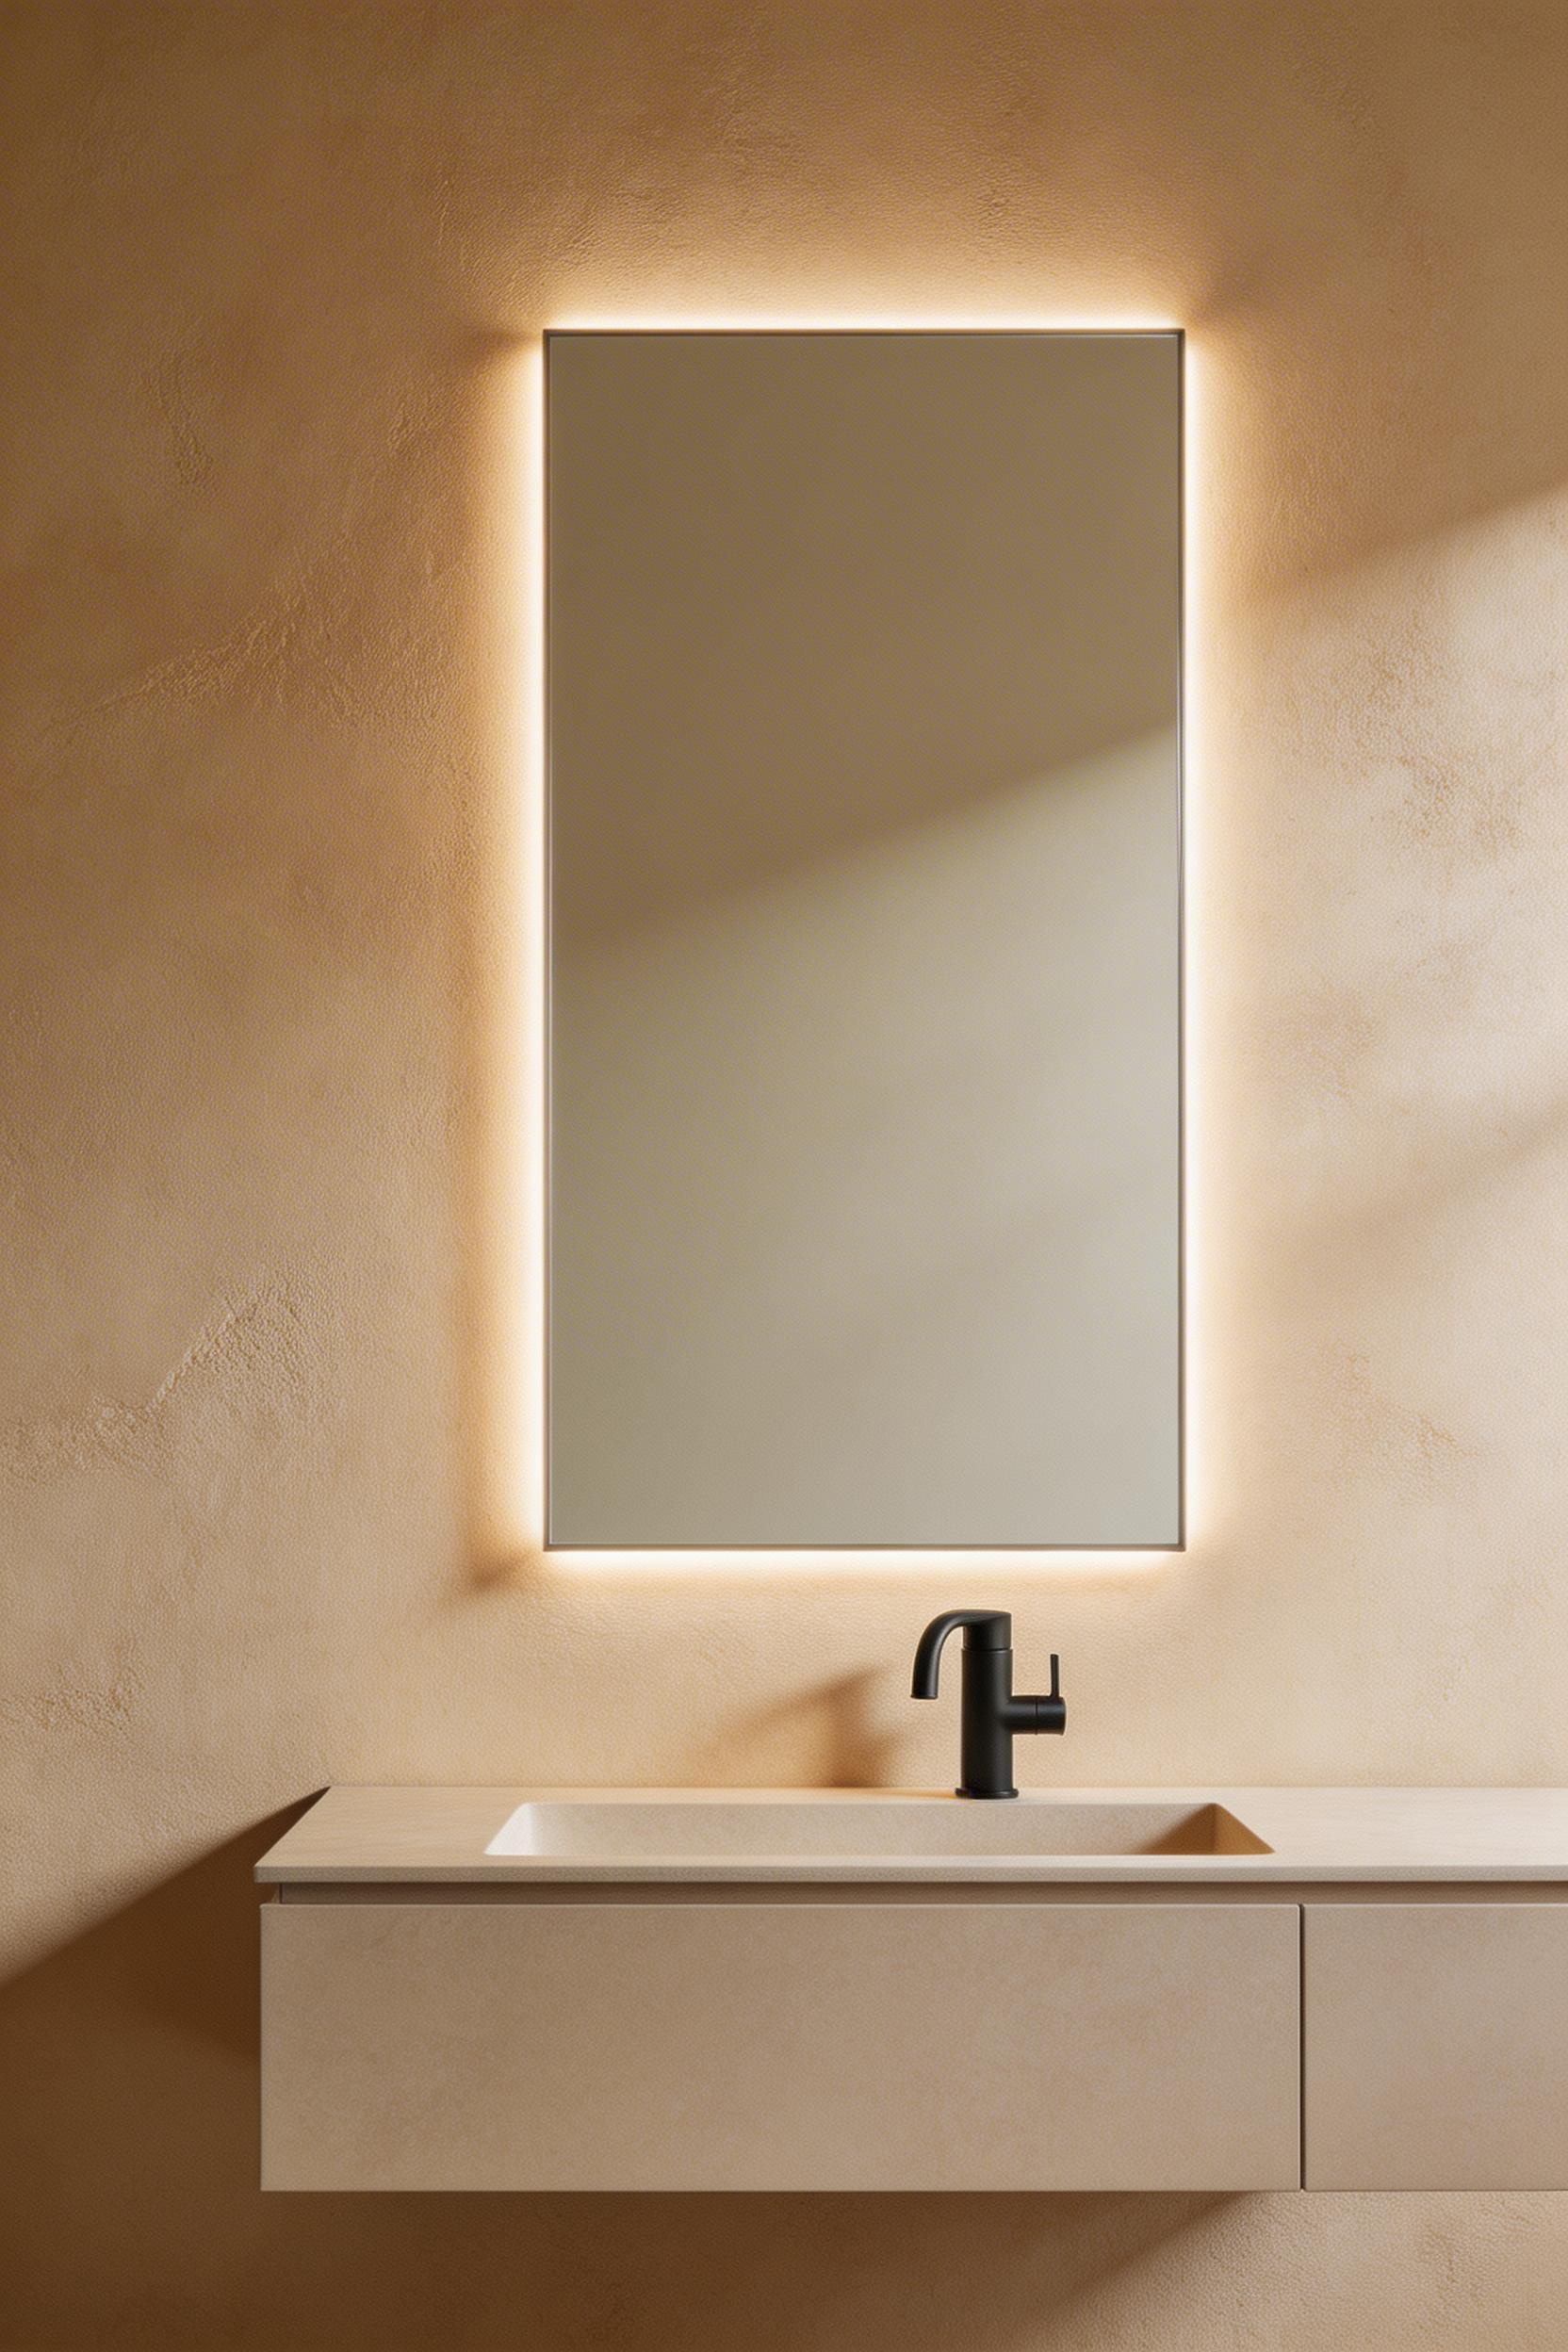
The LED mirror cabinet solves three problems at once. It addresses the face-shadowing caused by overhead-only lighting. It also adds hidden storage that keeps the vanity surface clear, and introduces a layer of visual depth that a plain-framed mirror cannot achieve. For a renovation focused on functional clean lines, it is one of the best single purchases available.
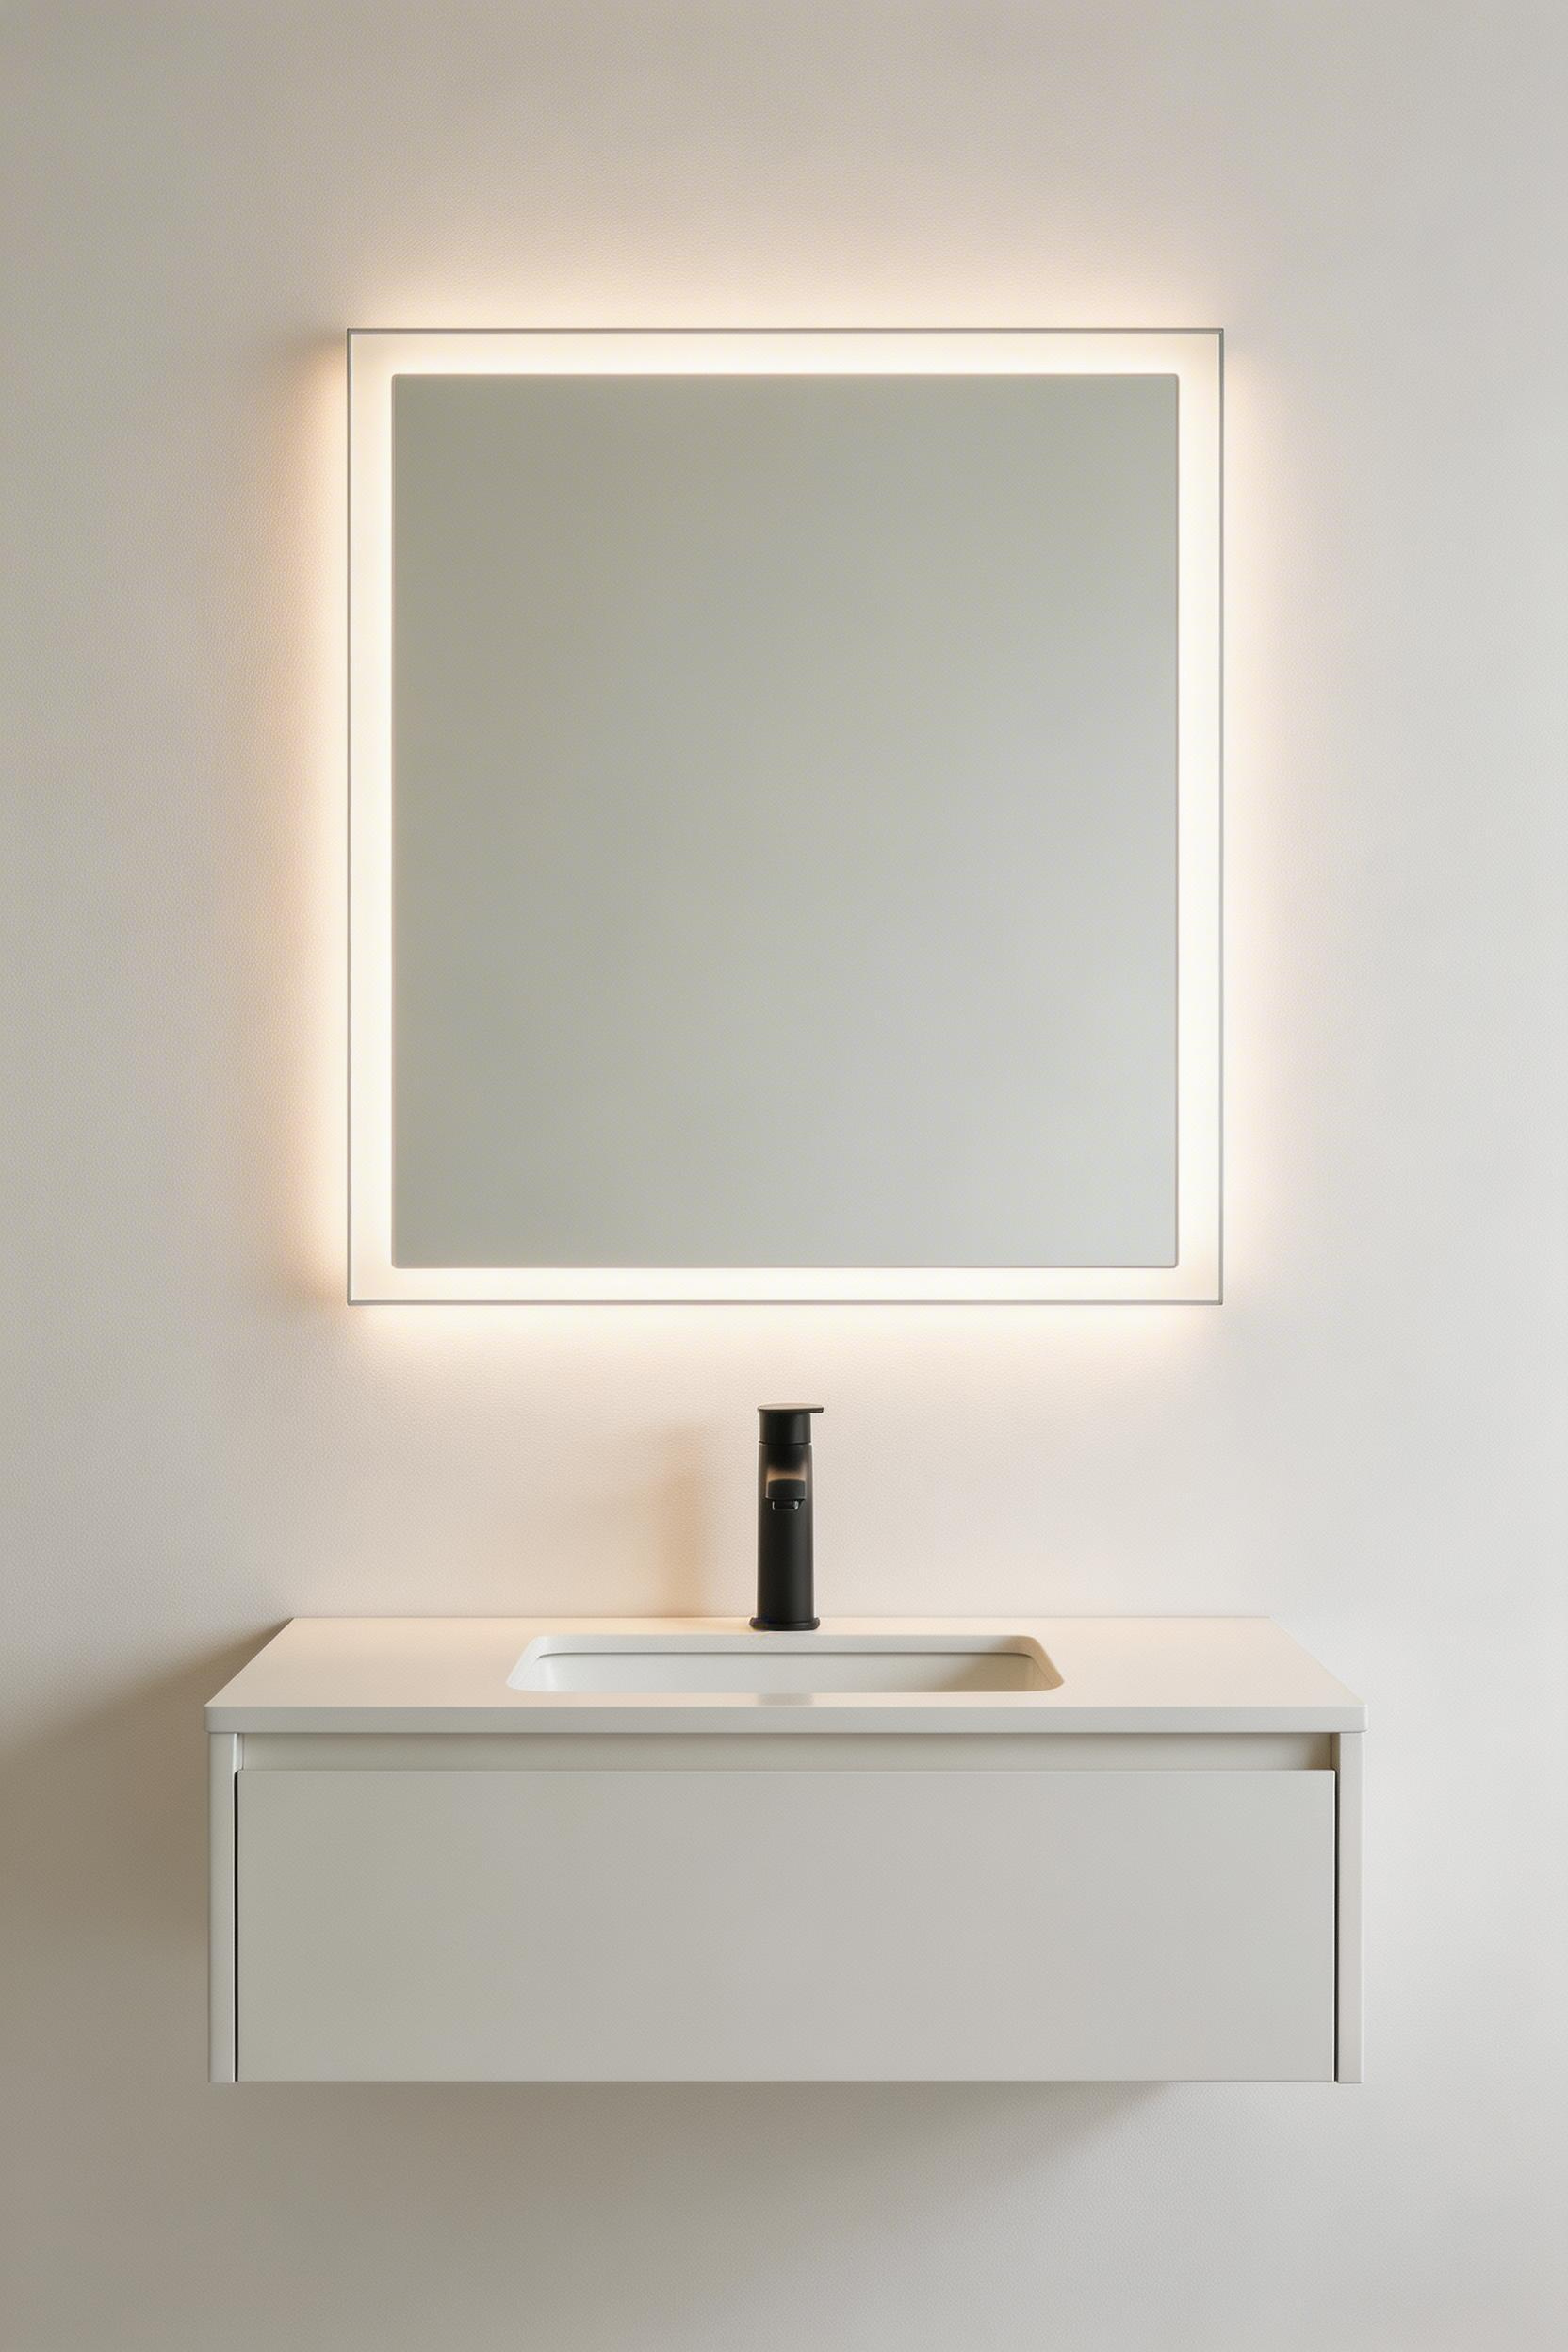
A backlit or front-lit LED mirror positions light at face height. It fills in the shadows that a ceiling-mounted fixture casts under the brow and chin. This is the lighting principle behind Hollywood dressing room mirrors, and it transfers directly to a bathroom vanity context. The colour rendering index (CRI) matters here: aim for CRI 90 or above, which is what quality LED mirrors specify. Below CRI 80, skin tones look off. Makeup applied in that light will not translate well outside.
Anti-fog technology in LED mirrors uses a heating element drawing 30–50 watts. Energy cost is minimal — roughly $2–4 per year at average US electricity rates. The dimmer function is more practical than it sounds. Being able to drop the mirror light to 20% brightness for a late-night visit is the kind of feature that changes daily behaviour. You would not predict the difference before installation, but you notice it every morning after.
The NEUTYPE 36×28-inch LED Bathroom Mirror with Anti-Fog ($179–$220) is a capable entry-level option with CRI 90, touch dimmer, and three colour temperature settings. The Robern M Series 30×36 Recessed Medicine Cabinet with LED ($1,400–$1,900) is best-in-class for a recessed installation: adjustable glass shelves, soft-close hinges, and a full-perimeter LED strip. At an interesting mid-point, the Kohler Verdera Voice Lighted Medicine Cabinet ($900–$1,100) integrates Amazon Alexa in a way that feels genuinely useful rather than gimmicky.
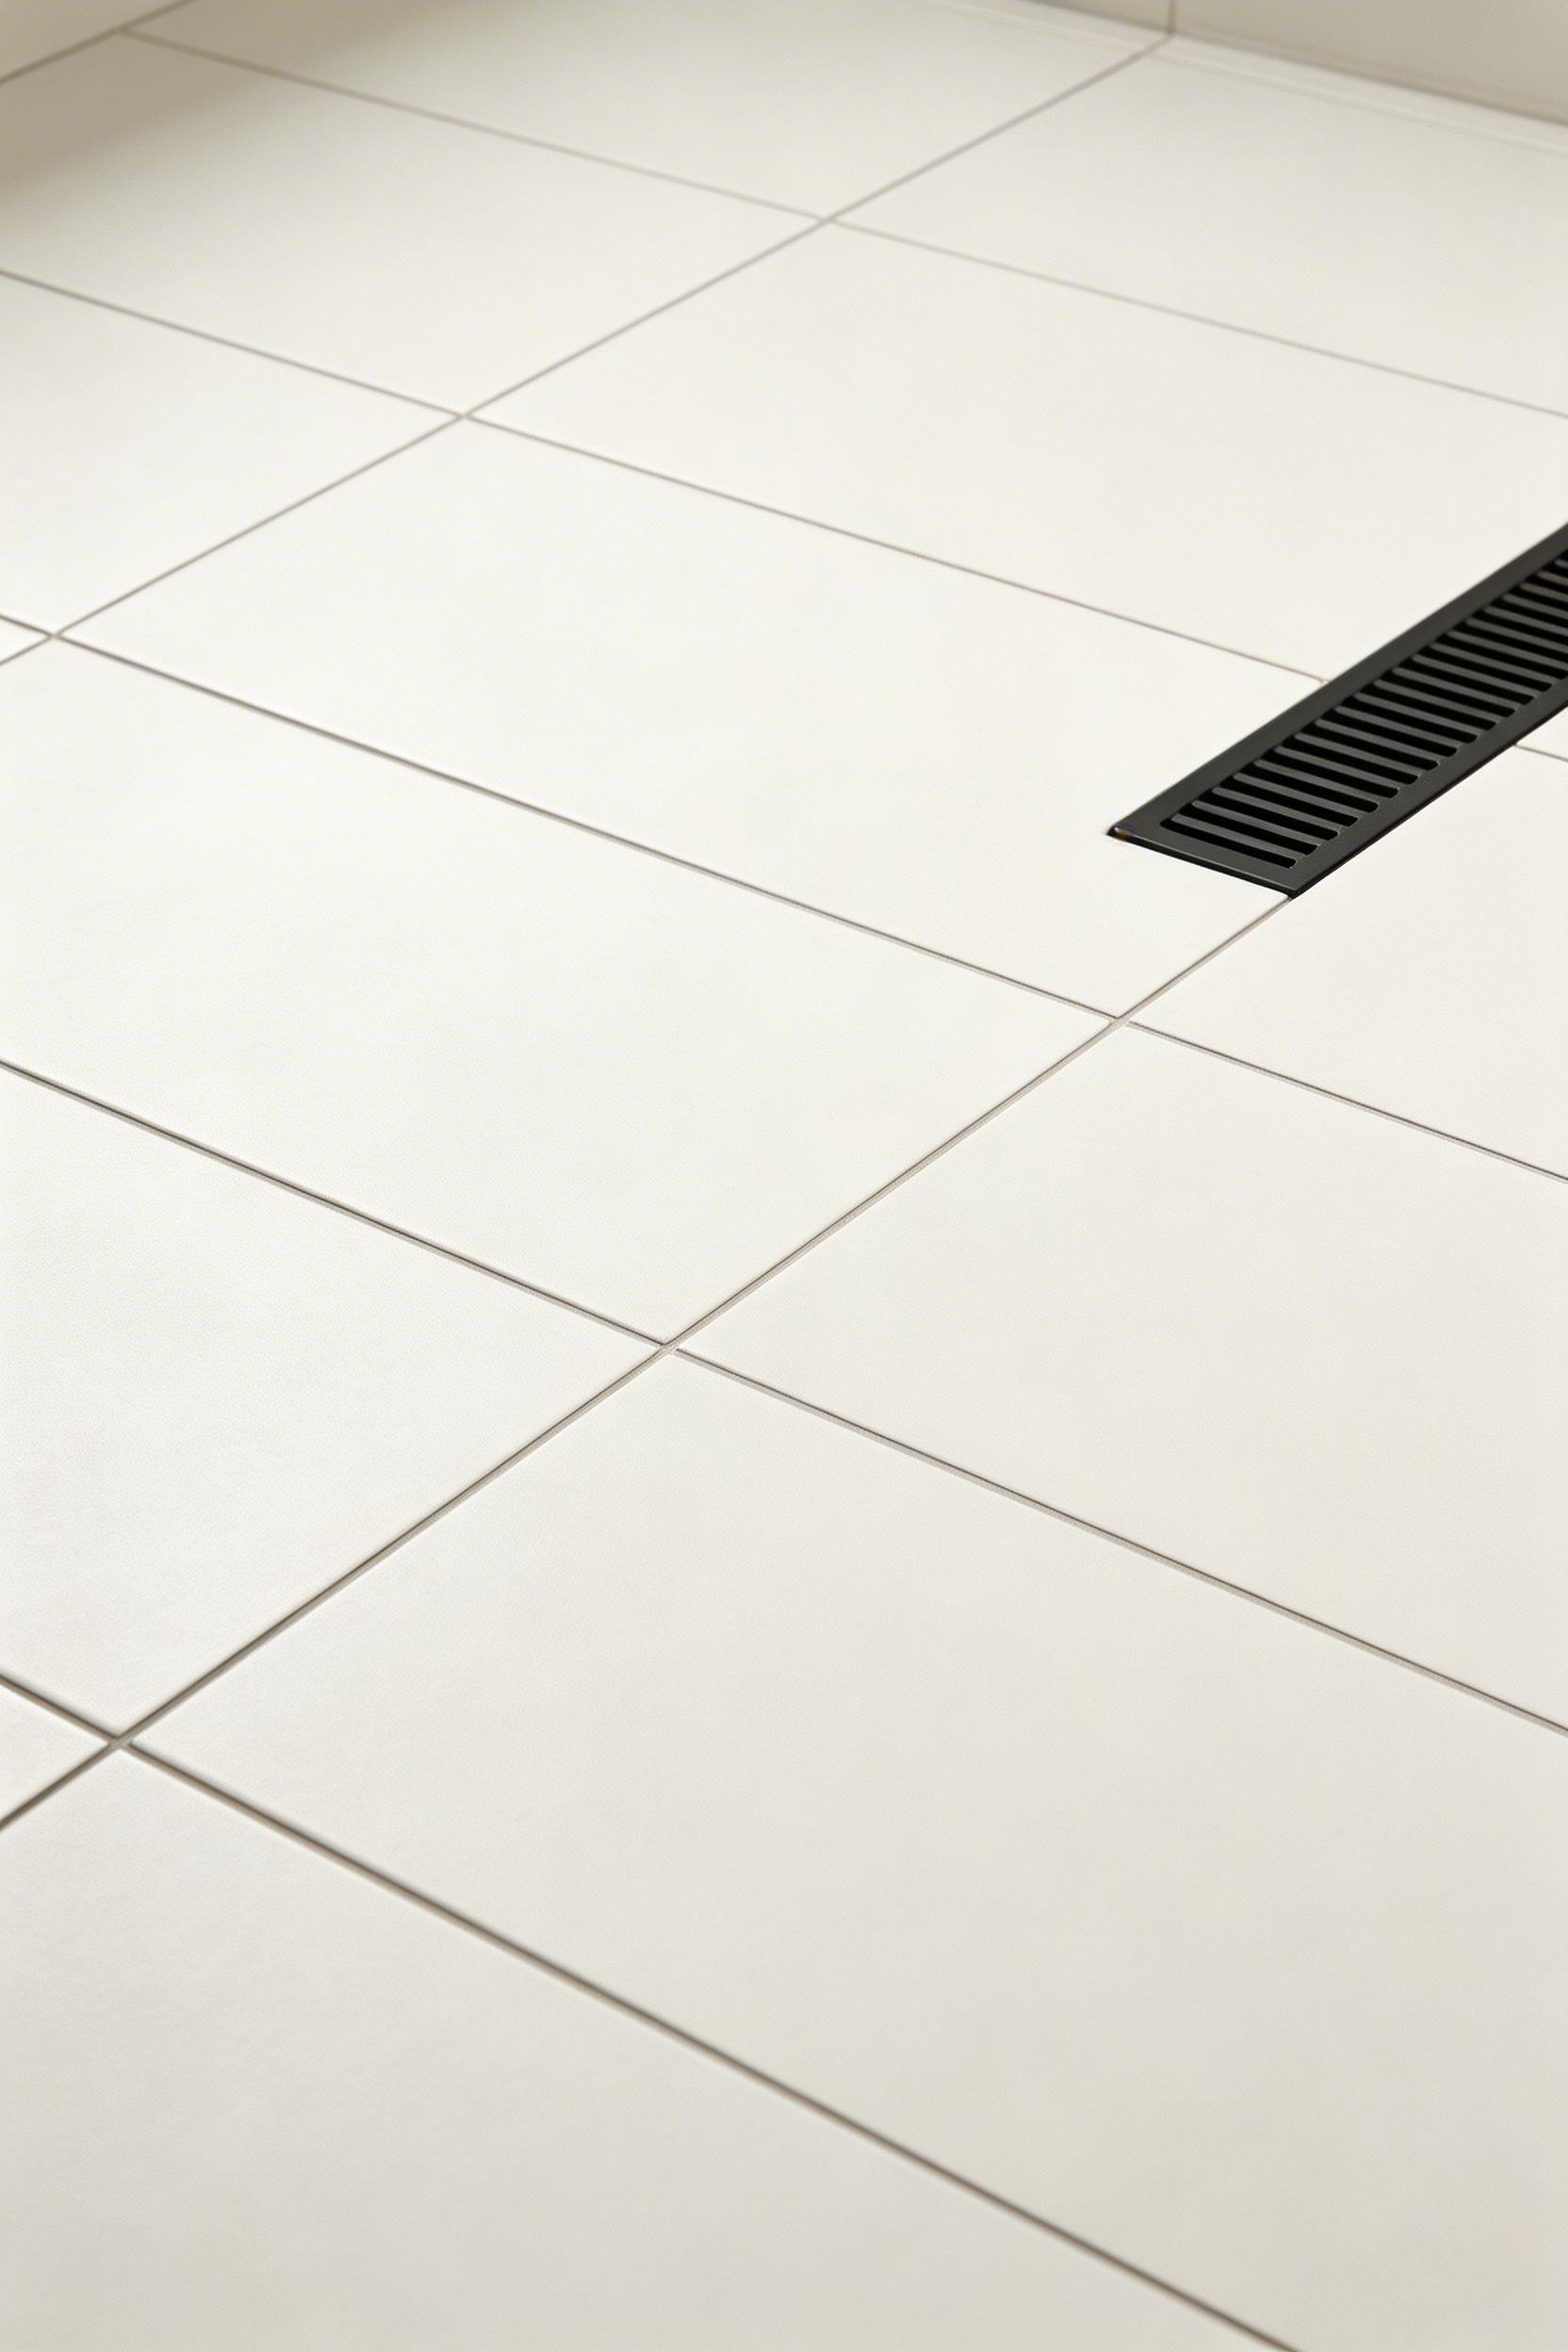
The drain is not glamorous. But the choice between a centre-point drain and a linear drain tells you a great deal about the level of thought behind a remodel. A linear drain allows large-format tile to run continuously across the shower floor without a visual break at the centre. That continuity is the whole point of choosing 24×48 or larger tile in the first place.
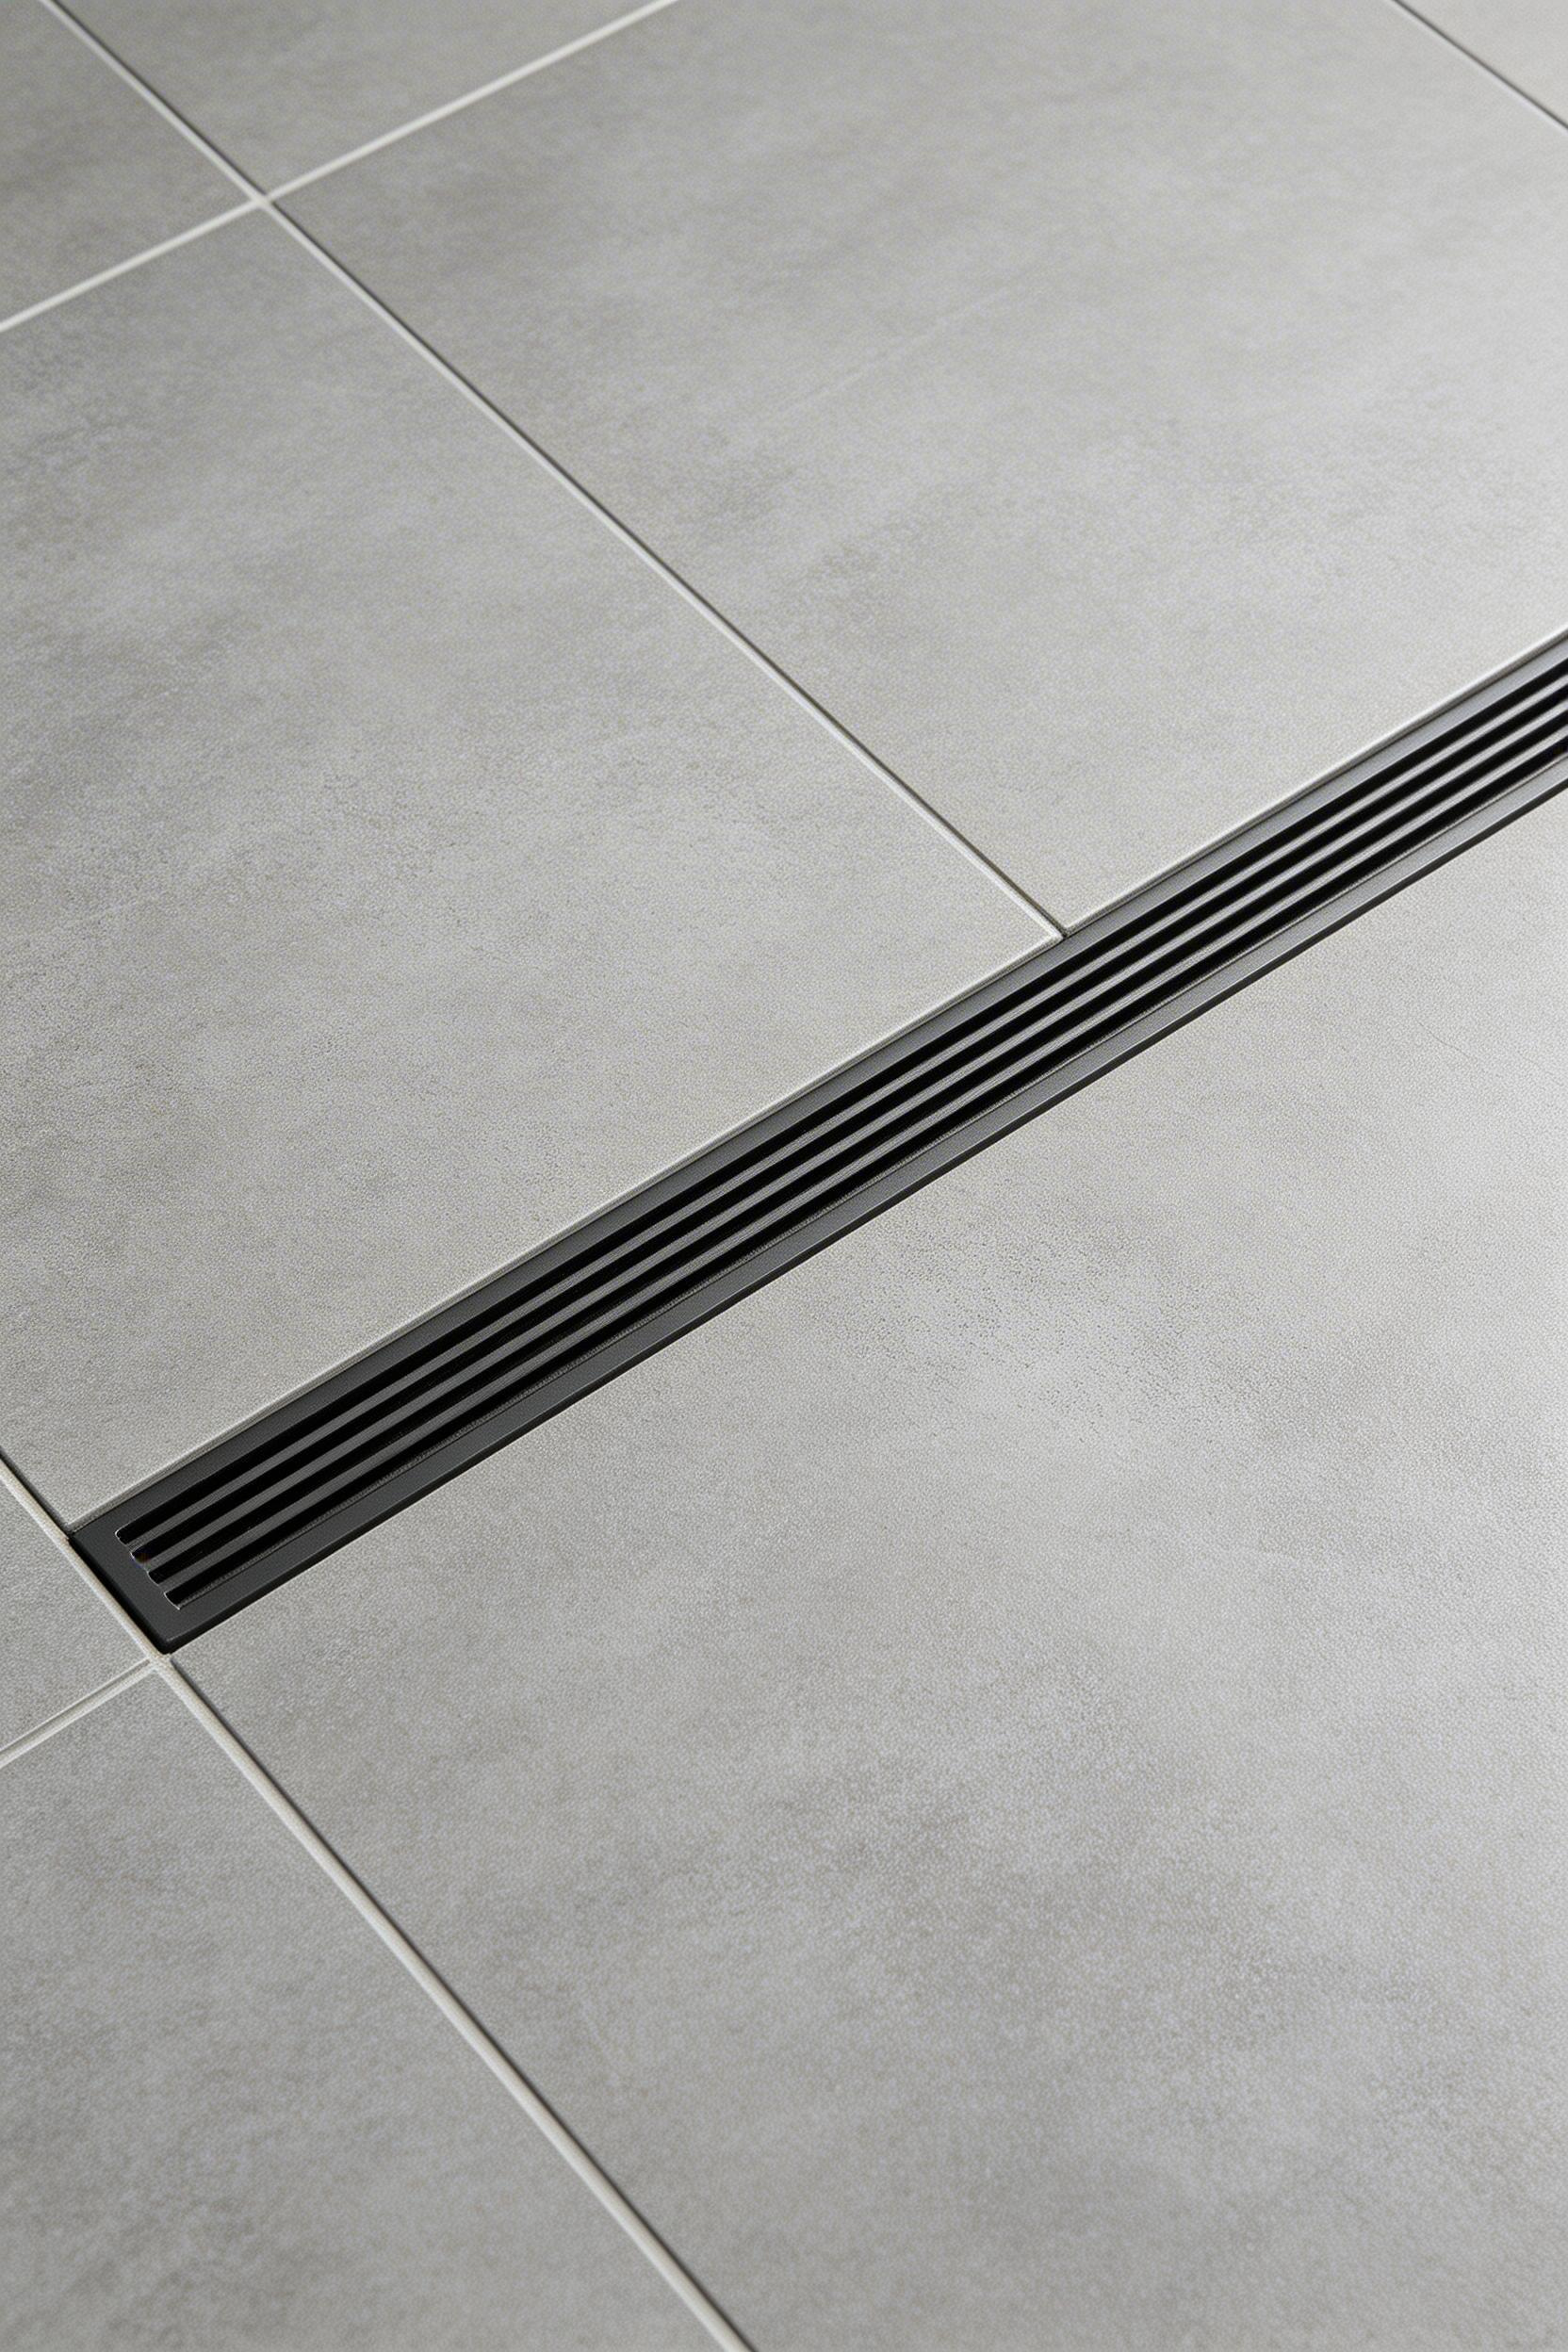
A centre-point drain requires the floor to slope in four directions simultaneously. That makes tiling accurately much harder and lippage errors (tile edges sitting at different heights) more common. A linear drain needs only a single-directional slope of 1/4 inch per linear foot. That is simpler to execute correctly and less prone to the tile lippage that shows up badly on large-format installations.
The Schluter KERDI-LINE 36-inch Linear Drain ($180–$230) is the industry standard. It integrates directly with the Schluter waterproofing system. The QuARTz 48-inch with tile insert ($260–$310) is practically invisible when tiled — the cover accepts 1/4-inch to 3/8-inch tile inlay for a near-seamless look. For a premium finish, the Infinity Drain S-LTIF Series in brushed stainless ($380–$460) is available in 12 finishes including matte black.
One positioning note: place the linear drain along the wall opposite the showerhead rather than below it. Water should flow away from where you stand. If it is placed directly under the showerhead, you step over it every time you enter or exit. That minor frustration compounds over years of daily use.
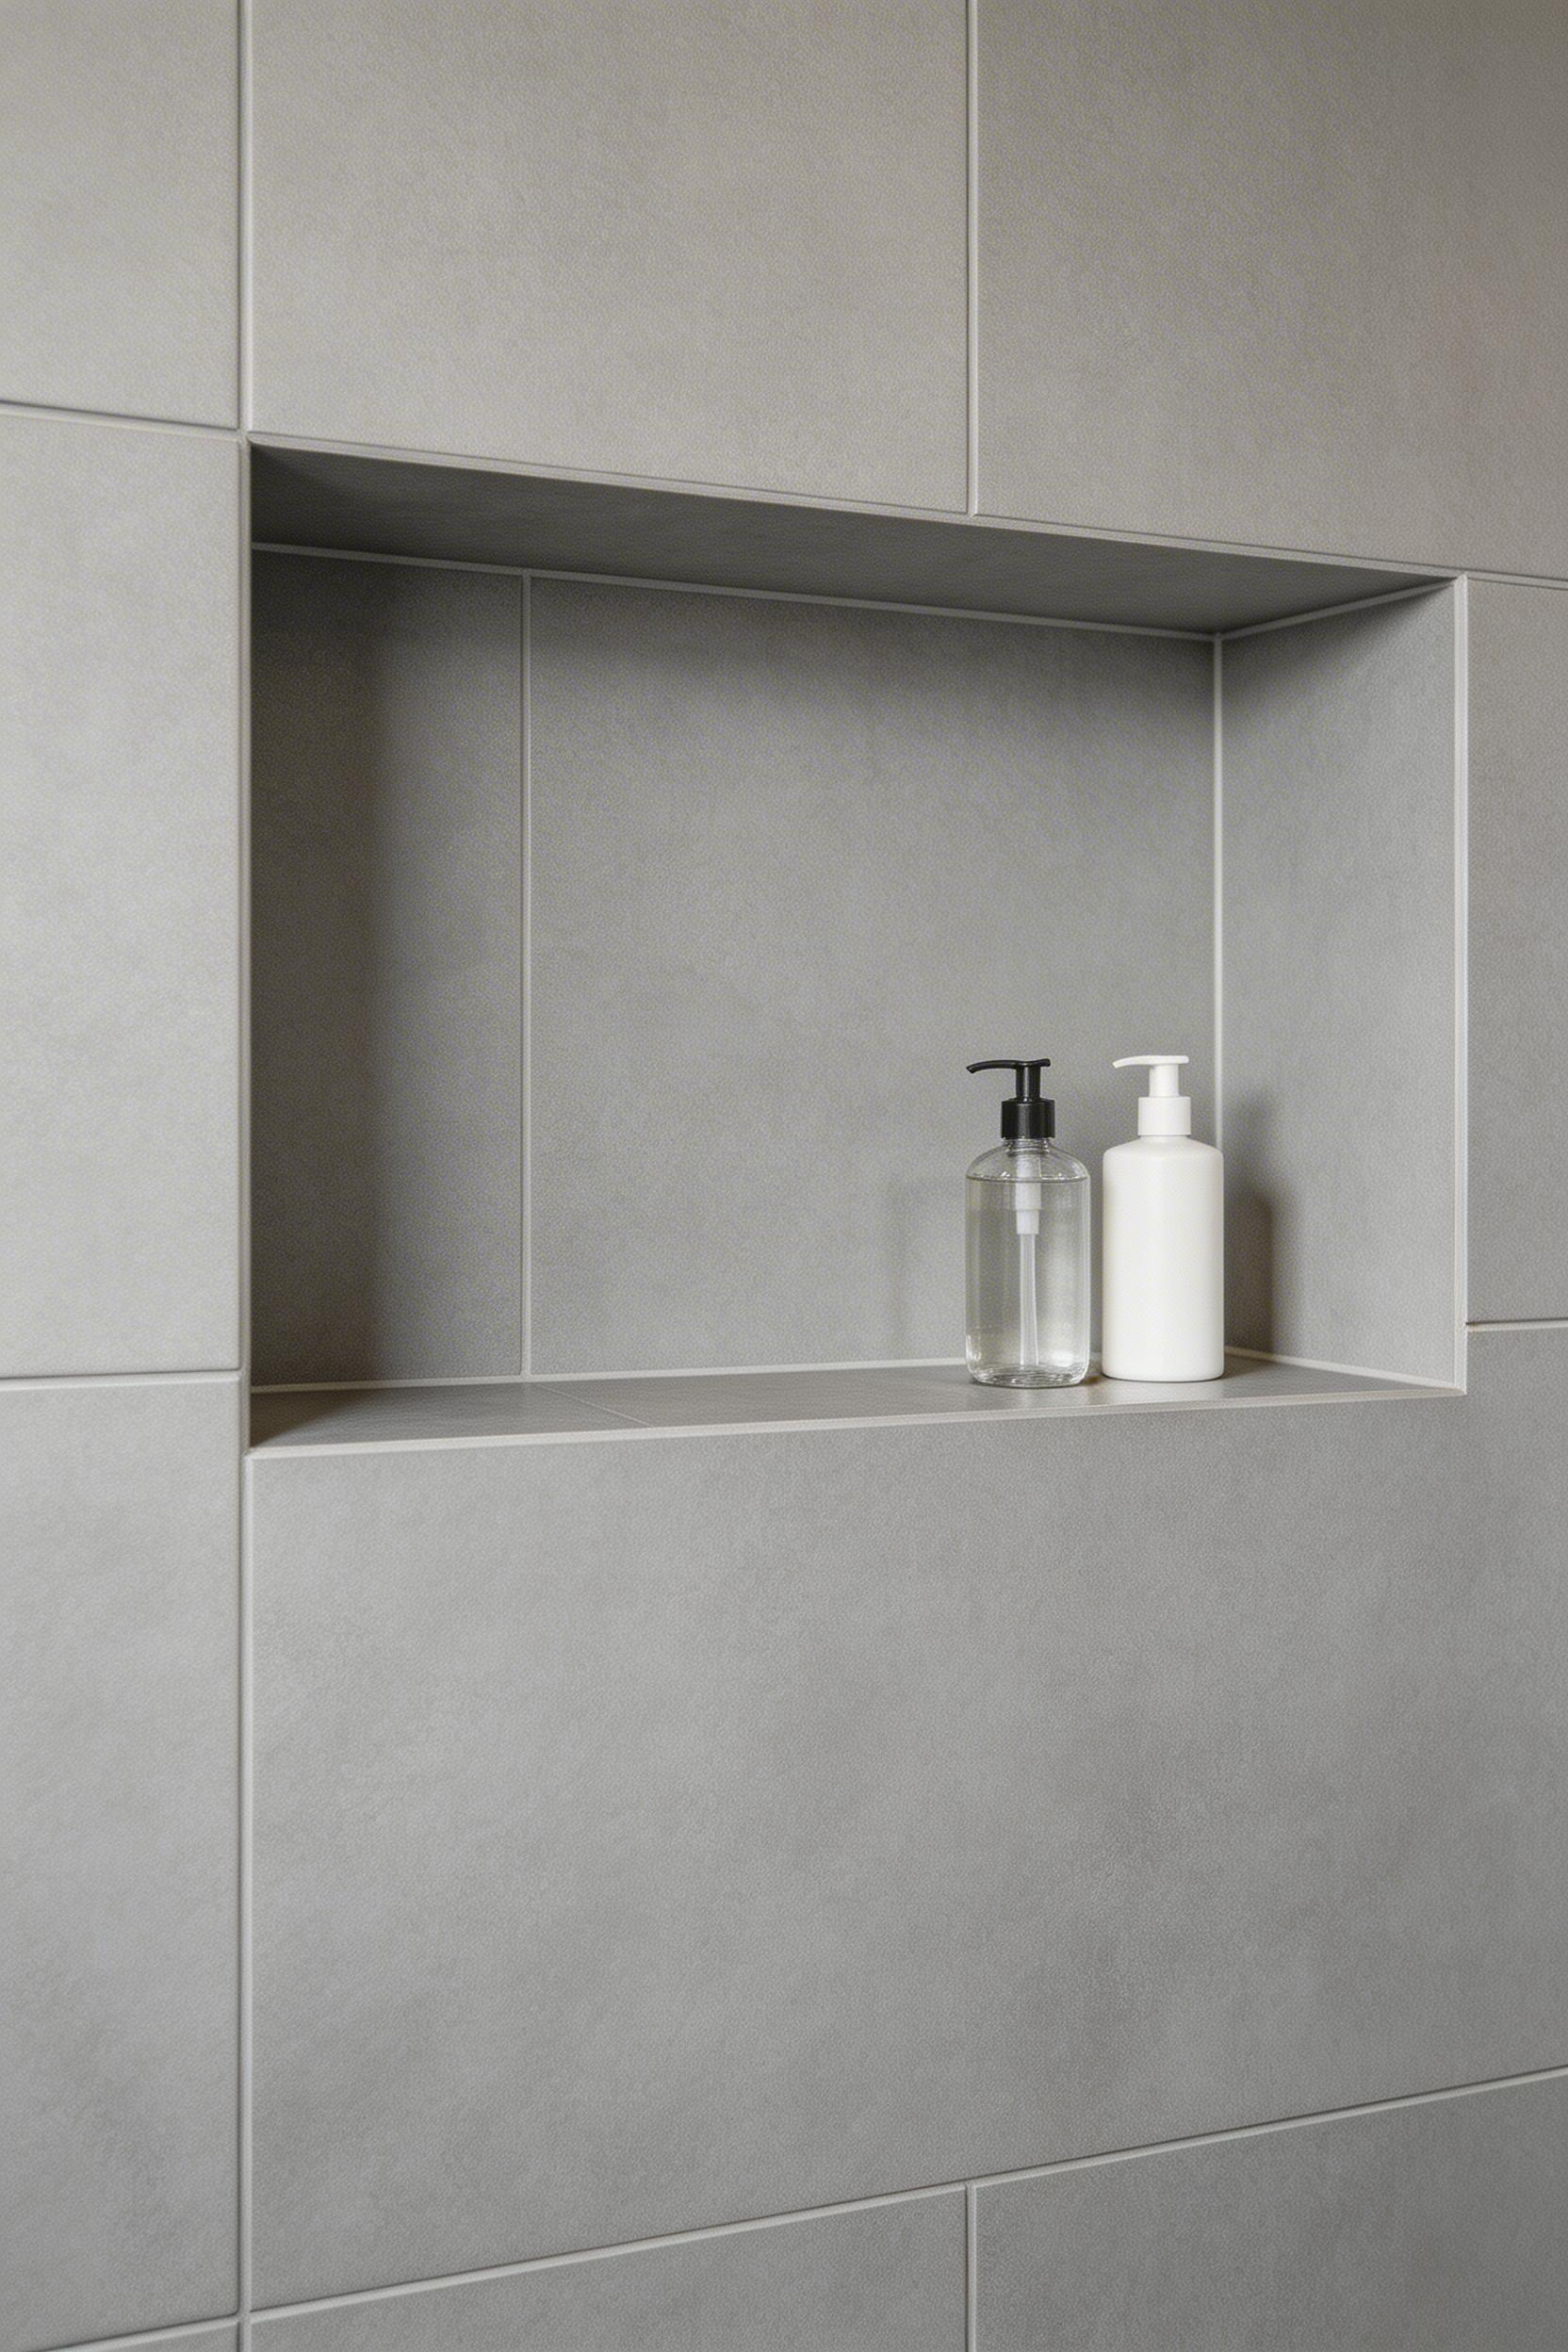
A recessed shower niche eliminates the corner caddy — and with it the rust streaks, the soap scum accumulation on wire shelving, and the general visual noise that a surface-mounted organiser introduces. When the goal is a clean, uncluttered look, the niche is not optional. It is part of the design language.
The niche must be framed between studs with horizontal blocking at top and bottom. If the niche straddles a stud, that stud must be cut and headers installed — a structural framing change, not just a cutting job. Also: do not install a niche in an exterior wall. Cutting into exterior wall insulation creates a cold bridge that leads to condensation and mould in the niche cavity over time.
Waterproofing is non-negotiable. A niche is a pocket that traps moisture by design. The Schluter KERDI or RedGard liquid membrane must extend fully into the niche interior, over all six faces, before any tile is applied. The Schluter KERDI-BOARD-SN 12×24 niche ($55–$75) is the most reliable pre-formed option. Its pre-sloped bottom drains away from the wall and integrates directly with the KERDI waterproofing system. The Redi Niche Double Recessed Shelf ($90–$110) adds a second shelf level, which is useful when multiple people share the shower.
Build the niche wider than you think you need. A 12-inch-wide niche feels cramped within a few months of use. A 24-inch niche accommodates two rows of product side by side and still looks proportional within a standard shower enclosure. Height placement of 48–52 inches from the finished floor is the sweet spot for standing use without craning or crouching.
A heated towel rail is one of the most accessible upgrades in this kind of renovation — particularly relative to cost. An electric unit drawing 100–150 watts, running two to three hours per day, adds approximately $5–$15 per month to an electricity bill. In return, you get a warm towel every morning and a modest amount of supplemental room heating.
Electric units are far simpler to install. A GFCI outlet or hardwired connection on a 20-amp circuit is all that is required. Hydronic units connect into the central heating system and run at near-zero cost once installed, but the plumbing connection adds significant installation expense. For most bathroom renovation projects, electric is the practical choice unless a hydronic system is already planned.
The BTU rating matters more than most buyers realise. A 100-watt rail in a 60-square-foot bathroom will keep towels warm but will not meaningfully warm the room. A 150-watt rail in that same space makes a noticeable difference to the ambient temperature on cold mornings. For finish, brushed stainless and matte black both hold well in a contemporary palette.
The WarmlyYours Infinity 20×40 Hardwired Towel Warmer in brushed stainless ($195–$240) is a reliable entry-level option at 95 watts. The Runtal Omnipanel 24×24 Electric Towel Warmer ($280–$350) steps up to 600 watts with a programmable timer. For a premium architectural piece, the Zehnder Charleston 500x1200mm Electric Rail ($890–$1,100) is a 20-year product with dual heating elements for redundancy — an investment that will outlast three full remodels.
Concrete-effect finishes are among the most requested looks in a bathroom consultation — and among the most frequently regretted when specified as actual concrete. True concrete in a wet room requires a penetrating sealer every one to three years. It is also susceptible to acid etching from standard cleaning products and can crack with any structural movement beneath it. Fortunately, there are three alternatives that achieve the look without those liabilities.
Porcelain tiles in concrete-effect finishes (PEI 4–5 rated, zero sealing required) are the practical first choice for floors and wet walls. The Porcelanosa VENIS Gravity Graphite 60x120cm ($9.50/sqft) is one of the better-executed options. Its matte texture reads convincingly in natural light without looking obviously printed. For a truly seamless look with no grout lines, microcement is the material. Installed professionally using the Ardex Pandomo Wall System ($60–$80/sqft), a microcement surface on the vanity wall is virtually indistinguishable from polished concrete. That said, microcement needs a polyurethane sealer every two to three years. It will also show etching from acidic cleaners if left unprotected.
My preferred approach in a contemporary bathroom remodel: concrete-effect porcelain on the floor and a microcement feature wall above the vanity. You get the seamless plaster look exactly where it will be seen and photographed, without putting a maintenance-intensive surface where cleaning chemicals, wet feet, and dropped products will test it every day.
The curbless shower — also called a zero-threshold shower — is both an ADA accessibility standard and an important aesthetic move. Removing the threshold extends the visual floor plane continuously from the bathroom into the shower. This makes the overall space read as larger and more resolved.
The floor must slope a minimum of 1/4 inch per foot toward the drain. For a 48-inch-wide shower, that is 1 inch of total drop from the entry side to the drain. In slab-on-grade construction, achieving this without a threshold usually means cutting the slab to create a 3.5–4-inch depression for the drain body and sloped mortar bed. On a wood subfloor, a pre-sloped foam system like the Wedi Fundo Primo ($350–$550) raises the shower floor to create the necessary slope without touching the subfloor structure.
Curbless entry is most effective when the shower floor tile and bathroom floor tile are identical. Using a different tile inside the shower creates a visual boundary that undercuts the zero-threshold concept. If you are committing to this detail — and it is worth committing to — match the floor materials on both sides. Also check for good information about bathroom interior design before making any final layout decisions, since floor continuity choices affect the full room plan. The Laticrete Hydro Ban Pre-Sloped Pan ($280–$360) is a good mid-range choice for achieving the correct slope without a custom mortar bed.
Lighting is where most contemporary bathroom remodel projects make their most predictable mistake. The standard approach — a single overhead recessed downlight and a strip light above the mirror — produces flat, unflattering illumination. Shadows land under the brow and chin at the vanity. Addressing this costs less than most fixtures and changes how the room works on a daily basis.
IP44 is the minimum electrical safety rating for recessed downlights installed within 0.6 metres horizontally of a shower or bath. Inside the shower itself, IP65 is required. Most residential ceiling downlights are not IP-rated at all. Confirm the rating before specifying any bathroom fixture. The Nora Lighting NHR-515 4-inch LED Downlight (IP44, $45–$65 each) is a reliable professional-grade choice with CRI 90+ and airtight construction for insulated ceilings.
If you can only make one lighting change in your remodel, move the vanity light from above the mirror to the sides. A 24-inch linear LED bar at face height on each side of the mirror eliminates the shadow pattern that overhead-only lighting creates. The Kichler Jeno 24-inch Linear LED Vanity Light in matte black ($180–$220) is a practical option for side mounting. Pair any dimmable LED downlight with a Lutron Diva LED+ Dimmer Switch ($32–$45) to prevent the flicker that standard dimmers produce with LED loads.
Colour temperature choice matters too. At 2700K (warm white), the bathroom reads as a spa-like, relaxing space. That is the right choice for a primary bathroom. At 4000K (cool white), the light is more accurate for makeup application. If you use the room for both, consider a fixture with a selectable temperature setting.
A freestanding tub is the most architecturally significant single purchase in a full bathroom renovation, and also the one most likely to be decided on aesthetic grounds alone. That deserves a more honest conversation than most design guides offer.
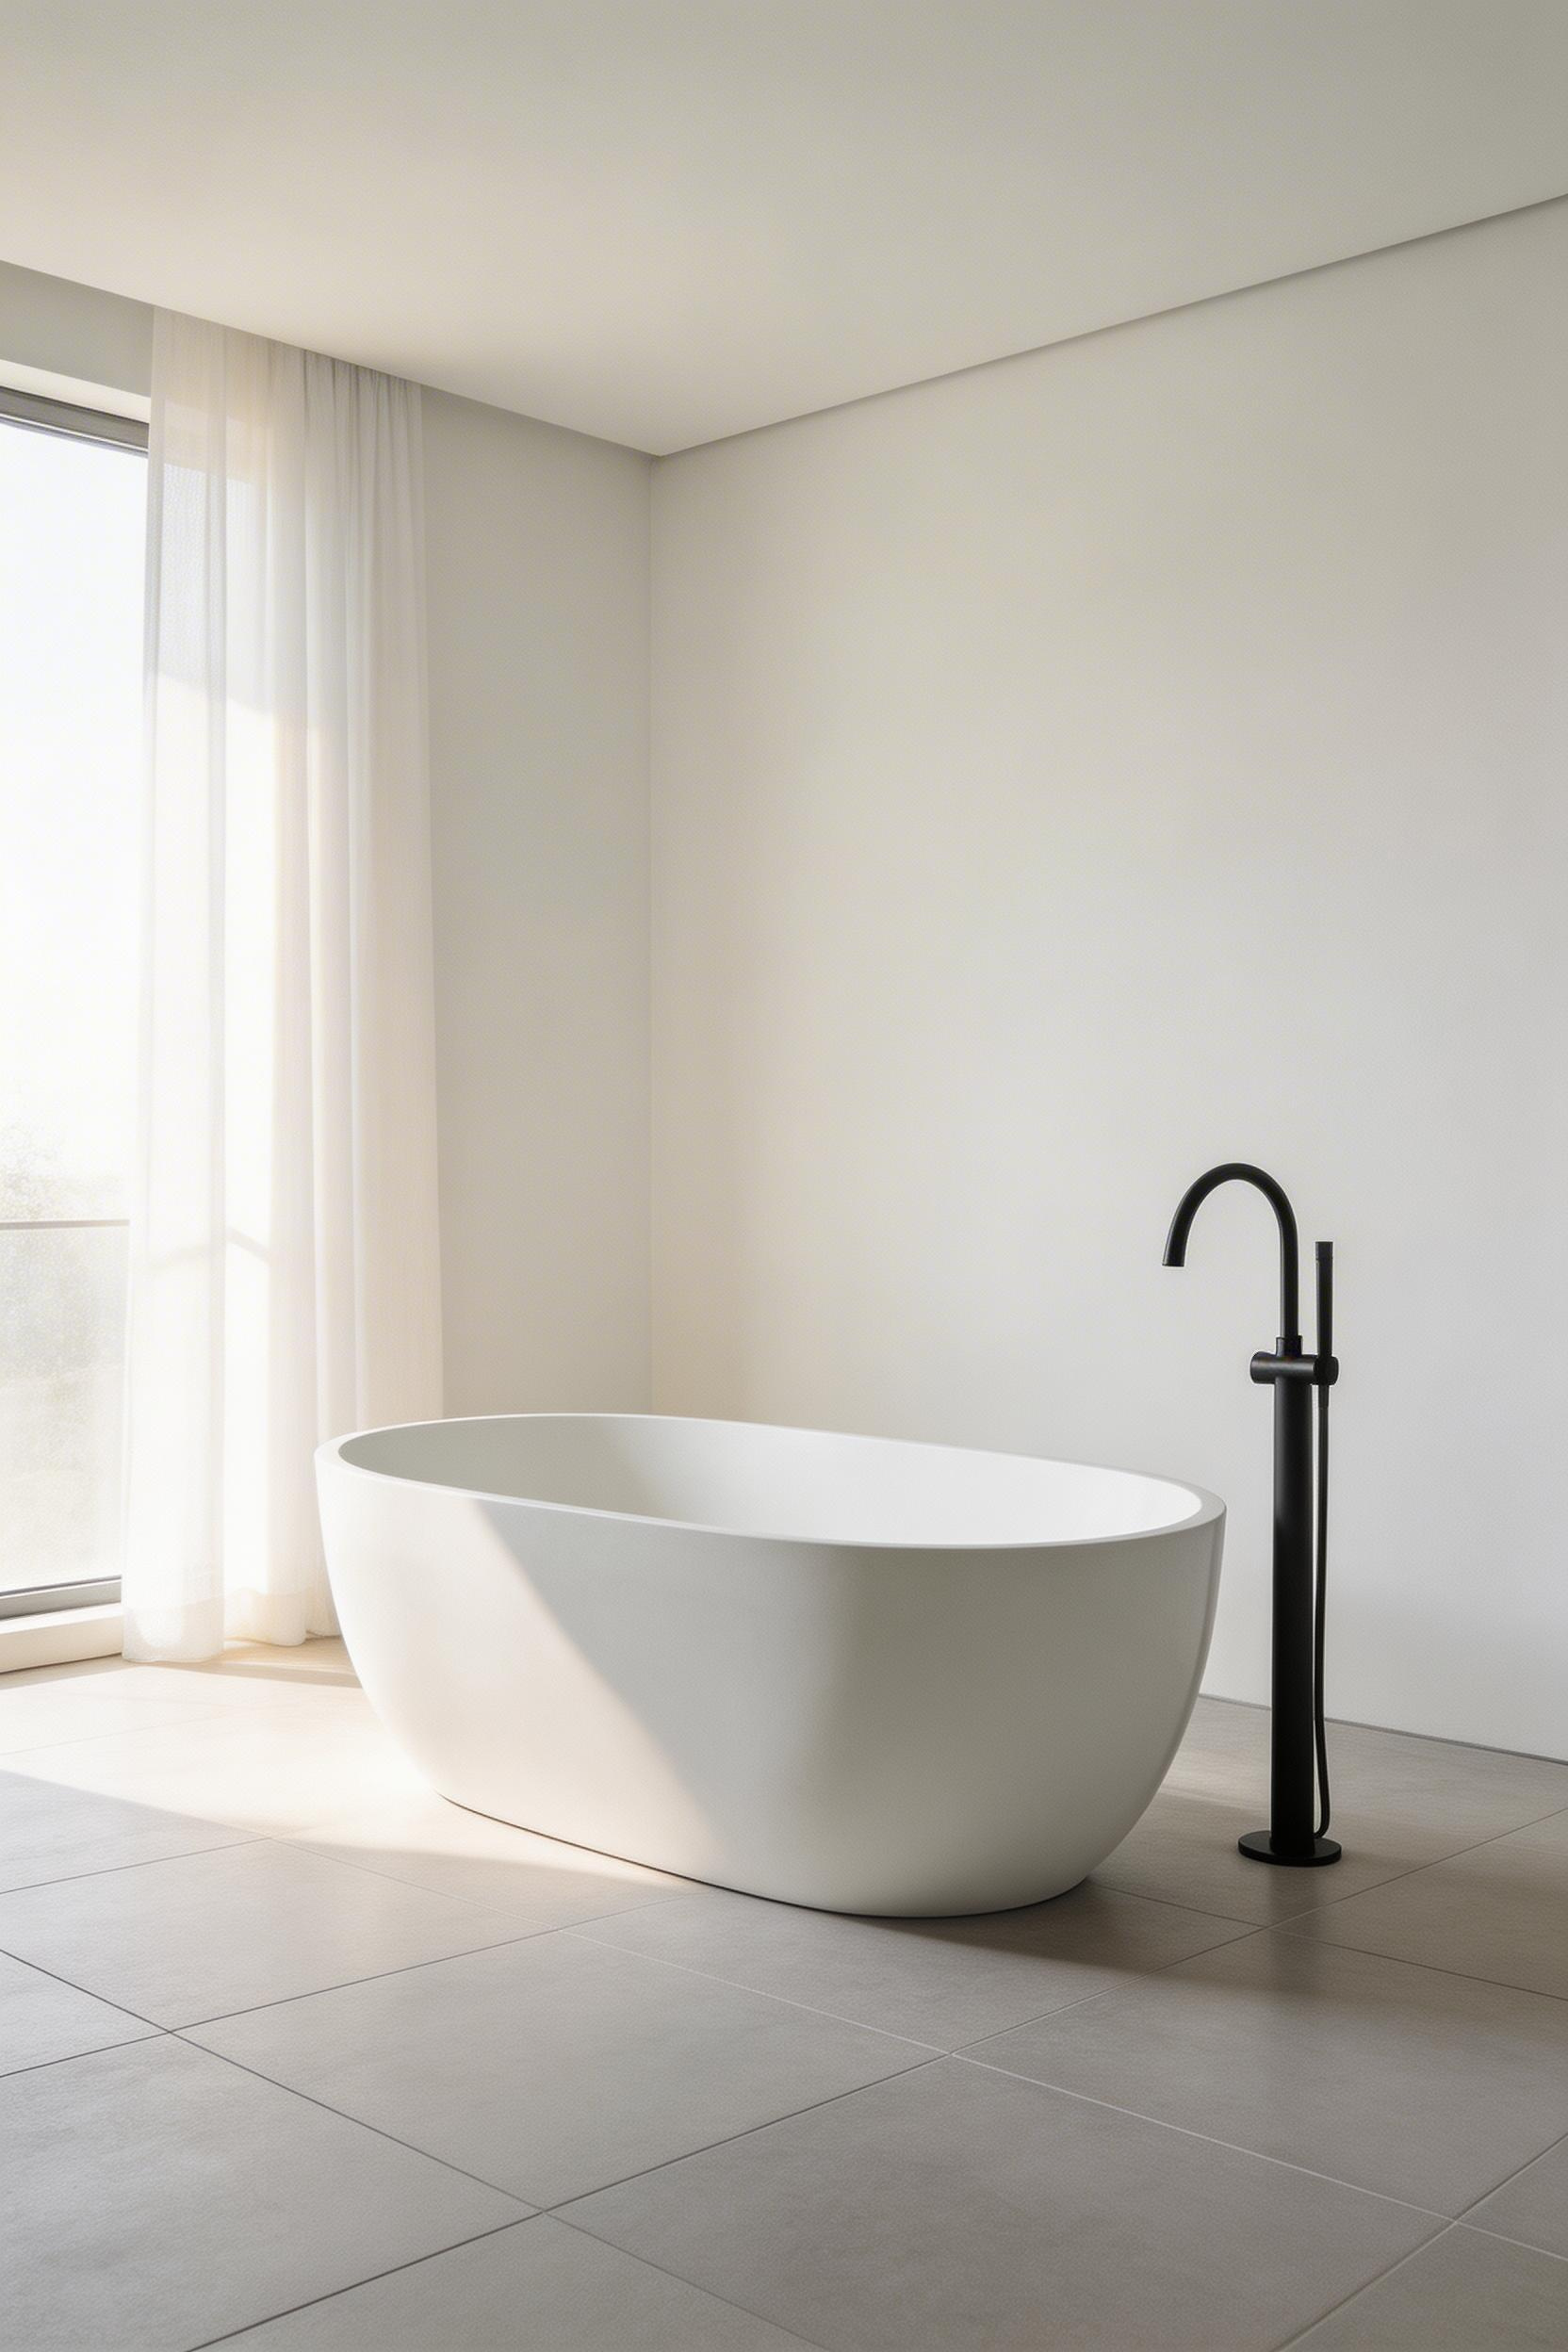
A freestanding tub requires a minimum 12-inch clearance on all sides for comfortable entry and cleaning access. In practice, that means the tub itself — typically 59–67 inches long — plus 24 inches of total clearance length, plus the floor-mounted tub filler on one end. A bathroom under roughly 8 feet wide will feel cramped with a freestanding tub regardless of how good it looks in the product photograph. If you are drawn to the freestanding aesthetic but working with a smaller footprint, a built-in tub with a feature surround will read more clearly as a deliberate design choice rather than a squeeze.
Acrylic freestanding tubs (50–90 lbs empty) are fine for most applications and accessible at $900–$1,500. The Kohler Underscore 60-inch ($1,200–$1,500) is a well-proven option. For a primary bathroom where the tub will be used seriously and daily, stone resin is a different proposition. The Victoria + Albert Napoli 1660 ($3,800–$4,400) in QUARRYCAST volcanic limestone-and-resin holds heat 3x longer than acrylic. That is measurable as a 10–15 degree difference in water temperature after 30 minutes — a genuine use improvement, not marketing language. If the floor plan supports it and the budget permits, that is the step up I would prioritise. More bathtub ideas are worth exploring if you are still deciding between formats before finalising your floor plan.
For upper floors: check load capacity. Stone resin tubs run 180–350 lbs empty. Most residential floors are designed for 40 lbs/sqft live load. A 350-lb tub over a small contact area can exceed that. Confirm with a structural engineer if in any doubt.
The challenge in this kind of renovation is that the clean-line, minimal aesthetic can easily tip into cold or clinical. A textured plaster wall — limewash or Venetian plaster — is one of the most effective tools for introducing warmth and depth. It does not add pattern or colour that would break the contemporary language.
Limewash paint is made from aged slaked lime. It penetrates the wall surface rather than sitting on top of it, producing a depth and natural variation that flat emulsion paint cannot replicate. Venetian plaster (Stucco Veneziano) uses multiple thin layers of plaster mixed with marble dust, burnished between coats to a smooth, polished finish. Both materials are naturally alkaline, which gives them inherent resistance to mould growth — a practical advantage in a humid bathroom environment.
Portola Paints Roman Clay ($65–$85/gallon) is the most accessible limewash-effect option. It is water-based, low VOC, available in 50+ colours, and achievable as a careful DIY project. True Venetian plaster (Meoded Grassello di Calce, $110–$130/gallon) produces a more authentic result but is significantly more skill-dependent. Professional application is strongly recommended. In both cases, a bathroom application should receive a matte wax sealer after the final curing period. Minimum curing time for lime-based finishes is 28 days before sealing.
The approach that works best: apply the limewash or plaster to the vanity wall only, treating it as a deliberate feature wall. The clean surfaces on three sides frame and contextualise the textured wall without competing with it.
Not all smart bathroom upgrades are genuinely useful. The heated towel rail and LED mirror both pass a clear daily-use test. Smart toilets require a slightly more critical assessment, because the feature range spans from transformative to unnecessary.

The lowest-barrier smart bathroom upgrade is a bidet toilet seat. A TOTO Washlet C5 ($600–$730) retrofits onto most existing elongated bowls. It requires only a GFCI outlet within 3 feet of the toilet. The features it delivers — adjustable warm water washing, heated seat, warm air dry, eWater+ wand cleaning — are a Japanese standard refined over four decades. Once installed, most users find it becomes non-negotiable. The Kohler Elongated Bidet Seat ($395–$480) covers the essentials at a lower price point without UV wand cleaning.
A full integrated smart toilet (the TOTO Neorest NX1 at $7,200–$7,800 is the benchmark product) makes sense primarily in a primary master bathroom where the investment will be used every day. The wall-hung configuration is worth the additional carrier frame cost ($800–$1,200 for a TOTO WT151M mounting frame) for one purely practical reason: a wall-hung bowl takes 90 seconds to clean underneath. A floor-mounted toilet takes 10 minutes to do properly. Multiply that over a decade of weekly cleaning and the access advantage becomes significant. For those planning a spa-style bathroom, a smart toilet is one of the few technology upgrades that genuinely earns its place.
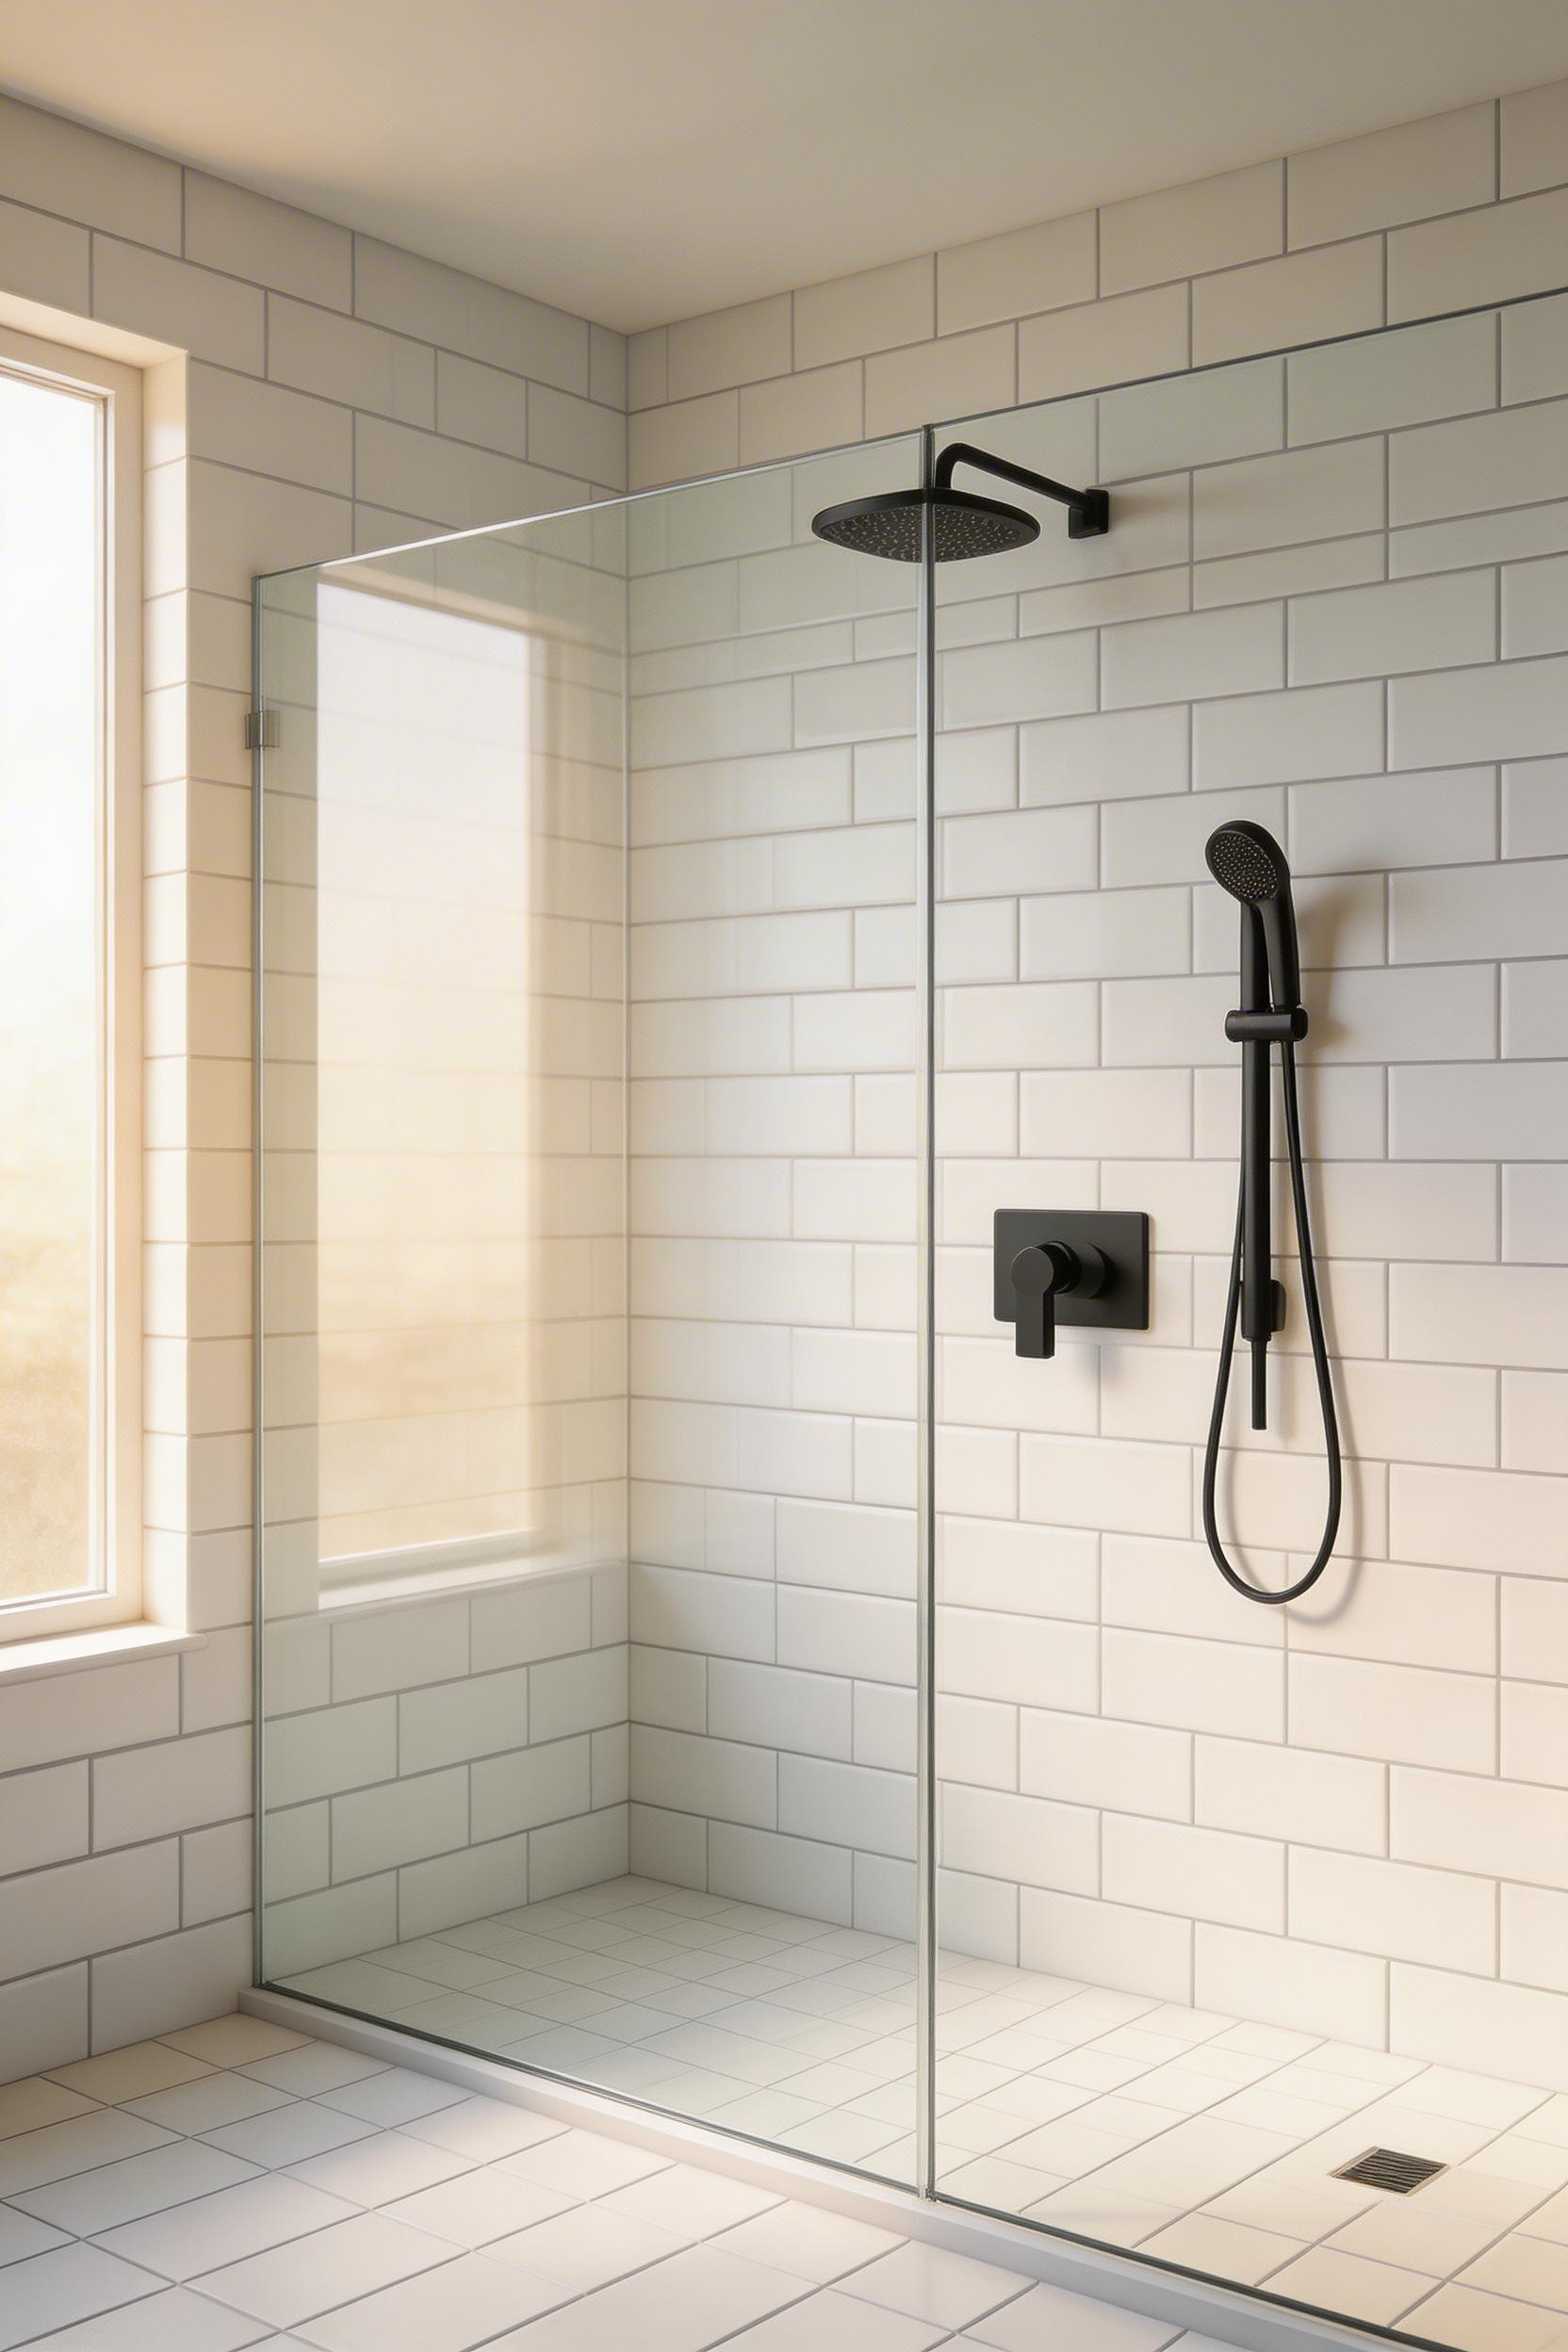
The frameless glass shower enclosure is the last component a renovation needs — and in many ways the most visible. It is what people notice first in a finished photograph and what defines whether the shower reads as contemporary or dated. The framing detail, the glass thickness, and the hardware finish are all legible from across the room.
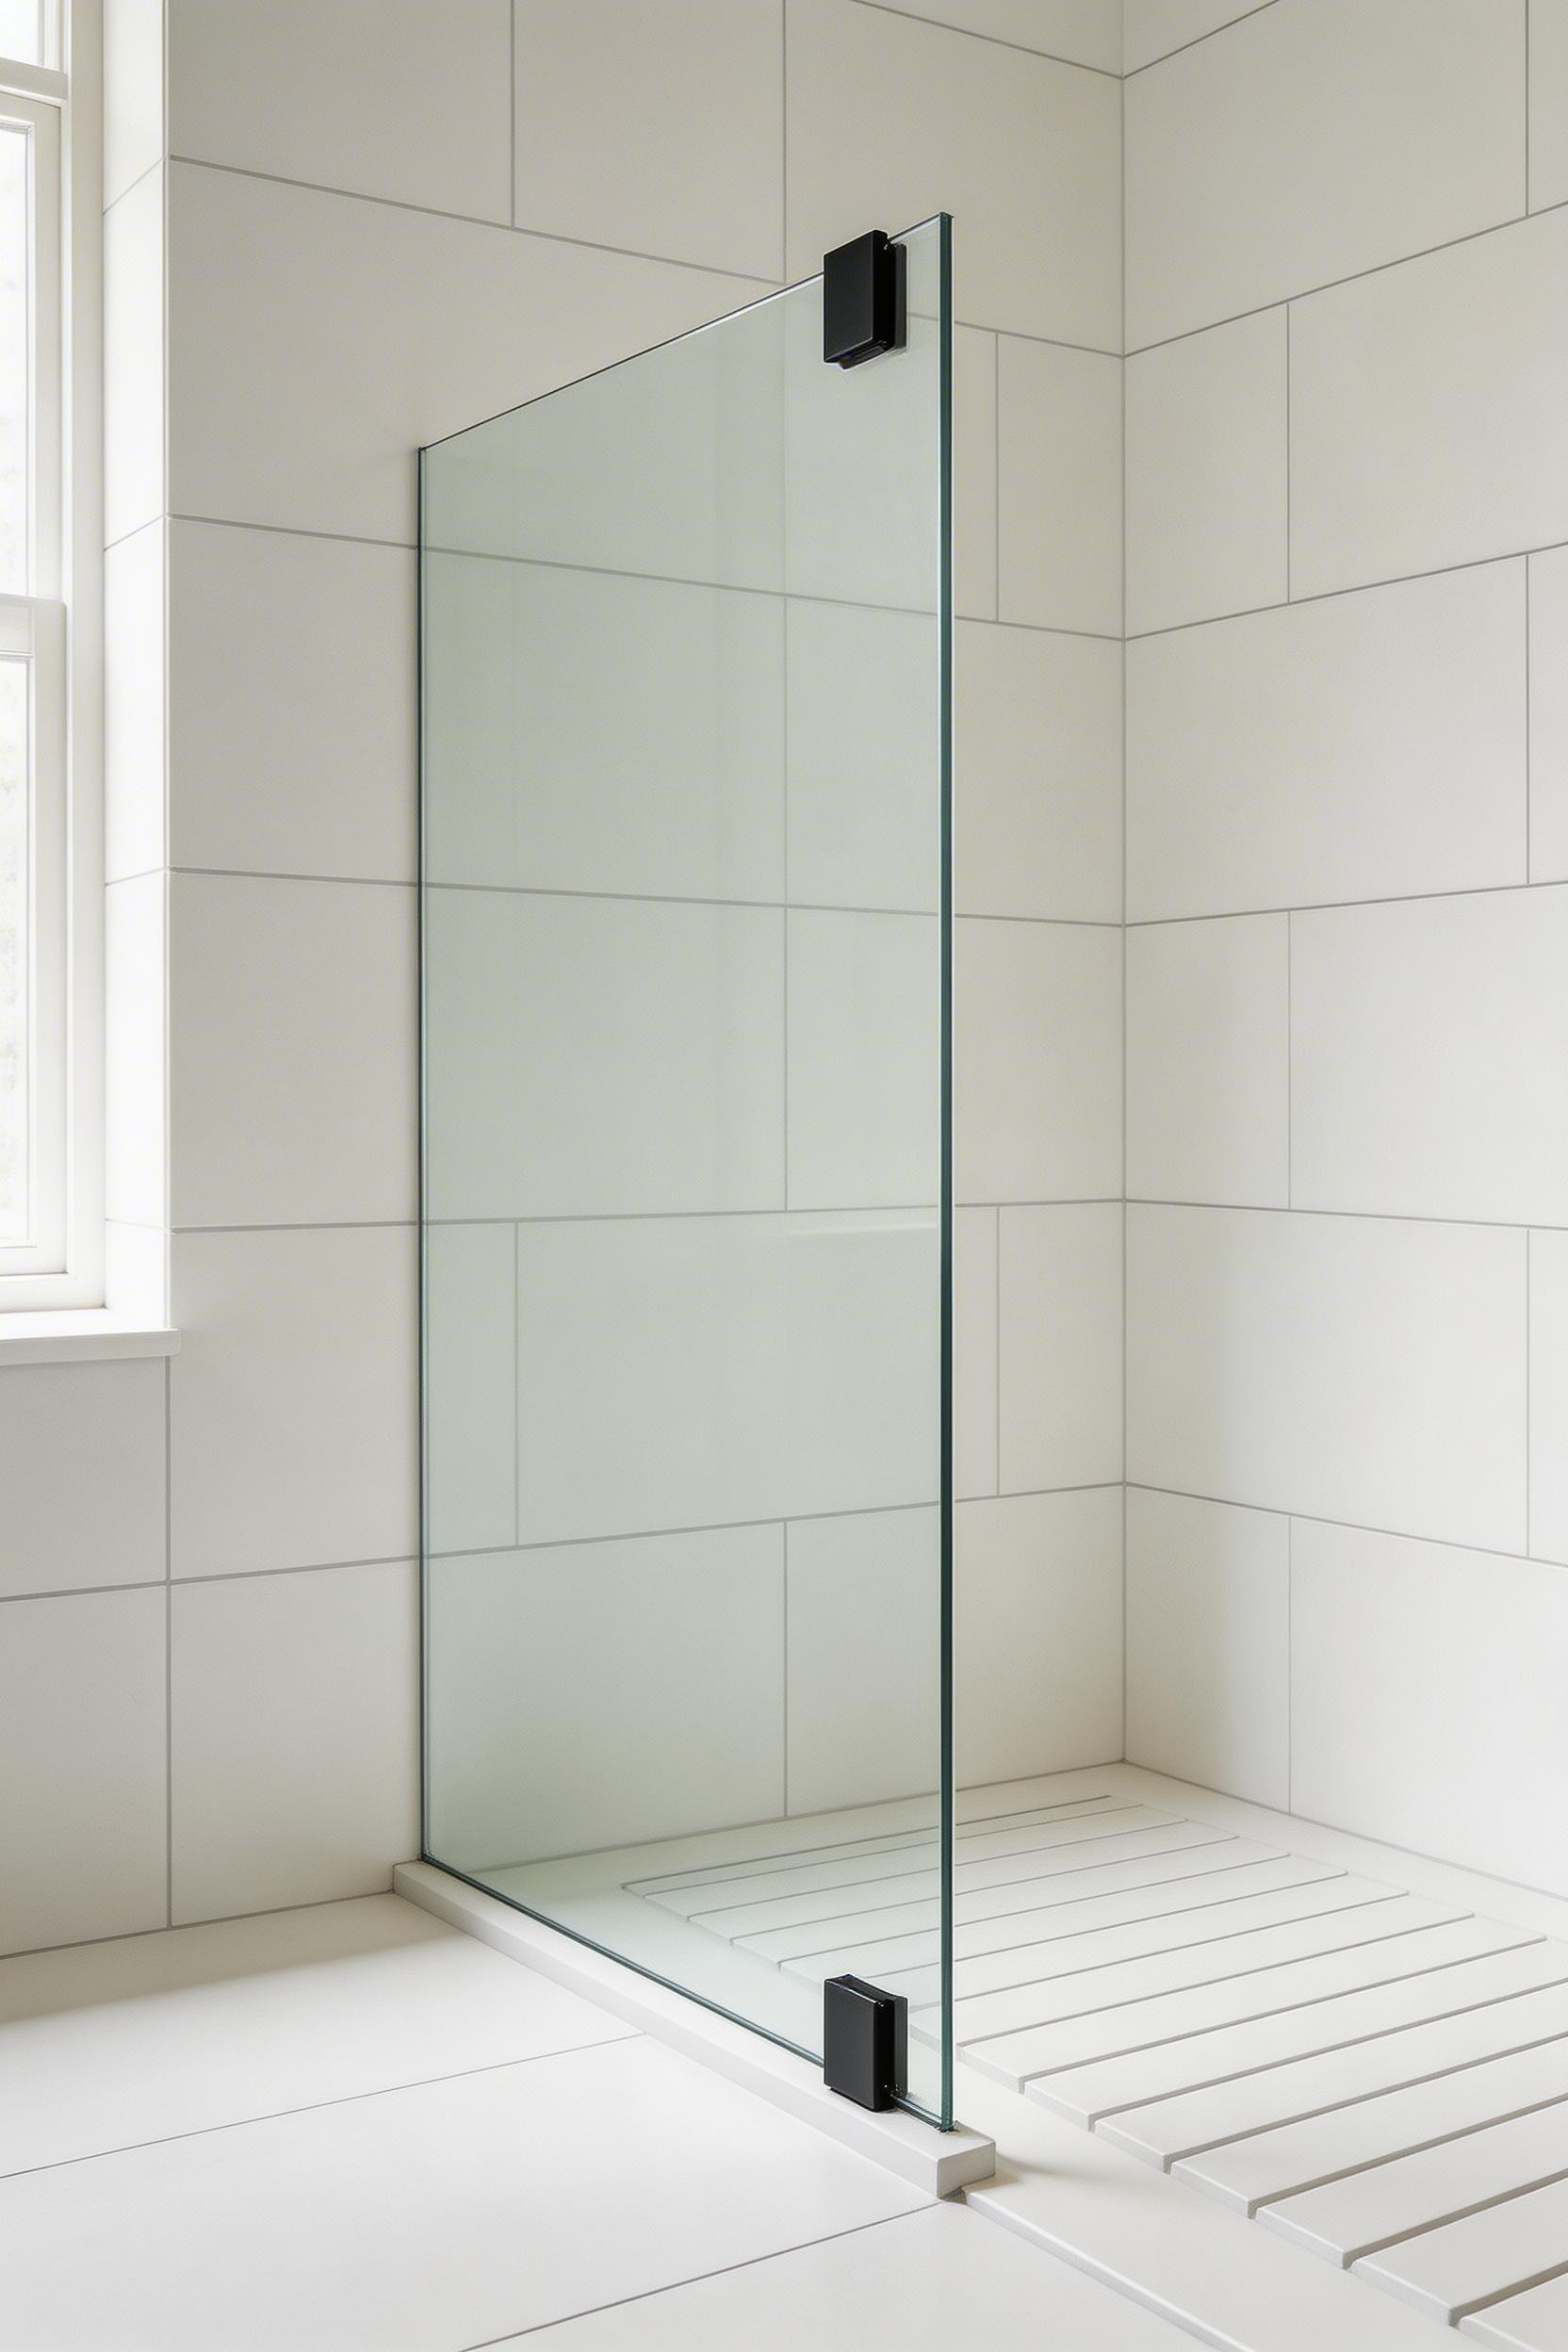
3/8-inch (10mm) glass is the minimum for pivot doors. 1/4-inch glass is noticeably flimsy in use and looks lightweight at the edge. For doors over 30 inches wide, 1/2-inch (12mm) glass is the professional recommendation. The glass must be tempered to CPSC 16 CFR 1201 — always confirm this specification is met.
For hardware mounting, you have two main options. Clamp (standoff) mounting attaches the glass directly to the wall through point fixings. It creates the cleanest, most minimal look but requires accurate core drilling into finished tile. Channel mounting uses a U-channel set in silicone along the wall and floor. It is slightly more visible but more forgiving of out-of-square walls and easier to reseal if a leak develops over time.
The DreamLine Elegance 56–60-inch Frameless Pivot Door ($580–$700) is the industry-standard mid-range option: adjustable width, reversible hinge, 3/8-inch glass, widely available. The Vigo Elan 60-inch Frameless Sliding Door in matte black ($890–$1,050) is a strong choice for tighter spaces where a pivot door would require clearance you do not have. For the closest thing to a fully bespoke enclosure at a semi-custom price, the Basco Infinity Custom Frameless Enclosure ($1,800–$2,800 installed) is measured to your specific opening, clamp-mounted, and finished with hardware in your choice of brushed nickel or matte black.
One specification worth adding if budget allows: low-iron glass (sold as Starphire or Optiwhite). Standard clear glass has a green tint visible at the edge and at angles. In a contemporary bathroom with white or light tile, it is noticeable every day. Low-iron glass eliminates this for $150–$300 extra. It is the kind of detail that separates a considered contemporary bathroom remodel from an ordinary one.
A contemporary bathroom remodel does not have to mean a full gut. The fifteen ideas here span a wide range of investment and disruption — from a $200 heated towel rail you can install yourself to a frameless glass enclosure that requires a skilled glazier. But they all work on the same principle: they change the room at the level of structure, surface, or light rather than at the level of accessories.
If I were advising someone starting from scratch, the answer would depend on budget and timeline. For bathroom remodeling on a budget, the highest-impact low-cost moves are the matte black fixture swap, the LED mirror cabinet, and the heated towel rail — all achievable without touching the floor or walls. For a full renovation with construction budget, the floating vanity, large-format tile, walk-in shower conversion, and curbless entry are the four structural decisions that set the room’s character before any finish is applied.
The principle behind all timeless bathroom design is that longevity comes from material quality and spatial thinking, not from following a trend cycle. A well-executed contemporary bathroom remodel in 2026 — with honest materials, considered proportions, and proper waterproofing — will still look right in 2036. That is the standard worth holding every decision to.