Physical Address
304 North Cardinal St.
Dorchester Center, MA 02124
Physical Address
304 North Cardinal St.
Dorchester Center, MA 02124
After 15 years of transforming dated bathrooms into stunning spaces, I’ve learned that a Budget Bathroom Remodel doesn’t require emptying your savings account. Whether you’re looking to increase your home’s value or simply create a more enjoyable space, these 24 strategic upgrades can help you achieve remarkable results without breaking the bank. From quick weekend projects to more involved transformations, each of these budget-friendly improvements has been tested and proven in countless renovations.
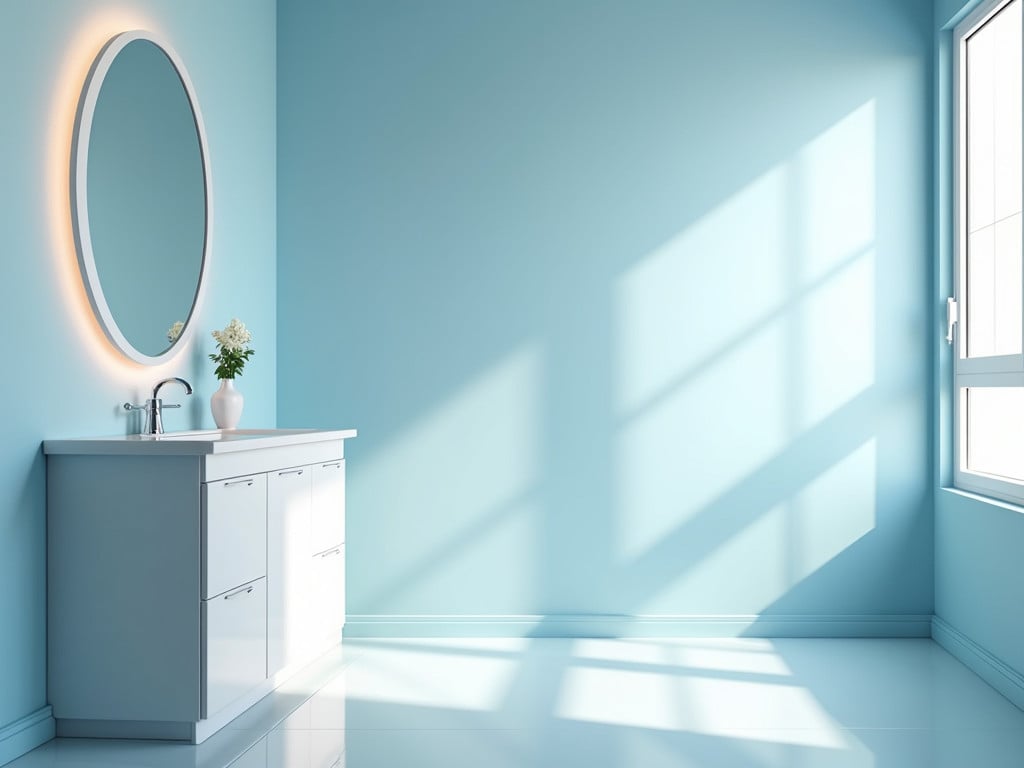
One of the most transformative aspects of any budget bathroom remodel is a fresh coat of paint. The key decision often comes down to this: do you want to make the room feel larger, or are you looking to create a cozy, intimate space? For most homeowners working with standard-sized bathrooms, light, neutral colors are both a safe and smart choice. They bounce natural light around the room, creating an illusion of space that can make even the smallest bathroom feel more open and airy.
When it comes to finish, here’s something most paint stores won’t tell you: while flat paint might look great in your living room, it’s not your friend in a high-moisture environment like a bathroom. Semi-gloss is your best bet – it’s more resistant to moisture and mildew, and it’s easier to clean. Before you start, remember the crucial prep work: clean those walls thoroughly and apply painter’s tape with precision. Taking an extra 30 minutes for prep can save you hours of touch-ups later.
When planning a budget bathroom remodel, the faucet often gets overlooked. But here’s the thing – it’s like jewelry for your vanity, and choosing the right one can completely transform the look of your space. Brushed nickel remains a timeless choice, hiding water spots better than chrome while pairing beautifully with virtually any style. For those feeling more adventurous, matte black faucets are having a moment right now, adding an instant modern touch that can make your bathroom feel fresh and current.
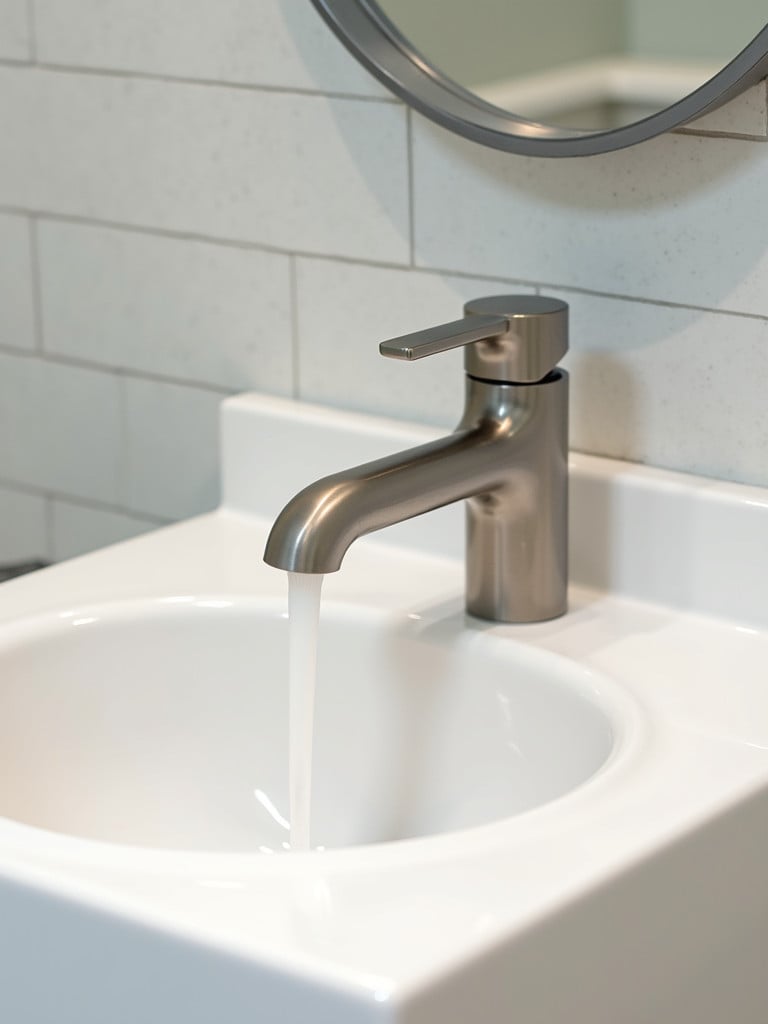
More than just aesthetics, modern faucets often bring improved water efficiency, potentially lowering your monthly bills. The installation process is straightforward, but remember my golden rule: always turn off the water supply before you start, and keep the manufacturer’s instructions handy. I’ve seen too many DIYers skip this step and end up with a flooding disaster that turned their budget bathroom remodel into an expensive emergency.
In my years of budget bathroom remodel projects, I’ve found that people often underestimate the impact of a showerhead upgrade. While spray patterns are important, the real question you should be asking is: do you want a standard flow rate or a low-flow option? Today’s low-flow models have come a long way from their weak-streaming predecessors, offering excellent pressure while reducing water consumption – and your monthly bills.
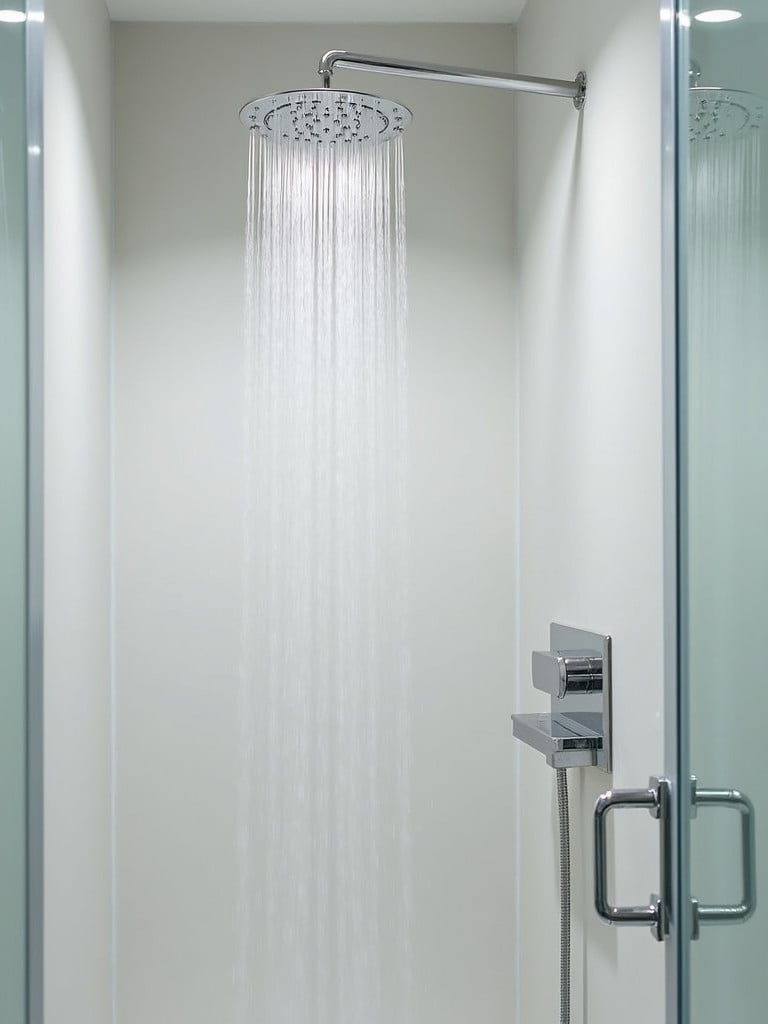
For a truly luxurious feel without the luxury price tag, consider a rain showerhead. It’s one of those magical upgrades that can make your daily shower feel like a high-end spa experience. If versatility is your priority, a handheld showerhead might be your best bet – they’re particularly useful for cleaning the shower itself and washing pets. The installation is surprisingly straightforward, but here’s a crucial tip: always use plumber’s tape on the threads before installation. This simple step, which costs less than a dollar, can prevent leaks and ensure a proper seal.
When tackling a budget bathroom remodel, changing your cabinet hardware might seem like a minor update, but it’s like giving your bathroom a new piece of jewelry – it can completely transform the character of the space. The key is thinking about your daily use first, aesthetics second. Those ultra-modern, minimalist pulls might look fantastic in photos, but if they’re uncomfortable to use, you’ll regret the choice every single day.
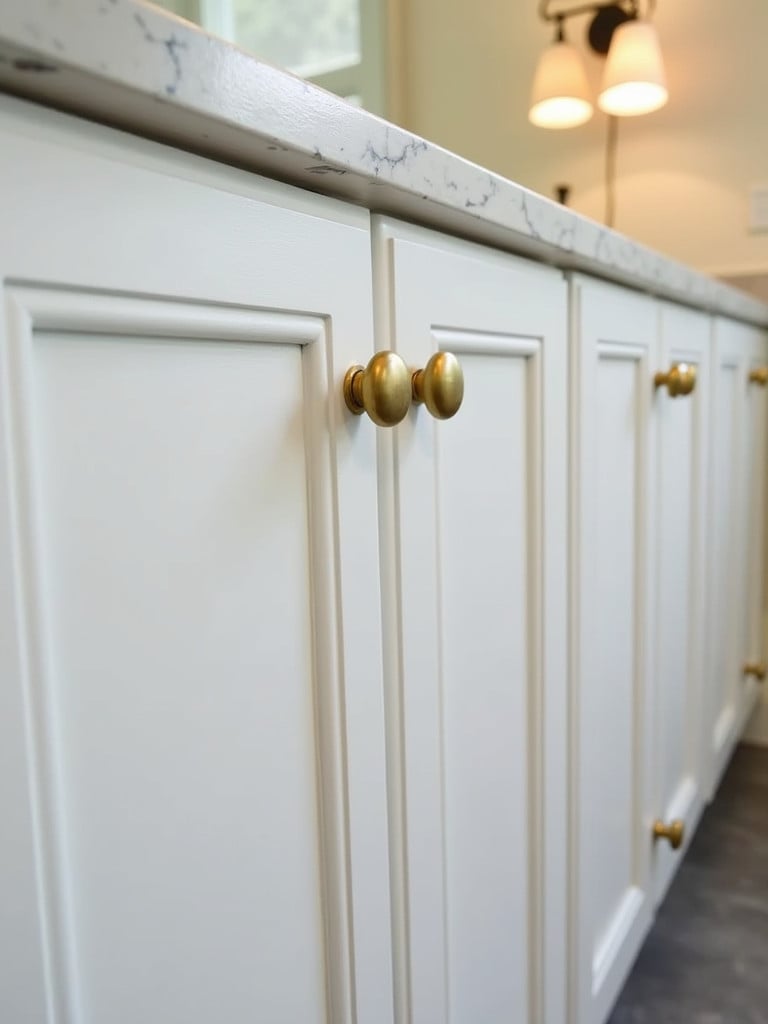
For finishes, here’s a pro tip I’ve learned through countless renovations: your hardware doesn’t have to match your faucet exactly, but they should complement each other. If you’ve got a brushed nickel faucet, you’ve got plenty of options – oil-rubbed bronze, matte black, or even brushed brass can work beautifully. Just be sure to measure the spacing for new hardware before you buy – there’s nothing more frustrating than discovering your new pulls don’t fit the existing holes. Keep your old hardware until you’re sure the new pieces fit perfectly, and use a screwdriver with the appropriate head to avoid stripping the screws.
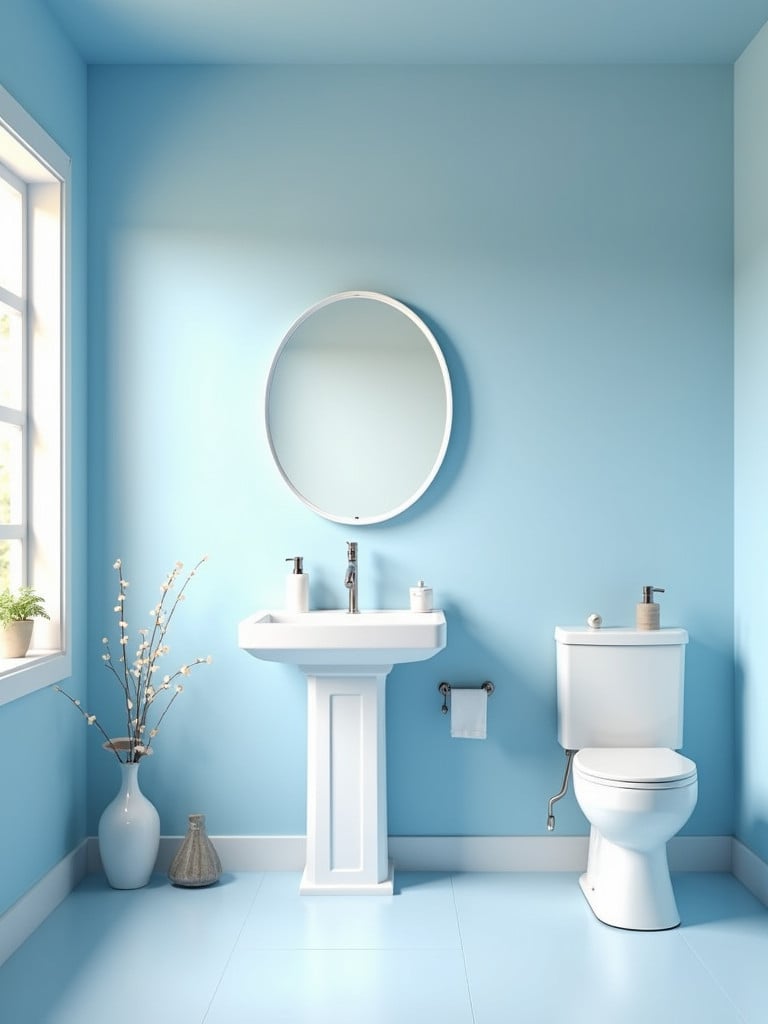
Sometimes the smallest changes in a budget bathroom remodel can make the biggest difference in your daily comfort. The toilet seat is often the last thing people think about updating, but it can make a surprising difference in both comfort and aesthetics. After installing hundreds of toilet seats, I’m firmly in the soft-close camp – not just for the luxury feel, but for practical reasons too. No more accidentally slammed seats, which is especially nice for those middle-of-the-night bathroom visits.

When it comes to materials, you’ve got options, but here’s my workshop advice: skip the wooden seats unless you’re absolutely in love with the look. They’re harder to clean and generally don’t last as long as plastic or polypropylene options. A quality plastic seat with built-in antimicrobial protection will give you the best bang for your buck. Installation is straightforward, but here’s a tip most people miss: check the shape of your toilet bowl before buying. Toilet seats come in round and elongated versions, and getting the wrong one means a trip back to the store. While you’re replacing the seat, take the opportunity to thoroughly clean around the hinges – it’s an area that often gets neglected during regular cleaning.
In any budget bathroom remodel, maximizing storage and functionality is crucial. One of the most frequent questions I get in my renovation workshops is about towel storage: “How many towel rods and hooks do I really need?” The answer depends on your household size, but here’s my rule of thumb: plan for at least two full-size towel bars per person, plus a few extra hooks for hand towels and robes.

Here’s a space-saving tip that many homeowners miss: the wall above your toilet is prime real estate for a towel bar. It’s often an unused space that can be put to work without making your bathroom feel cramped. When installing, always use wall anchors if you’re going into drywall – this isn’t optional, it’s essential. Take the time to measure and mark your locations carefully, use a level, and consider the height of your users – there’s nothing more frustrating than a towel bar that’s too high or too low for comfortable use.
When planning a budget bathroom remodel, people often underestimate the impact a mirror can have on the overall look. The two critical questions to consider are: what size mirror will work best for your space, and should you go framed or frameless? Here’s my professional take: when it comes to size, bigger is usually better in a bathroom. A larger mirror not only makes the space feel more open but also enhances natural light and makes it easier for multiple people to use the mirror at once.

One of the most transformative aspects of mirrors that many don’t realize is their ability to enhance natural light – I’ve seen dark bathrooms completely transformed just by strategic mirror placement. When mounting your new mirror, always use a stud finder and appropriate anchors. This isn’t just about safety; it’s about longevity. A properly mounted mirror will stay put for years, while a poorly mounted one is an accident waiting to happen. Before mounting, try this designer trick: hold the mirror in place with painter’s tape and live with it for a day. This gives you a chance to ensure you’re happy with the height and positioning before making any permanent changes.
Lighting can make or break any budget bathroom remodel, and the most common question I get is whether to choose sconces, a vanity light bar, or ceiling fixtures. My answer? The best lighting setup usually combines different types of fixtures. The key is creating even, shadow-free lighting that works for all your bathroom activities, from applying makeup to shaving.

Before you start any electrical work, here’s my non-negotiable advice: if you’re not completely comfortable working with electrical wiring, hire a professional. The money you spend on an electrician is worth every penny for both safety and peace of mind. However, if you’re confident in your DIY skills, always start by turning off the power at the breaker box – not just the switch. A simple voltage tester can save you from a shocking experience. Consider installing a dimmer switch alongside new fixtures – it’s an extra step that adds versatility to your lighting setup, allowing you to create the perfect ambiance for any time of day.
Organization is key to any successful budget bathroom remodel, and the right storage solutions can make all the difference. When clients ask about bathroom organization, their first question is usually about sizing: “What size baskets will work in my space?” Start by measuring your storage areas and making a list of everything you need to store. The real secret to success? Go for a variety of sizes. A combination of large baskets for towels and toilet paper, medium ones for cleaning supplies, and smaller ones for personal items gives you the most flexibility.

The beauty of using baskets and jars for organization isn’t just practical – it’s aesthetic too. Woven baskets add warmth and texture to your bathroom, while glass jars can make even everyday items like cotton balls and Q-tips look intentional and decorative. Here’s a pro tip that’s helped countless homeowners maintain their newly organized spaces: group similar items together and label everything. It might seem unnecessary, but labels help maintain organization long-term, especially in households with multiple people. Don’t forget about vertical space – adding a few floating shelves to display your newly organized items can turn storage into a design feature.
One of the biggest decisions in your budget bathroom remodel is choosing between a shower curtain and a glass door. In my renovation experience, this choice often comes down to three factors: budget, maintenance preferences, and overall bathroom style. While glass doors can make a bathroom feel more spacious and modern, don’t underestimate the impact of a well-chosen shower curtain. They’re not just the budget-friendly option – they’re also incredibly versatile and easy to change when you want to update your look.

Here’s something most people don’t consider: shower curtains can actually be a design advantage. They give you the flexibility to add pattern, color, or texture to your bathroom without committing to permanent changes. If you go the curtain route, here’s my non-negotiable advice: always use a liner, and make sure it’s a good one. Those few extra dollars spent on a quality liner will pay off in longevity and performance. For installation, whether you’re hanging a curtain rod or installing a glass door, make sure you’re anchoring into studs or using proper wall anchors. I’ve seen too many shower rods come crashing down because someone thought drywall alone would hold them.
Want to add a touch of natural beauty to your budget bathroom remodel? Plants might be the perfect solution. In my workshops, I often get asked about which plants can actually survive in a bathroom environment. The truth is, bathrooms can be great spaces for certain plants – the humidity from showers creates a perfect environment for tropical varieties. A bright bathroom window is ideal for plants like pothos or snake plants, while peace lilies can thrive even in lower light conditions.

One clever trick I’ve learned over years of bathroom design is using hanging plants to maximize space. They add visual interest without taking up valuable counter or floor space. Just make sure you’re using proper anchors when installing hanging planters – bathroom humidity can make even lightweight items more prone to falling. Here’s a practical tip that’s saved many of my clients’ plants: place small plants in water-resistant containers on window sills or vanity corners, but avoid placing them where they might get splashed with soap or chemicals. Remember, plants aren’t just decorative – they can actually improve air quality in your bathroom, making your daily routine more pleasant.
In my renovation career, I’ve seen wallpaper make a dramatic comeback in budget bathroom remodel projects. The most common question I get is: “Should I wallpaper the whole bathroom or just create an accent wall?” While there’s no one-size-fits-all answer, I typically recommend starting with an accent wall, particularly in smaller bathrooms. It’s more budget-friendly, less overwhelming, and if you decide you don’t love it, it’s easier to change. The wall behind your vanity is often the perfect candidate for this treatment – it creates a focal point without dominating the space.

Before you start applying wallpaper, here’s a crucial tip from my workshop experience: proper wall preparation is everything. Clean the walls thoroughly and repair any imperfections – wallpaper will highlight every bump and divot. Use a plumb bob or level to ensure your first strip is perfectly straight; if it’s not, every subsequent strip will be off. And here’s something many people don’t realize: not all wallpapers are created equal. In a bathroom, you need to use moisture-resistant wallpaper specifically designed for high-humidity areas. It might cost a bit more upfront, but it’s worth every penny in longevity and maintenance savings.
Here’s a secret weapon for your budget bathroom remodel that most people overlook: the grout pen. Dingy grout can make even the nicest tiles look shabby, and the transformation from a simple grout pen can be remarkable. The question I get most often is whether to clean the grout first or jump straight to using a grout pen. My answer? Always clean first. A grout pen can work wonders, but it needs a clean surface to adhere properly. I recommend using a dedicated grout cleaner and a stiff brush before you start – you might be surprised how much of that discoloration is just surface dirt.

The beauty of grout pens is their ability to make your tiles look brand new without the hassle and expense of regrouting. Here’s a pro tip that’s saved many of my clients time and frustration: test the grout pen in an inconspicuous area first. This lets you check both the color match and how well it adheres to your particular grout. When applying, work in small sections and keep a damp cloth handy to wipe away any excess before it dries. Take your time with this project – rushing the process can lead to uneven results. The effort you put into careful application will pay off with a professional-looking finish that can make your entire bathroom feel refreshed.
One of the most impactful elements of a budget bathroom remodel can be adding a frame to your existing mirror. The question I hear most in my workshops is whether to choose a simple or ornate frame design. My advice? Let your bathroom’s overall style be your guide, but don’t be afraid to make a statement. A well-chosen frame can turn a basic builder-grade mirror into a custom-looking piece that elevates your entire bathroom. The most important consideration isn’t just style – it’s scale. A frame that’s too thin can look insignificant, while one that’s too heavy can overwhelm the space.

Here’s a money-saving tip I’ve used in countless renovations: you don’t always need to replace your existing mirror to get this custom look. Mirror frame kits are available that can work with your existing mirror, saving you both money and the hassle of removal and replacement. When installing, use a strong adhesive specifically designed for mirrors – regular construction adhesive can damage the mirror’s backing. Make sure your frame won’t interfere with any existing light fixtures or faucets. I always recommend doing a dry fit with paper templates before making any permanent attachments. This extra step can save you from costly mistakes and ensure your newly framed mirror becomes the stunning focal point you envision.
After years of budget bathroom remodel projects, I can tell you that replacing a vanity top is one of those upgrades that makes a huge impact. The most common question I get in my workshops is about material choice: “What’s going to be durable and easy to maintain?” Here’s my honest take: while natural stone like granite looks beautiful, quartz is the winner for bathrooms. It’s non-porous, incredibly durable, and requires virtually no maintenance. Plus, modern quartz options come in patterns that convincingly mimic natural stone at a fraction of the cost.

Before you start this project, here’s a crucial tip from my experience: take detailed measurements of your existing vanity base, including the location of all plumbing. Nothing’s worse than getting your new countertop home only to find it doesn’t fit your space or accommodate your plumbing layout. When it comes to installation, while it’s possible to DIY, I recommend getting help – even a small vanity top is heavy and awkward to maneuver. Use a quality silicone caulk for installation, and don’t forget to seal around the edges where the counter meets the wall. This isn’t just about aesthetics; it’s about protecting your vanity base from water damage that could compromise your entire renovation investment.
When planning a budget bathroom remodel, don’t overlook the impact of the right bath mat or rug. It’s not just about comfort – it’s a crucial safety feature that can prevent slips and falls while protecting your floor from water damage. After testing countless options in various bathroom setups, I’ve found that the best bath mats combine three key features: moisture absorption, quick drying capabilities, and a non-slip backing. Cotton is great for absorption but can stay wet too long; synthetic materials dry faster but might not feel as luxurious underfoot.

Here’s something many homeowners don’t consider: your bath mat is also an opportunity to add color, pattern, or texture to your space. When choosing a size and placement, think about your daily routine – where do you typically step out of the shower or stand while using the sink? For maximum practicality, I recommend having two mats per bathroom so you can rotate them through the wash without leaving your floor bare. Here’s a pro tip: if you’re going with a patterned design, choose one that can hide a bit of daily dirt while still looking fresh. Your bath mat should be both functional and aesthetically pleasing, serving as a thoughtful accent to your overall design.
Looking to add storage without sacrificing floor space in your budget bathroom remodel? Floating shelves might be your perfect solution. One of the most frequent questions I get about floating shelves is about size and placement. Here’s what I’ve learned from installing hundreds of these: in a bathroom, shorter shelves (24-36 inches) are often more practical than longer ones. They’re easier to mount securely, less likely to sag over time, and give you more flexibility with placement. When it comes to material choice, while wood shelves look beautiful, make sure they’re properly sealed to handle bathroom humidity.

The key to successful floating shelf installation is proper anchoring – I can’t stress this enough. Always use a stud finder and try to hit at least one stud. For drywall installations, use high-quality anchors rated for at least twice the weight you plan to put on the shelf. Here’s a designer trick that’s saved many of my clients from regret: use painter’s tape to mark your shelf placement and live with it for a day or two. This gives you time to ensure the height and spacing work for your needs. Remember to consider what you’ll be storing on these shelves when deciding on placement – decorative items can sit higher, while frequently used items should be within easy reach.
Want to add a fresh pattern or color to your budget bathroom remodel without the commitment of traditional tile? Self-adhesive tiles might be your answer. While you can technically tile an entire bathroom with peel-and-stick tiles, I recommend starting with a smaller project like a backsplash or accent wall. This lets you test the waters and perfect your installation technique without committing to a larger area. The key to success with self-adhesive tiles – and this is something I’ve learned through trial and error – is proper wall preparation.

Your surface needs to be immaculately clean, dry, and smooth. Even minor wall texture can prevent proper adhesion. Here’s a pro tip that’s saved many DIY projects: use a level and draw guide lines on your wall before you start. Unlike traditional tiles where you can adjust spacing with grout, these tiles need to be placed perfectly the first time. Consider starting your pattern from the center of the wall and working outward – this ensures a more balanced look and helps hide any size discrepancies at the edges. Take your time with the installation; rushing this project can lead to crooked lines and poor adhesion that will be immediately noticeable.
One of the most dramatic transformations in a budget bathroom remodel can come from refinishing your cabinets. The question of paint versus stain comes up in nearly every workshop I teach, and here’s what I’ve learned: while stain can highlight beautiful wood grain, paint offers more versatility in color choices and is often more forgiving of cabinet imperfections. For bathrooms specifically, I recommend a semi-gloss or satin finish – these are easier to clean and stand up better to moisture than matte finishes.

Preparation is absolutely crucial for this project, and it’s where most DIYers go wrong. Remove all hardware, clean the cabinets thoroughly with a degreaser, and sand all surfaces lightly. Here’s a tip many people miss: label all your doors and hardware as you remove them. A simple numbering system will save you hours of frustration during reassembly. For the best results, apply primer and at least two coats of paint, sanding lightly between coats. And here’s something I always tell my workshop participants: this isn’t a weekend project. Give each coat proper drying time – rushing the process is the fastest way to ruin your finish and waste all your hard work.
Adding a backsplash is a smart move in any budget bathroom remodel, offering both protection and style. When it comes to material choice, subway tiles remain a classic choice for good reason – they’re affordable, timeless, and incredibly versatile. However, don’t feel limited by traditional white. Modern subway tiles come in various colors and finishes, allowing you to create a unique look while maintaining that classic appeal that never goes out of style.

The secret to a professional-looking backsplash isn’t just in the tiles themselves – it’s in the preparation and spacing. Use spacers religiously to ensure consistent grout lines, and don’t rush the process. Here’s a pro tip that’s saved many DIY projects: lay out your entire pattern on the floor first, especially if you’re doing any special patterns like herringbone. This helps you visualize the final result and identify any potential issues before you apply any adhesive. Remember to apply sealer to both the tiles and grout once everything is set – this extra step will protect your work from water damage and make cleaning much easier in the long run.
When discussing budget bathroom remodel ideas in my workshops, adding seating often gets skeptical looks – until I explain the practicality of it. The main question is usually about size: how big should a bathroom bench or stool be? My rule of thumb is this: measure the space where you plan to put it and subtract 6-8 inches for comfortable movement around it. Remember, in bathroom design, function should always lead form. A bench or stool needs to be practical first, decorative second.

When it comes to material choice, I strongly recommend going with something that can handle moisture well. Teak or cedar are excellent choices for wooden benches, as they naturally resist moisture and mildew. If you’re going with an upholstered stool, look for water-resistant fabrics or removable cushions that can be easily cleaned. Here’s a pro tip I share in every workshop: consider a bench with hidden storage. It’s amazing how much extra storage space you can gain while adding a useful seating area. Just make sure whatever you choose has non-slip feet – bathroom floors can get slippery, and you don’t want your seating sliding around.
The finishing touches in your budget bathroom remodel can make all the difference between a basic bathroom and one that feels professionally designed. One of the most common questions I get about bathroom art and decor is about placement – where should these pieces go, and how much is too much? Here’s my tried-and-true advice: start with one focal point, usually visible from the doorway, and build from there. In a bathroom, less is often more. You want enough decorative elements to make the space feel finished, but not so many that they compete with the room’s function or become difficult to clean around.

When it comes to artwork in bathrooms, moisture-resistant framing is crucial. I’ve seen too many beautiful prints ruined by bathroom humidity. Consider metal frames with sealed backs, or better yet, canvas prints that can handle moisture better than paper. For decorative items, I always recommend grouping in odd numbers – threes work particularly well. And here’s a pro tip from years of bathroom design: incorporate functional items into your decor. Beautiful soap dispensers, stylish tissue box covers, and decorative trays can serve both practical and aesthetic purposes. The key is choosing items that complement your overall design while adding personality to the space.
Window treatments are often overlooked in a budget bathroom remodel, but they can significantly impact both privacy and style. The biggest question I get about bathroom window treatments is how to balance privacy with natural light. After countless bathroom renovations, I’ve found that the best solution often combines different layers. For example, a frosted window film paired with a simple shade or curtain gives you complete privacy while still allowing you to control the amount of light entering the space.

Here’s something many homeowners don’t consider: bathroom window treatments need to stand up to high humidity and frequent temperature changes. That’s why I recommend waterproof or moisture-resistant options. Faux wood blinds, for instance, give you the look of natural wood without the risk of warping. If you’re going with curtains, choose materials that dry quickly and resist mildew. And here’s a pro tip that’s saved many of my clients from frustration: always measure your window multiple times before purchasing any window treatment. Include the depth of any window sill or trim in your measurements – these details matter for proper fitting and can make the difference between a professional-looking installation and one that screams “DIY gone wrong.”
The final step in any successful budget bathroom remodel is often the most overlooked: organizing and decluttering. In all my years of bathroom renovations, I’ve noticed that the most successful makeovers often start with a thorough decluttering. The question isn’t just about what to keep and what to toss – it’s about creating systems that help maintain organization long-term. Start by taking everything out of your bathroom and sorting items into three categories: daily use, occasional use, and rarely used. Be honest with yourself about what you really need and use.

Here’s a workshop tip that’s transformed countless bathrooms: invest in drawer dividers and small containers before putting items back. This isn’t just about making things look neat – it’s about creating a system that’s easy to maintain. Use clear containers so you can see what’s inside, and label everything. Remember, the goal isn’t just to organize once, but to create a system that works for your daily routine. And here’s my favorite pro tip: implement the “one in, one out” rule. When you buy a new bathroom item, remove an old one. This simple practice prevents clutter from building up again and helps maintain the clean, organized look you’ve worked so hard to achieve.
Throughout this guide, we’ve explored 24 ways to transform your bathroom without breaking the bank. Whether you’re looking to make a few simple updates or tackle a complete budget bathroom remodel, remember that successful renovations aren’t about doing everything at once – they’re about making strategic choices that maximize your investment. Each project we’ve discussed can stand alone or be combined with others for a more comprehensive transformation.
Start with the changes that will make the biggest impact in your specific space, whether that’s a fresh coat of paint, updated fixtures, or better organization. Take your time with each project, focusing on proper preparation and execution. Remember, a successful budget bathroom remodel isn’t about cutting corners – it’s about making smart choices that balance cost with longevity and style. By approaching your renovation thoughtfully and implementing these tested strategies, you can create a bathroom that not only looks beautiful but functions better for your daily needs.
Most importantly, don’t feel pressured to tackle everything at once. Even small changes, when done well, can make a significant difference in how your bathroom looks and feels. Whether you’re planning a weekend update or a month-long transformation, these ideas can help you achieve the bathroom of your dreams without overspending. Your perfect bathroom makeover is within reach – it just takes some planning, patience, and the right approach to bring your vision to life.


