Physical Address
304 North Cardinal St.
Dorchester Center, MA 02124
Physical Address
304 North Cardinal St.
Dorchester Center, MA 02124
Discover 15 kitchen lighting ideas that go beyond basic recessed lights — from pendant heights to colour temperature, layered for real results.
Most guides to kitchen lighting tell you to add recessed downlights throughout the ceiling and call it done. Design blogs repeat it. Renovation shows reinforce it. Here is what they are not telling you. After 11 years designing Nordic-influenced kitchens, I have found that recessed-only lighting creates some of the flattest, least inviting kitchens imaginable. It turns a gathering space into something that feels more like a car park than a home. These 15 kitchen lighting ideas draw on the principles that actually change how a kitchen looks and feels — at every time of day, in every season.
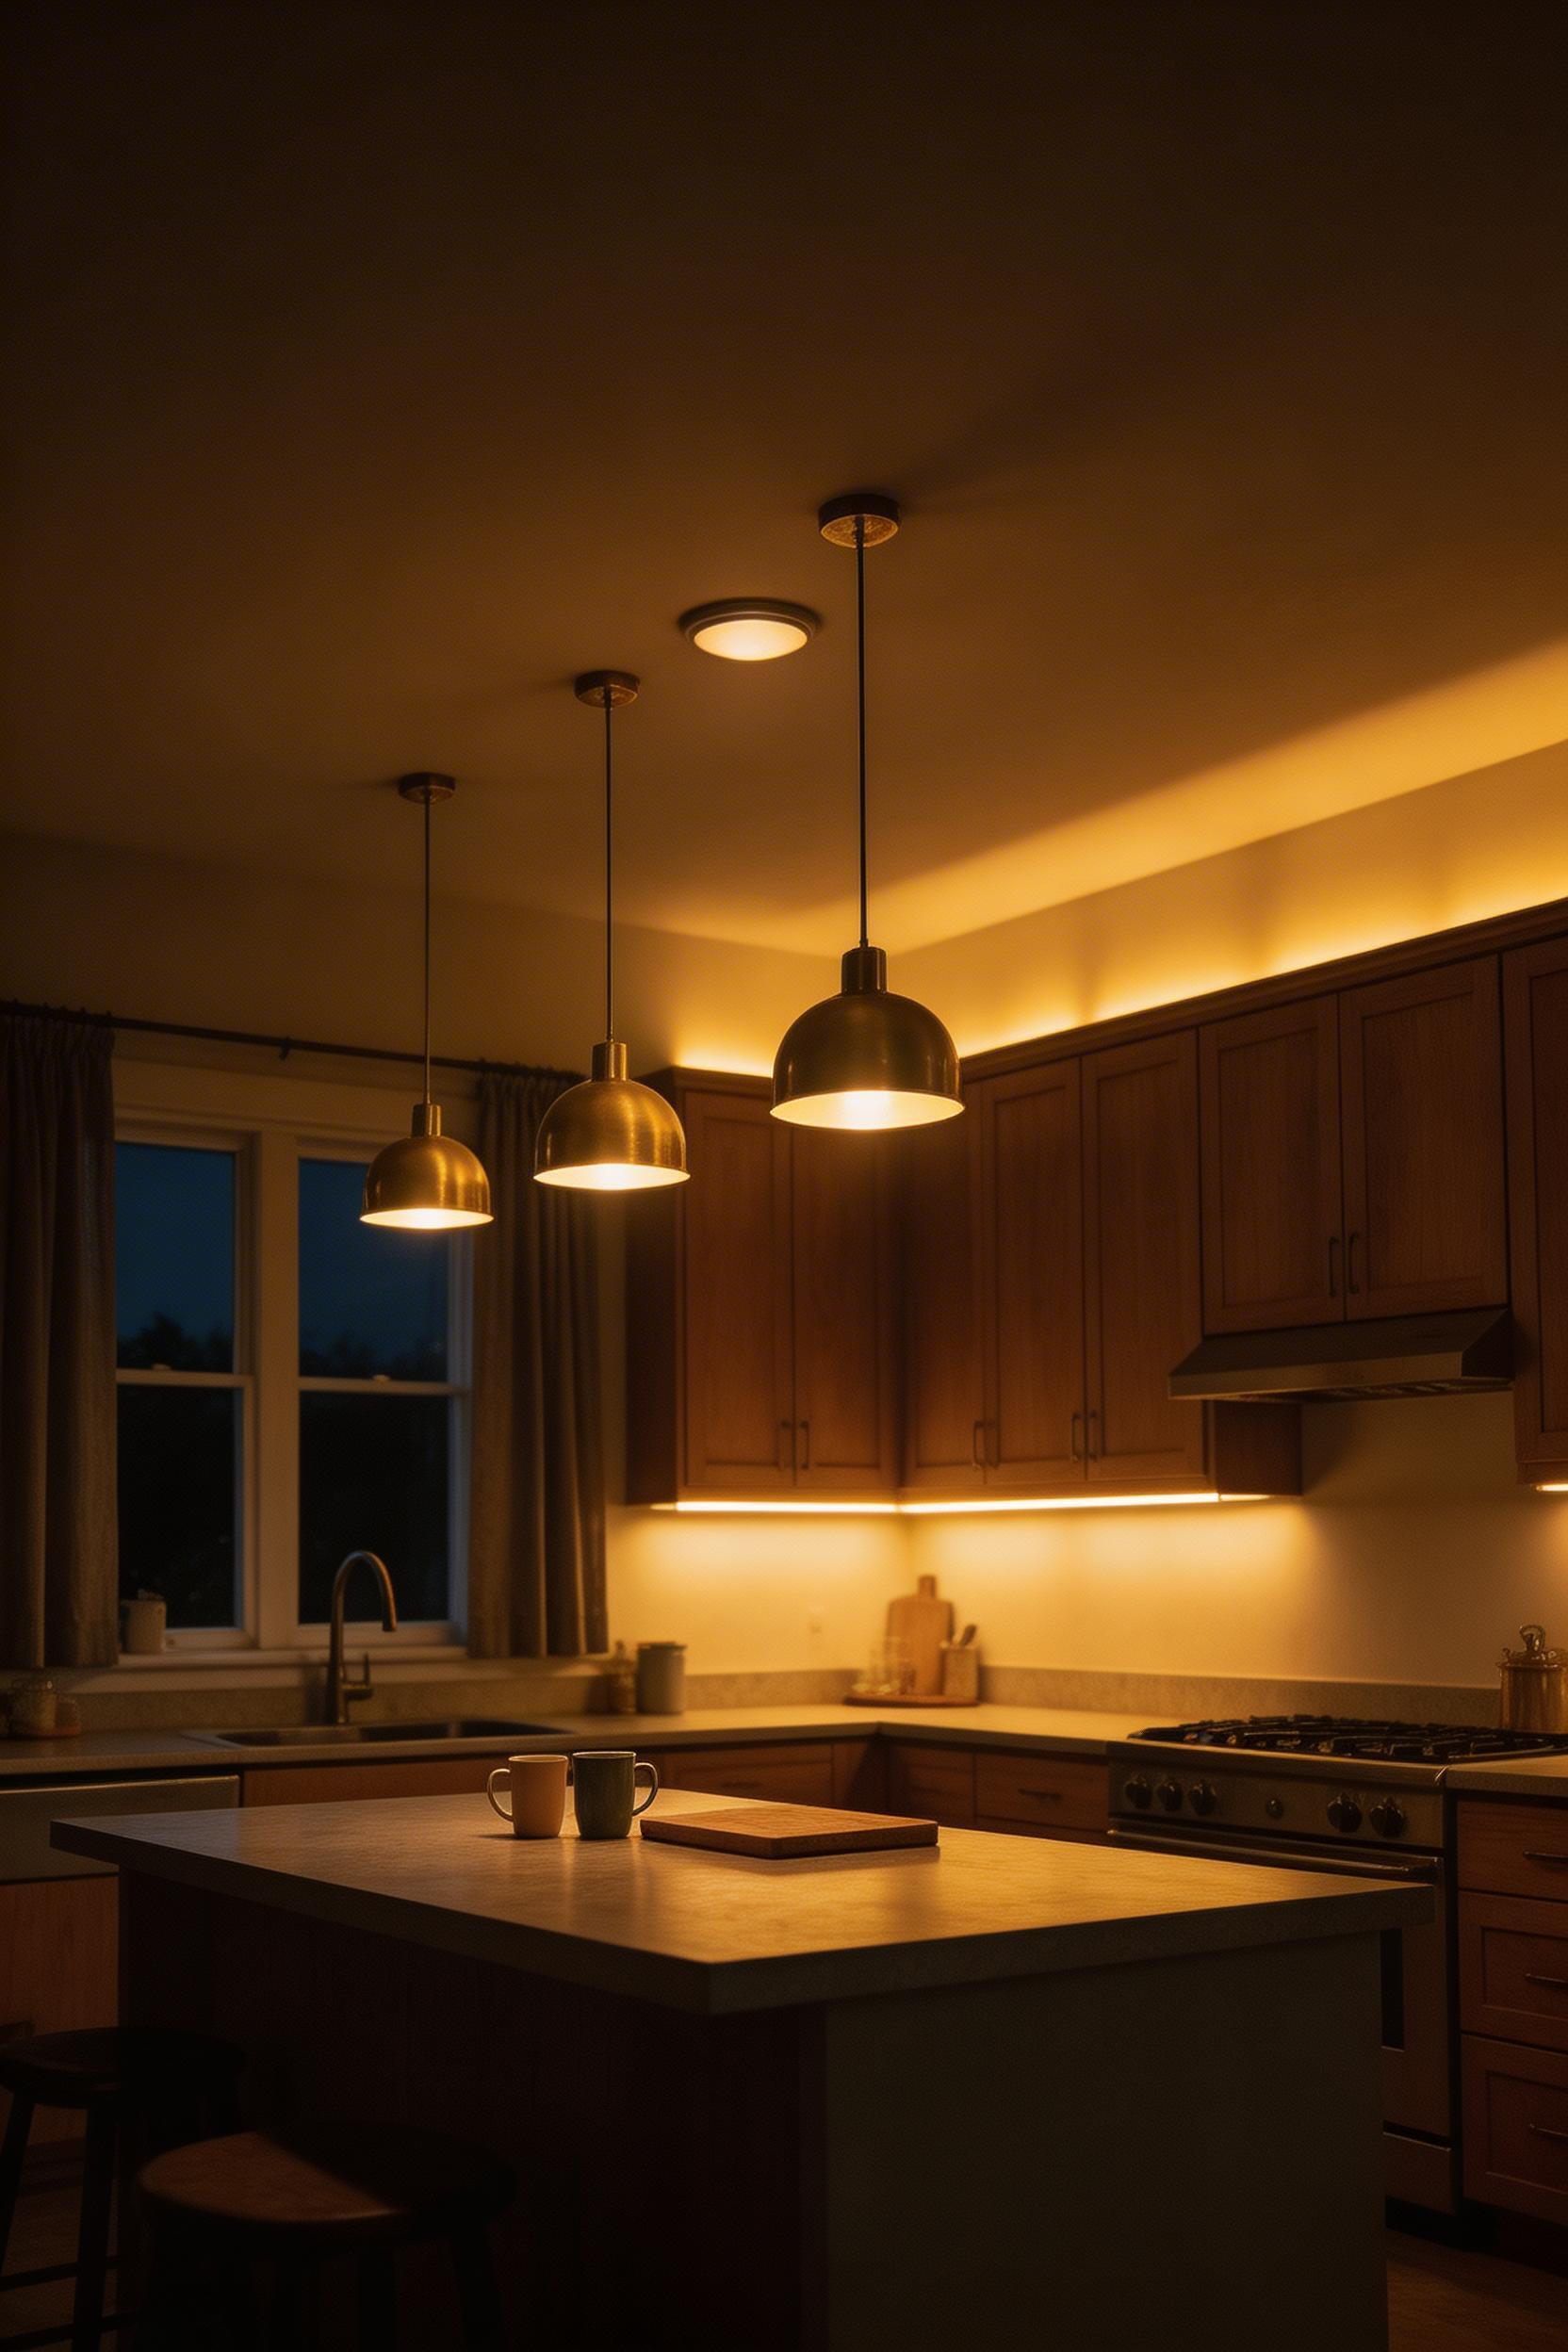
The problem is not recessed lights themselves. They are useful, even essential. The problem is treating them as the entire solution. Good kitchen lighting ideas work in layers. There is the background fill, the task layer that points where you need it, and an accent layer that adds depth and character. When those three layers are separately controllable — each on its own dimmer — the kitchen transforms. It becomes a workspace at 9am, a practical cooking space at 6pm, and something genuinely warm and liveable by 8pm. That shift does not happen with a single switch.
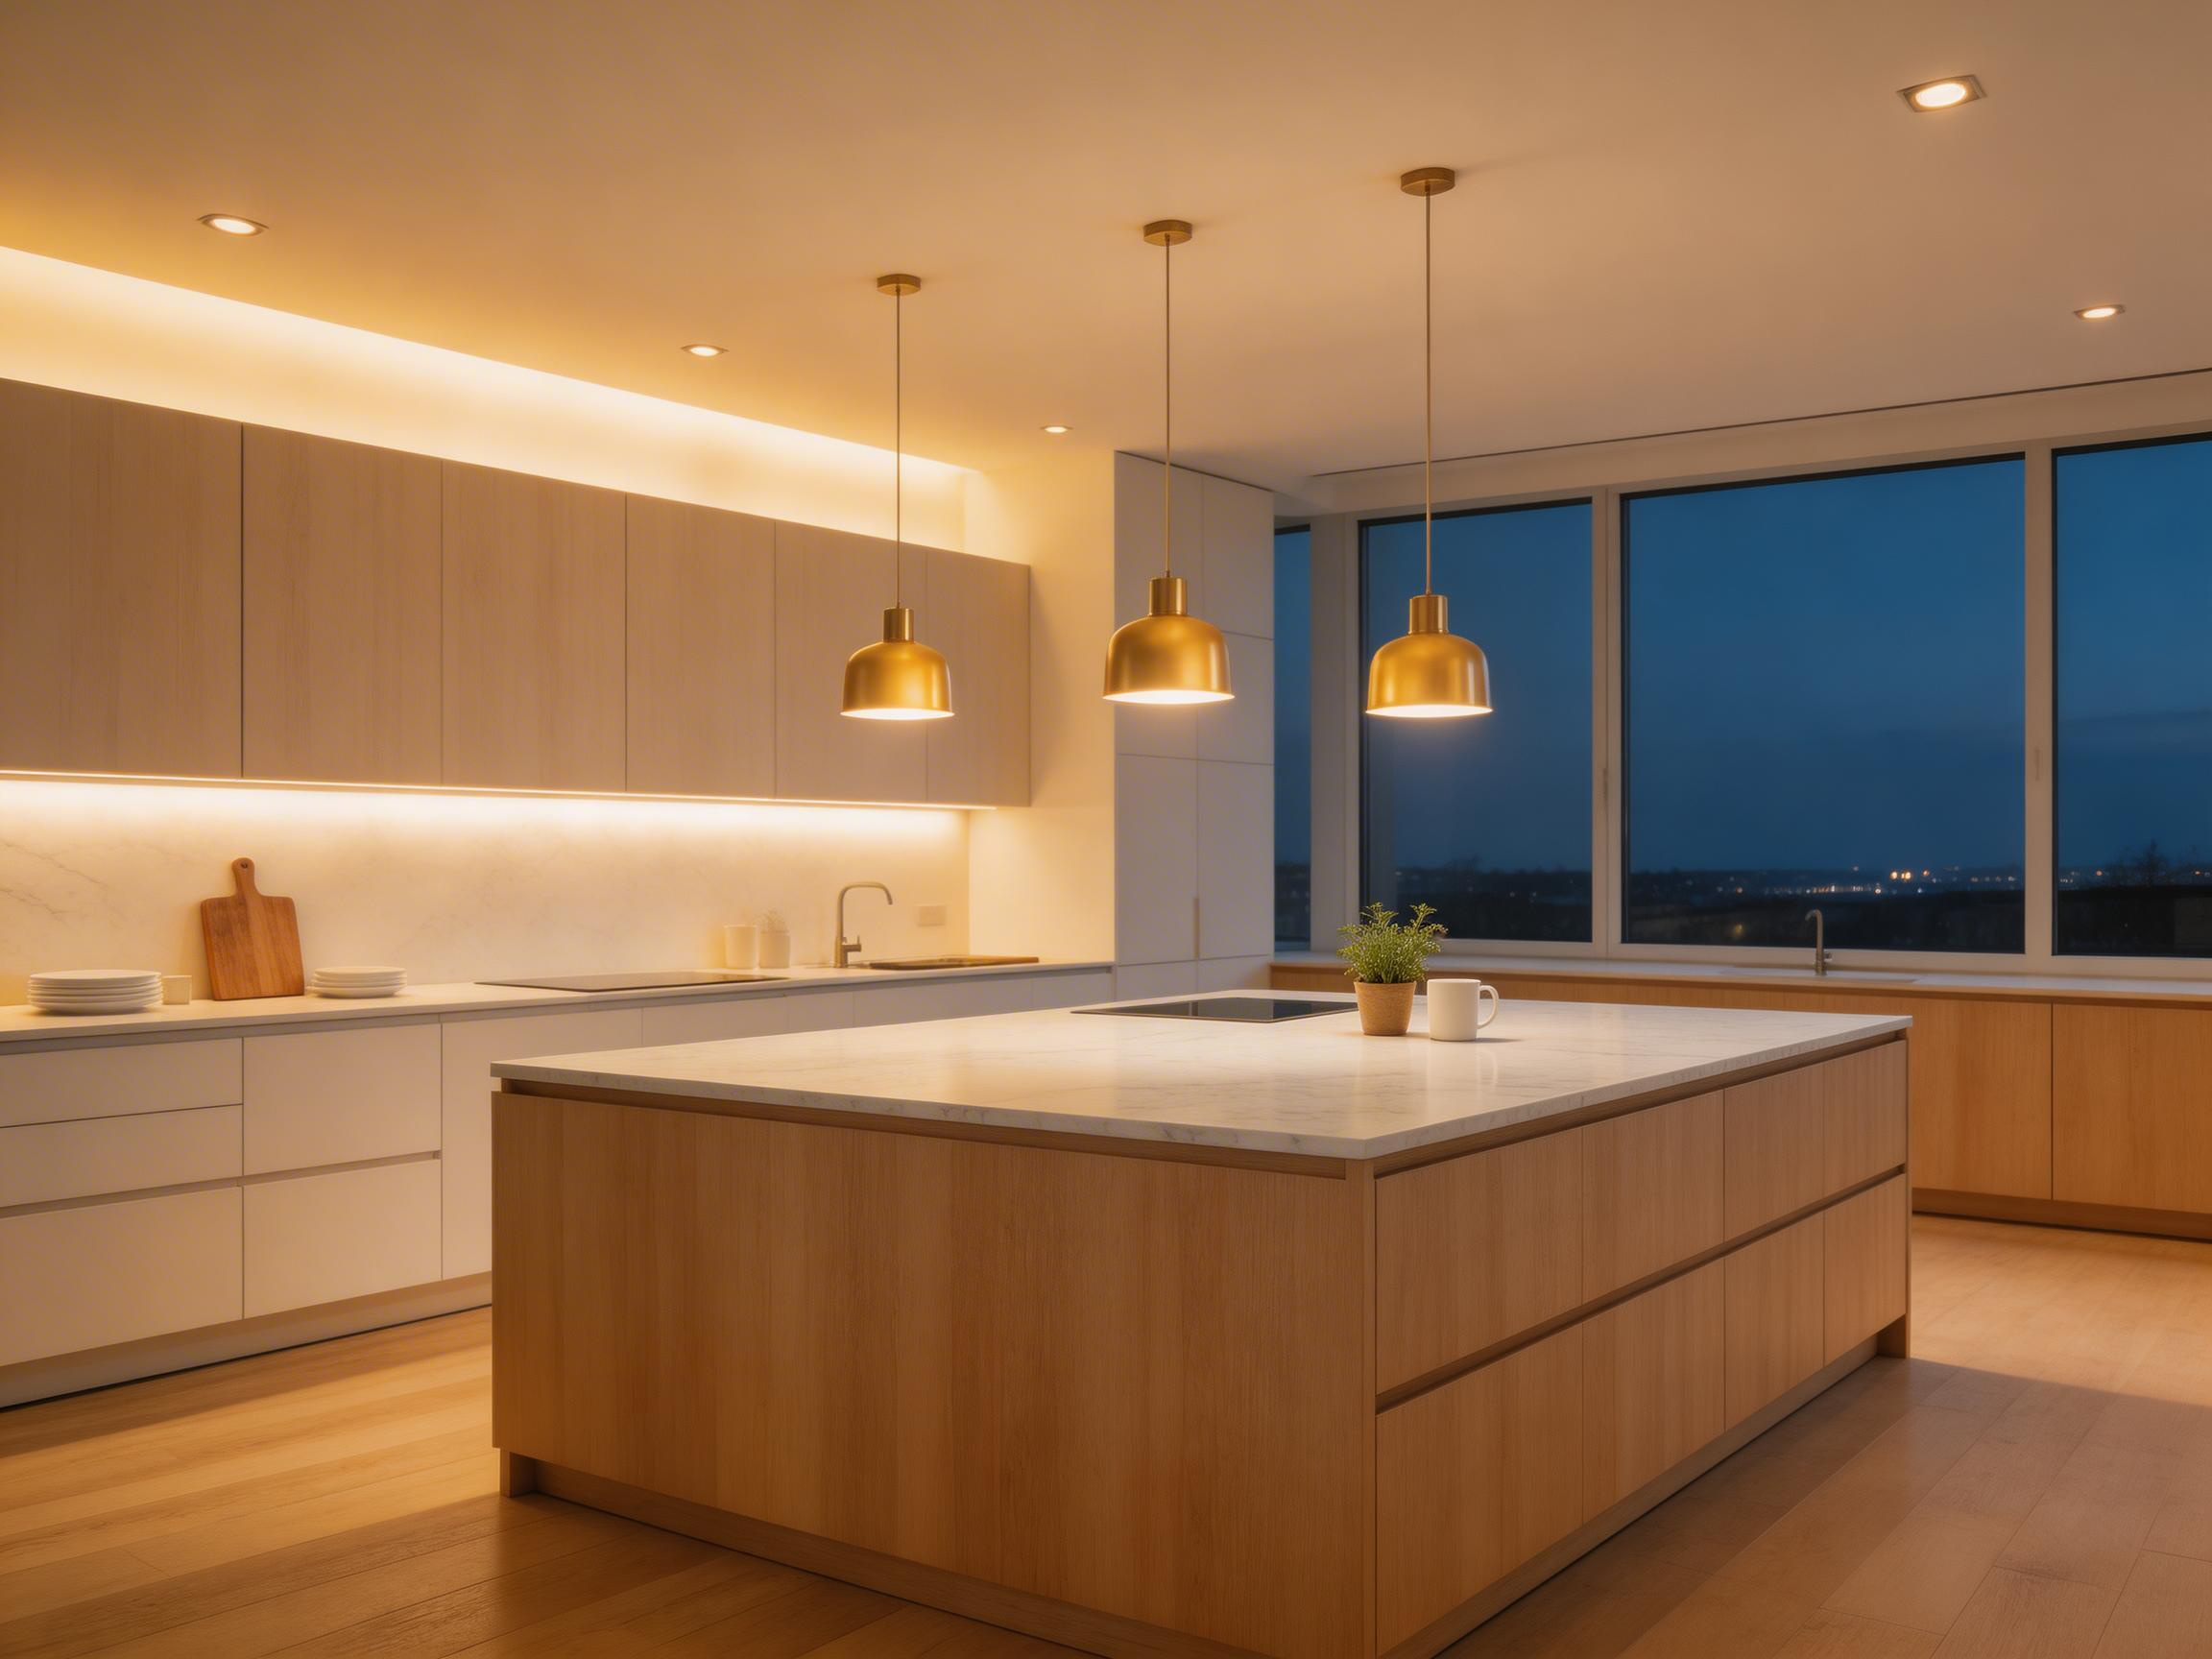
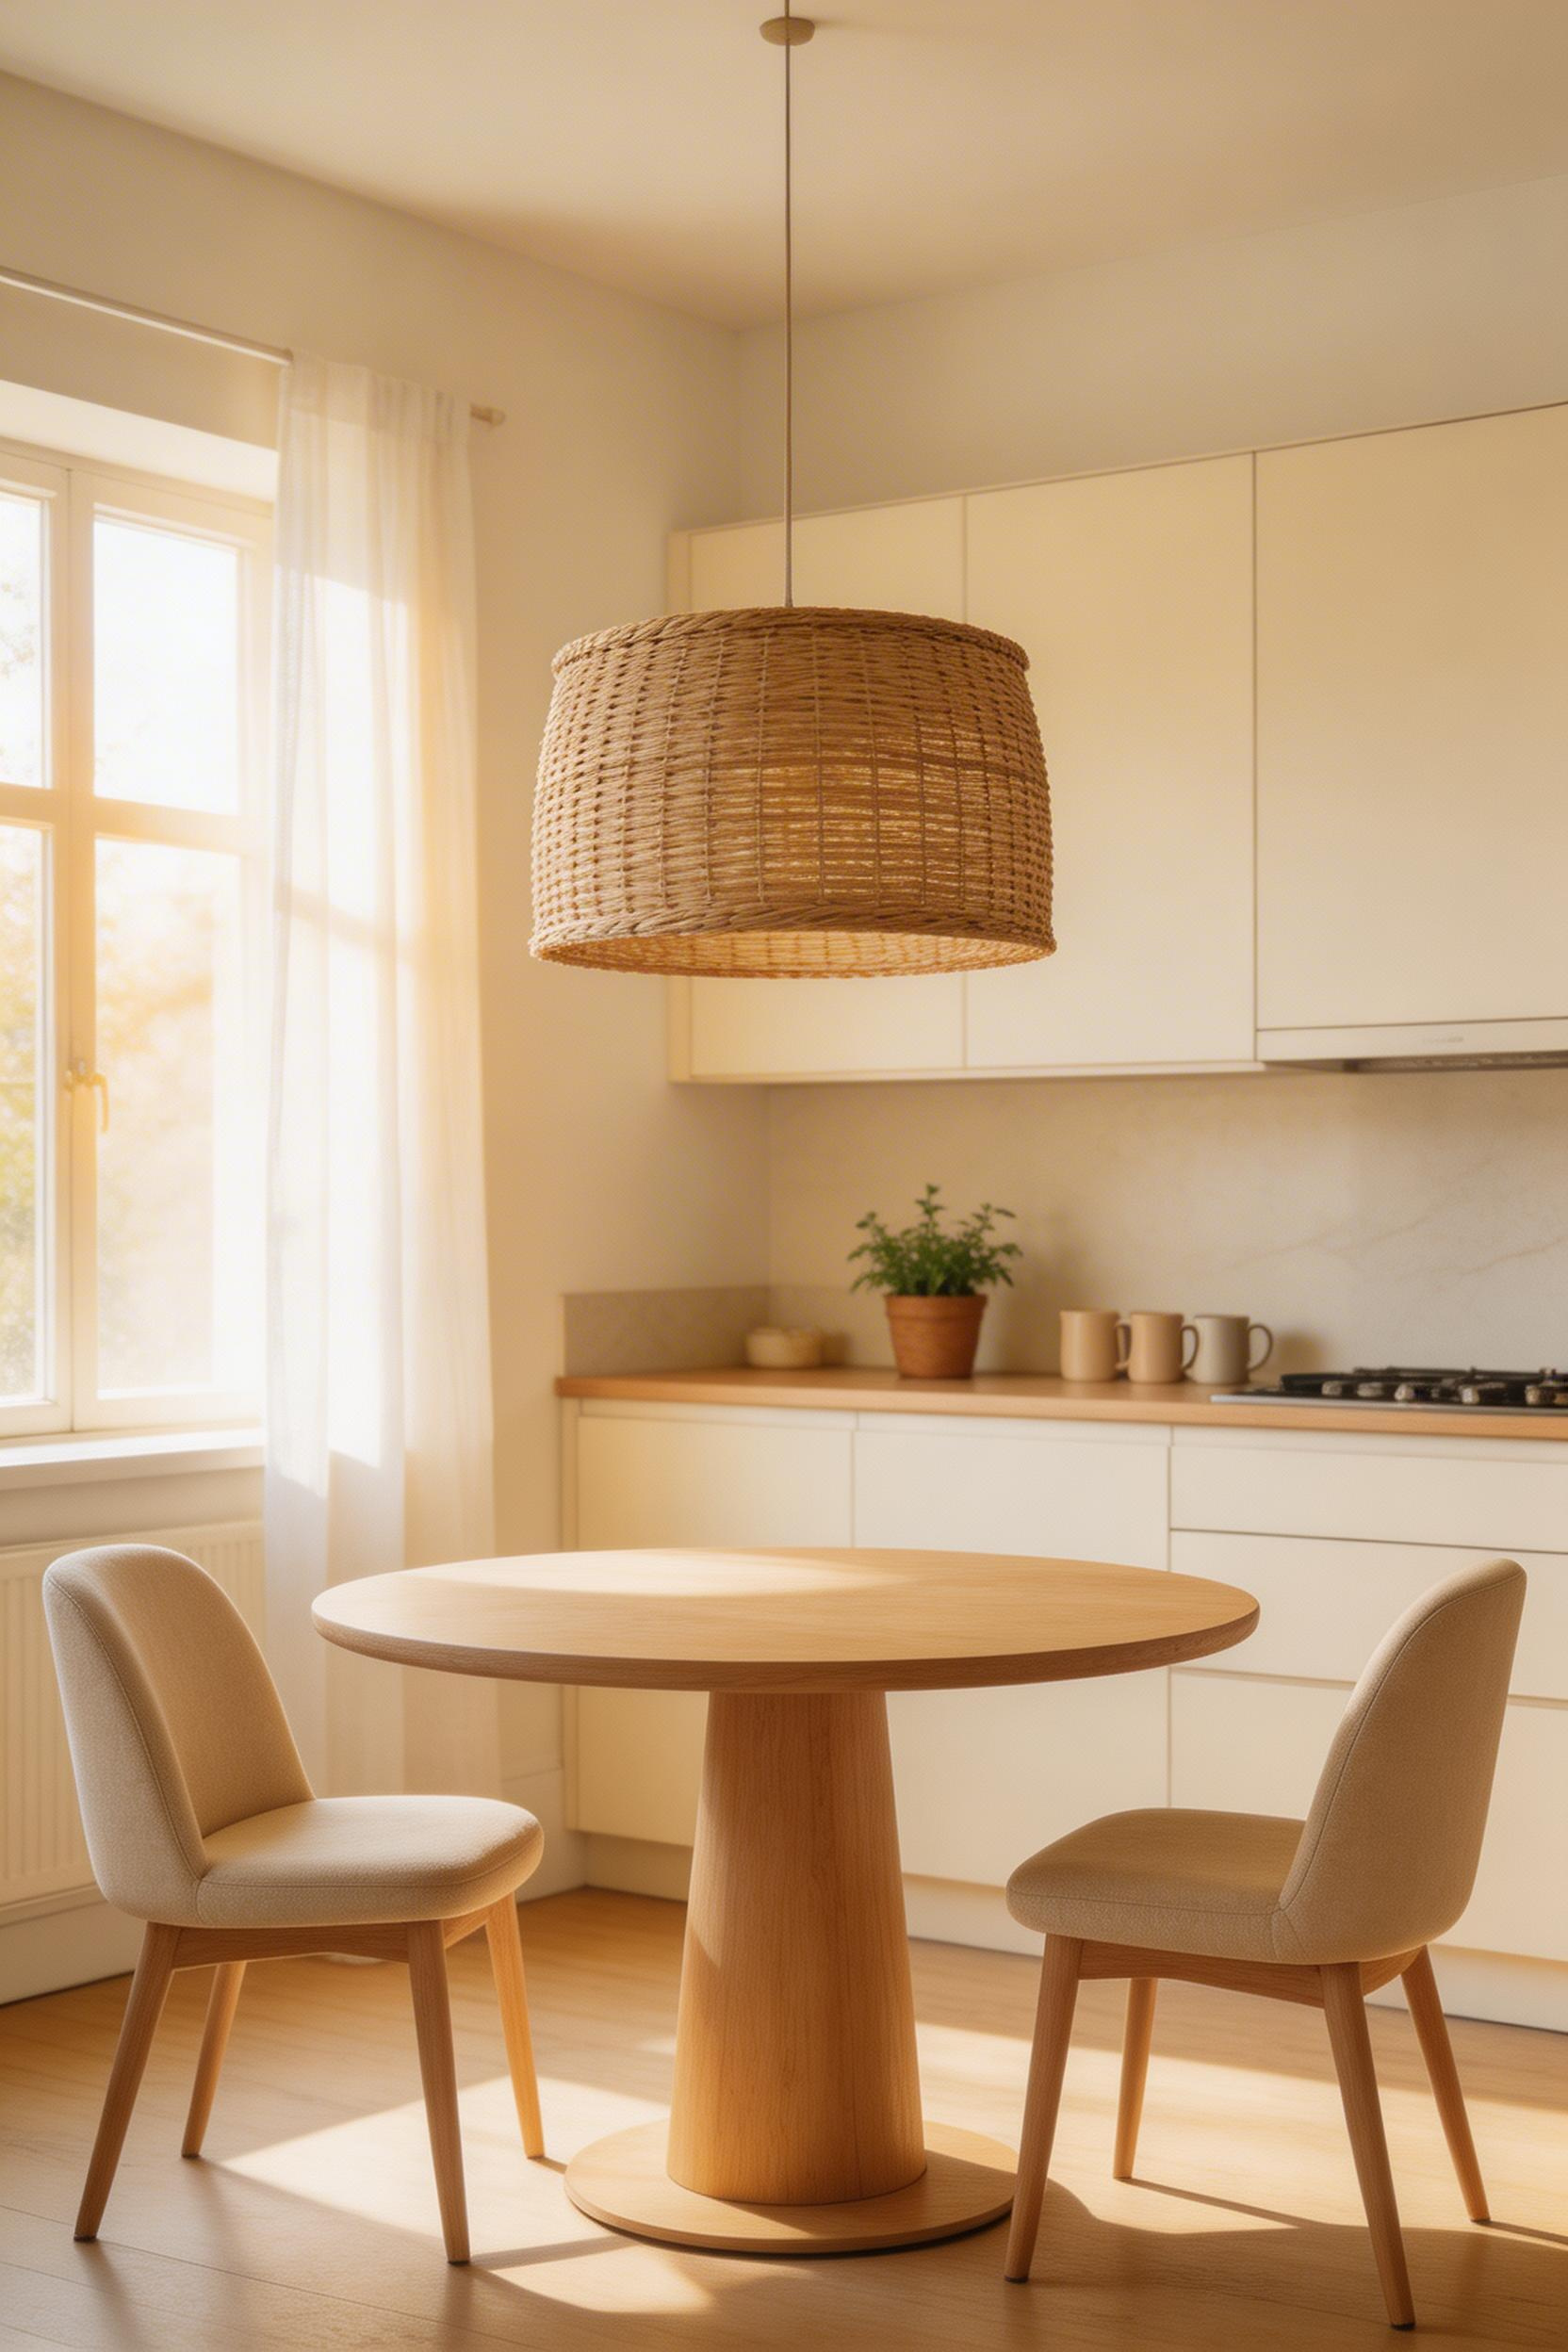
The island pendant is the most visible fixture in the kitchen and, unfortunately, the one most often installed at the wrong height. Standard guidance is to hang the bottom of the shade 30–36 inches above the countertop surface. For a seated bar stool position, 30 inches is the minimum before the shade becomes obstructive. For a standard island with no bar seating, 34–36 inches gives good task light without feeling oppressive.
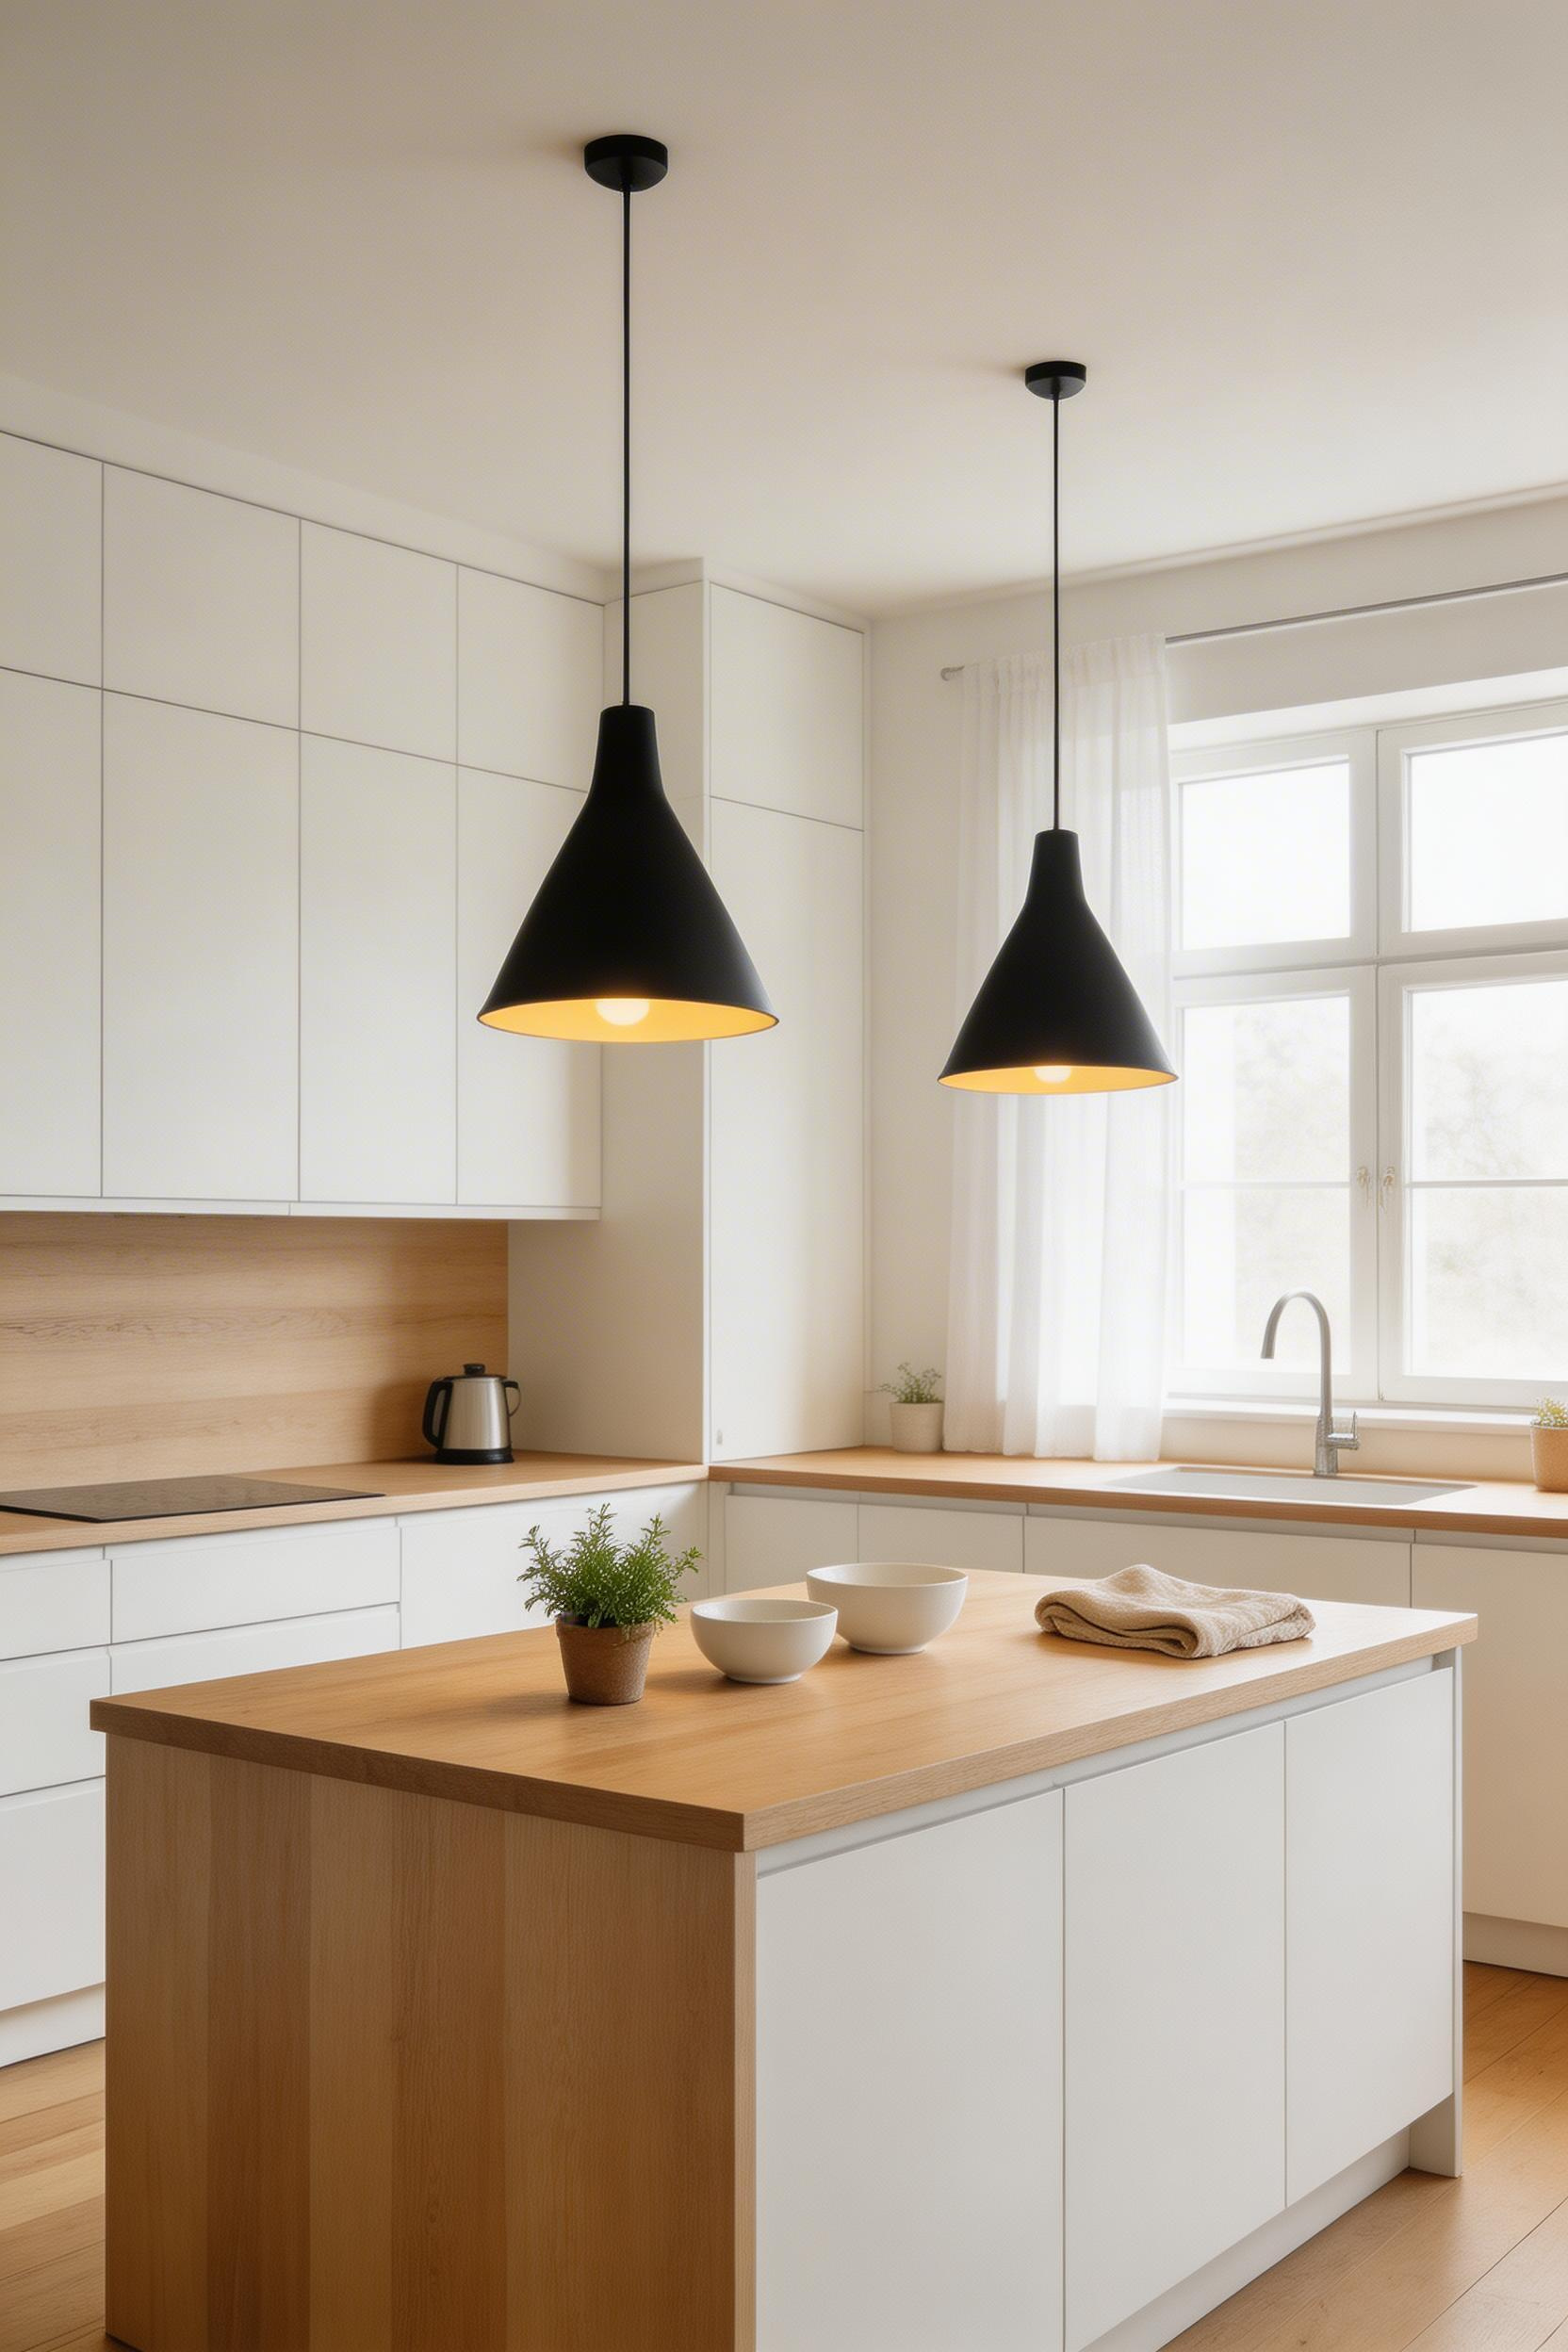
Spacing between pendants should be 24–30 inches apart, centred over the island. A common mistake is spacing them too close, which creates a cluster rather than a clean pair. If the island is under 48 inches wide, a single larger pendant usually looks better than two smaller ones. When the island is wider than 60 inches, three smaller pendants or two generously sized ones work well.
Scale matters more than style. The pendant diameter should be roughly one-third of the island’s width. A 15-inch shade over a 60-inch island will look undersized regardless of how beautiful the fixture is. Also: before drilling holes in the ceiling, hang pendants temporarily at different heights using hook-and-loop strips for a week. What looks right in a showroom often needs adjustment once you are actually using the counter.
According to a 2023 Houzz Kitchen Trends Study, pendant lighting over kitchen islands is the most-requested lighting feature in kitchen renovations, cited by 67% of homeowners planning updates. It is popular for good reason — a well-chosen pendant is often the most characterful kitchen lighting idea in the entire space.
Under-cabinet lighting is one of the most practical kitchen lighting ideas available, but most DIY installations look cheap. The most common problems are visible LED dots (hot spots from strips without diffusers), an unpleasant blue-white colour, and strips placed at the back of the soffit. That last positioning lights the backsplash instead of the counter.
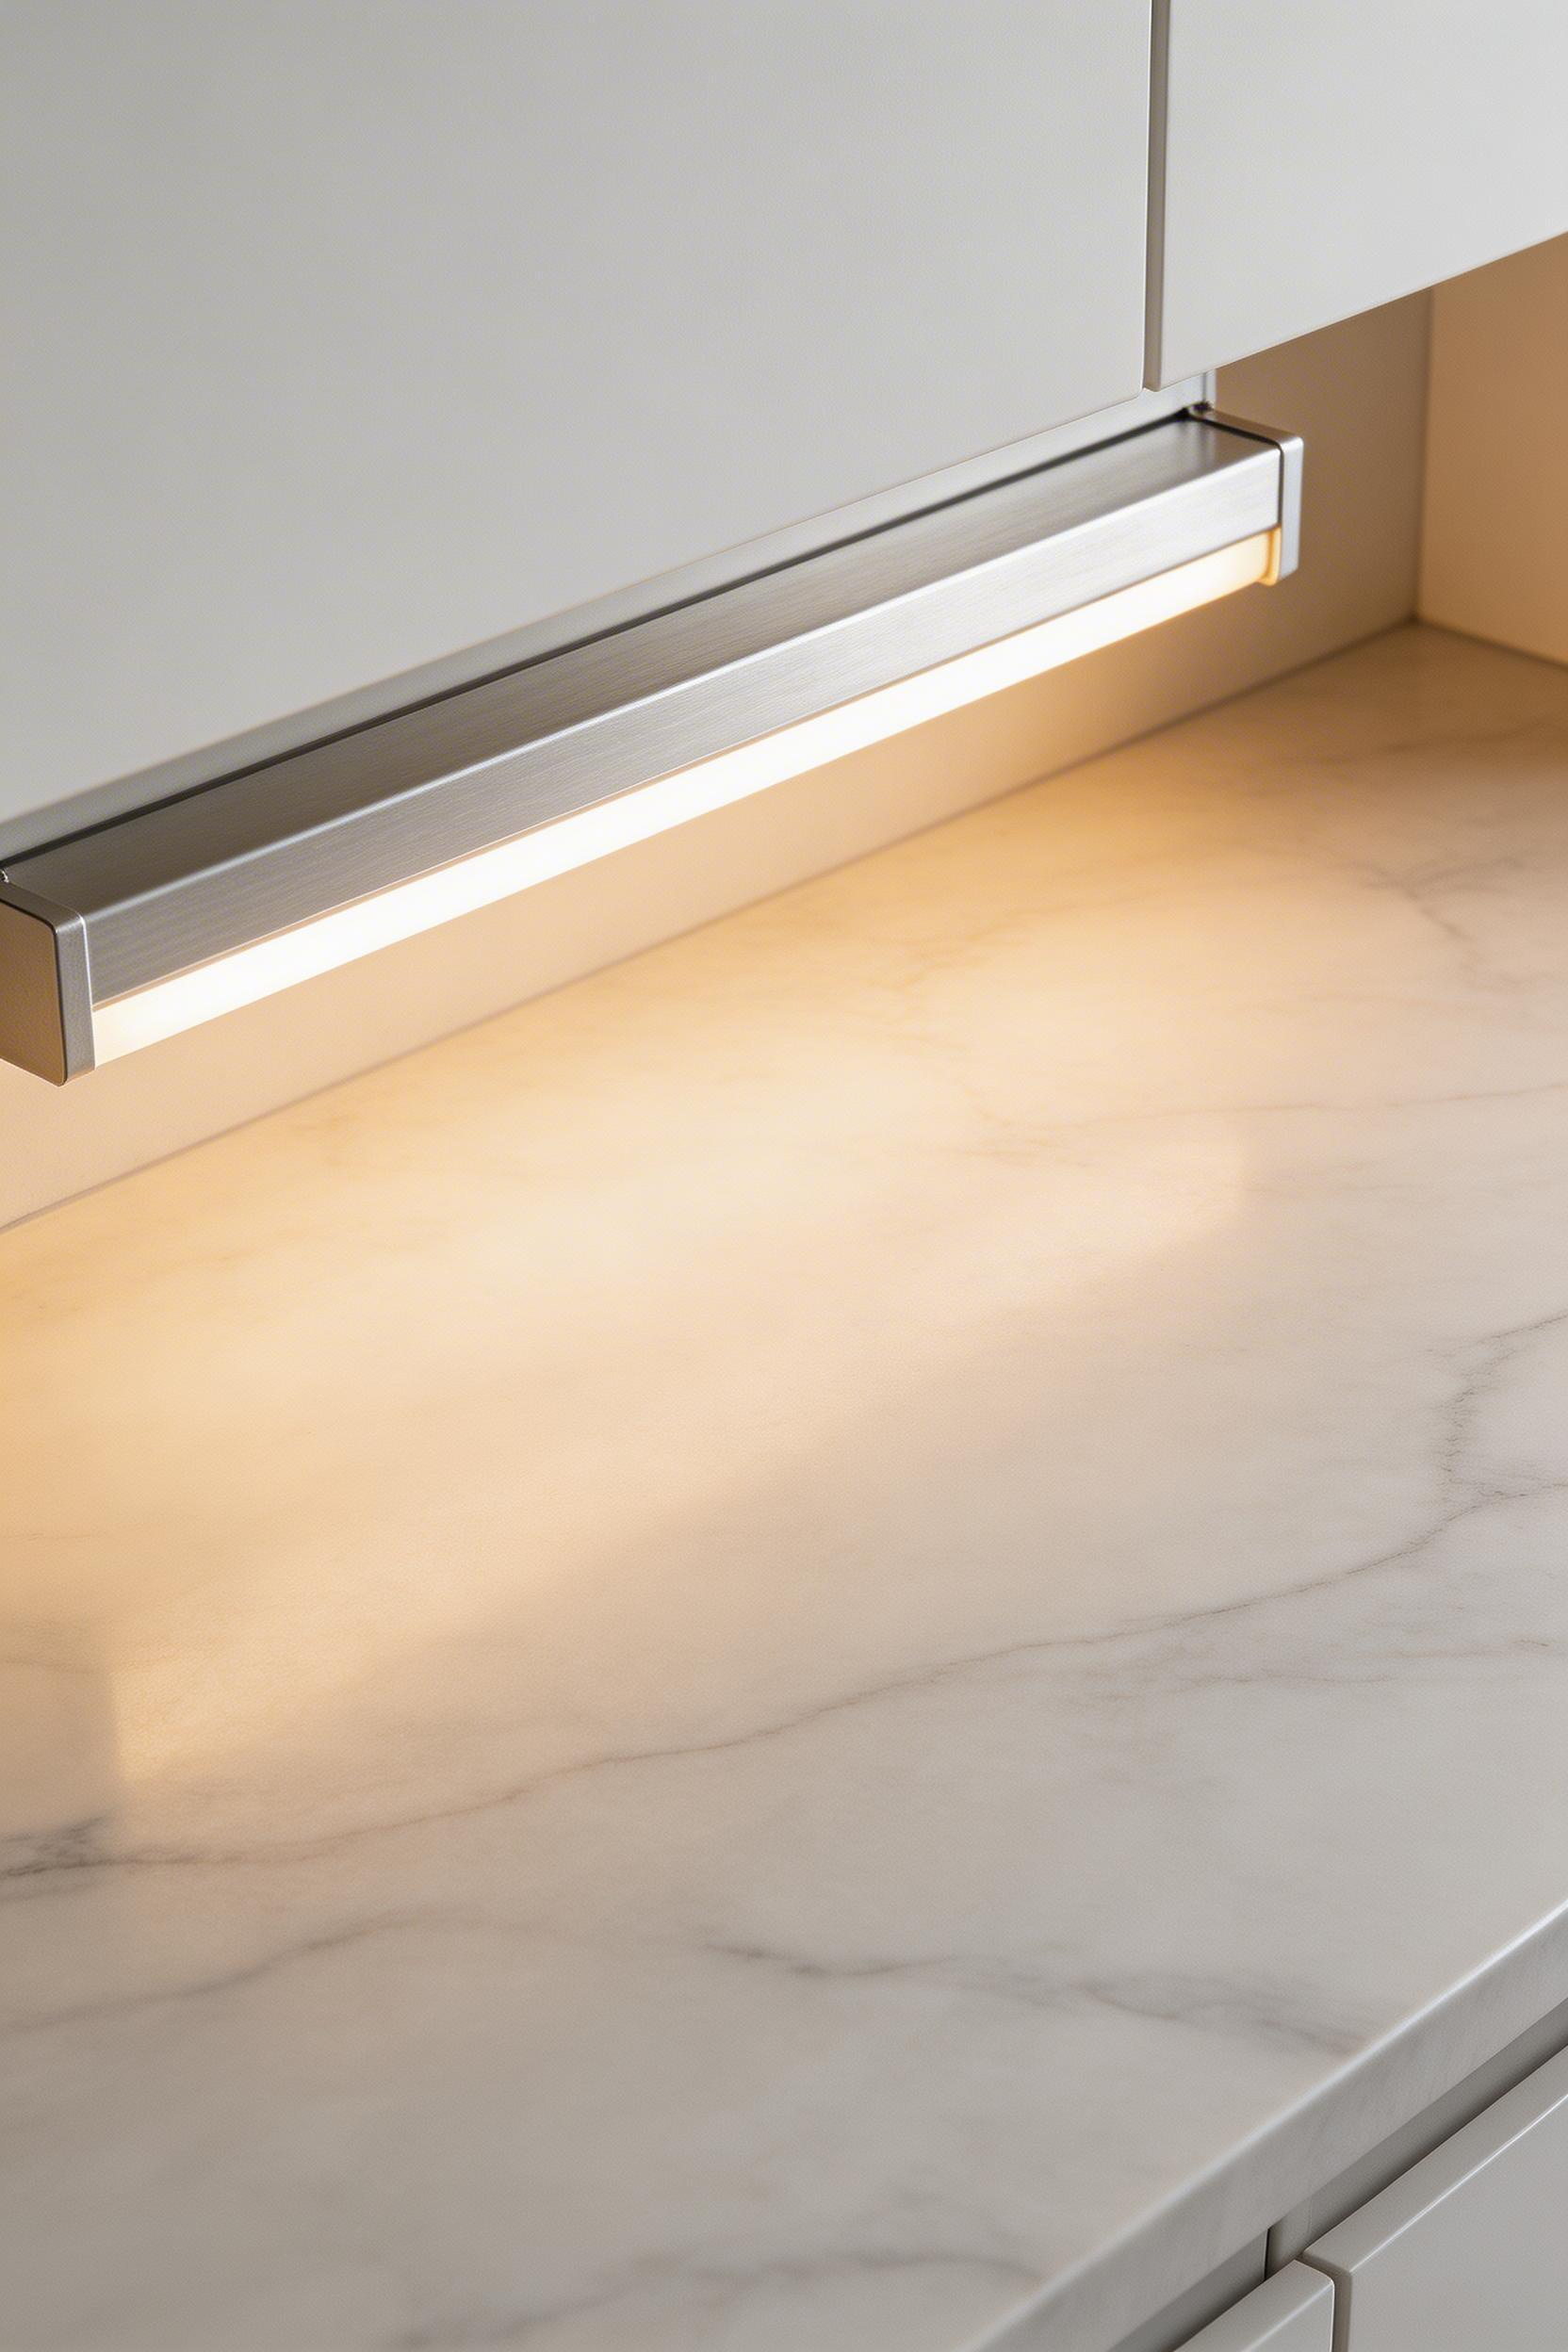
The single most important specification is CRI — Colour Rendering Index. For kitchen task lighting, 90+ CRI is the minimum. A lower CRI makes food look flat and slightly grey, even when the light itself appears bright. Pair that with the right colour temperature: 2700–3000K for dark cabinets, 3500–4000K for white or very pale cabinetry.
Diffuser channels (aluminium extrusions with a frosted cover) eliminate the dot problem entirely. Brands like Integral LED and Sensio make purpose-designed under-cabinet kits with the diffuser channel, driver, and connectors included. For a 900mm (36-inch) run, allow at least 10W/metre to reach adequate brightness at the counter surface. Place the strip at the front edge of the soffit — not the back. And run it behind a small timber batten if the gap is visible from a seated position, so the strip itself is hidden from sightlines below. Studies show a properly installed under-cabinet strip delivers 600–800 lux at counter level. That is well above the 500 lux minimum for safe food prep.
Recessed downlights are the most popular kitchen lighting solution in UK and US homes. But they produce a flat, clinical result when used alone. The shadows they cast on faces are unflattering. An all-downlight kitchen has none of the warmth of a space where light comes from multiple directions and heights.
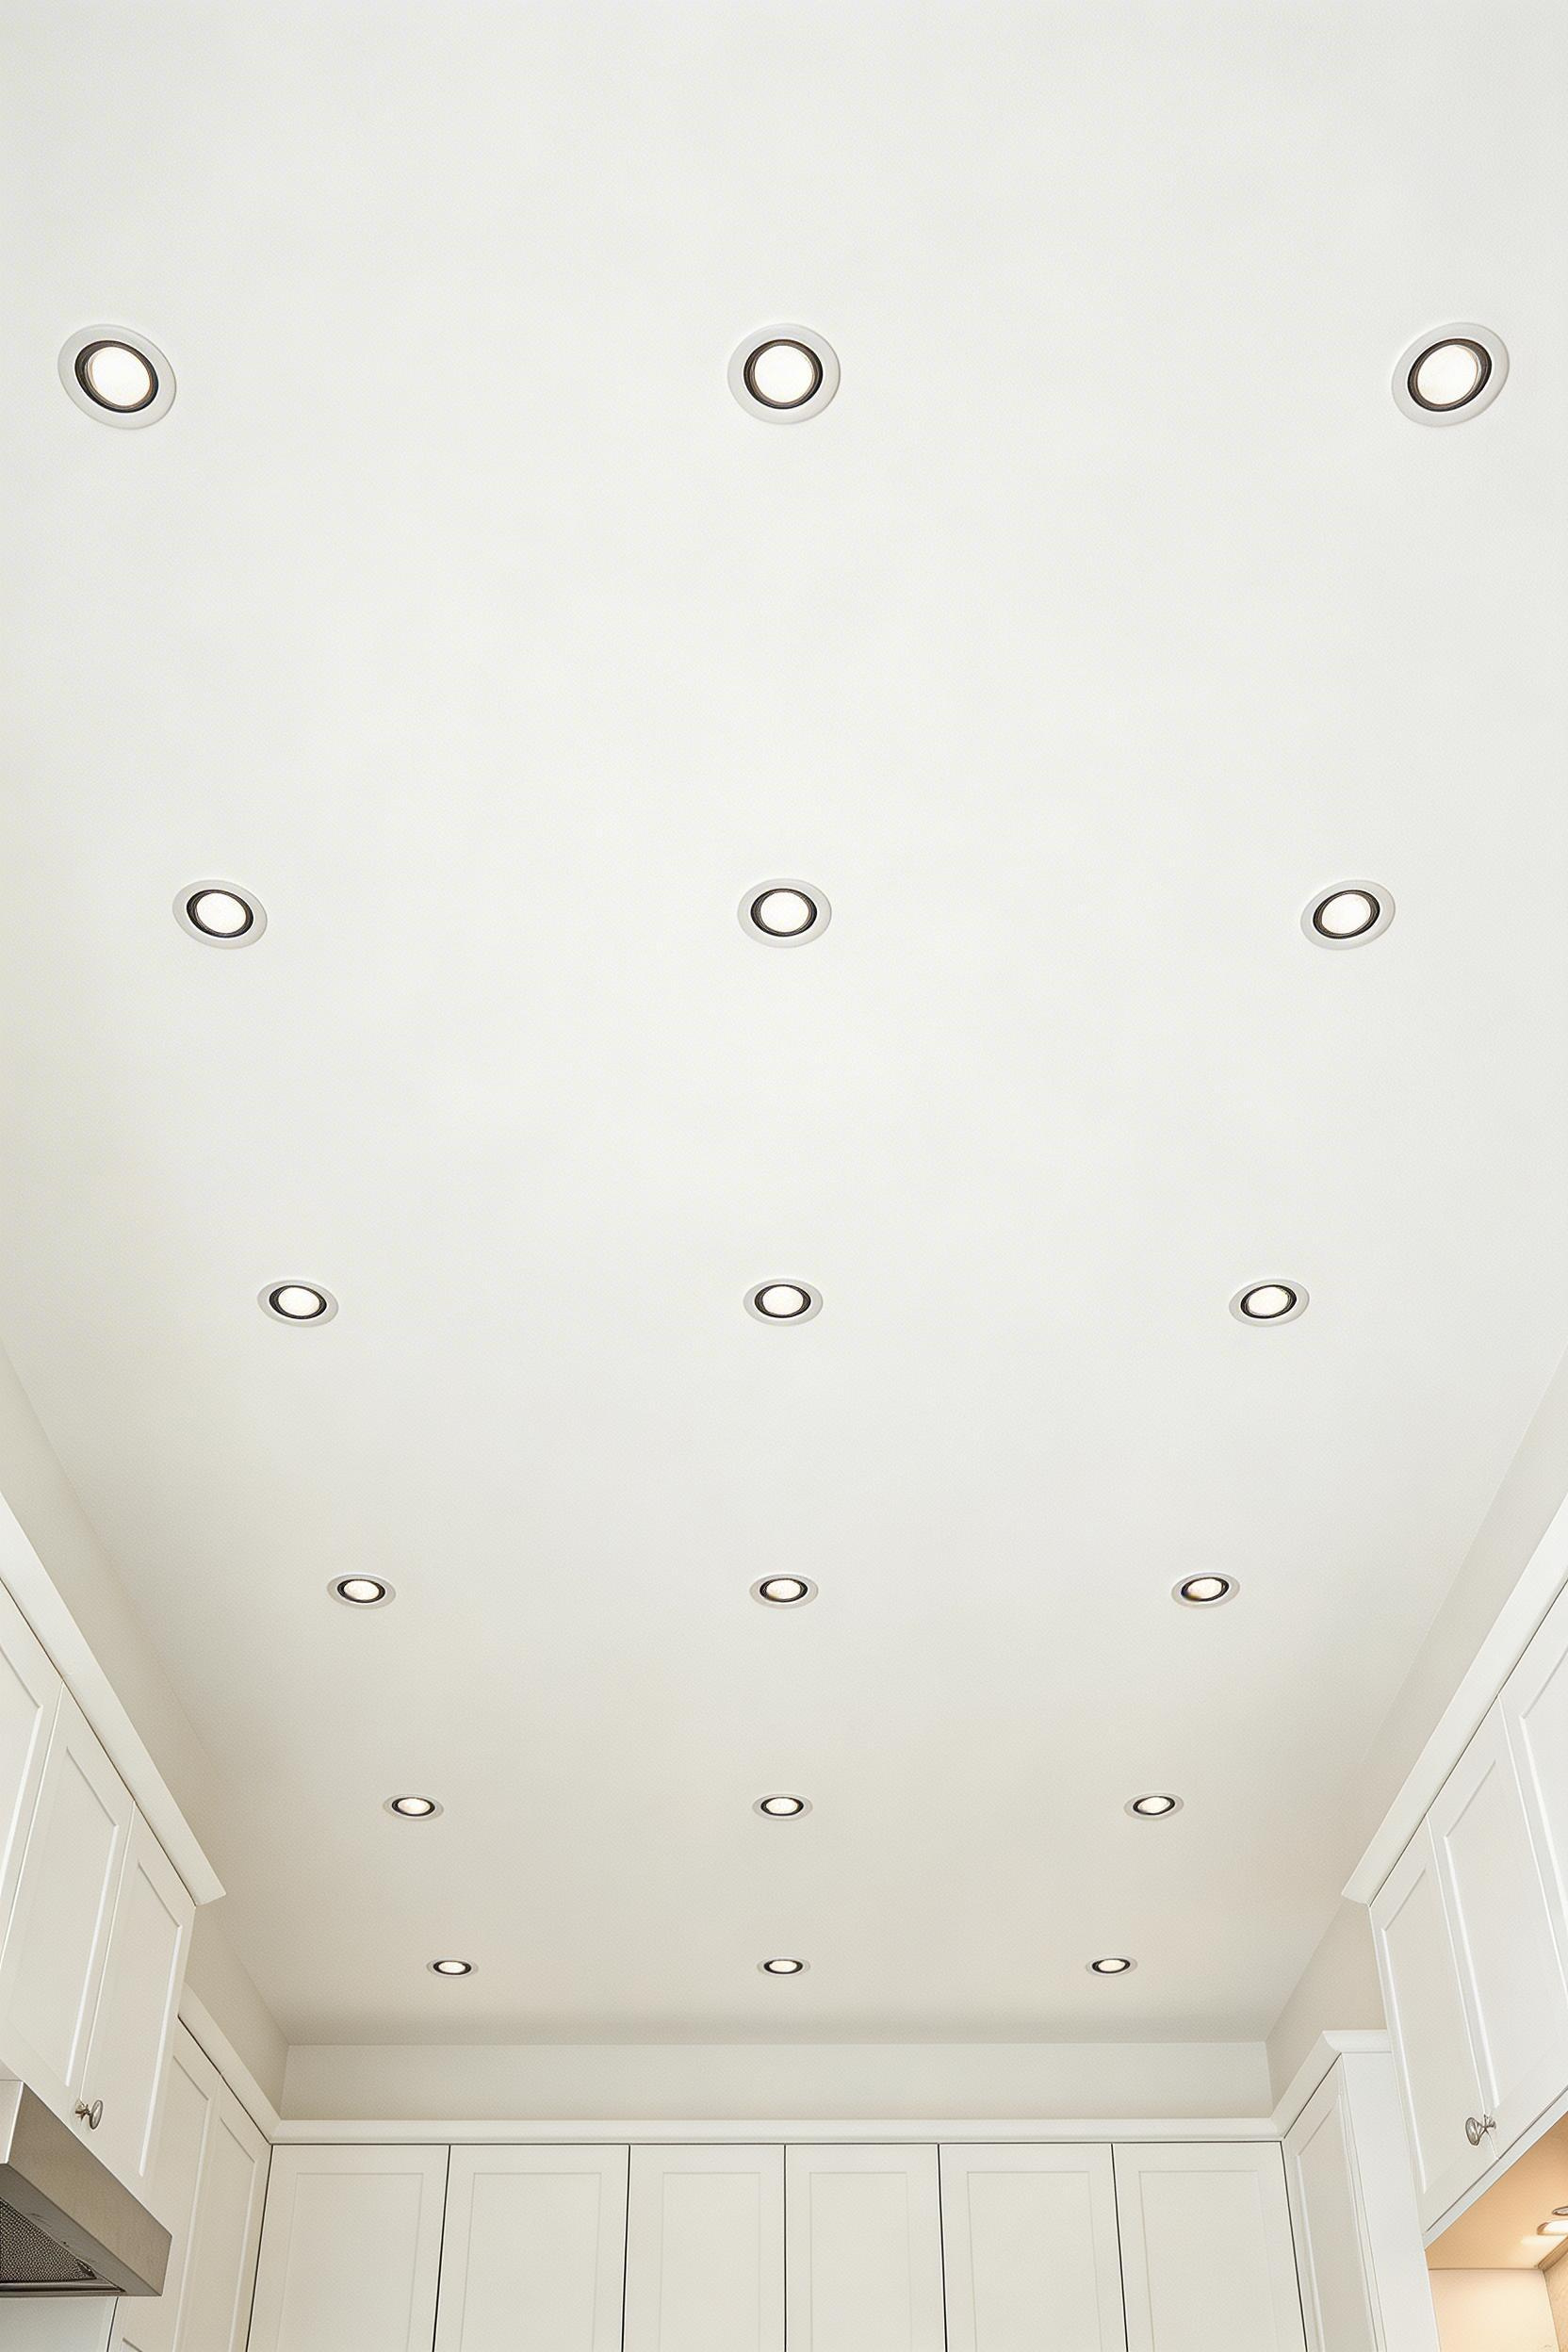
For an 8-foot ceiling in a 12-foot-wide kitchen, use two rows spaced roughly 3–4 feet from the walls and 3–4 feet apart. Beam angle matters. A 40-degree flood is good for general ambient fill; 25-degree spot works well directly over a hob or prep area. Tilt-adjustable recessed fittings (eyeball mechanism) are worth the small price premium. They let you redirect the beam after installation if furniture or layout changes.
Always specify CRI 90+ LED bulbs for recessed fittings. Standard GU10 bulbs at CRI 80 or below make food look flat. They also reduce the perceived quality of the whole room. Fire-rated fittings are required if the ceiling is below a habitable room upstairs. And remember: treat recessed lights as the background layer only. If you find yourself relying on them alone, the kitchen lighting design is not finished yet. For a more dramatic character in the recessed layer, industrial kitchen lighting principles — using fewer, more intentional fixtures in place of a uniform grid — are worth considering.
Of all the kitchen lighting ideas in this list, dimmer switches deliver the best return for money. A good dimmer on the ambient circuit alone changes what a kitchen can be. At full power it is a practical workspace. At 20% it becomes something genuinely warm and social. The difference between a kitchen at 100% recessed downlights and the same kitchen at 25% recessed downlights with pendant lights at 60% is remarkable.
Not all dimmers work with LED bulbs. Trailing-edge (electronic) dimmers are best for most LED drivers. Leading-edge dimmers, designed for halogen, cause buzz, flicker, or premature failure with many LED bulbs. Always check the dimmer manufacturer’s compatibility list for your specific bulb model.
For reliability and LED compatibility, Lutron is the industry reference. Their Caséta wireless dimmer ($59.95) requires no neutral wire and works with Alexa, Google, and Apple HomeKit. In the UK, the Varilight V-Pro LED Dimmer (£18–£28) is a solid trailing-edge option. If you are planning a kitchen renovation, also consider a smart dimmer from the start. It costs little more than a standard one but gives you scene control and remote adjustment. The Energy Saving Trust estimates dimming LED lights by 50% reduces energy use by roughly 40%, so the running cost savings are real, even if modest.
Most dramatic ceiling fixtures — lanterns, chandeliers, multi-arm pendants — require at least 7 feet of clearance from floor to shade bottom. In a kitchen with 8-foot ceilings, the 12 inches of available drop can put a fixture dangerously close to head height. The semi-flush category is one of the kitchen lighting ideas that solves this. These fittings hang 4–12 inches below the ceiling junction box, providing a visual anchor without clearance problems.
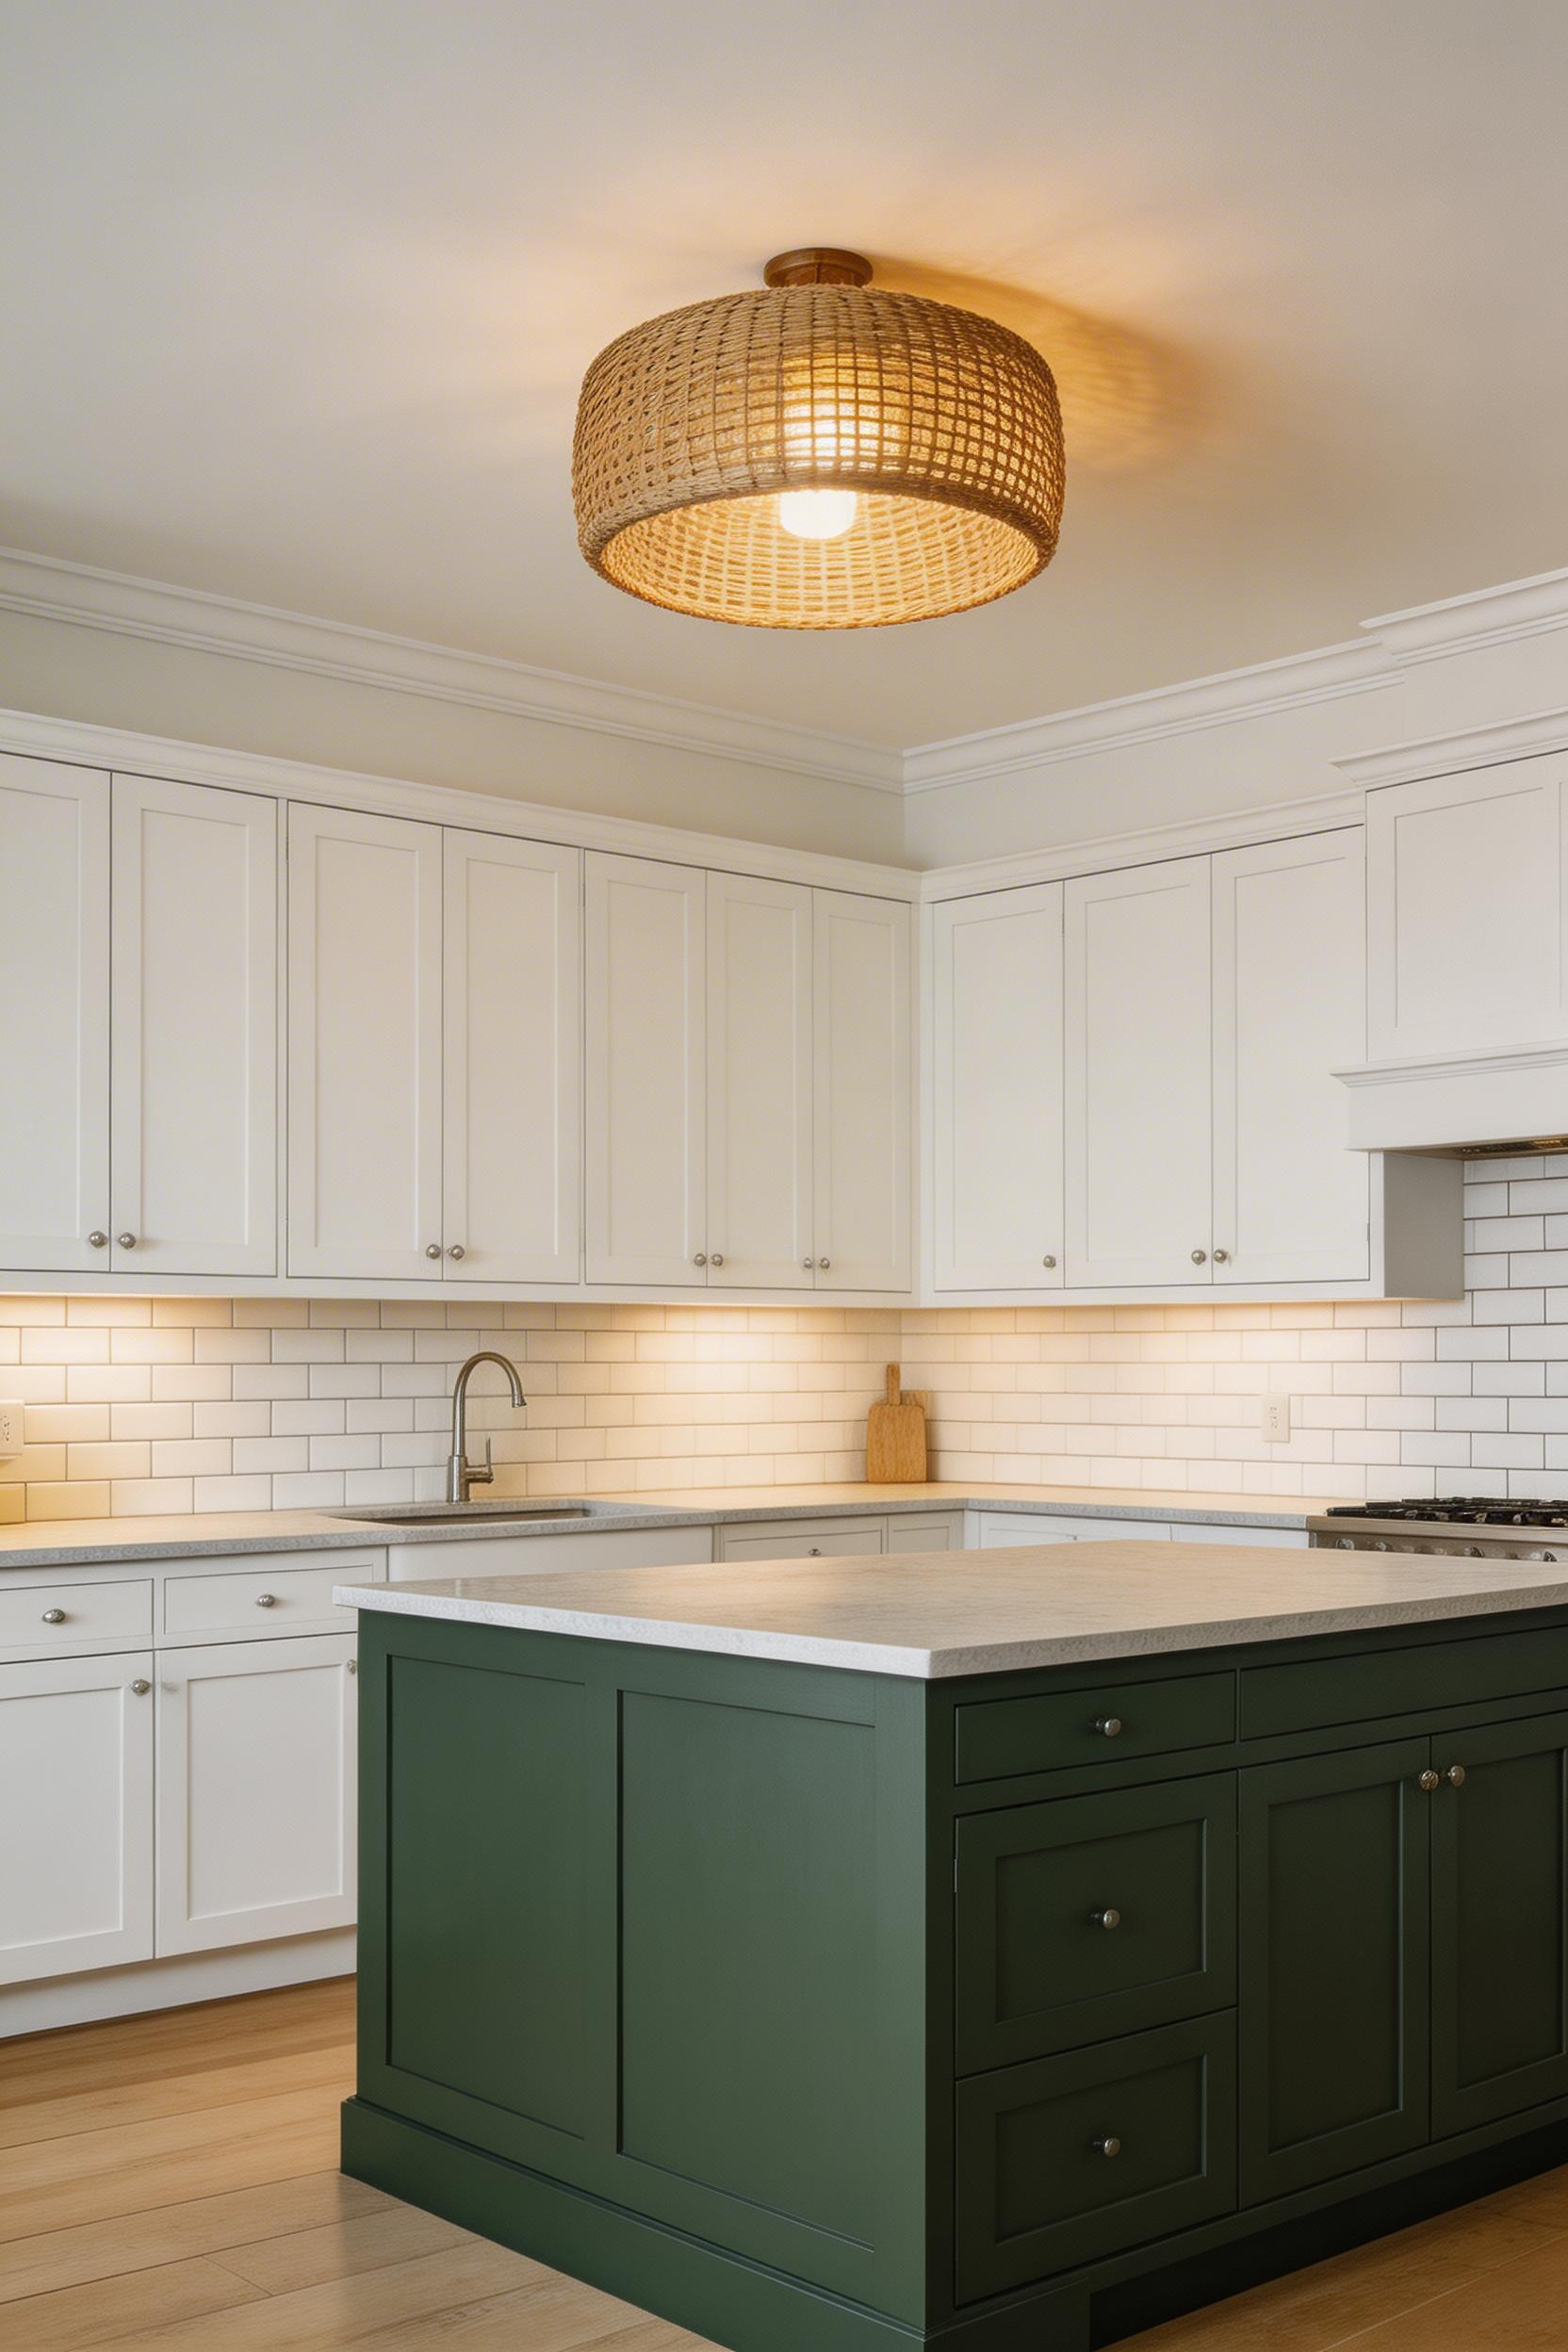
The key to a semi-flush that reads as a design choice rather than a compromise is scale and finish. A 20-inch diameter drum semi-flush in aged brass or dark bronze makes a clear statement. A white 12-inch semi-flush in the same space looks like the second option on the shelf.
According to the NKBA, 47% of US kitchens built before 2000 have ceiling heights of 8 feet or under. The semi-flush category has expanded significantly. Brands like Nordlux, Hinkley, and Visual Comfort all offer well-designed options now. The Habitat Albus woven rattan semi-flush (£95–£125) is a good UK example. At 45cm diameter with warm diffused light, it suits both modern and transitional kitchens well.
The gap between upper cabinet tops and the ceiling is one of the most overlooked opportunities in kitchen lighting ideas. This space is typically 6–24 inches tall, universally present, and almost always left empty. Running LED strip lighting on top of the cabinets — pushed back against the wall, pointing upward — creates indirect ambient uplighting. The ceiling appears to glow softly, making the room feel taller and significantly warmer.

Use 24V LED rope light or strip lighting for runs over 3 metres, to avoid voltage drop dimming at the far end. Push the strip back against the wall rather than toward the front edge. This prevents it from being visible and creates a more even wash on the ceiling surface. Warm white 2700K is almost always the right choice; this is an atmospheric layer, not task lighting.
A 5-metre 24V kit with a 30W driver handles a typical kitchen perimeter. The driver should be mounted inside a cabinet for access. Research from Cornell University’s Lighting Lab found that indirect lighting reduces perceived stress compared to direct downlighting alone. That is worth considering in what is often the busiest room in the house. This is also one of the kitchen lighting ideas that can be added post-renovation. All you need is a power source inside the upper cabinets. It works especially well as a complement to kitchen lighting over island choices — the two layers address different zones without competing.
Interior cabinet lighting transforms the way a kitchen reads. Glazed cabinets without internal lighting look flat from across the room — the glass simply reflects back the ambient ceiling light. With a strip or puck light inside, the same cabinet becomes a feature — dishware, glassware, and ceramics lit from within.

The traditional approach uses puck lights — small circular LED discs fixed to the cabinet interior. However, puck lights create distinct circular pools of light with dark areas between them. A LED strip in a diffuser channel runs the full cabinet width. It delivers even, consistent illumination across the entire shelf. For a 600mm (24-inch) deep cabinet, mount the strip at the front of the cabinet top, facing downward. This positions the light toward the viewer rather than pointing it at the back wall.
For open shelving, run the strip along the underside of the shelf above rather than inside the cabinet itself. This keeps the hardware out of sight when looking at the shelf straight-on. Reed switch door activation is worth adding during a renovation. A small magnet triggers the strip when the door opens. It removes the need for a separate switch and lasts tens of thousands of cycles.
Track lighting has a reputation problem. The older rectangular tracks with large clip-on spots are rightly associated with offices and retail. Modern slim-profile monorail and H-track systems are a different category entirely. They are refined, flexible, and often smarter than a grid of fixed recessed fittings.
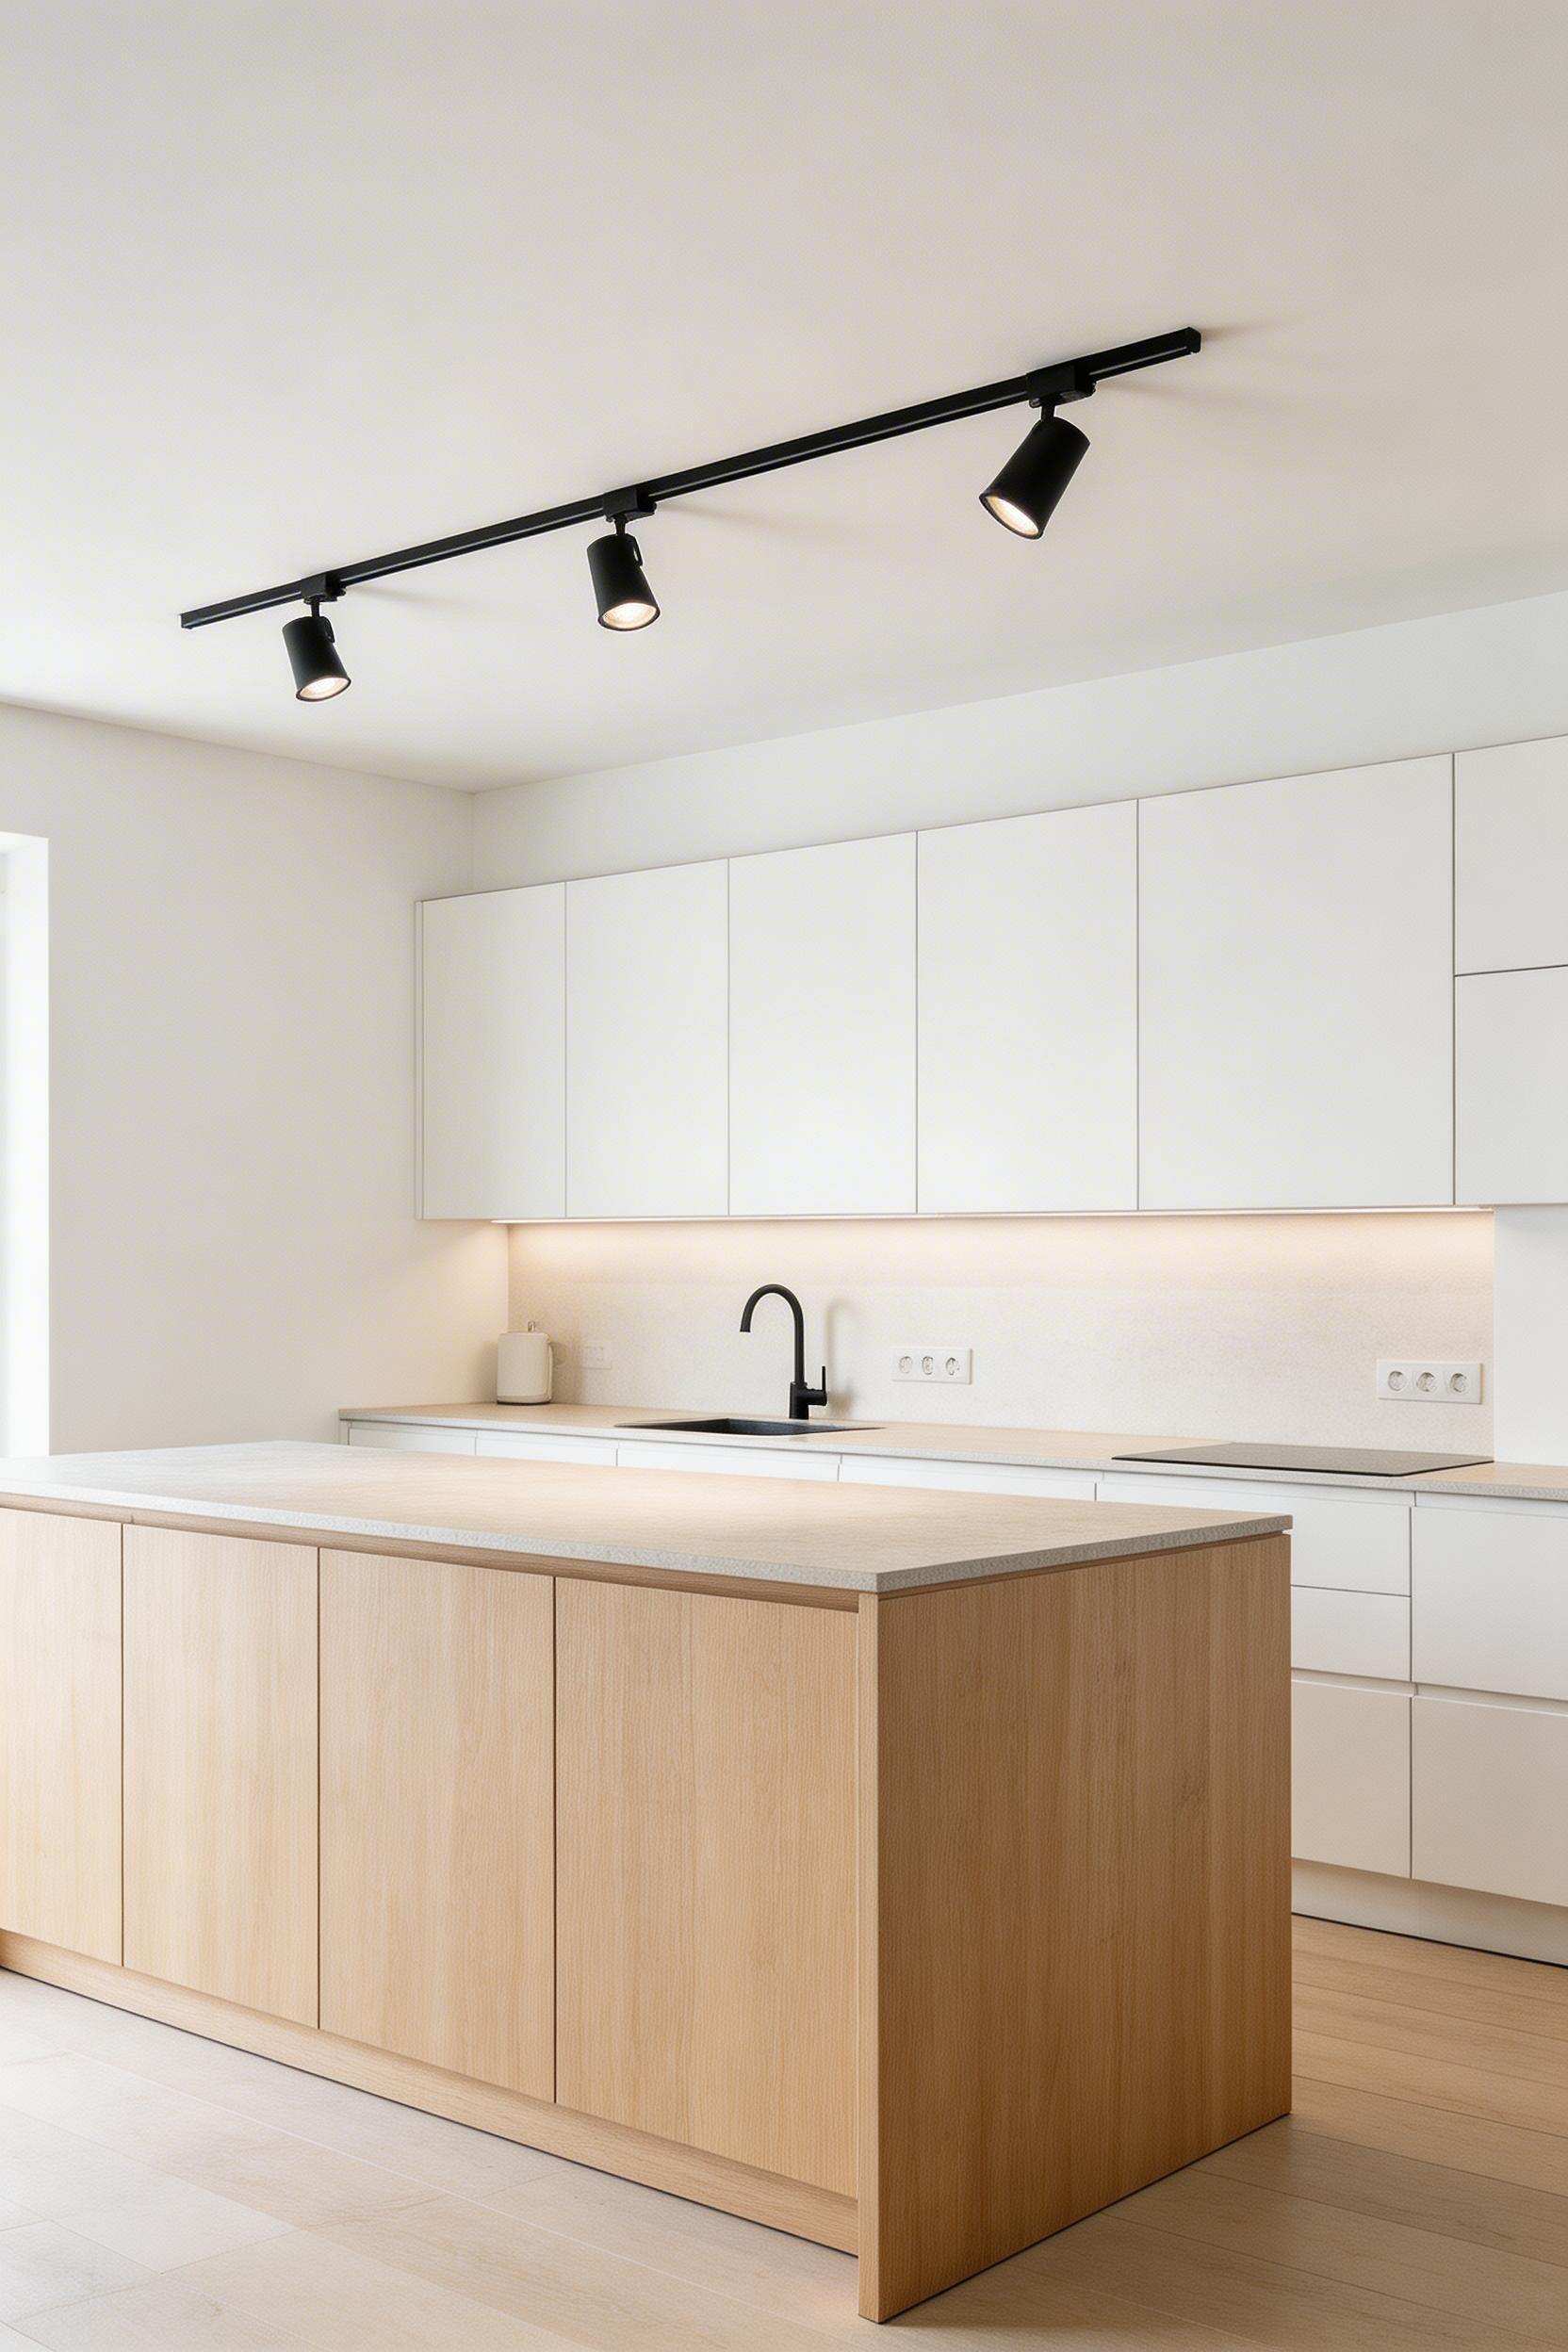
A single 6-foot track can replace 4–6 recessed fixtures and requires only one ceiling junction box. Adjustable track heads can be repositioned after installation — useful in kitchens where the layout or furniture arrangement might change. Slim-profile systems, like Astro Lighting’s Ascoli range or Flos Architectural’s My Spot, have a rail diameter of 2cm or less. They sit very flat against the ceiling.
Track heads are now available not just as directional spots but as pendants, small drum shades, and even decorative bare-bulb options. Position the track parallel to — and about 18 inches out from — the primary work counter. Angle half the heads toward the counter for task light. Point the rest toward the ceiling for ambient fill. According to LD+A Magazine, adjustable track systems have seen a 34% increase in residential specification over five years. They are primarily replacing fixed recessed grids in open-plan kitchen renovations.
Toe-kick lighting is one of the kitchen lighting ideas that most guides skip, and I understand why. It is hard to explain the impact until you have seen it. The toe-kick space at the base of cabinets (typically 100–150mm tall and 50–75mm deep) is almost always left empty. Adding an LED strip here, facing outward and slightly downward, creates a floating appearance. The cabinets appear to lift off the floor, and the room reads with more depth and drama.
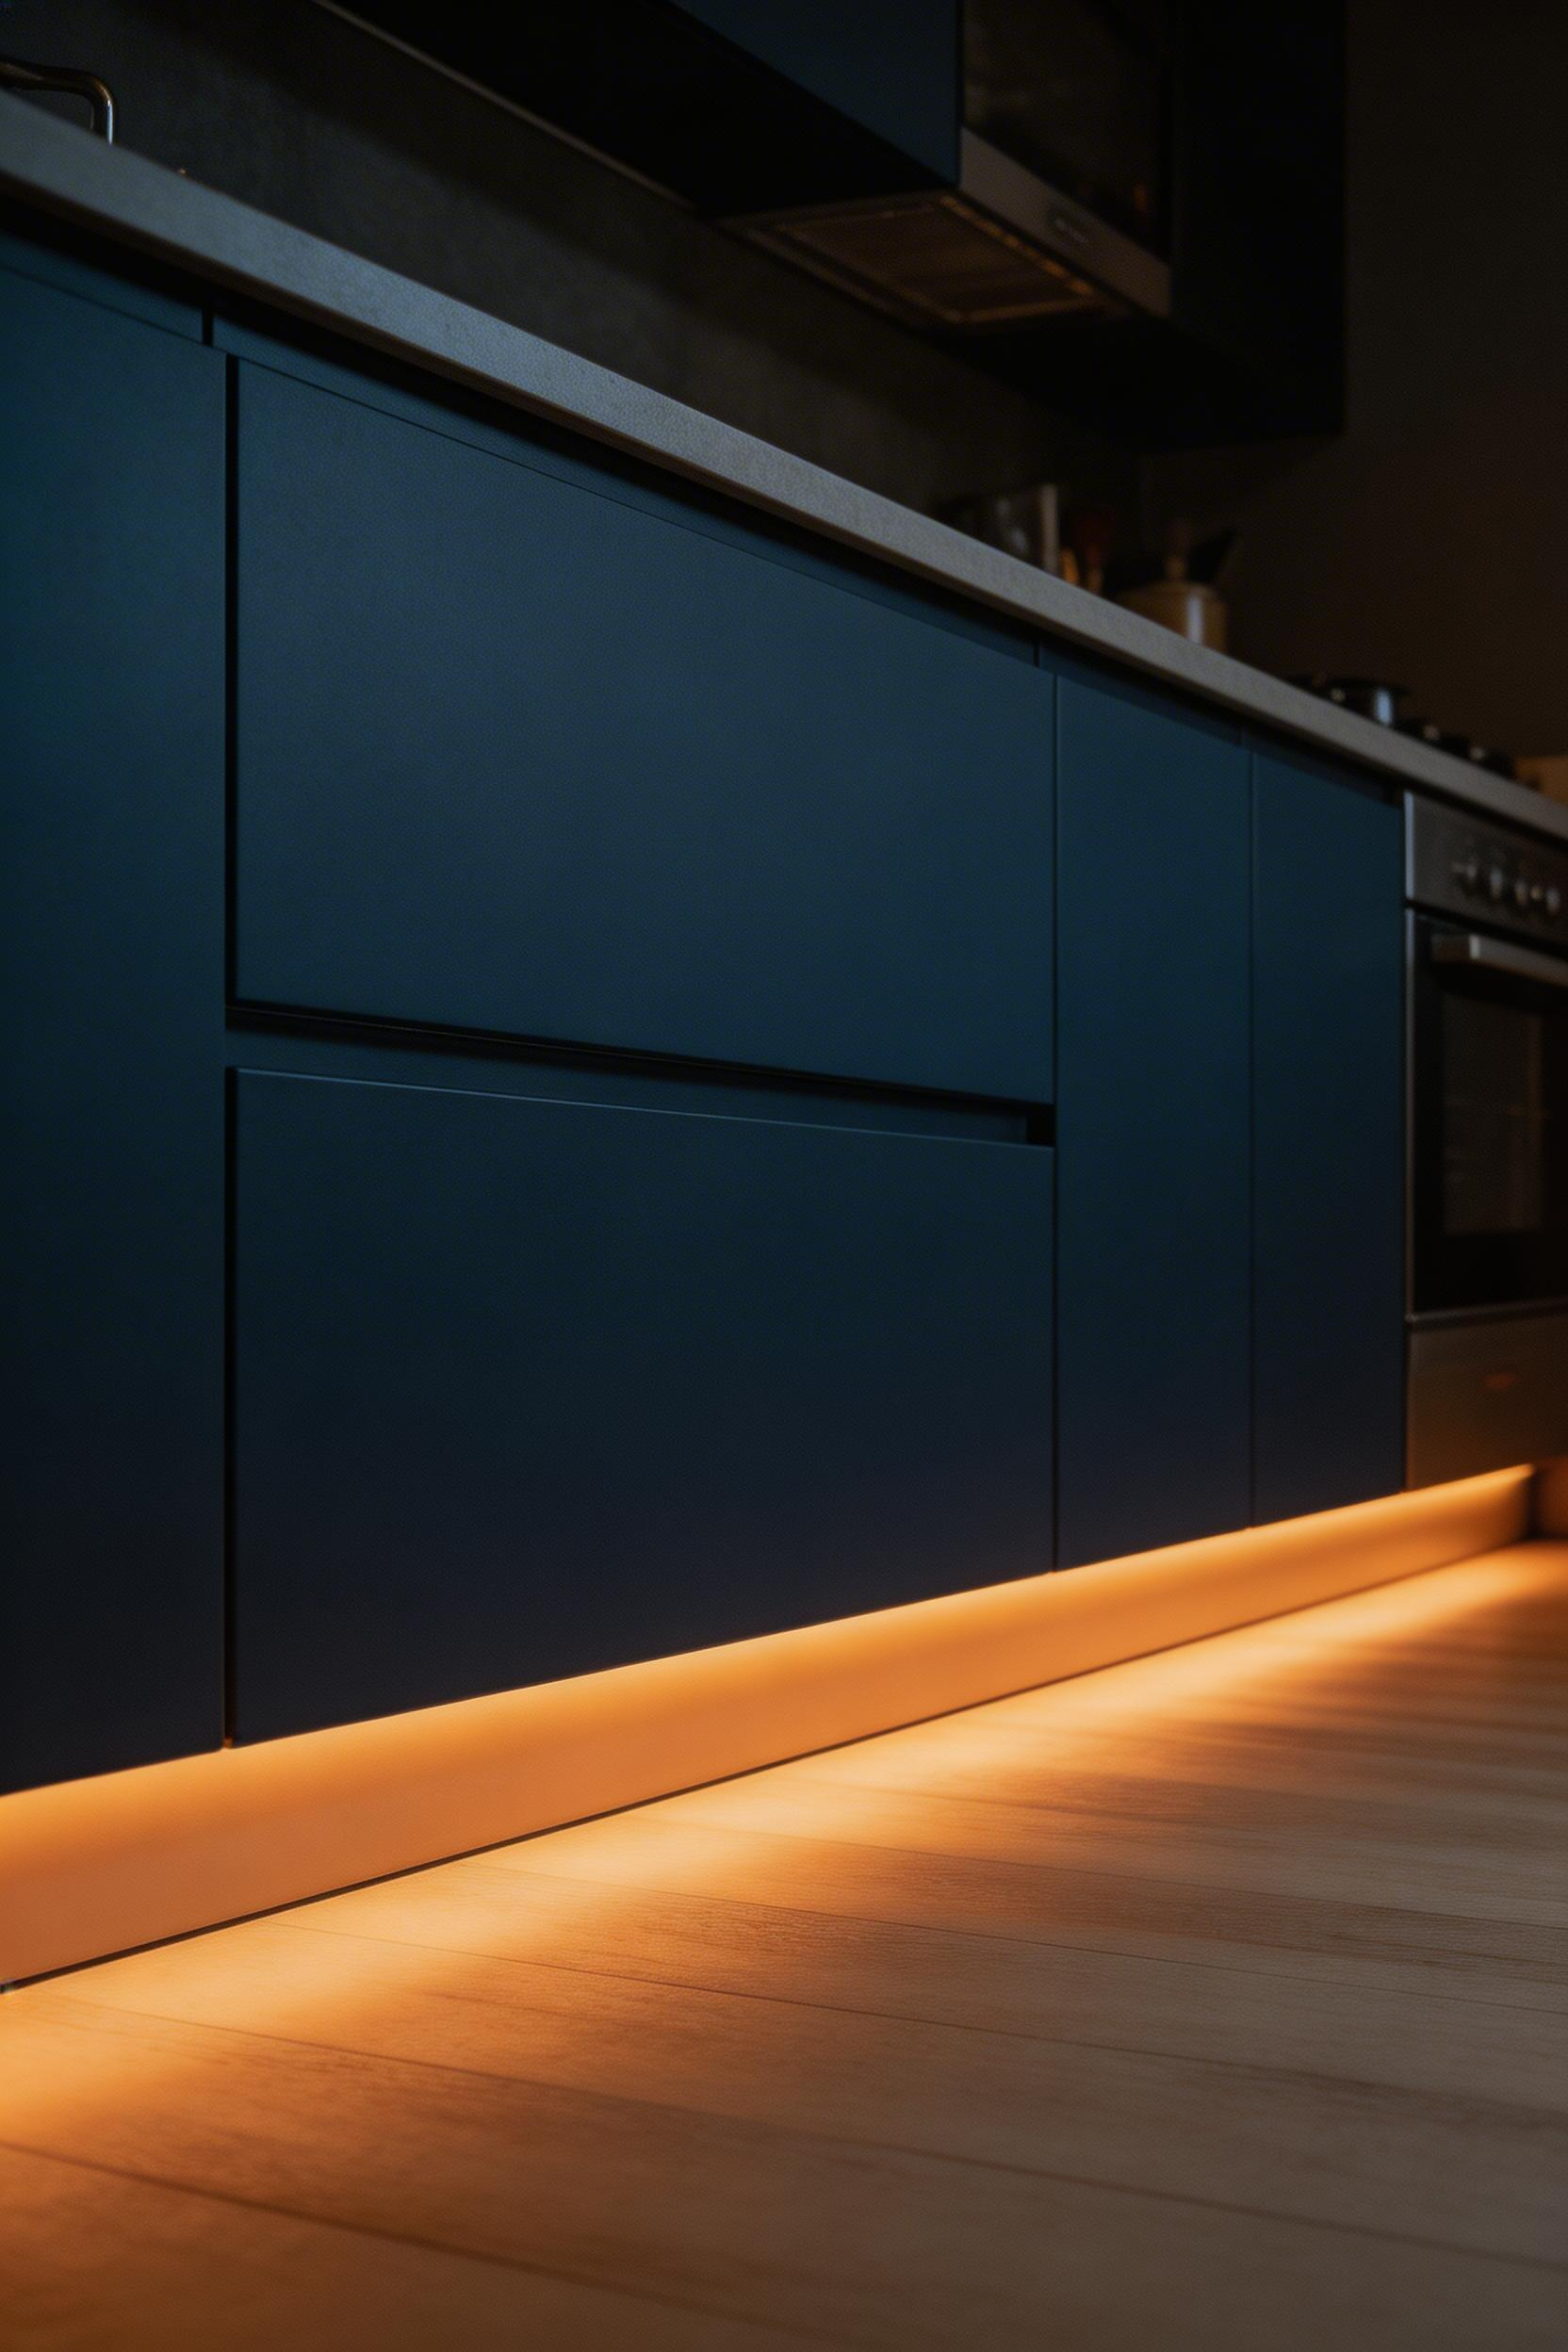
This technique is most effective in mid-tone and dark cabinetry — navy, charcoal, forest green, black. In a white or cream kitchen, the contrast is lower and the effect more subtle, so I would prioritise it for darker finishes. At night, with ambient overhead lights dimmed, the toe-kick strip also provides safe navigation light at floor level — which is genuinely useful for the 2am kitchen trip.
Use warm white 2700K here without exception. An IP67-rated waterproof strip is worth specifying, particularly near the dishwasher end. Keep wattage low — 10W per 5-metre strip is sufficient. More power washes out the floating effect. Mount the strip at the back of the toe-kick channel, angled slightly downward toward the floor. And keep the driver inside a cabinet where it is accessible for future maintenance. This technique arrived in residential kitchens via Scandinavian and German kitchen catalogues in the mid-2000s, and is now standard in higher-spec ranges from Bulthaup and SieMatic.
Most people choose kitchen lighting by fixture style and forget about what actually comes out of the bulb. Colour temperature — measured in Kelvin — determines whether your kitchen looks warm or stark and clinical. This is true regardless of which fittings you choose. It is also the factor most often got wrong in DIY lighting updates.
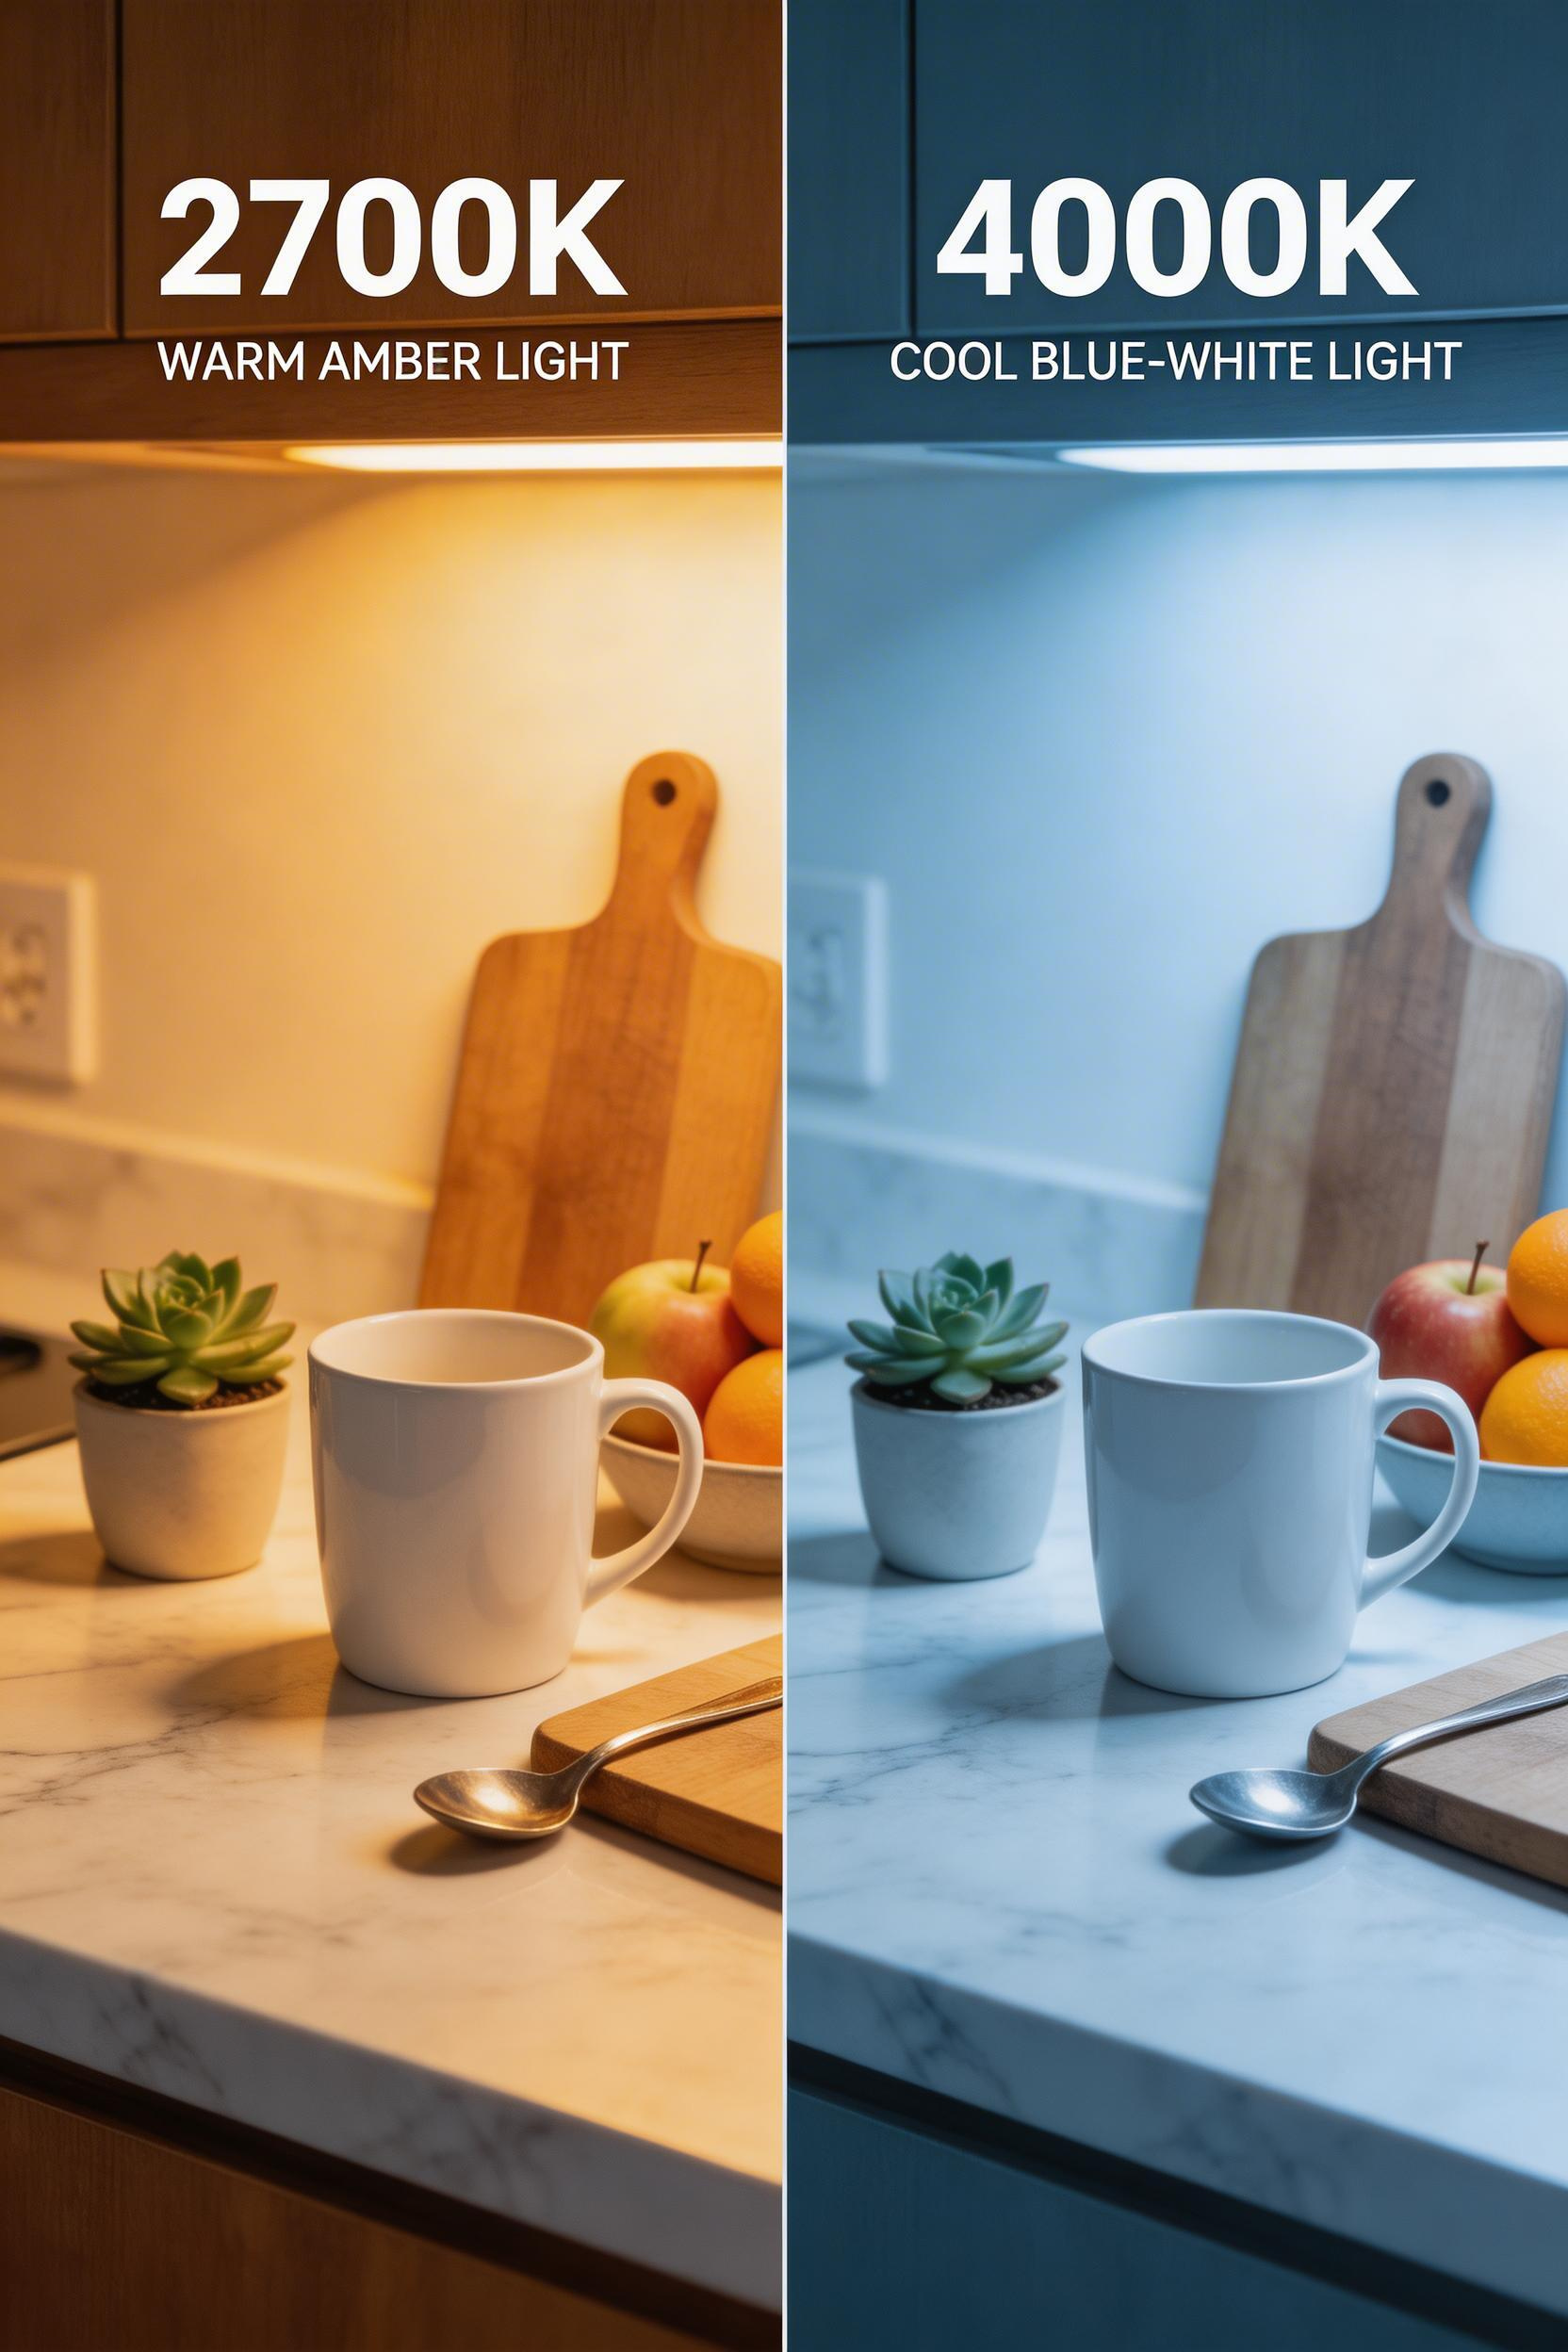
2700K is warm white — similar to old incandescent bulbs, cosy, flattering on faces and food. 3000K is soft white, slightly crisper, good for task zones in an otherwise warm kitchen. 4000K is cool/neutral white — clear and functional, fine in a commercial kitchen, but often too clinical for residential use. 5000K and above is daylight — appropriate for workshops and offices, rarely for home kitchens.
For practical kitchen lighting ideas, I specify 2700K for islands, dining areas, and accent layers. For task zones (over the hob and sink), 3000K is a useful step up — fractionally crisper while still warm enough to feel right. Research in the Journal of Sensory Studies (2019) found that diners rated food presentation 14% higher under 2700K warm white compared to 4000K neutral white. The food was identical in both cases. Also, always choose CRI 90+ regardless of Kelvin — a warm-white bulb at CRI 75 can still make food look flat and grey.
If you are looking to rethink your kitchen light fixtures, start with colour temperature first. Swapping out existing bulbs for the right Kelvin is the cheapest and highest-impact change before spending on new fittings.
Smart controls are among the kitchen lighting ideas sometimes dismissed as a gadget purchase — but genuinely useful when implemented correctly. The reason is not the voice control or the phone app. The reason is scene presets: named configurations that set multiple fixtures to specific levels at once. Transitioning from cooking to dining to cleaning requires one tap rather than adjusting four separate dimmers.

Cooking scene: task lights at 100%, ambient at 70%, accent off. Evening scene: task at 40%, ambient at 25%, island pendant at 60%. Cleaning scene: everything at 100%. These three cover 95% of kitchen situations. The honest truth: most households set up two or three scenes and ignore the rest. Keep the configuration simple.
For reliability, hub-based systems are more stable than Wi-Fi-native bulbs. Lutron Caséta starts at $179 for a starter kit; Philips Hue Bridge is £54.99. Both handle router restarts without dropping connections. Smart dimmer switches controlling whole circuits are more practical than individual smart bulbs. They work with any lamp type and maintain physical switch function even if the hub goes offline. A system that requires the router to be working before you can turn on the light is not a good kitchen system. A 2024 Parks Associates report found smart lighting has an 83% continued use rate after 12 months — the highest retention of any smart home category. Kitchens are one of the two most common first installations.
Wall sconces are rarely used in kitchens, and that is exactly why they work so well when they are. Two matching sconces flanking a kitchen window or range hood add a layer of decorative warmth that neither pendants nor recessed lights can replicate. The light comes from a mid-height position on the wall — a different angle than any ceiling source.
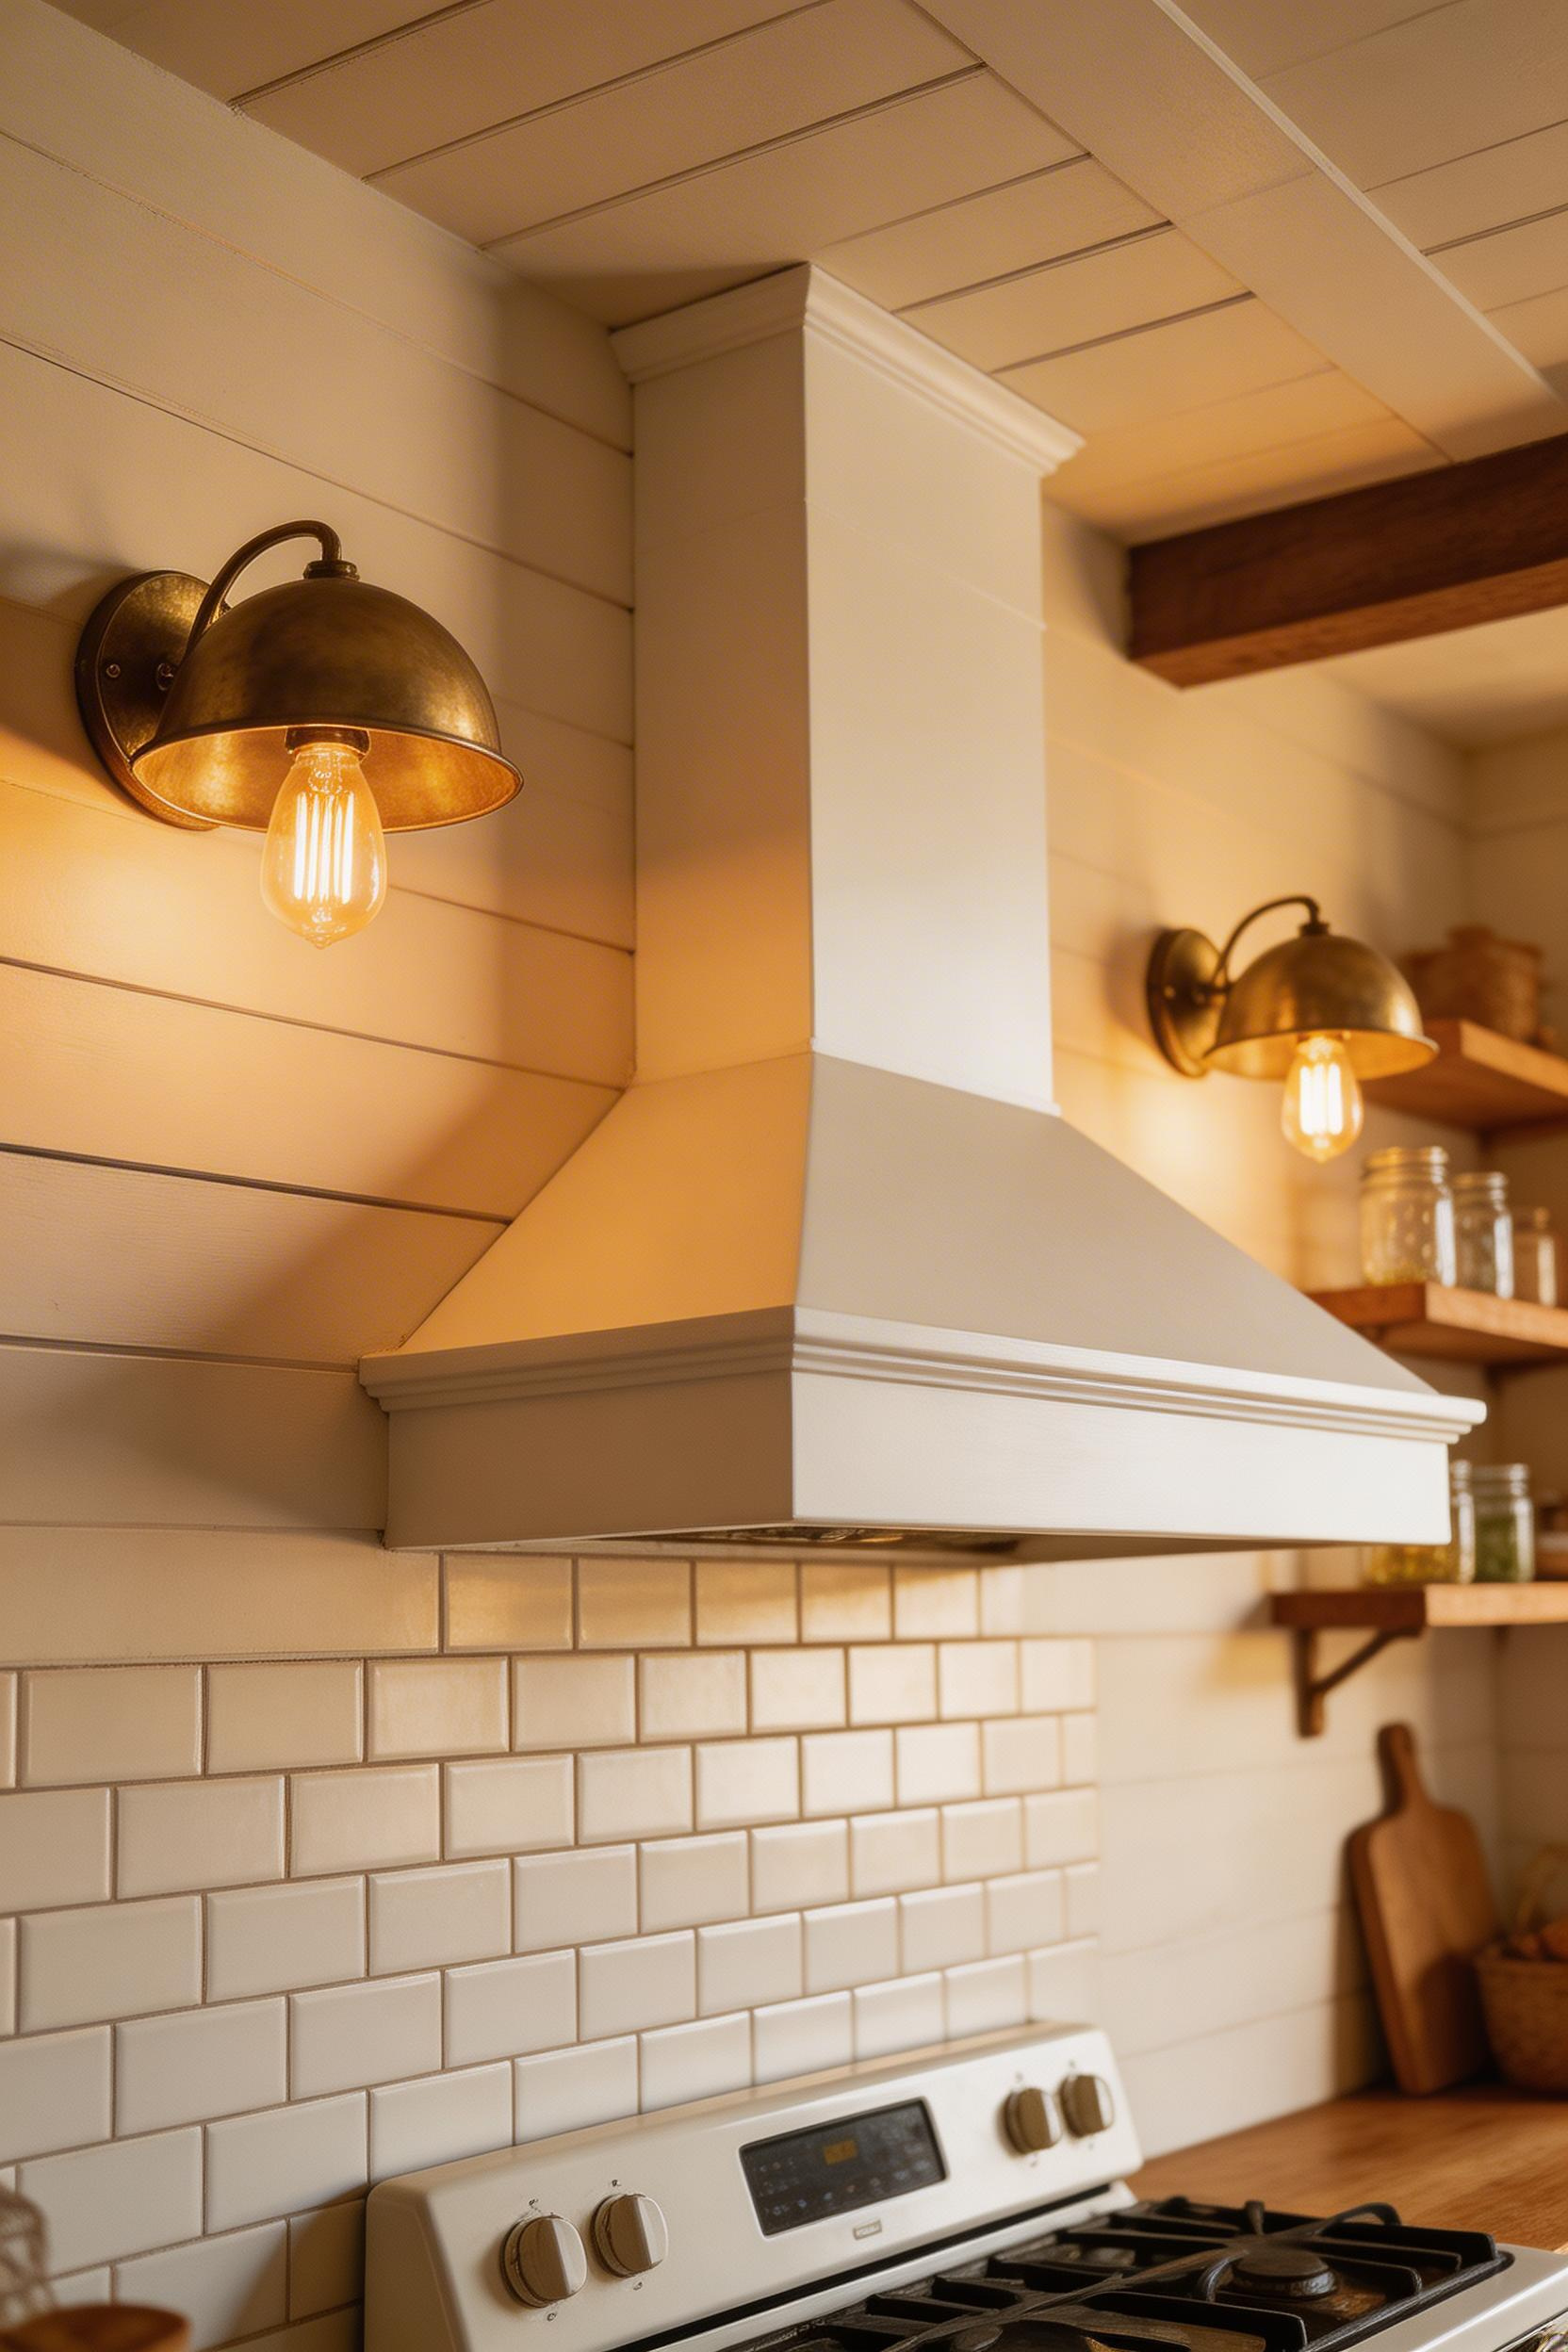
Flanking a window keeps the window wall well-lit after dark — particularly valuable in north-facing or small-windowed kitchens where the absence of natural light is most felt in the evenings. Flanking a range hood creates a focused cooking alcove feel that suits alcove and galley kitchens especially well. Mounting height should be 5.5–6 feet from floor to fixture centre.
Hardwired installation requires in-wall cable routing — plan this during renovation if possible. Plug-in sconces with fabric-covered cable are a legitimate retrofit option, not a compromise. The John Lewis Hove Plug-In Wall Light (£45–£65) is a good example — the cord becomes part of the detail. The best installation I have done was two aged brass half-dome sconces flanking a simple casement window in a galley kitchen, with 2200K Edison filament bulbs. It went from purely functional to genuinely atmospheric with two holes in the wall and a couple of hours of work. According to Architectural Digest’s 2023 kitchen trend report, wall sconces in kitchen features increased 41% between 2019 and 2023. That reflects the broader move toward layered, hospitality-influenced kitchen lighting ideas.
A kitchen with an eat-in area or breakfast nook needs its own lighting moment. When the recessed grid extends without interruption into the dining area, neither zone has its own identity. A single pendant over the nook table solves this. It defines the space, draws attention to the dining area, and adds warmth that overhead lighting alone never achieves.
For a 36-inch (90cm) round table, a 16–20 inch diameter drum pendant is well-proportioned. Hang the bottom of the pendant 30–34 inches above the table surface — low enough to feel intimate, high enough to see across the table comfortably. For a rectangular nook table (say, 30 x 48 inches), a single large drum works better than two small pendants. It avoids precise symmetrical spacing and suits the relaxed nature of a breakfast nook.
Choose a drum shade in a material different from your main island pendants. If the island has glass pendants, try a woven rattan drum for the nook. If the island has industrial steel cones, a linen drum shade adds warmth. The intentional contrast signals that the two zones serve different purposes, which is exactly the effect you want. The NKBA’s 2023 Design Trends Survey found that 73% of new kitchen designs include an eat-in island or nook, up from 55% in 2018. That makes dedicated nook lighting one of the kitchen lighting ideas with the most immediate relevance.
This is the foundation of every kitchen lighting scheme worth having. Ambient light fills the room and removes deep shadows — recessed downlights, a semi-flush ceiling fixture, or above-cabinet indirect strips. Task light puts functional illumination where you need it. This means under-cabinet strips, island pendants positioned low enough to actually light the work surface, and the cooker hood’s integrated light over the hob. Accent light adds depth and character — interior cabinet strips, toe-kick lighting, and sconces.
Each layer must be separately switchable and separately dimmable. This requires a minimum of three circuits planned at the first-fix wiring stage of a renovation. If you are working post-renovation, add plug-in under-cabinet and above-cabinet strips as independent circuits. It is not a perfect solution, but it is meaningfully better than a single switch.
In Nordic kitchens, the daily sequence runs like this: ambient at 100% during morning prep, dropping to 50% through the day. Task lighting comes to full during dinner cooking. Then ambient drops to 20–30% with the pendant at 60–70% for the meal, and accent lighting carries the evening. That progression is only possible when the layers are independently controlled. A Cornell University study found that 78% of participants preferred layered lighting with individual zone control over single-source alternatives. If you are planning broader kitchen makeover ideas, redesigning the lighting circuits should be first on the list.
Edison bulbs — exposed decorative filament in a clear or smoked glass envelope — are one of the kitchen lighting ideas that divides opinion. Used poorly, they look like someone tried to recreate a coffee shop aesthetic and ran out of budget. Used well, they add genuine warmth and character that no other light source matches. The low-wattage filament glows at 2200K — noticeably more amber than standard warm-white LED.
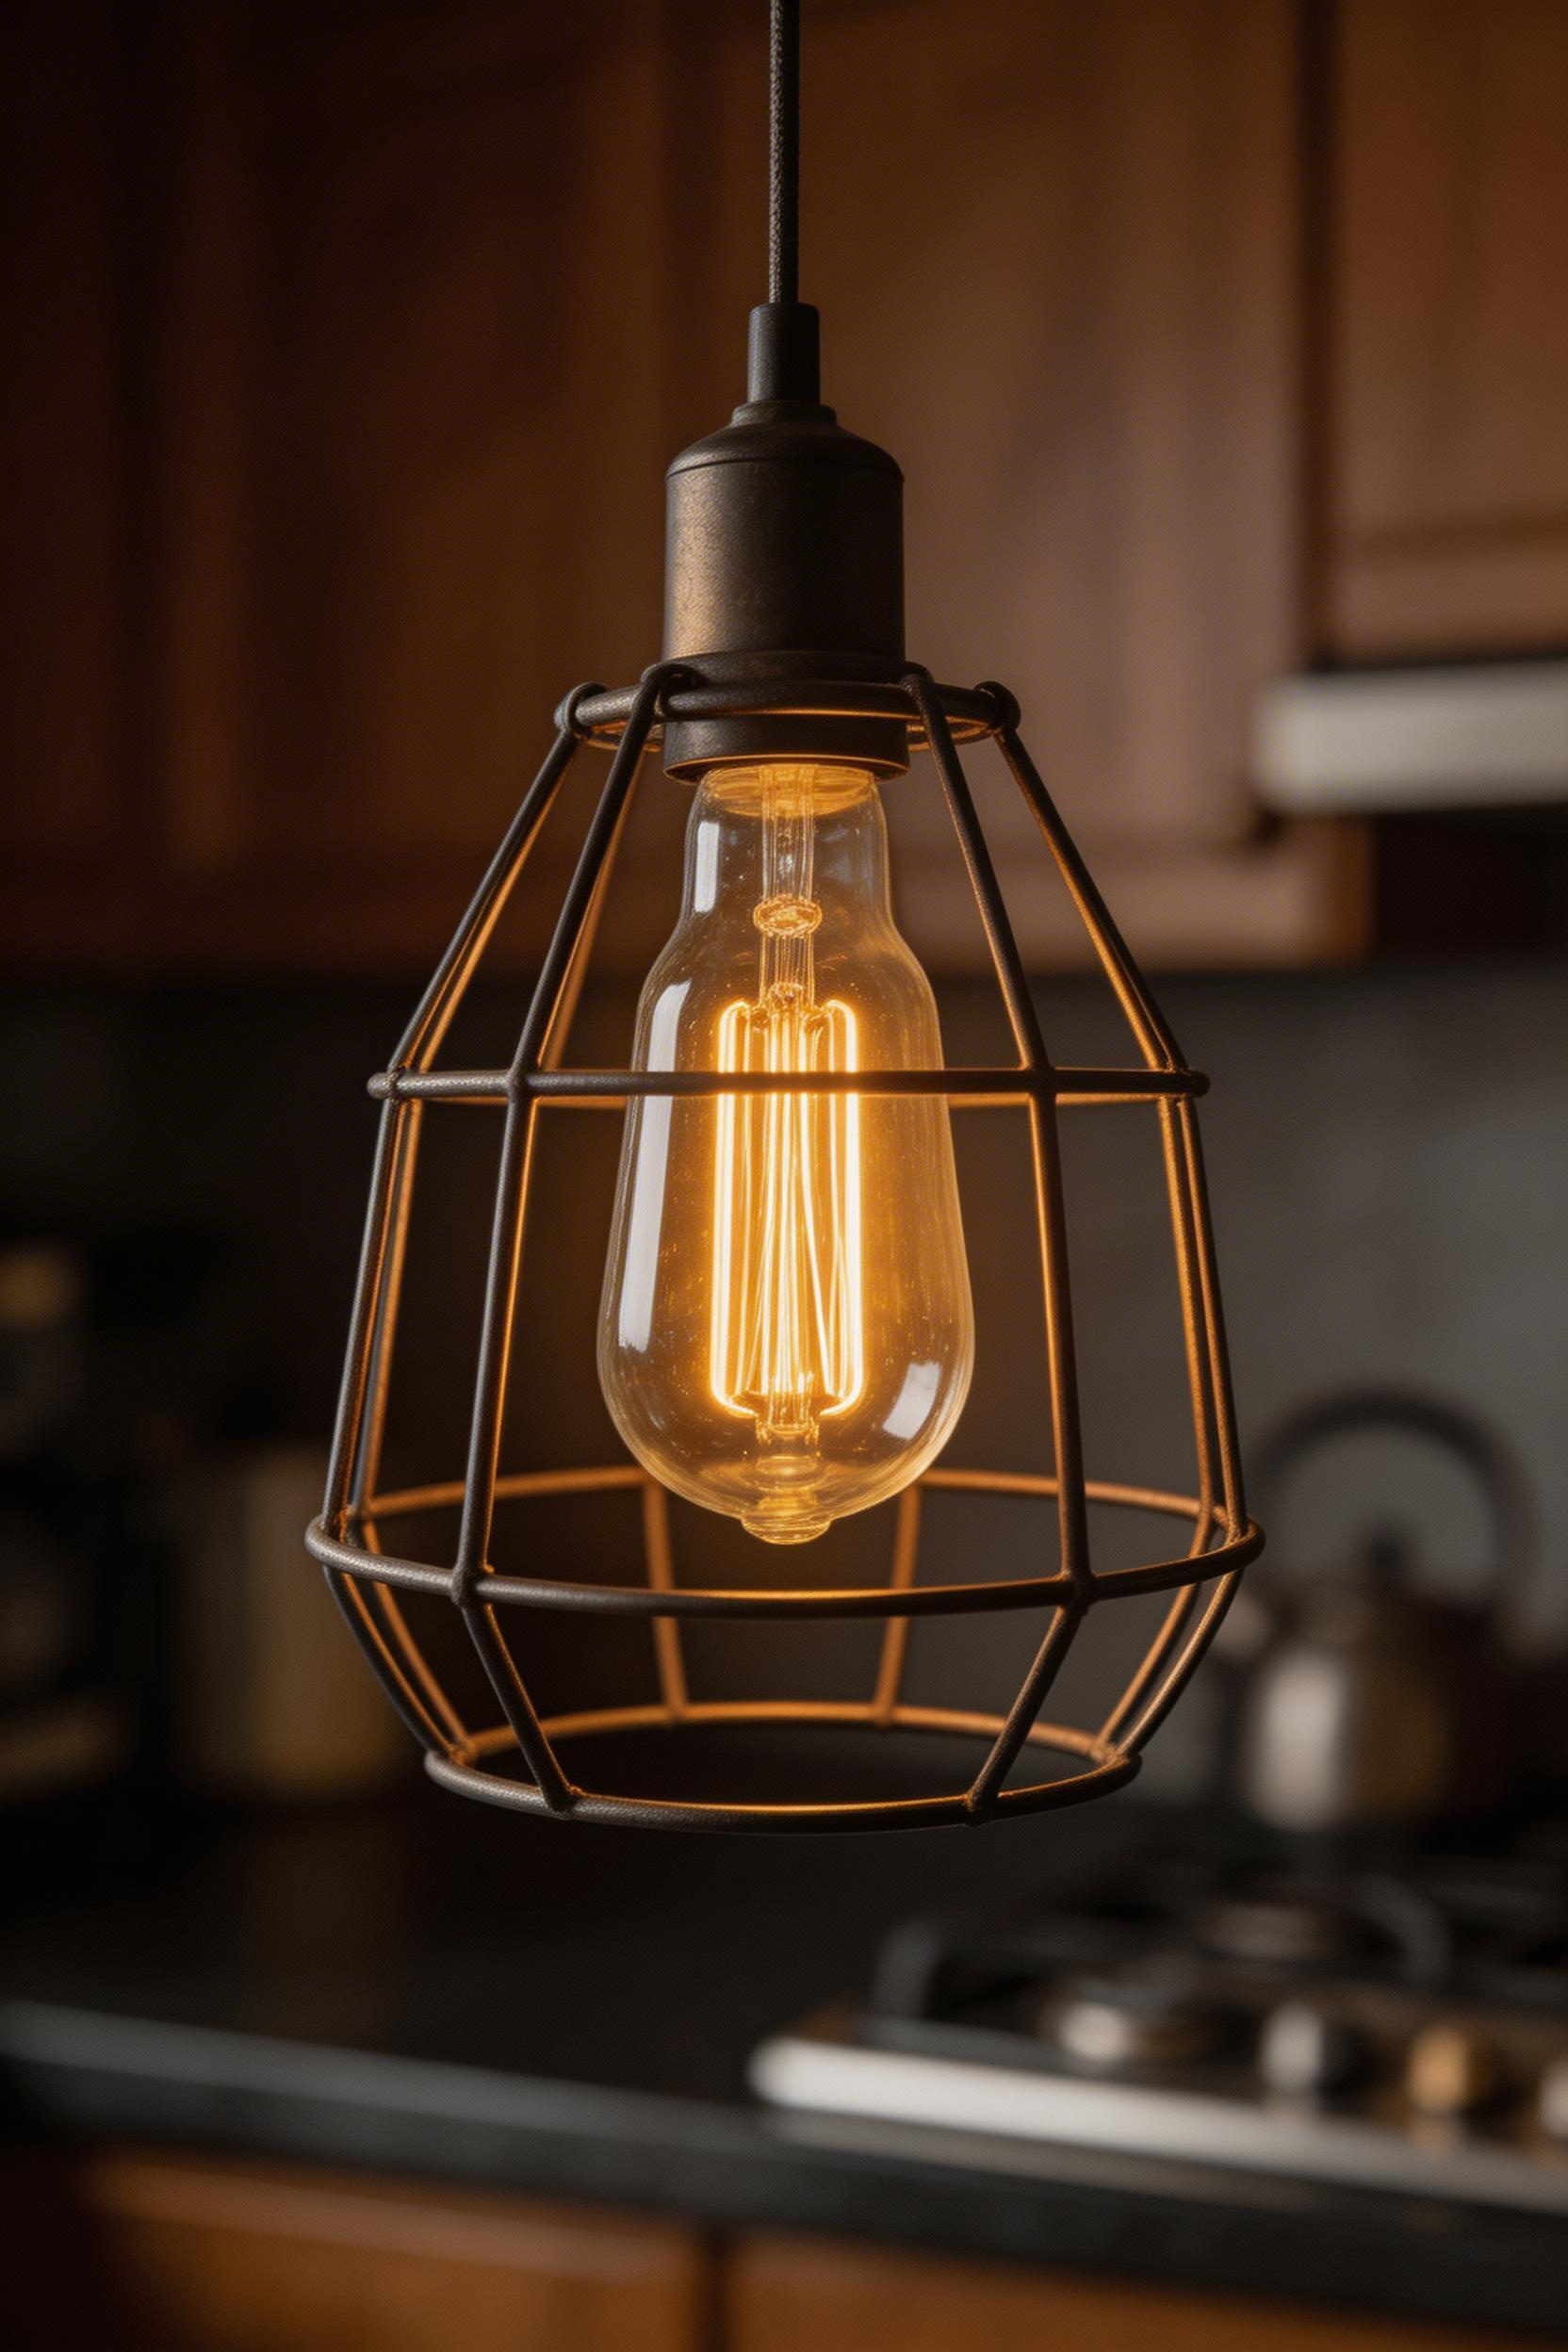
They work in open cage pendants, bare-bulb wall sconces, glass-front cabinet interiors, and dining nook drum shades where the warm amber tone suits the eating atmosphere. They do not work well as primary task or ambient sources. The lumen output is too low for island pendants or under-cabinet strips. You simply cannot chop vegetables safely by Edison bulb light alone.
LED filament bulbs — like the Calex Nostalgie E27 at 2200K or the Osram Vintage 1906 LED — are the current best option. They run cool, last 15,000+ hours, and are dimmable to a genuine low level. Clear glass gives full filament visibility; smoked or amber glass softens the glow and reduces glare from direct sightlines. The Lighting Industry Association reports that vintage filament LED bulb sales grew by 210% between 2017 and 2022. That growth is real — but so is the risk of overuse. My recommendation: use one or two Edison-style fixtures as deliberate accent pieces. Make sure every task surface has proper kitchen lighting behind it before you reach for the filament bulbs.
The most important insight from these 15 kitchen lighting ideas is also the simplest. No single fixture type can do everything. Recessed downlights alone create a flat, clinical result. Pendant lights alone leave the perimeter dark. Under-cabinet strips alone look like an afterthought. The combination of ambient, task, and accent layers — each independently dimmable — allows a kitchen to shift between its many different roles throughout the day.
Start with what you can control. If you can only make one change today, add a dimmer switch to your main ceiling circuit. If you are planning a renovation, insist on three separate lighting circuits from the first-fix electrician. And if you have space above the upper cabinets and a power source nearby, an LED strip for indirect uplighting costs under £30. It transforms the room after dark.
For most kitchens, the priority order is: circuits and dimmers first, under-cabinet task lighting second, island pendants third, and accent layers last. That sequence gets the highest practical return first. The more characterful decisions — sconces, Edison bulbs, toe-kick strips — come when the fundamentals are in place. If you are considering a broader kitchen cabinet colors overhaul alongside your lighting update, note that the two decisions interact. Darker cabinets benefit most from toe-kick lighting and under-cabinet contrast. Pale kitchens often gain more from warm pendants and above-cabinet indirect uplighting.