Physical Address
304 North Cardinal St.
Dorchester Center, MA 02124
Physical Address
304 North Cardinal St.
Dorchester Center, MA 02124
Authentic rustic bathroom designs with reclaimed wood, stone tile, clawfoot tubs, and heritage details. Expert tips from Rachel Blackwood on materials and sourcing.
The best bathrooms were never “designed” at all—they evolved. Walk into a 19th-century cottage in the English countryside or a 200-year-old farmhouse in Vermont, and you’ll find bathrooms where every element earned its place through necessity and time. A clawfoot tub wasn’t chosen from a catalog; it was the bathing vessel that worked. A vanity wasn’t matched to a designer palette; it was salvaged from the parlor and adapted. The brick walls didn’t announce themselves as rustic. They simply were.
This is the secret of authentic rustic bathroom designs: they feel inhabited because they honor materials that have earned their character. Not decorative rusticity—the kind that fades after six months of real use—but structural rusticity. The kind where wood is sealed properly because it needs to be, where stone tile is chosen for durability as much as beauty, where fixtures follow period logic because that logic still works.
In my 12 years renovating and restoring historical homes, I’ve learned that the best rustic bathrooms begin with materials. The vanity you choose, the floor beneath your feet, the wall texture behind your mirror—these decisions ripple through every other choice. Get the foundation right, and accessories, lighting, and hardware fall into place naturally. Rush it, and you end up with a bathroom that looks styled rather than lived-in.
The seventeen approaches below move from the foundational (vanities, flooring) through the atmospheric (brick, beams, lighting) to the refined (textiles, art, hardware). Each one includes the specific, concrete details you’ll need—brand names, dimensions, sourcing strategies, installation realities—because vague inspiration is useless. Rustic design is in the details.
Reclaimed wood carries something new wood simply cannot: a hundred years of being itself. The hand-hewn surface, the nail holes, the grain color that comes only from generations in a barn—these are architectural biography. When you run your hand across a reclaimed wood vanity, you’re touching the actual history of the timber.
Old-growth wood—harvested before 1900 in most regions—has dramatically different properties than modern lumber. Heart wood density from century-old trees runs two to three times harder than contemporary softwoods. The grain is tighter, the color richer. A reclaimed barn beam was never chosen for beauty when it was a structural member; it endured because the wood was genuinely superior. When it becomes your vanity, that durability becomes your advantage.
The challenge is sealing it correctly. Bathroom moisture demands that you think seriously about finish. Tung oil creates a natural, matte appearance but requires three to four coats and yearly reapplication—ideal if you want to observe the wood aging further. Marine varnish from brands like Interlux or Epifanes offers 10-plus years of durability with a high-gloss finish and UV protection, though the shine reads as too modern for some spaces. Additionally, epoxy sealers (West System, MAS Epoxy) create a waterproof barrier that’s excellent for undermount sinks and water-exposure areas. The choice depends on whether you want to seal the wood against all moisture or allow it to continue developing patina over time.
Sourcing reclaimed wood matters tactically. Habitat ReStore locations, regional architectural salvage yards, and specialized dealers stock barn beams at $3–8 per board foot and old flooring at $2–5 per square foot. You’ll encounter wider boards, irregular thickness, and genuine character—but you’ll also encounter surprises like hidden nails or insect damage. Budget time for inspection and planning before you commit. A salvage vanity that’s 48 inches wide with visible grain runoff is not the same as a designed piece; it’s the opposite, intentionally.
Dimension matters. Standard bathroom vanities run 21–24 inches deep and 30–36 inches tall. Reclaimed wood is rarely sized to these standards. A Victorian-era dresser conversion (common for farmhouse bathrooms) typically runs 28–36 inches wide, which works fine for most bathroom layouts. Colonial and Federal pieces are narrower and often have less accessible understructure for plumbing. Eastlake-style dressers from the 1880s–1910s, by contrast, are often beautifully proportioned for conversion—around 36–42 inches wide with plenty of interior depth.
The final step is sealing all undersides and edges. Before your vanity is installed on a properly braced 2×4 frame, seal the bottom with epoxy or silicone. Seal the cutout edges around the sink opening. Seal the plumbing holes. This is tedious and invisible, but it’s the difference between a vanity that lasts 15 years and one that rots in six.
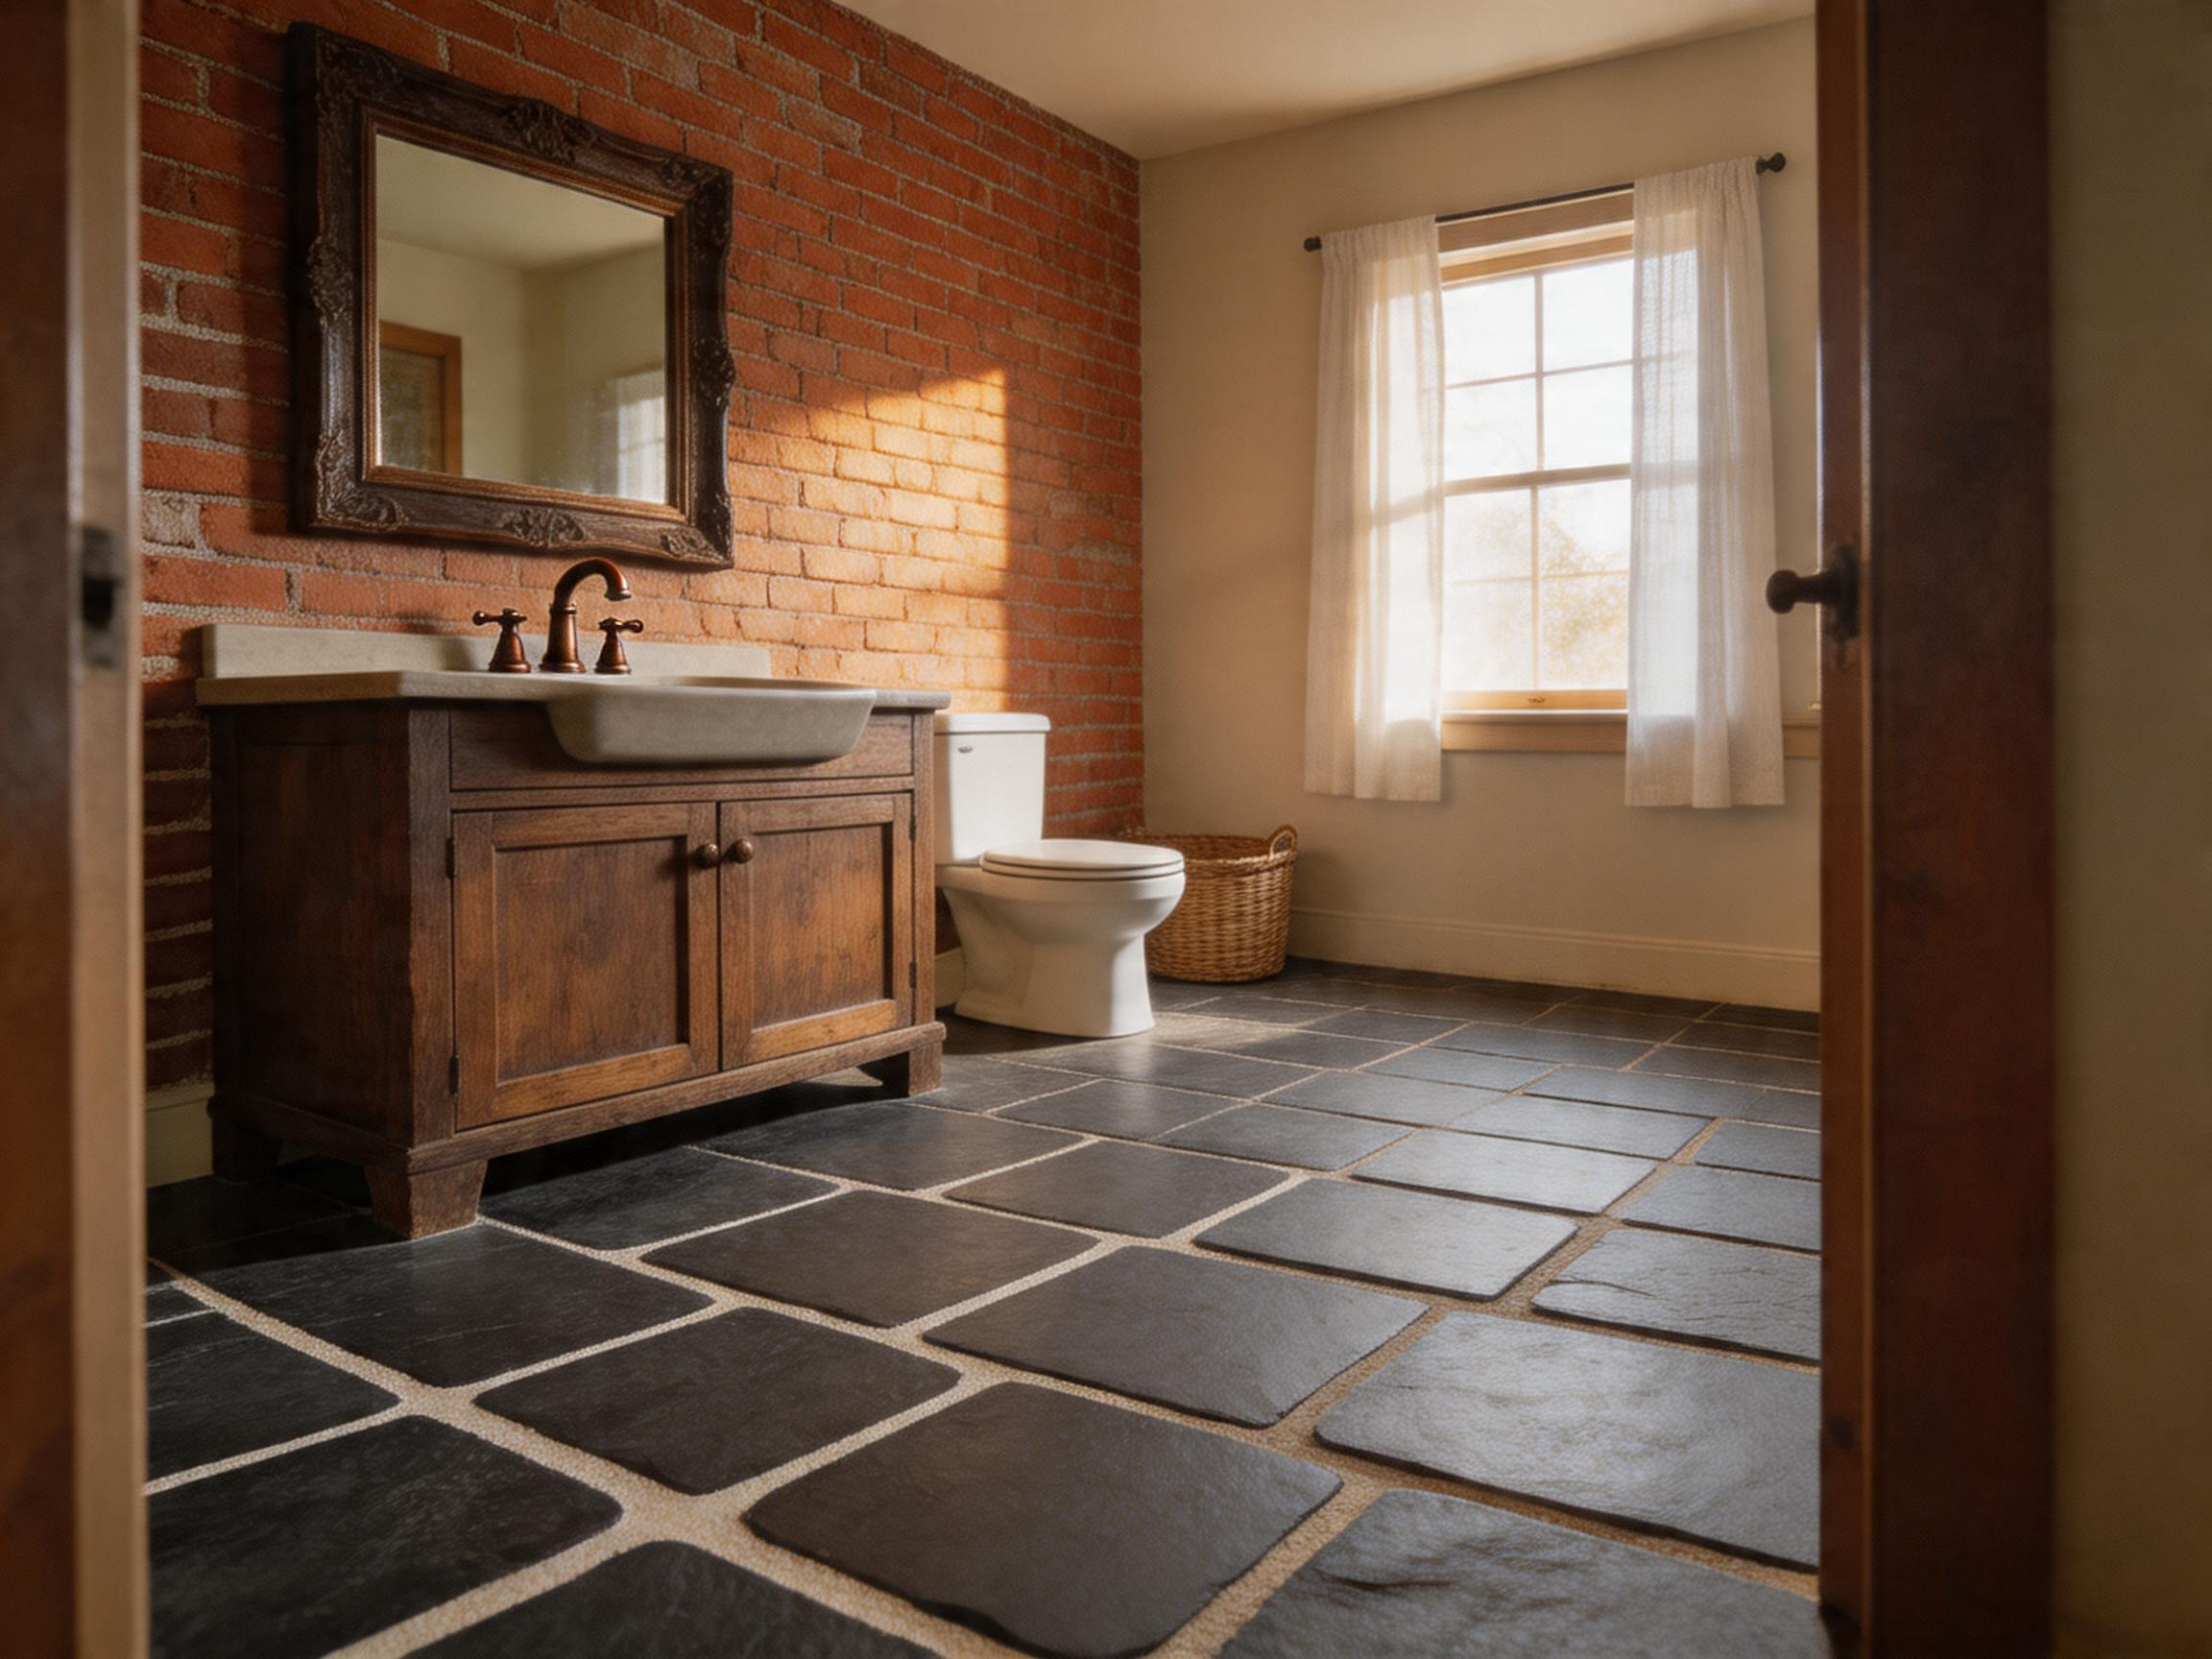
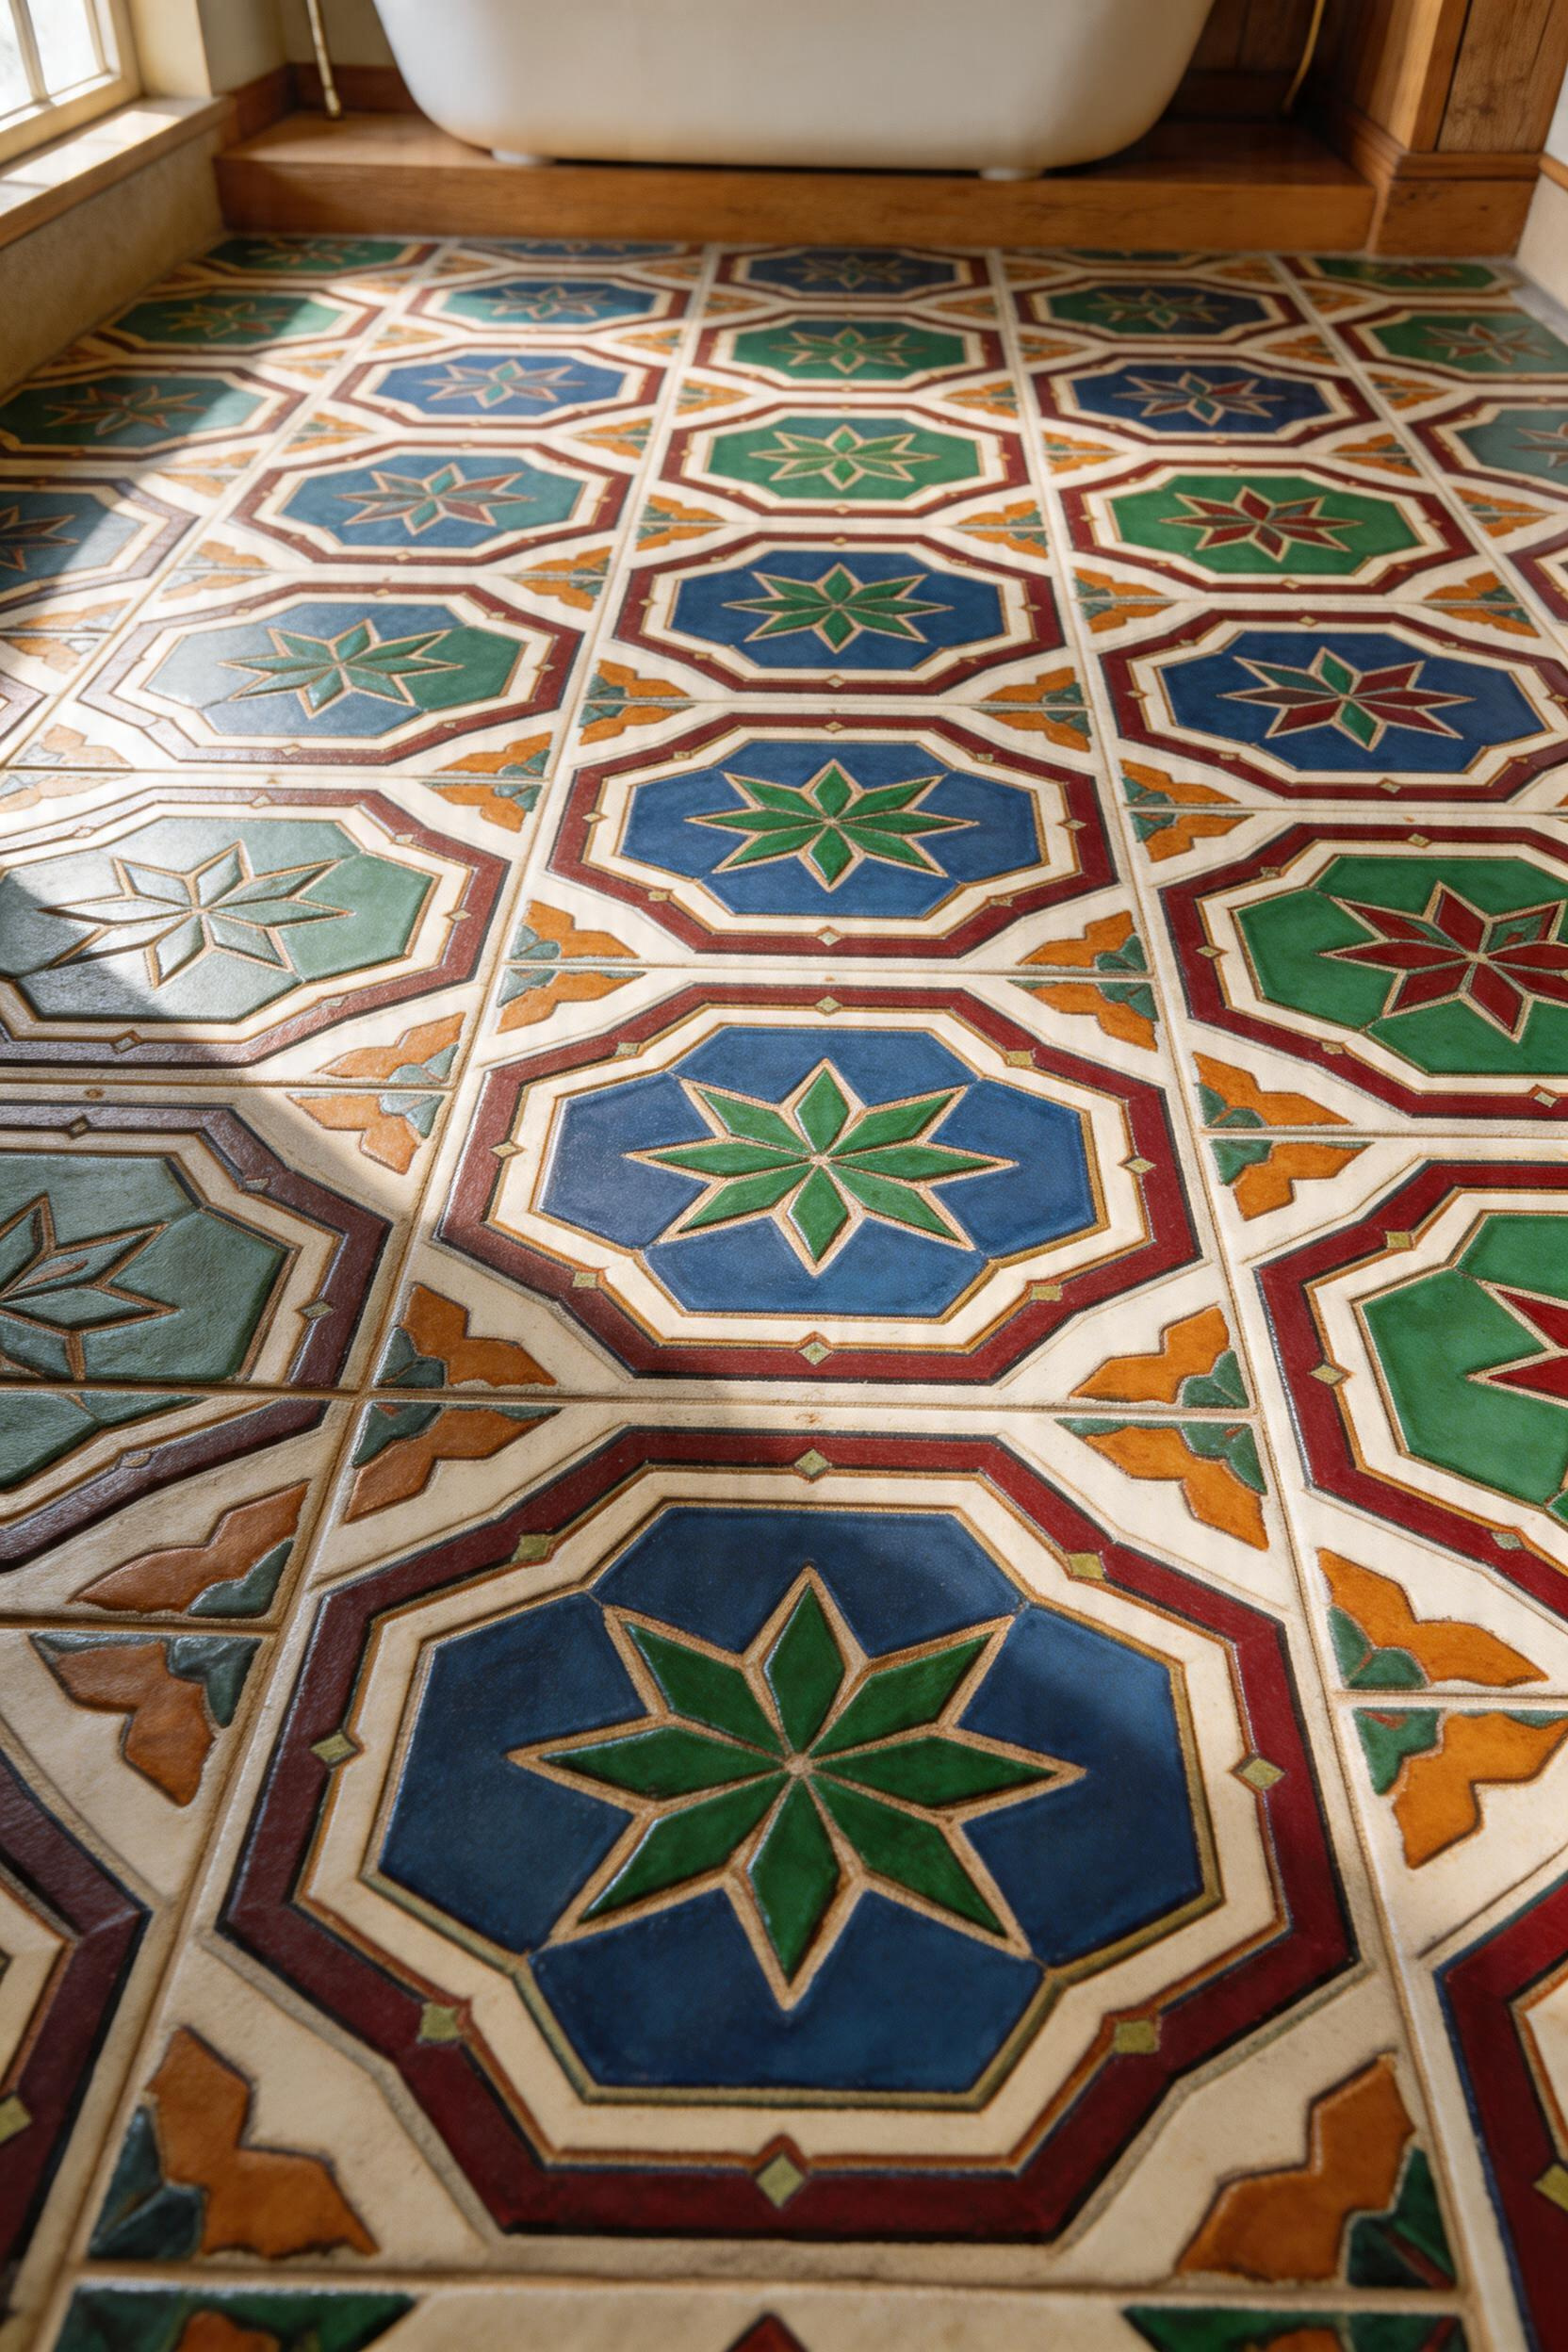
A slate floor at 300 years old is more beautiful than it was at 30. This is not true of most materials. Limestone softens and gains patina. Travertine’s naturally porous surface accumulates warmth from use. These materials were built for bathrooms by virtue of being built for time.
The stone species matters intensely. Slate splits naturally into thin sheets, rates 7 on the Mohs hardness scale, and comes in grey and charcoal tones that ground a bathroom visually. Travertine (Mohs 4.5) is porous, comes in creams and golds, and costs $4–10 per square foot installed. It demands sealing but rewards you with a softer, warmer aesthetic. Limestone (Mohs 3–4) is even softer and more elegantly light, ranging from cream to pale beige. Flagstone is irregular thickness, rustic-edged, and multi-toned—the most forgiving material for imperfect installation.
A critical distinction splits stone aesthetic: honed versus polished. Honed finishes are matte, naturally slip-resistant (a Rz rating of 0.8–1.6 micrometers—measurements matter in bathrooms), and show fingerprints less readily. They cost $1–2 more per square foot but deliver the rustic aesthetic directly. Polished finishes are glossy, display veining beautifully, but become slippery when wet—a genuine safety concern in bathrooms. A brushed finish sits between these, offering slight texture and slip resistance while hiding wear.
Grout is never merely cosmetic. Wide grout joints (1/2 inch rather than 1/8 inch) create the traditional farmhouse aesthetic—the individual tiles remain defined, the floor feels assembled rather than seamless. Grout color shapes visual weight: light grey grout expands space; charcoal or black grout creates definition and hides staining. Moreover, epoxy grout resists bathroom moisture better than traditional mortar but costs two to three times more and requires skilled installation.
If you’re considering radiant floor heating (a genuine luxury in a rustic bathroom), check compatibility. Slate and dense limestone work fine. Travertine requires testing due to its porosity, and some exotic stones can fracture with temperature cycling. Verify with your heating system installer.
The practical truth: stone tile is the foundation of bathrooms that feel authentic. It demands respect during installation and sealing but rewards you with decades of deepening character.
A clawfoot tub is an act of confidence. It declares: I’m not hiding this fixture. It occupies space. It weighs 300–500 pounds. And yes, you need to plan structurally for its arrival.
The original cast iron clawfoot tubs from pre-1950 are architectural artifacts. Hand-poured into molds, painted or glazed finishes applied by hand, these tubs have weight and presence. Weight matters: 375–500 pounds means your bathroom floor must have solid support. If you’re installing in a second-floor bathroom, you’ll need to verify that the joists can handle concentrated load. A structural engineer’s assessment costs $300–500 and is money wisely spent.
Modern reproductions from makers like Victoria & Albert and Barclay are genuinely excellent. These cast iron tubs run $2,500–5,000 retail, weigh 350–450 pounds, and offer contemporary comforts (modern drain positioning, factory-smooth interiors) with period aesthetics. Vintage original clawfoots, sourced from architectural salvage, run $800–2,500 on the secondary market, though they may require $500–1,500 in recasting and refinishing to be bathable. The calculation is personal: Do you want the provenance of genuine Victorian iron, or the reliability of a modern cast in period form?
Tub styles multiply. A roll-rim tub (traditional) has a rolled top edge, runs 54–72 inches long, and requires an 8×10 minimum floor space. A slipper tub slopes the back end upward, fitting smaller footprints, and is designed for single-person soaking. Double-ended tubs have two high ends, run 60–72 inches, and demand an 8×12 minimum space—luxury territory. Claw feet themselves come in paw varieties or ball-and-claw styles and run $500–1,500 for a set in cast iron, or $200–600 in brass or chrome.
The pairing with fixtures is not negotiable for period authenticity. A floor-mount faucet is essential; a wall-mount completely breaks the rustic spell. Brands like Delta (their oil-rubbed bronze RP24156), Kingston Brass, and Kohler’s Revival collection offer faucets in period finishes. The faucet spout should arc 8–10 inches above the tub rim for comfortable filling. Oil-rubbed bronze, brushed brass, and aged chrome are the right choices; polished chrome looks aggressively modern.
Visible pipe—exposed copper 1/2-inch supply lines running from the wall to the tub—adds authenticity rather than detracting from it. Your plumber will understand. Pair this with an elevated overflow drain (some original clawfoots have the drain on the rim itself, a period detail), and your bathroom reads as intentional historical recreation.
Open shelving in a rustic bathroom is trust made visible. You’re saying: everything on these shelves is worth looking at. Which means the real work isn’t carpentry—it’s curation.
Floating wooden shelves require heavy-duty hardware. Wrought iron L-brackets in hand-forged styles run 8–20 inches deep and are rated for 50–150 pounds per pair, costing $100–400. Steel rod brackets (decorative 1/2-inch rods) are lighter and cost $50–200 but feel less substantial. Hidden brackets mount inside the shelves for a clean look and cost $80–300 per pair; they handle 100 pounds.
The wood itself matters. Reclaimed pine runs $8–15 per linear foot, and oak runs $12–20. Most reclaimed lumber comes in widths of 8–16 inches and 1.5–2 inches thick. This thickness is crucial: it makes the shelves read as permanent rather than decorative. A 1/2-inch MDF shelf looks flimsy. A 2-inch reclaimed oak shelf looks like it could hold history.
Styling open shelves is where most bathrooms stumble. The instinct is to display everything. However, 60 percent empty space is more visually restful than 60 percent full. Arrange items in odd-numbered groups (3 or 5, never 2 or 4). Vary heights—tall ceramic vessel in back, smaller items forward. Combine textures: ceramic, linen towels, woven baskets, plant pots in varying heights. The eye moves through a balanced composition, not a display case.
Sealing is critical. Marine varnish (three coats) protects against humidity for 10+ years but requires annual maintenance. Epoxy sealer (two coats) is more water-resistant, requires less frequent recoating, and costs $20–40 per gallon. Wax finishes are beautiful but softer and require quarterly reapplication. Recessed shelves—set into a wall rather than floating—offer better moisture protection. But even perfect shelves will suffer if they’re positioned within 3 feet of a shower or are directly exposed to spray. Ventilation matters: run your exhaust fan for 20 minutes after showers.
Exposed brick in a bathroom makes a different claim than shiplap or paint. It says: this room was built to last. Brick doesn’t pretend. It simply endures.
You have two paths: expose existing brick beneath plaster or drywall, or apply brick slips to a modern wall. Exposing existing brick is the genuine article. You remove the plaster layer (messy, destructive), assess the mortar (usually original lime mortar, which is soft and breathable), and tuckpoint with matching lime mortar—a 1:3 mixture of lime and sand. This labor-intensive work reveals the original texture and color but costs $15–30 per square foot in labor alone. It also exposes structural concerns: if the brick deteriorated, you’ll discover it.
Brick slips are 1–2 centimeters thick veneers mortared to a substrate wall. They’re faster, lighter weight, and work on non-brick walls. They cost $8–15 per square foot in materials. The disadvantage: they look slightly thin in section when viewed at angles. The advantage: they avoid structural assessment and work anywhere.

Sealing brick for bathroom moisture requires nuance. An impregnating sealer penetrates the brick and mortar, maintains texture, and is breathable (critical—it lets moisture escape rather than trapping it inside). Apply every 3–5 years. A surface sealer creates a glossy film that looks wrong on rustic brick and traps moisture, causing mold and efflorescence (white salt deposits). Choose impregnating sealer every time. Brands like TileLab and Fila make products specifically for bathrooms.
Lime mortar tuckpointing is historically correct and functionally superior for old brick. Portland cement is harder, absorbs moisture, and deteriorates historic brick over decades. Lime mortar is softer, more breathable, and works with the brick’s natural expansion and contraction. Find a mason experienced in historic lime work.
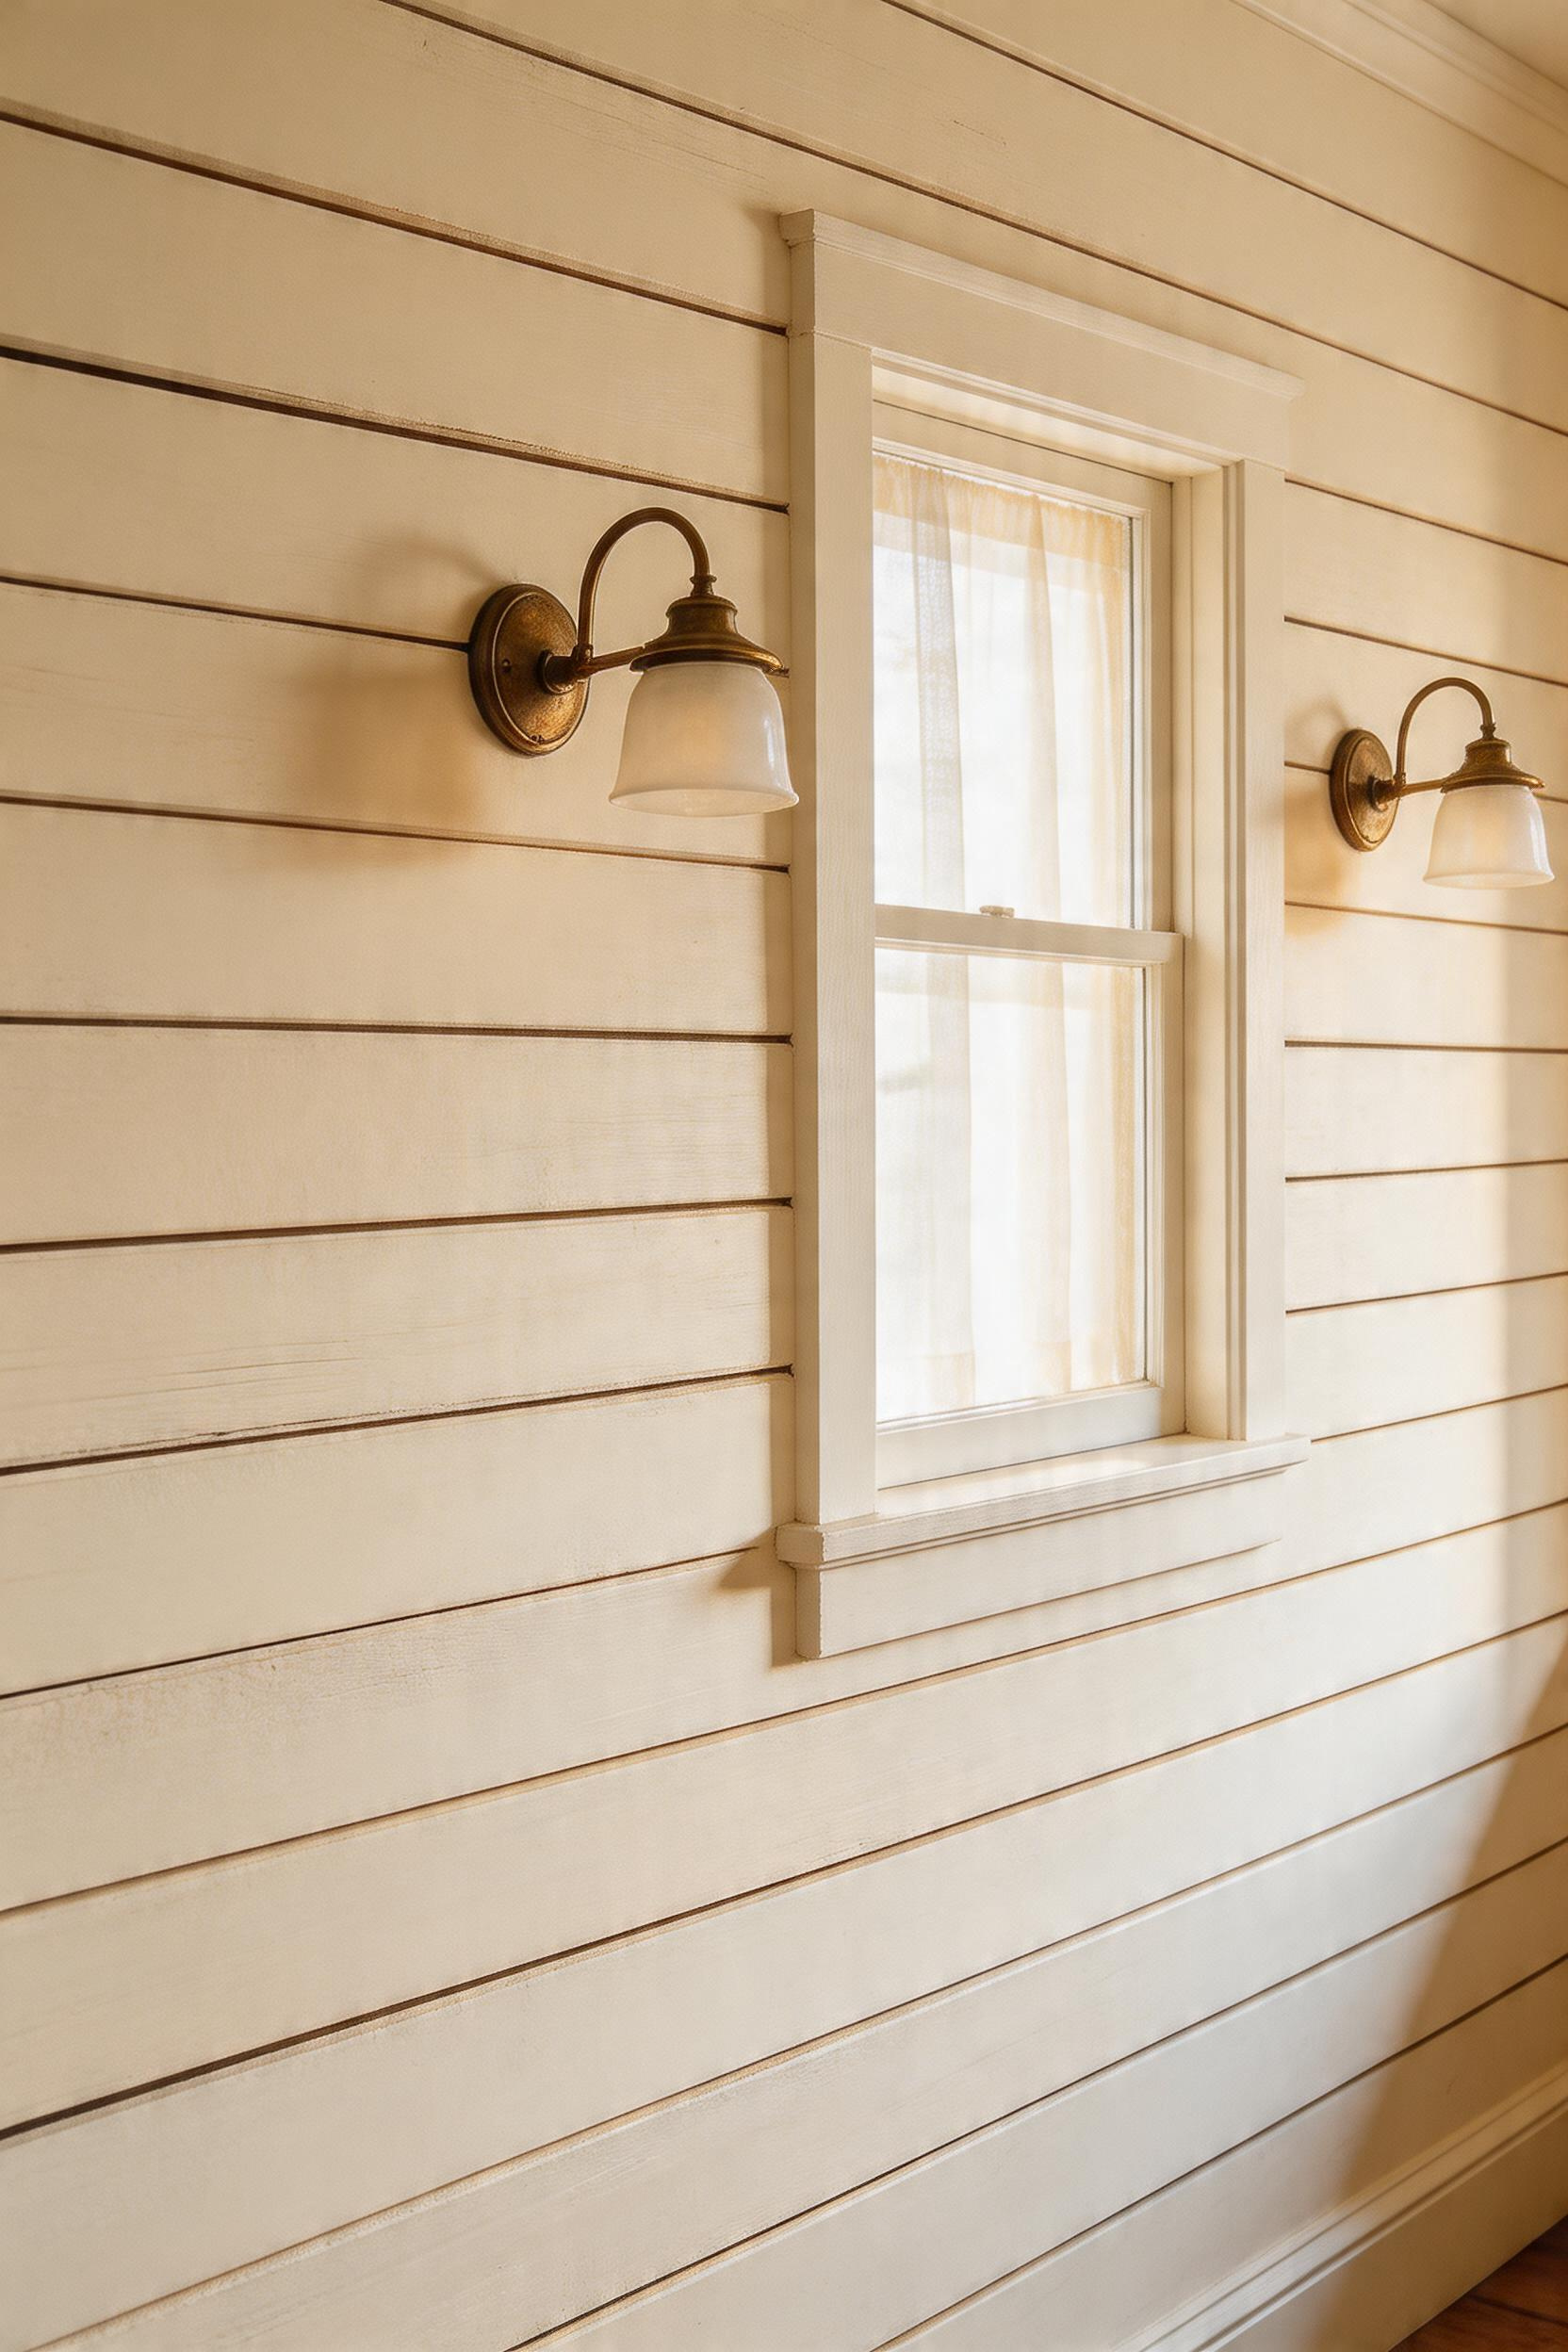
Lighting brings texture into focus. Position fixtures 6–12 inches from the wall, aiming parallel to the surface rather than perpendicular. This grazing light technique highlights texture and casts shadows on mortar. Warm-white LED (2700K) complements red and orange brick; cooler light (4000K) suits grey brick. Furthermore, install fixtures every 24–36 inches for even illumination.
Iron and bronze fixtures age in a way stainless steel never will. They develop patina. They respond to the environment. They become more themselves over time.
Hand-forged iron hardware differs from cast reproductions in weight, character, and cost. A hand-forged towel bar might weigh twice what a cast version does; hammer marks are visible; variations are intentional. These pieces run $50–200 each. Cast reproductions weigh less, cost $10–60, and are entirely adequate for most applications. The question is whether prominent pieces (towel bars, valve handles) deserve forged authenticity or whether cast suffices.
Oil-rubbed bronze develops patina over 3–6 months. This is not a finish flaw; it’s the material aging. Darkening from copper oxide, it becomes increasingly warm. The patina continues evolving with use; mineral hardness, cleaning habits, and humidity affect color progression. Care requires discipline: avoid abrasive cleaners, ammonia, bleach. Soap and water only. If you want to deepen the patina deliberately, apply mineral oil on a cloth quarterly. Waxing (carnauba) protects the finish. A fine steel wool (0000 grade) removes patina if you want to reset the finish.
Mixing metals works if intentional. Oil-rubbed bronze paired with matte black reads as contemporary-rustic. Oil-rubbed bronze with warm brass looks classical. Mixing three or more finishes looks chaotic. The rule of thirds: one dominant finish (60 percent), secondary (30 percent), accent (10 percent). Victorian homes naturally mixed metals—brass, iron, steel—because different fixtures came at different times. Embrace eclecticism if it’s authentic to your home’s era.
A mirror frame earned over time beats any new frame purchased in haste. The patina on an ornate Victorian mirror tells you who owned it, when they used it, what light fell across it.
Sourcing authentic period mirrors requires patience. Bidspotter aggregates local auction listings weekly. EstateSales.net organizes estate sales by address. Invaluable and Catawiki handle larger auctions. Additionally, architectural salvage yards and Habitat ReStore locations stock frames constantly. Pricing varies: a Victorian frame might run $50–300, a gilded mirror $100–500, an ornate piece $200–800. Condition drives price. Genuine patina—gold leaf pooling at edges, mirror backing deterioration—signals age authenticity.
Reframing a modern mirror with reclaimed wood or antique moulding is a practical alternative. Mount a 1/4-inch mirror plate inside a reclaimed wood frame using finishing nails and construction adhesive. Choose moulding based on style: crown (3–6 inches), baseboards (2–4 inches), or picture moulding (1–2 inches). Stain, paint, whitewash, or preserve the original wood. Professional reframing through services like Framebridge runs $200–600 but guarantees durability.
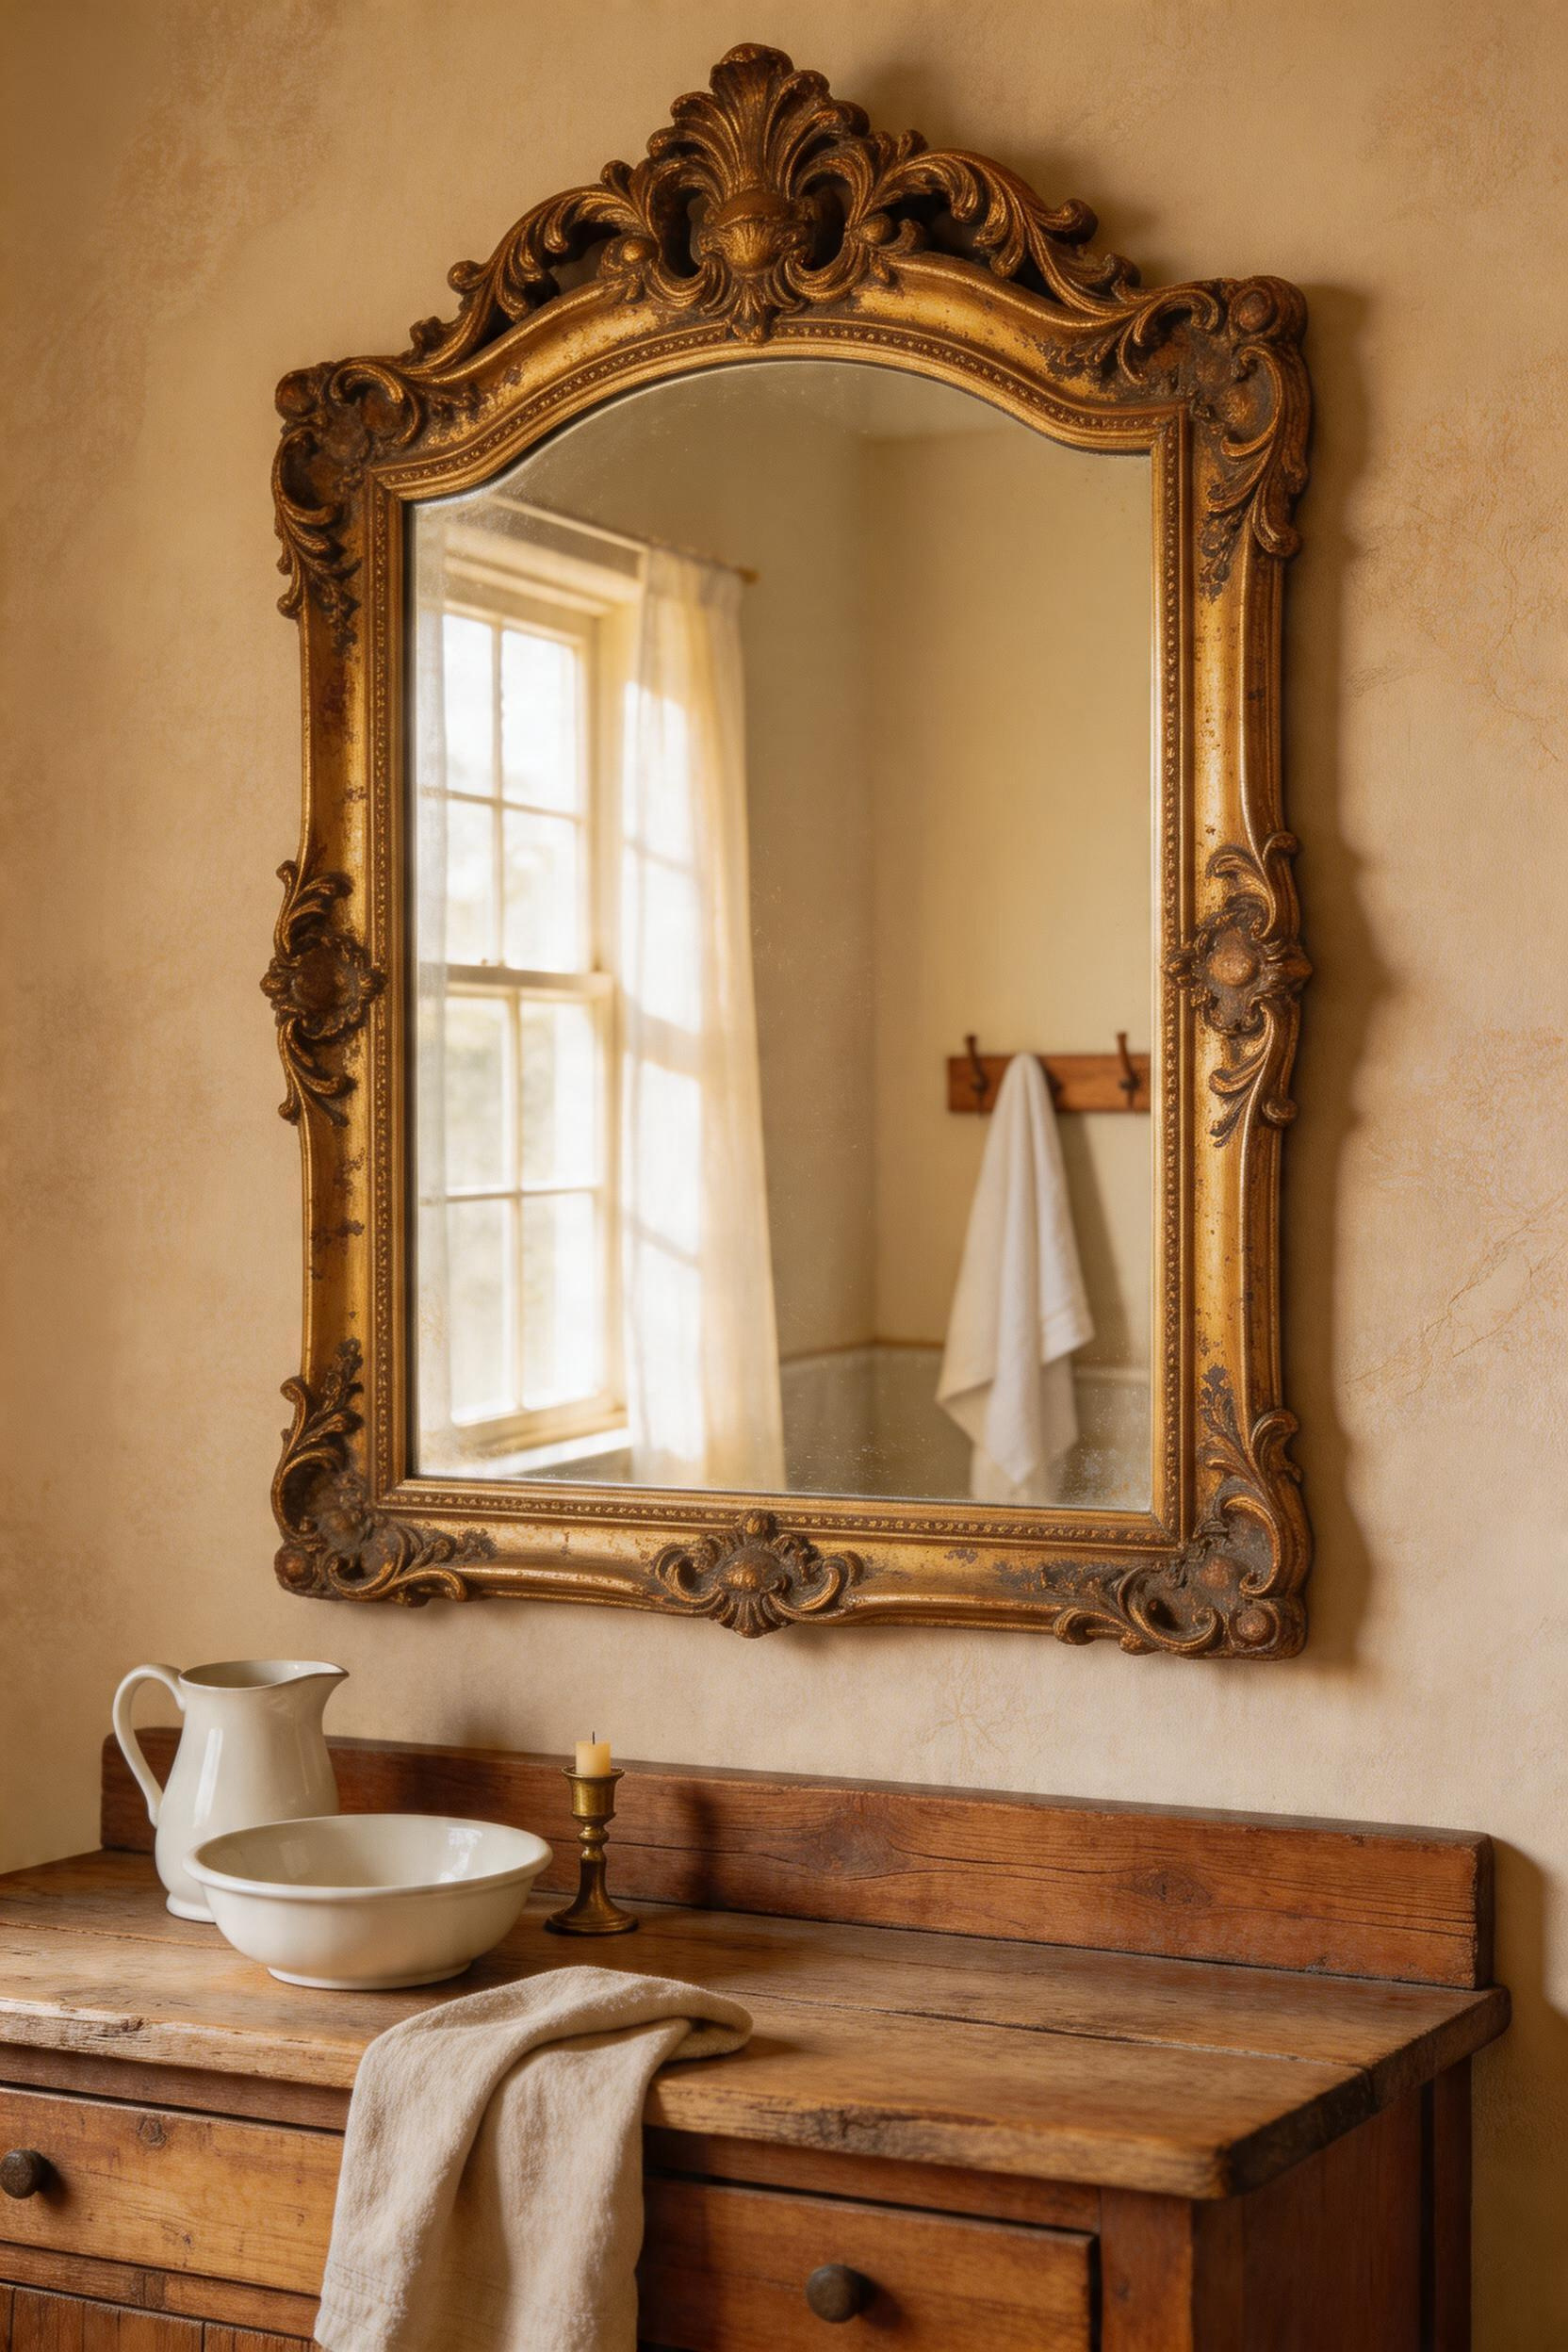
Scale rules matter. A mirror should be two-thirds the width of your vanity (a 24–30-inch vanity suggests a 16–20-inch mirror) or three-quarters width for a double vanity. Height-wise, position the bottom 8–12 inches above the faucet deck and the top 12 inches below the ceiling or light fixture. This positioning feels right proportionally and functionally. Full-length mirrors (48+ inches tall) require double hangers and careful wall reinforcement; they’re heavy.
Centering the mirror over the vanity is standard. Off-center placement adds visual interest in larger bathrooms but feels accidental in small spaces. The frame itself bridges the gap between period decor and modern living. An ornate 1890s frame in a contemporary bathroom reads as intentional eclecticism. A delicate Arts & Crafts frame in a Victorian bath feels historically coherent.
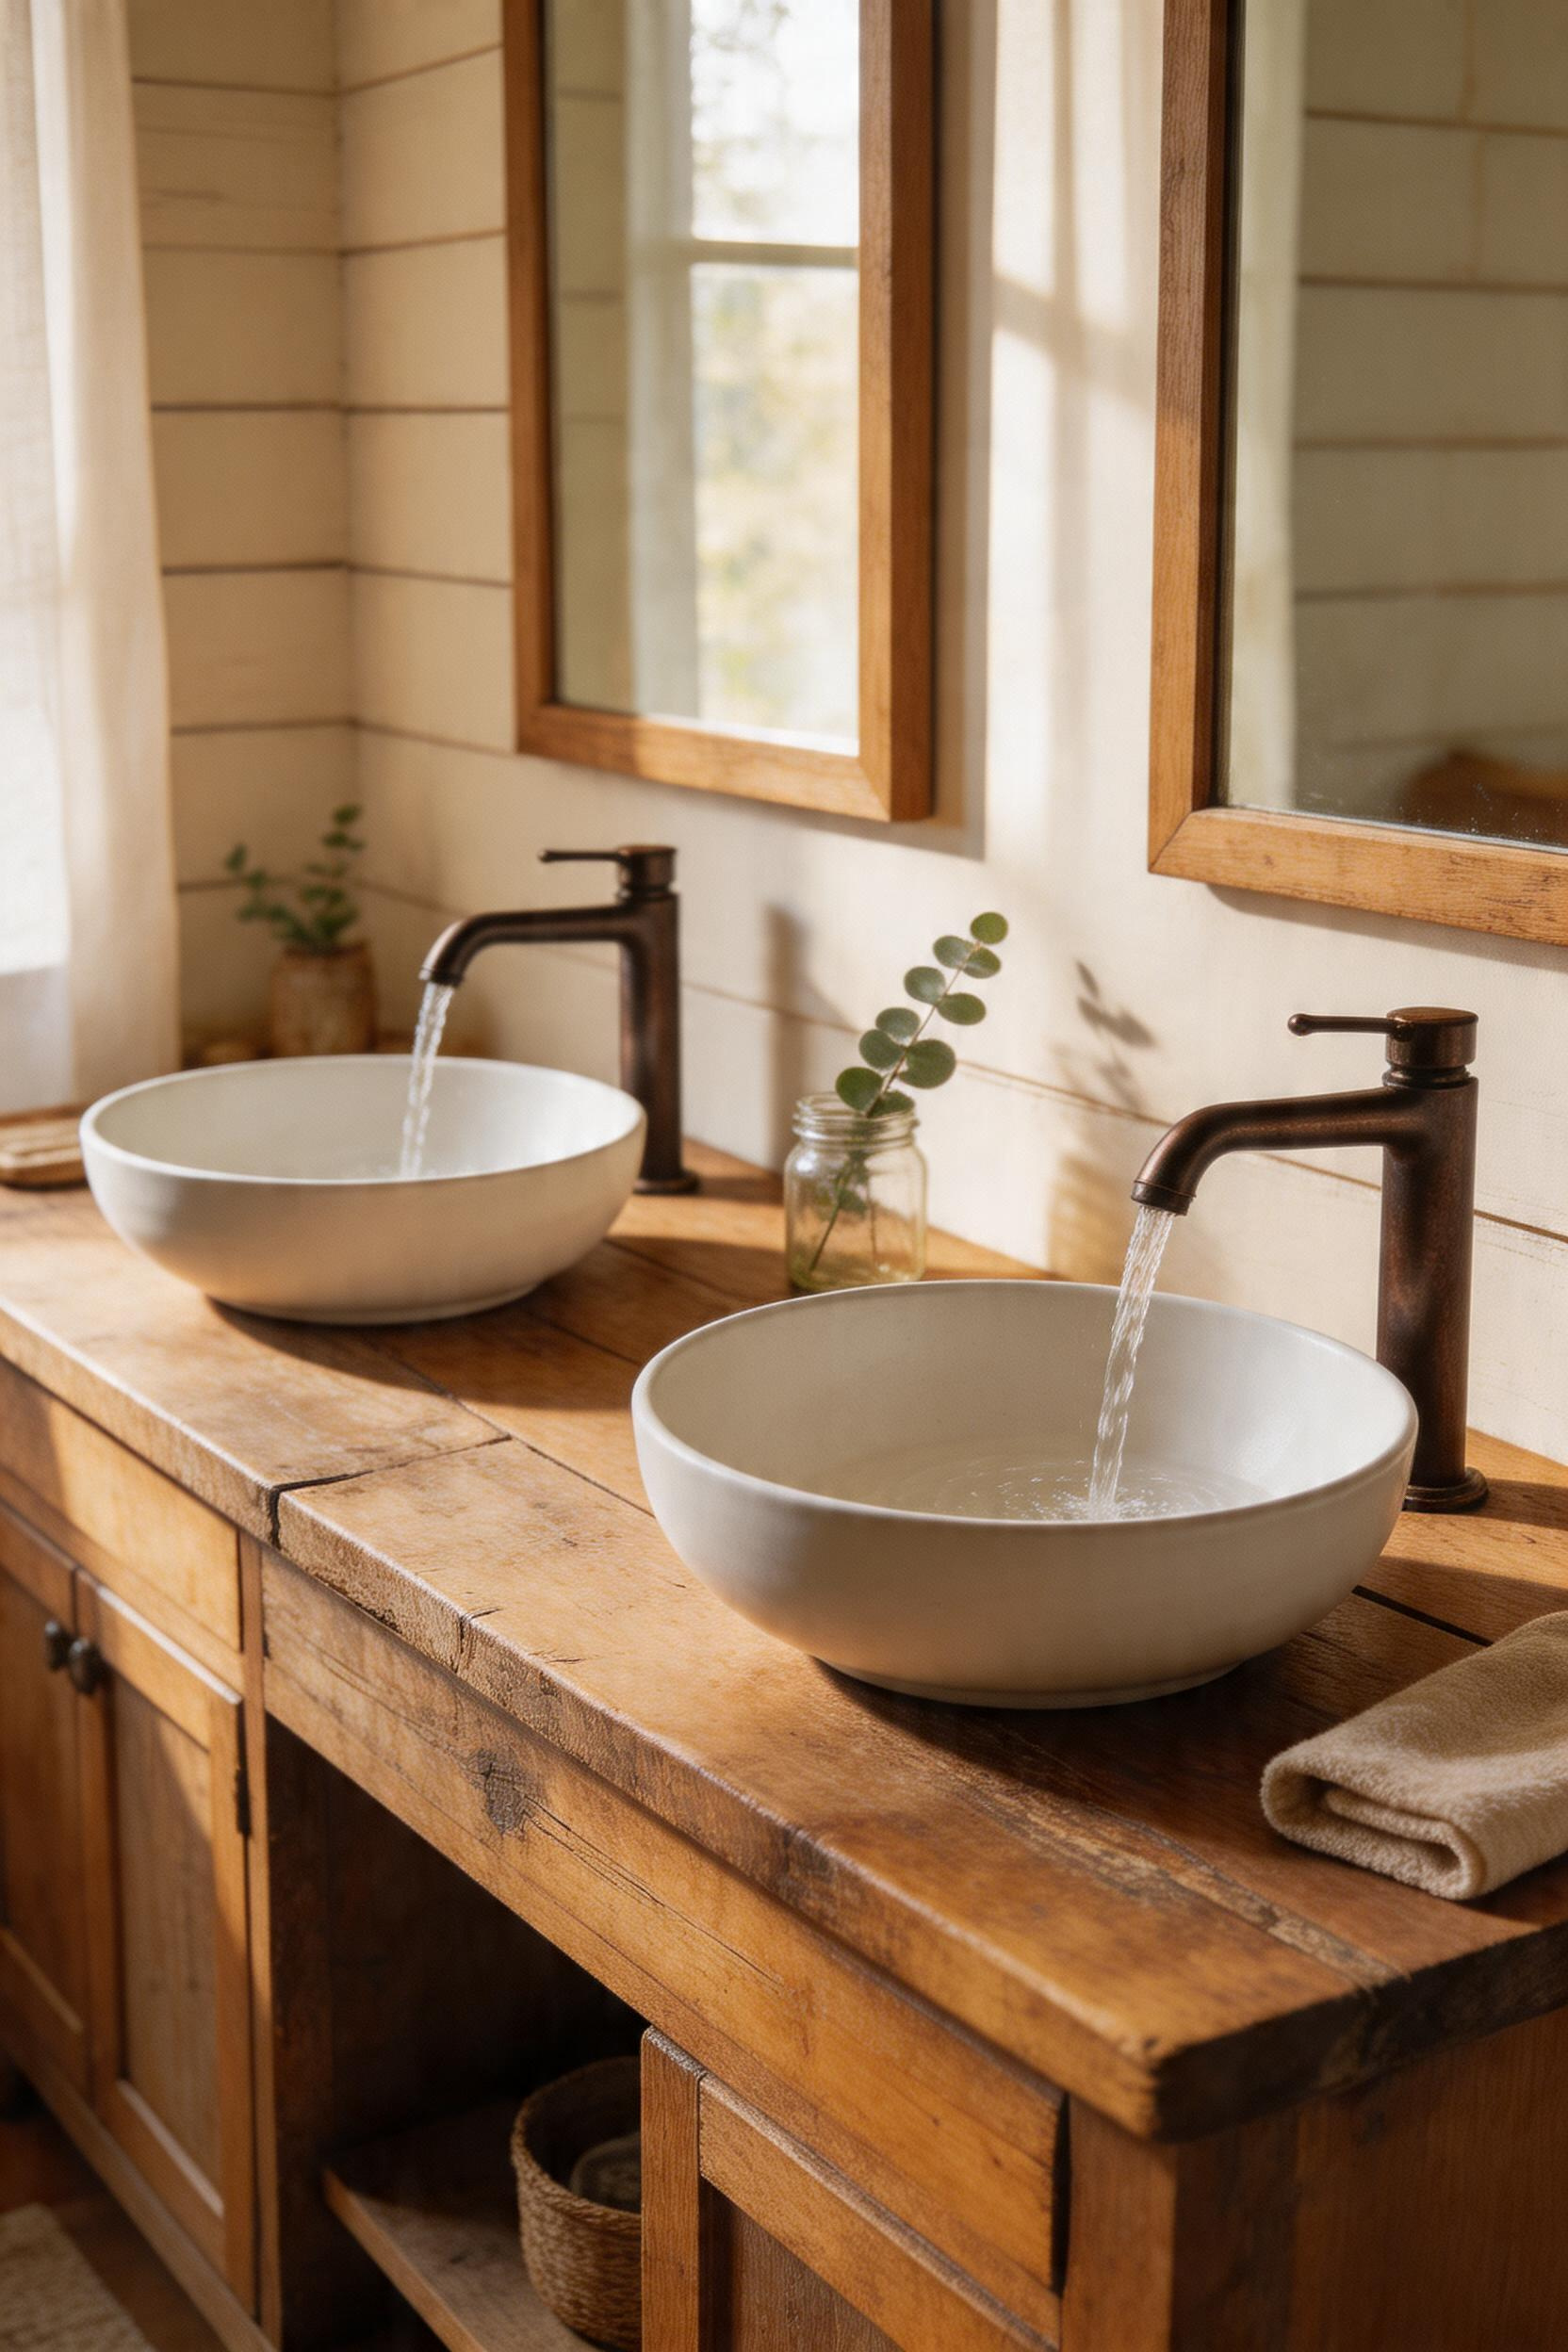
A vessel sink carved from stone is craft made functional. Hand-worked travertine, onyx, river stone, or marble—each asks you to slow down when you wash.
Travertine vessel sinks are warm tan or cream, porous (requiring sealing), and weigh 20–40 pounds. They cost $300–800 each. Onyx is more dramatic—translucent in thin sections, hard, expensive ($400–1,200)—and reads as luxury rustic. River stone pieces are naturally smooth pebbles, hand-carved into basins, unique per sink, and cost $350–900. Marble brings elegance and veining but stains more easily than denser stones. Slate is underused but excellent—durable, matte, dark tones.
Vessel sinks require different plumbing thinking. A faucet must clear the rim by 2–3 inches minimum, typically sitting 10–12 inches above the counter deck. Single-hole vessel-specific faucets (arc-spout typical) are your standard. Drain positioning varies: center-bottom or side-hole. Above-deck drains are most common for vessels. A pop-up drain is stylish but requires a 1.25-inch hole; overflow holes are optional and look better without them aesthetically.

Vanity height becomes important. Standard vanities sit 30–36 inches tall. A vessel sink adds 8–12 inches, creating total working height of 38–48 inches (higher than standard). This can feel comfortable or awkward depending on your build and preference. Try one before committing.
Maintenance for porous stone is non-negotiable. Seal within the first week of installation using penetrating sealer specifically formulated for stone. Reapply annually or every 18 months. Brands like TileLab and Aqua Mix make bathroom-specific sealers ($20–50 per quart). Daily care: mild soap and water, dry immediately. Use pH-neutral cleaners only—acidic cleaners etch limestone and marble. Stains appear within months if sealing is neglected. Stone-specific polishing cream can address minor etching.
Shiplap is deceptive. It looks simple—boards joined edge to edge. But the simplicity is the point. True shiplap has rabbeted top and bottom edges so joints are hidden. V-groove has routed channels that create shadow lines. Both work in bathrooms if sealed properly.
True shiplap comes in 5–7 inch widths and costs $2–5 per linear foot. V-groove is 4–6 inches wide at $1.50–3.50 per linear foot. Visually, shiplap appears smoother (hidden joints), while V-groove shows distinct shadow lines. Both require solid substrate and proper priming.
Paint finish drives moisture resistance. Primer is non-negotiable: use shellac or oil-based primer to block knots and moisture. Then apply two coats of semi-gloss bathroom paint. This creates a protective barrier. Semi-gloss is standard for bathrooms; high-gloss looks institutional. Whitewash (diluted white paint, 1:1 paint to water) offers a matte rustic aesthetic but requires touch-ups every 2–3 years. Natural finishes and clear sealers show grain beautifully but yellow over time and demand high maintenance in bathrooms.
Horizontal installation makes rooms feel wider, lowers the visual ceiling height, and is most common in farmhouse bathrooms. Vertical installation makes rooms feel taller and emphasizes wall height—less common but dramatic. Diagonal shiplap is playful and contemporary but requires 15–20 percent more material and waste.
Installation basics: shiplap requires dry substrate (moisture barrier if necessary), fastening to studs every 16 inches, and paintable caulk at seams. Resealing seams with paint annually maintains the moisture barrier. Never install over wet walls.
A hand-hammered copper basin is a conversation. The variations in depth, the uneven reflectivity, the way light pools differently depending on angle—these qualities are distinct markers of handcraft.
Copper’s patina is not oxidation failure; it’s maturation. A shiny copper sink gradually develops a brown oxide layer over 6–12 months, eventually darkening into verdigris (copper sulfate—the green patina). This living finish continues evolving with use, water hardness, cleaning habits, and humidity. Some people accelerate the process deliberately using hydrogen peroxide. Most people let time do the work.
Copper is naturally antimicrobial—it kills 99.9 percent of bacteria within two hours—making it functionally superior to ceramic for bathrooms. Care is disciplined: no acidic cleaners, no ammonia, no harsh scrubbing. Mild soap and water, dried immediately. If you want to deepen patina, apply mineral oil quarterly on cloth. To restore shine (resetting the patina), use fine steel wool (0000 grade) with mineral oil. Never use commercial copper polish—it strips the patina you’re cultivating.
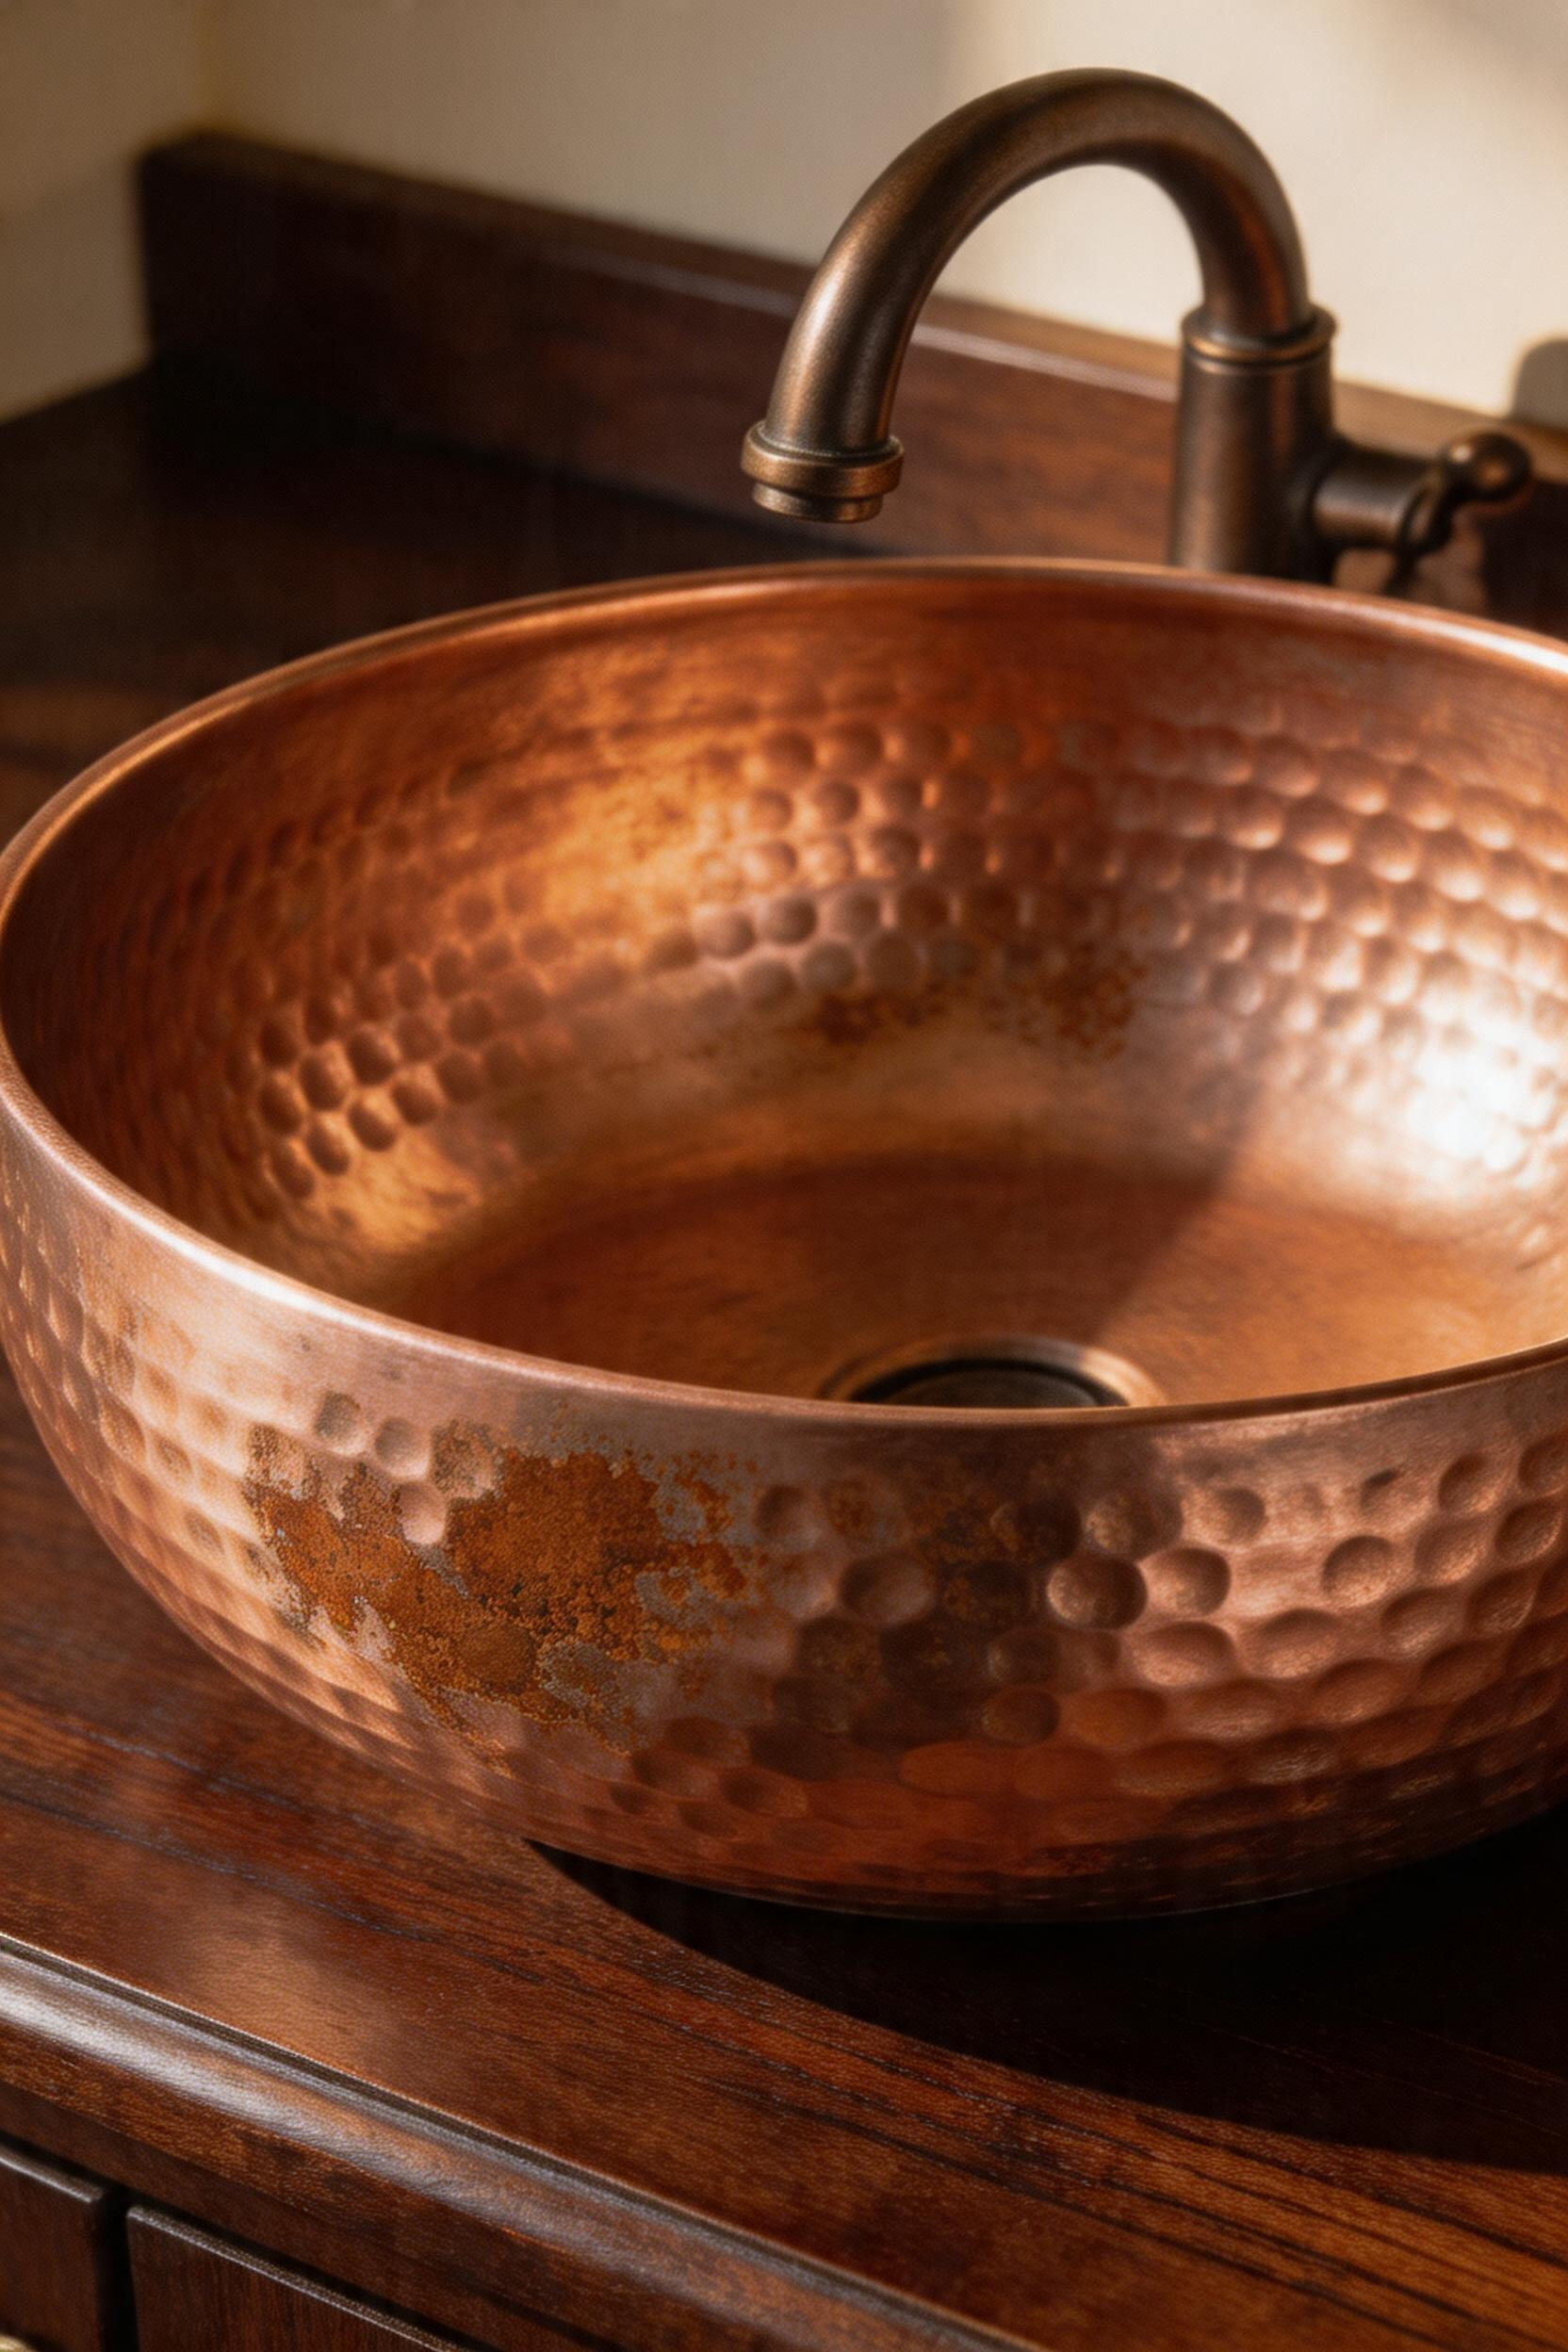
Pair a copper basin with dark walnut or reclaimed pine vanity. The warmth of copper against darker wood is visually arresting. Matte black or slate-grey painted vanities create drama. Vessel-style presentation displays the basin’s sculptural quality better than undermount positioning.
Brands like Sinkology and Native Trails make artisanal copper basins, hand-hammered, priced $500–1,500. These are investment pieces. The alternative is a factory-finished copper sink, lighter weight, less character, cheaper. The patina conversation matters: lacquered copper from the factory slows patina development; unlacquered copper (which you can specify) develops patina immediately.
A medicine cabinet is functional confession—it holds the everyday infrastructure of a life. The frame around that confession should be beautiful.
Recessed medicine cabinets require 14.5-inch stud cavities (standard spacing for 16-inch on-center framing). Installation involves cutting between studs, adding header backing, and drywall patching. Retrofit labor runs $200–400. The advantage is seamless integration; the cabinet doesn’t protrude into the room.
Surface-mount cabinets attach over drywall, protrude 3–4 inches, and cost $50–100 in labor. However, they’re easier to install, require no structural work, though they read as afterthought rather than intentional design.
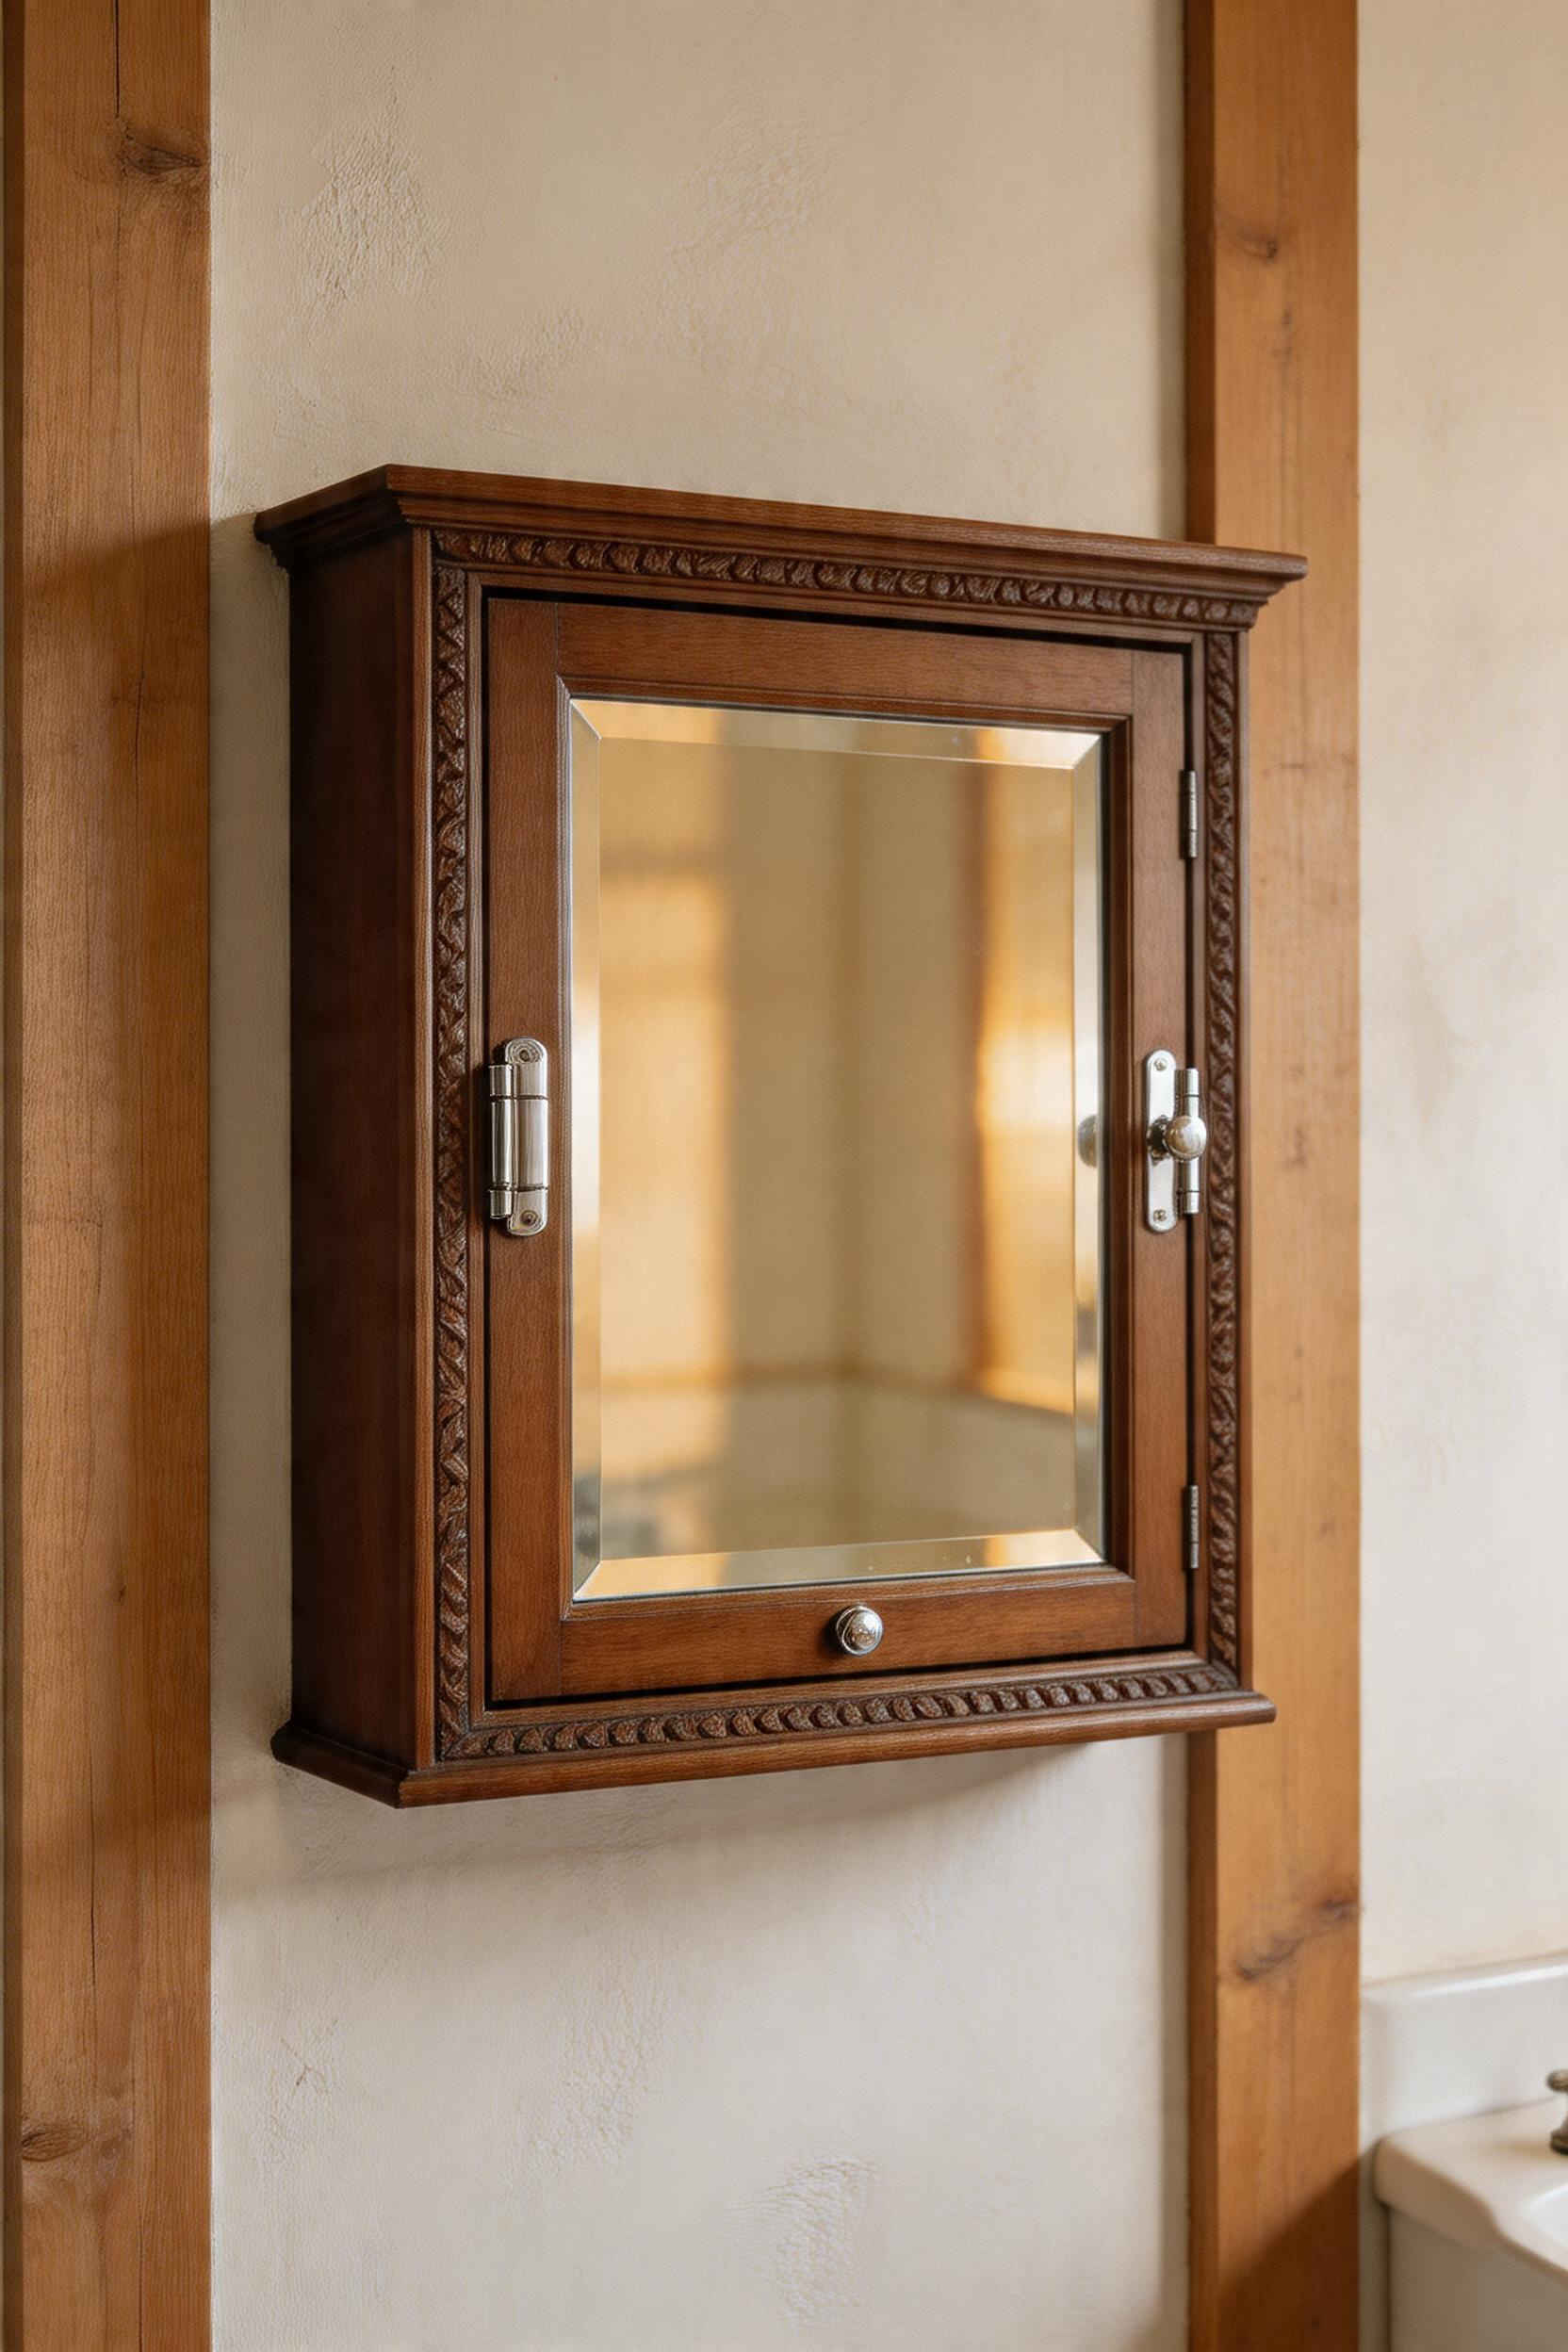
Period styles matter. Bevelled glass frames (Victorian, 1880–1920) are elegant and reflect light; they run $400–800 for quality reproductions, $100–400 for salvage originals. Chrome finish (Art Deco, 1920–1940) in polished or brushed forms costs $250–500 new, $50–200 vintage. Painted wood frames (Colonial/Federal or farmhouse) are simpler but no less authentic; $200–400 new, $30–150 vintage.
Finding originals requires patience. Architectural salvage yards stock them constantly. eBay and Etsy have regular inventory. Estate sales frequently include medicine cabinets. Condition varies—inspect hinges, check that the mirror seals tightly, verify that shelving is intact. Salvage cabinets often need internal hardware updates and mirror backing replacement.
Quality modern reproductions from Robern (Candela series, $800+), Afina (New York series, $500+), and Kohler (Revival collection, $600+) offer solid wood, bevelled glass, and reliable operation. The choice between salvage and reproduction is philosophical: Do you want historical authenticity and patina, or guaranteed functionality and appearance?
Encaustic tiles are not ceramic. They’re hand-poured pigmented cement—a process that requires patience and skill and produces tiles that are thicker, heavier, and more alive than any glazed alternative.
Portland cement base mixed with sand and pigments, poured into molds, cured 28+ days. No glaze. The pigment runs throughout. Slight variations between tiles are expected and valued. Thickness typically runs 5/8 to 7/8 inch, making these tiles substantial in hand. Weight matters: installation requires a skilled setter experienced with heavy materials.
Classic patterns are historical references. Hex tiles (1–2 inch hexagons, often two-color alternating) read as timeless European. Moroccan star (8-point stars with geometric infill, jewel-toned multi-color) makes a bold statement at $15–25 per square foot. Victorian geometric (intricate linear patterns, 4–6 colors) costs $12–20 per square foot and references historical authenticity. Penny round (circular 1–1.5 inch tiles) evokes Edwardian bathrooms. Subway-style encaustic (minimal patterns, muted tones) offers a contemporary approach at $10–15 per square foot.
Major suppliers include Clé Tile, Granada Tile, and Villa Lagoon Tile—all US-based, all offering extensive pattern libraries and color options.
Sealing and maintenance separate encaustic success from failure. Acclimation is essential: cure tiles indoors 48 hours before installation. Porous cement absorbs moisture during installation and will crack without this pause. Use penetrating sealer (impregnating sealer that lets cement breathe). Surface sealers trap moisture inside porous cement, causing mold and staining. Apply sealer after grouting, before bathroom use. Reapply every 1–3 years depending on water exposure.
Epoxy grout is strongly recommended for bathrooms. Traditional grout absorbs water and stains easily. Daily maintenance requires mild soap, no acidic cleaners, thorough drying. The commitment is real, but the beauty is worth it.
Linen is the textile equivalent of aged stone. It strengthens with use and time. A linen bath sheet at 10 years old is more absorbent and more beautiful than it was new.
Linen dries 30 percent faster than cotton. This speed comes from fiber structure: linen has a hollow core and lower moisture regain (8 percent versus 13 percent for cotton). In bathrooms, where moisture and heat create mildew risk, this speed matters. Linen also resists bacterial growth better than cotton; it’s why French hospitals still use linen textiles.
Raw linen arrives stiff and softens with 5–10 washes as cellulose fibers relax. Pre-washed linen skips this process: Rough Linen, LinenMe, Magic Linen all offer pre-washed options running $25–60 per piece. Stonewashed linen is pebble-tumbled for lived-in texture and immediate softness—premium price but worth it for a ready-to-use textile ($30–60 per piece).
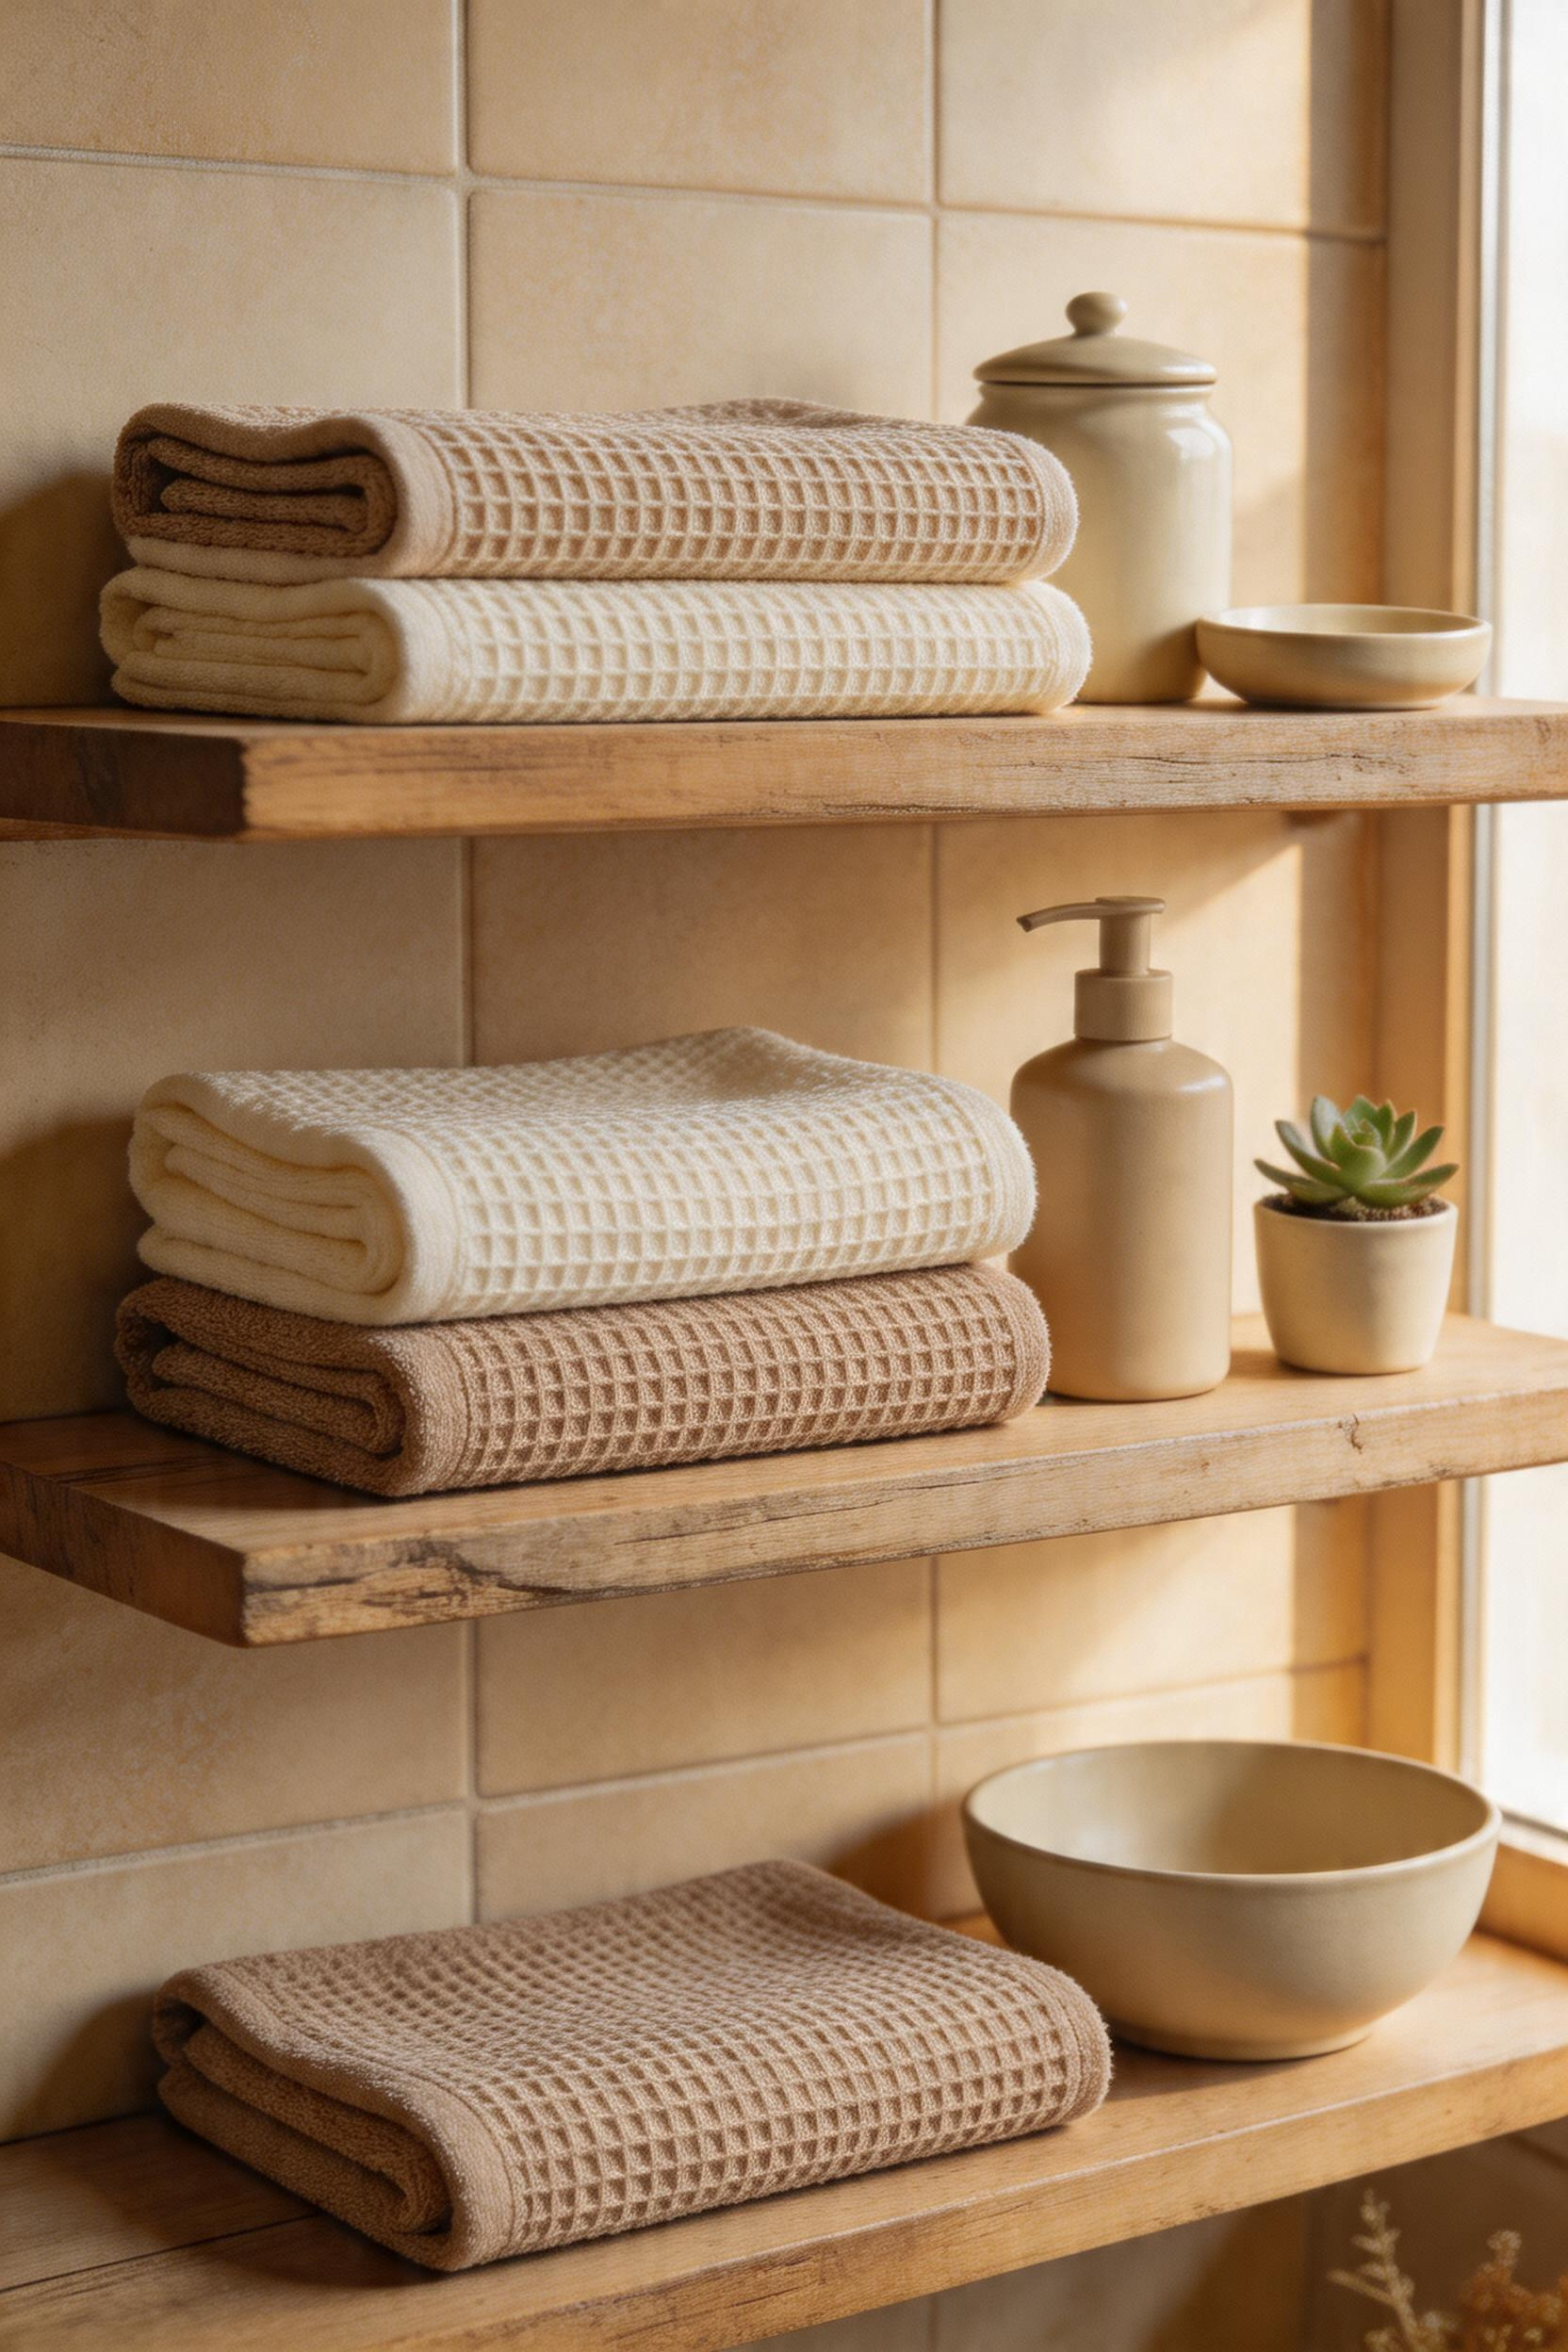
Layering textiles creates visual interest without clutter. A bath sheet (35×60 inches) is luxury drying and displays beautifully on a towel ladder or wooden rack. A hand towel (16×28 inches) handles daily use and groups nicely in odd numbers in baskets or on open shelves. A face cloth (13×13 inches) is delicate washing and looks beautiful stacked in ceramic bowls or folded neatly on shelves.
Color palette matters. Undyed linen is natural cream. Stonewashed varieties range from pale grey to oatmeal. Avoid bright colors—they read as too modern and undermine the rustic aesthetic. Texture mixing is essential: smooth plain weave plus waffle weave creates visual rhythm without matchy-ness.
Display is styling. Fold instead of rolling (folded textiles read more intentional). Arrange in odd numbers (3 towels, never 2 or 4). Layer different tones: a natural linen, a pale grey, and an oatmeal together feel cohesive rather than cluttered.
Salvage a dresser, repurpose it as a vanity, and you’re not updating the piece—you’re extending its story. This is the deepest kind of rustic design: using materials for what they were built to do, adjusted only minimally for new context.
Selection is critical. Choose solid hardwood—oak, walnut, cherry, mahogany. Avoid veneered or particle-board pieces; they swell and deteriorate with water exposure. Dimensions matter: standard bathroom vanities are 28–36 inches wide, 20–24 inches deep, 30–36 inches tall. Look for dressers in this range. Construction quality predicts longevity: solid drawer bottoms (not hardboard), mortise-and-tenon joinery, maker signatures a plus.
Sourcing happens at antique malls ($200–800), auction houses ($100–600), estate sales ($150–1,000), and regional dealers. Assess condition: is the wood sound? Are hinges and knobs repairable? Is it structurally stable? Cosmetic imperfections (worn finish, missing hardware) add character.
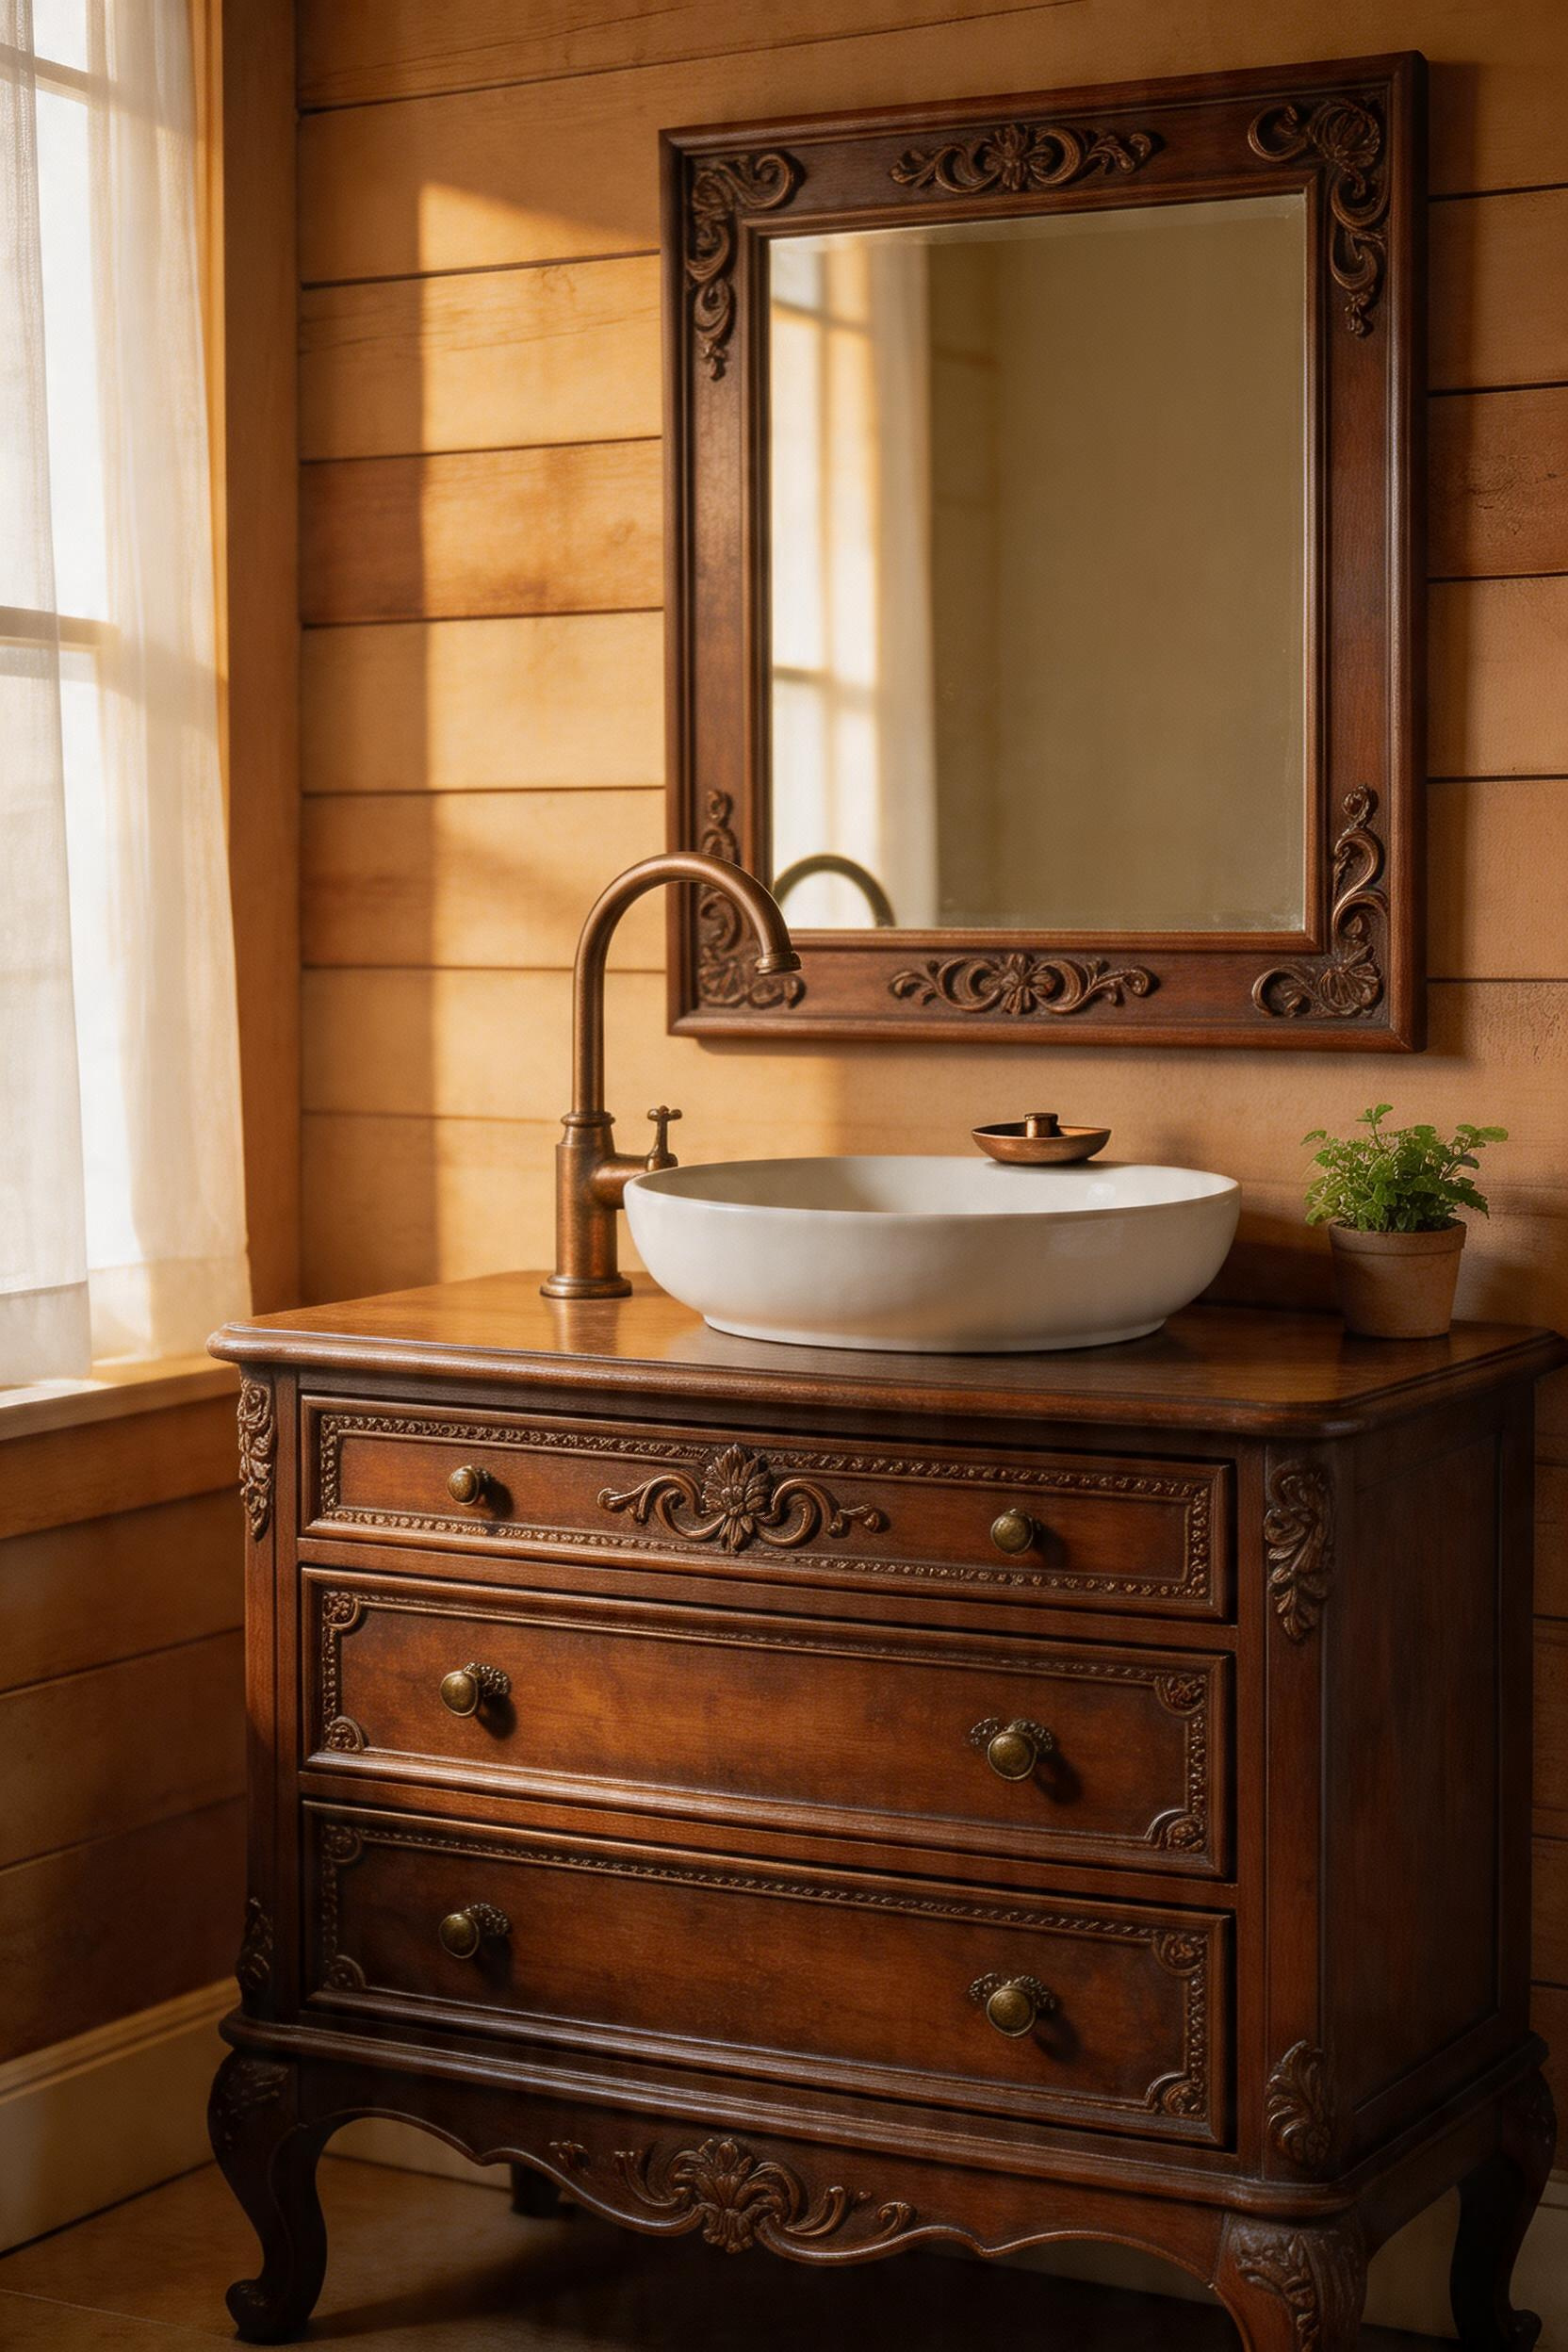
The conversion process requires planning. Install supply lines and drain rough-in before the cabinet is positioned (easiest access from the back). For a vessel sink, create a circular hole using a hole saw template (typically 3–5 inches). For an undermount sink, use a jigsaw for the rectangular opening. Seal the cutout edges with silicone or epoxy sealer.
Interior waterproofing is where most conversions fail. Seal the interior of the cabinet with a waterproof paint or epoxy. Line the underside with plastic sheeting. These invisible steps determine whether your dresser vanity lasts 3 years or 15.
Victorian washstands (1880–1910) are narrow and period-specific, often with original basin cutouts. Eastlake dressers (1880–1910) are rectilinear, ornamentally detailed, perfect scale for bathrooms. Farmhouse sideboards (1920–1960) are wide (42–48 inches), simply detailed, with generous storage. Each era offers different advantages. Avoid 1970s–80s walnut pieces (wrong era) and any particle-board construction.
A ceiling with timber beams grounds a bathroom in scale. It says: this is a room with bones. Not a temporary showroom, but a considered space.
Faux beams (hollow polyurethane or wood shells) weigh 1–5 pounds each and cost $40–150 per beam depending on size. They install on drywall studs without structural consideration. Real beams (reclaimed timber 8×10 to 12×12 inches) weigh 50–200 pounds, cost $300–1,000+ each, and require structural support (posts, lintels). Visual difference is minimal in a finished install. Installation difference is profound.
FauxWoodBeams.com and Barron Designs are major suppliers. Aesthetic ranges from smooth contemporary forms to rough-hewn hand-adze marks. The right choice feels authentic to the era of your home.
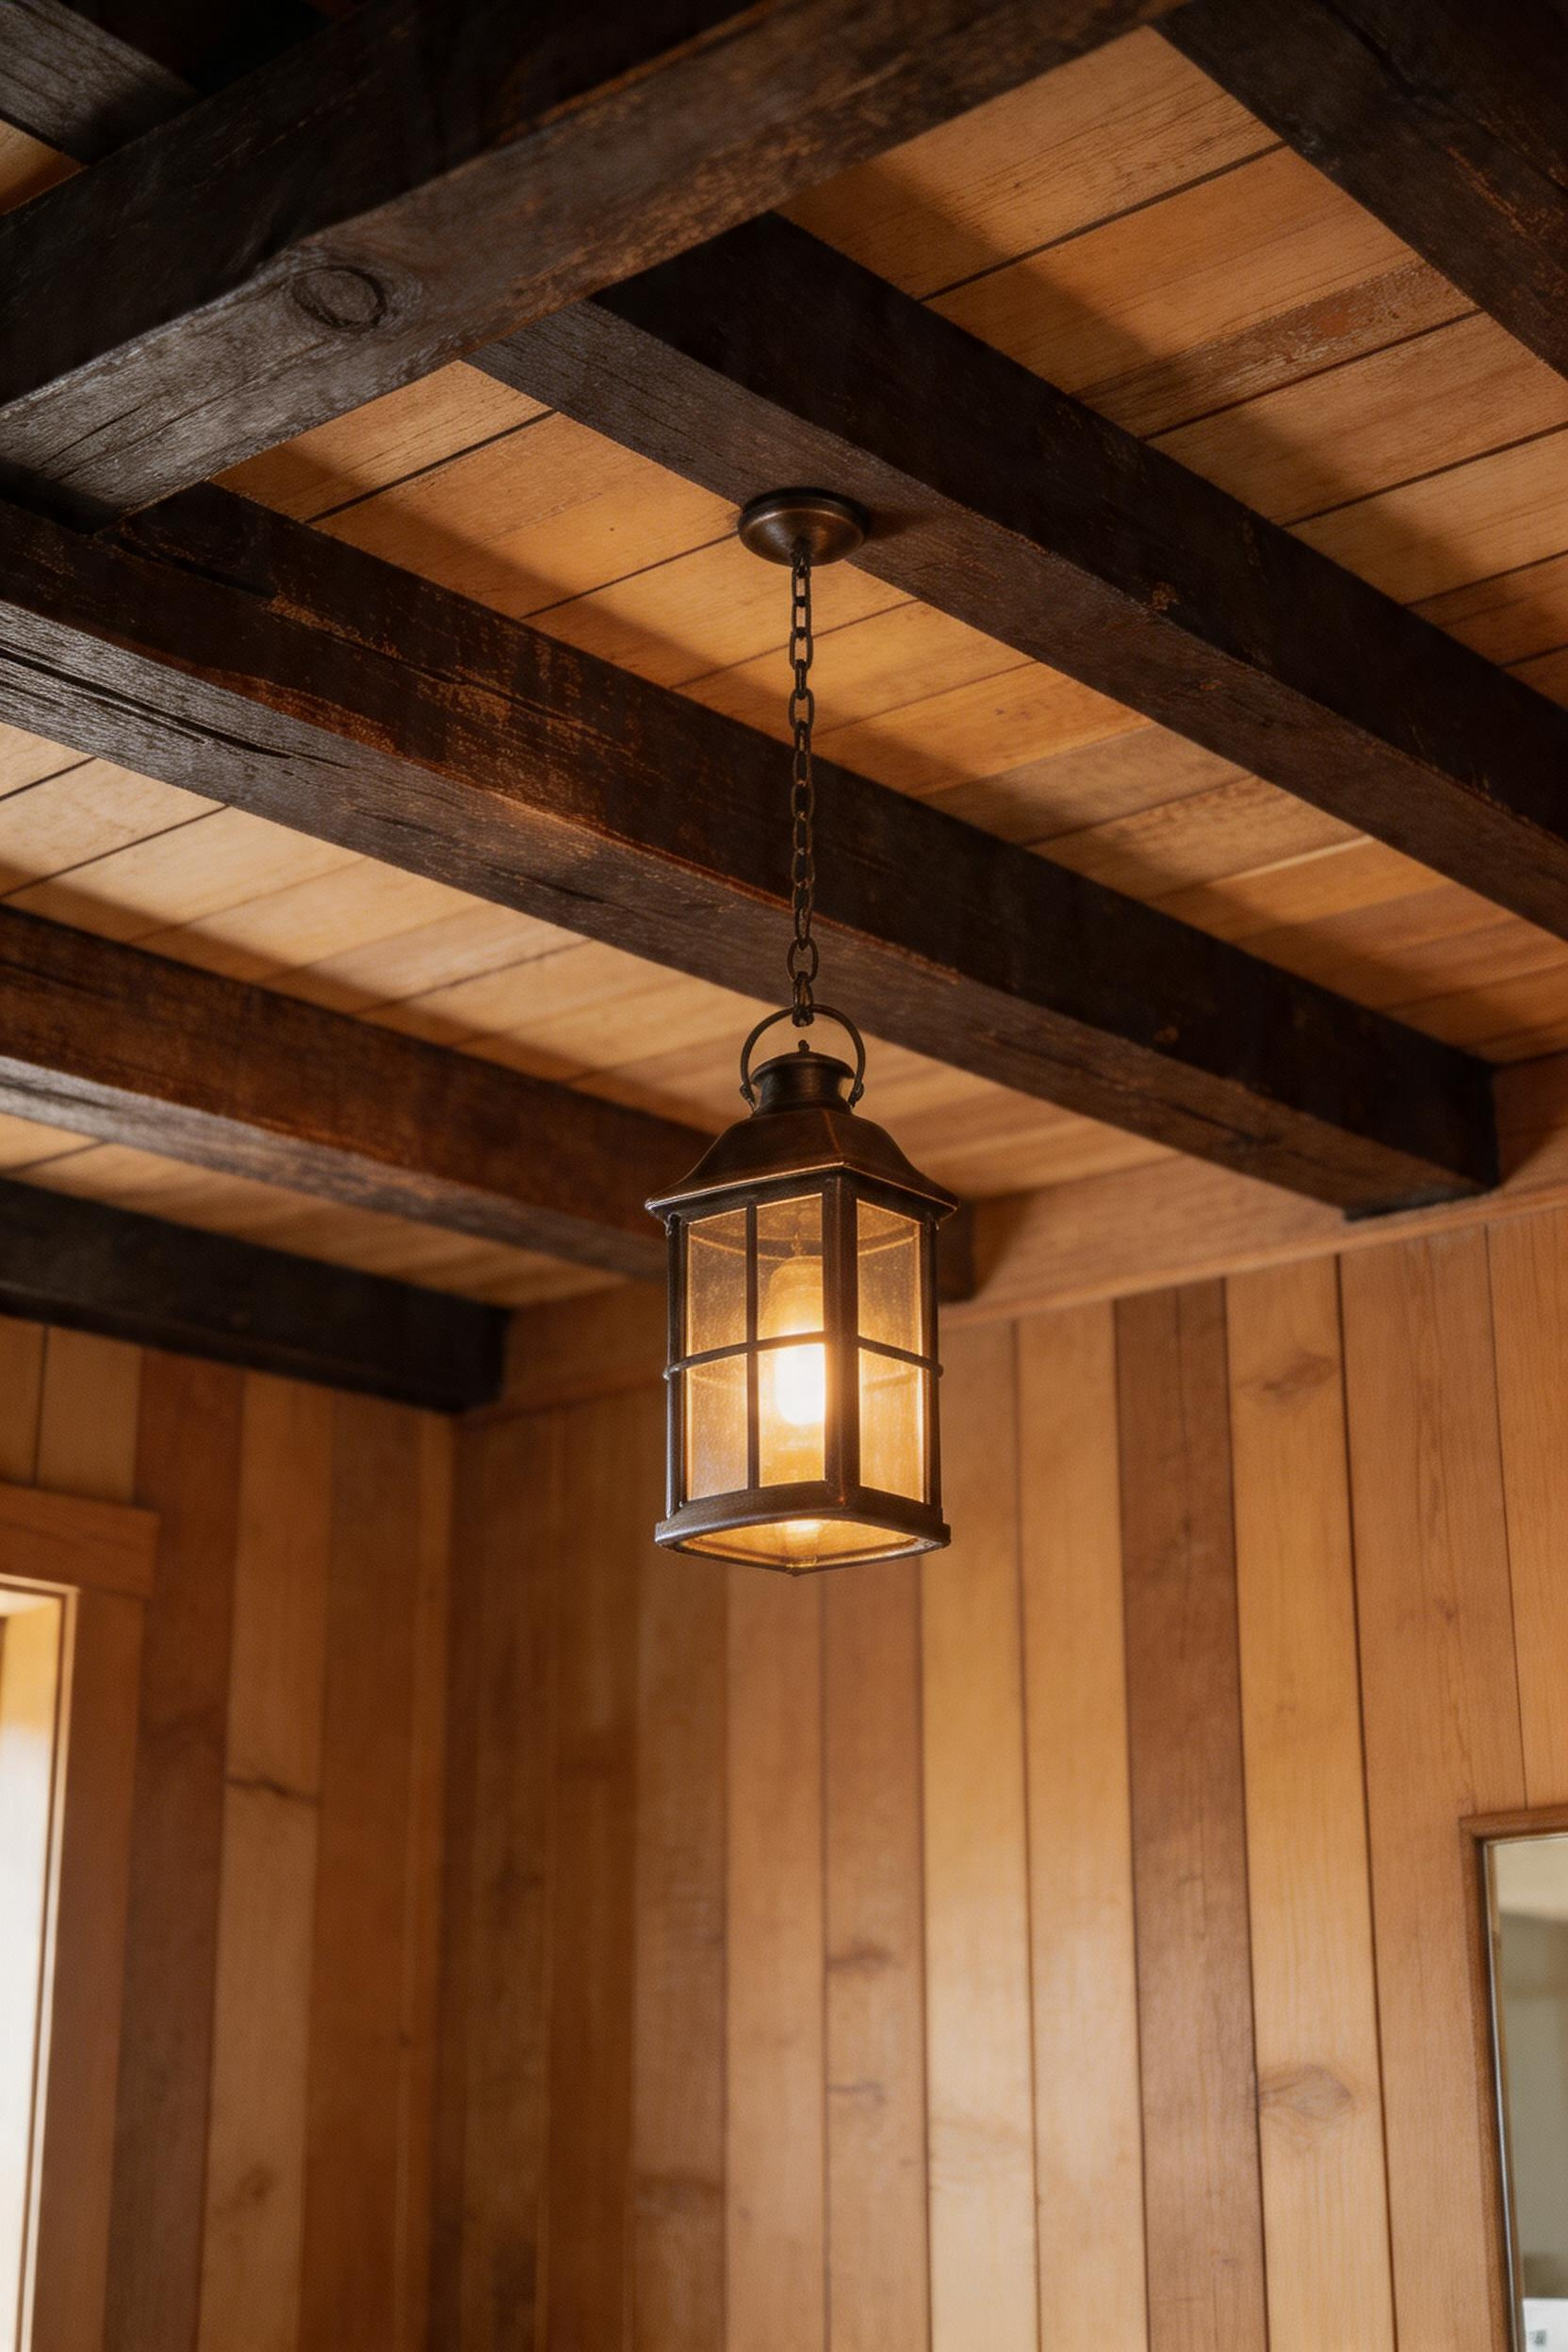
Lantern pendant lights pair beautifully with wood beams. Oil-rubbed bronze darkens with age and weather, costs $80–300 per fixture, and pairs naturally with hand-forged iron hardware. Matte black offers a contemporary-rustic hybrid, costing $60–250. Aged brass has warm undertone and vintage appeal at $100–350.
Style options include lantern (pierced metal panels), cage (open framework), and nautical (loop handles). All work in rustic bathrooms. Visual Comfort’s Hicks Lanterns ($150+), Hudson Valley Lighting ($120–280), Arteriors ($200+), and Restoration Hardware (premium, $400+) offer period styles.
Electrical code requires IP44 rating minimum within 0.6 meters (2 feet) of shower or bath. IP44 means splash-resistant (internal droplets and spray). IP65 (jet-water resistant) is rare for lantern-style fixtures. Most lanterns meet IP44. Verify specifications before purchase.
Placement matters practically. Pendants over vanity area are safer than over tub. Humidity-controlled areas (vanity, far from shower) are better than splash zones. Code compliance is non-negotiable.
Wainscoting divides a wall horizontally. It says: the upper half breathes and looks large; the lower half is protected and detailed.
Traditional heights are not arbitrary. Chair rail (32 inches) protected walls from chair backs in dining rooms and now feels cottage-like in bathrooms. Picture rail (48 inches) divides space more dramatically and suits taller bathrooms. Dado rail (54–60 inches) is proportionally high and can make standard bathrooms feel institutional. The proportion rule: wainscot height should be one-third to one-half of total wall height. For an 8-foot bathroom, that’s 32–48 inches.
Beadboard features narrow vertical boards with V-groove channels running between—Victorian and Arts & Crafts heritage (1880–1920), cottage aesthetic. Raised panel uses framed panels with raised centers—Colonial and Georgian (1700–1850), formal and traditional. Flat panel is framed with inset panels—Federal (1780–1820), simpler and more transitional.
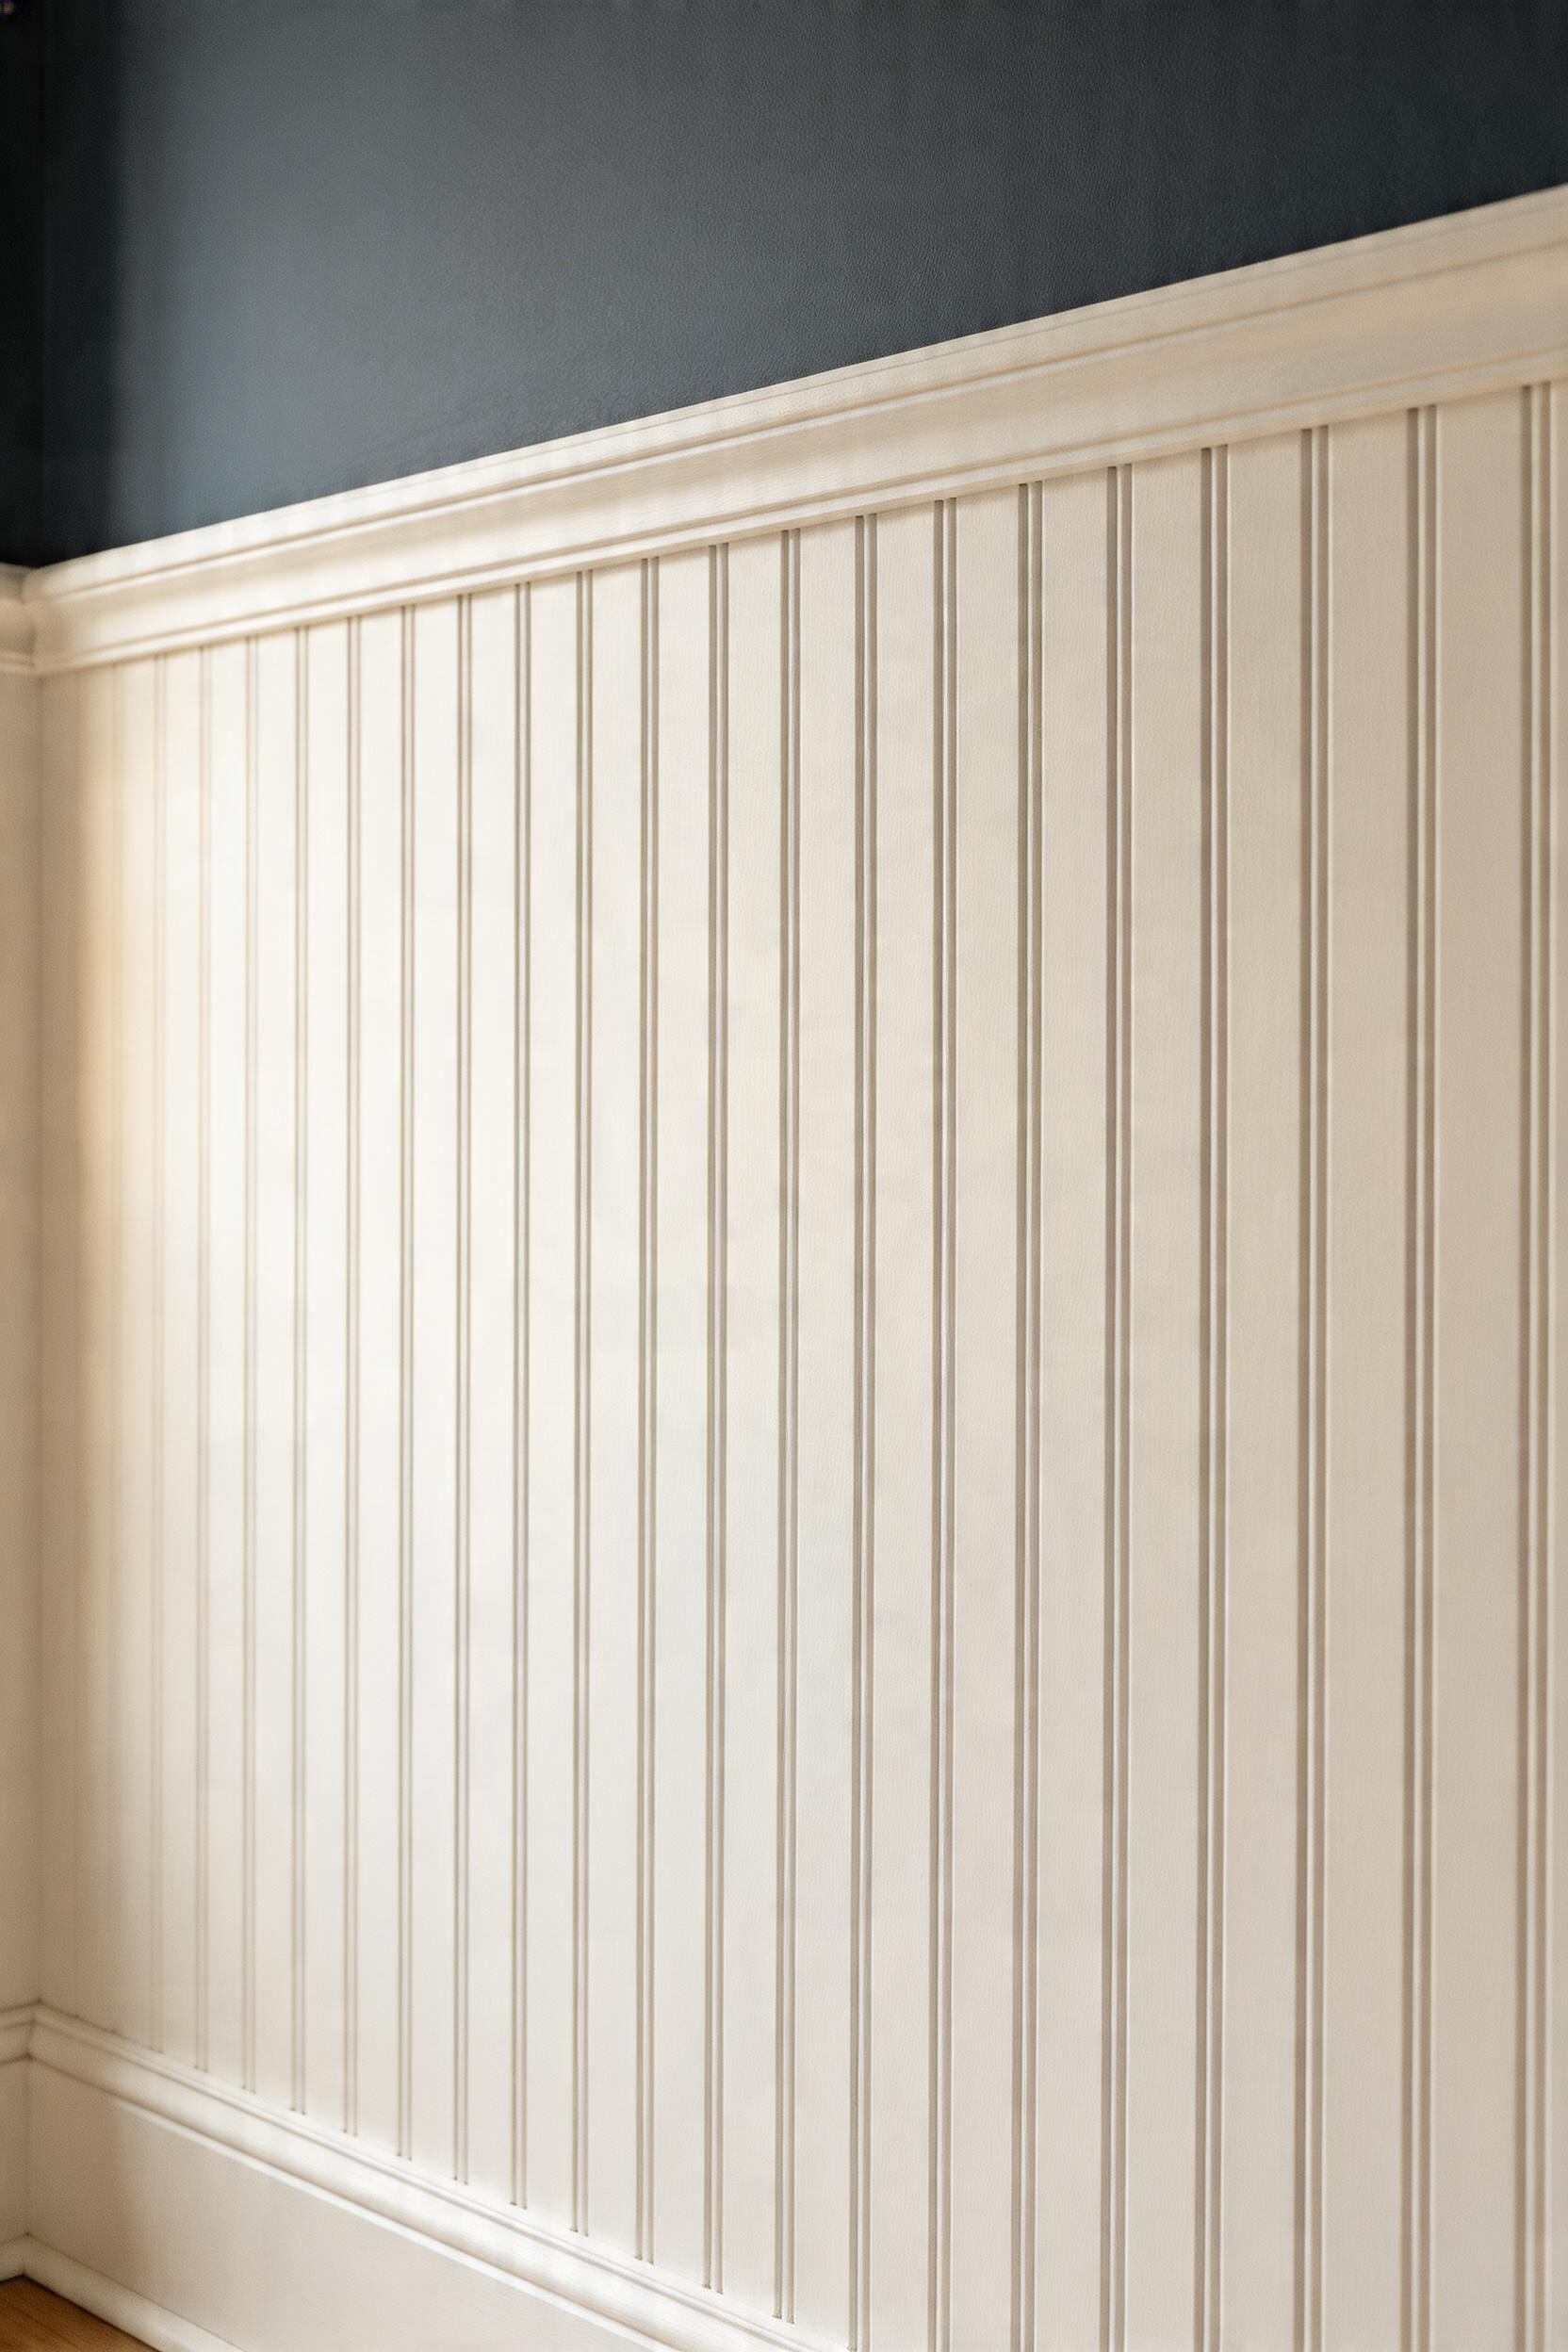
Beadboard is most forgiving for DIY; tongue-and-groove installs straightforwardly. Raised panel requires cabinetry precision. Flat panel is practical and less water-prone than raised in seams. Bathrooms favor beadboard or flat panel; raised panel’s recessed seams trap water.
Paint colors matter more than people expect. Benjamin Moore White Dove (OC-17), warm off-white, is period-appropriate and versatile. Sherwin-Williams Alabaster (SW-7008), pure bright white, offers modern clarity. Farrow & Ball Strong White (No. 2001) is sophisticated and widely respected. For the lower section, soft grey, pale sage, or muted blue-green (a lighter shade of Benjamin Moore HC-145 Hale Navy) adds depth. Trim should be bright or off-white for contrast.
The finish equation: primer + paint in semi-gloss. This protects better than flat or matte finishes in moisture-prone areas.
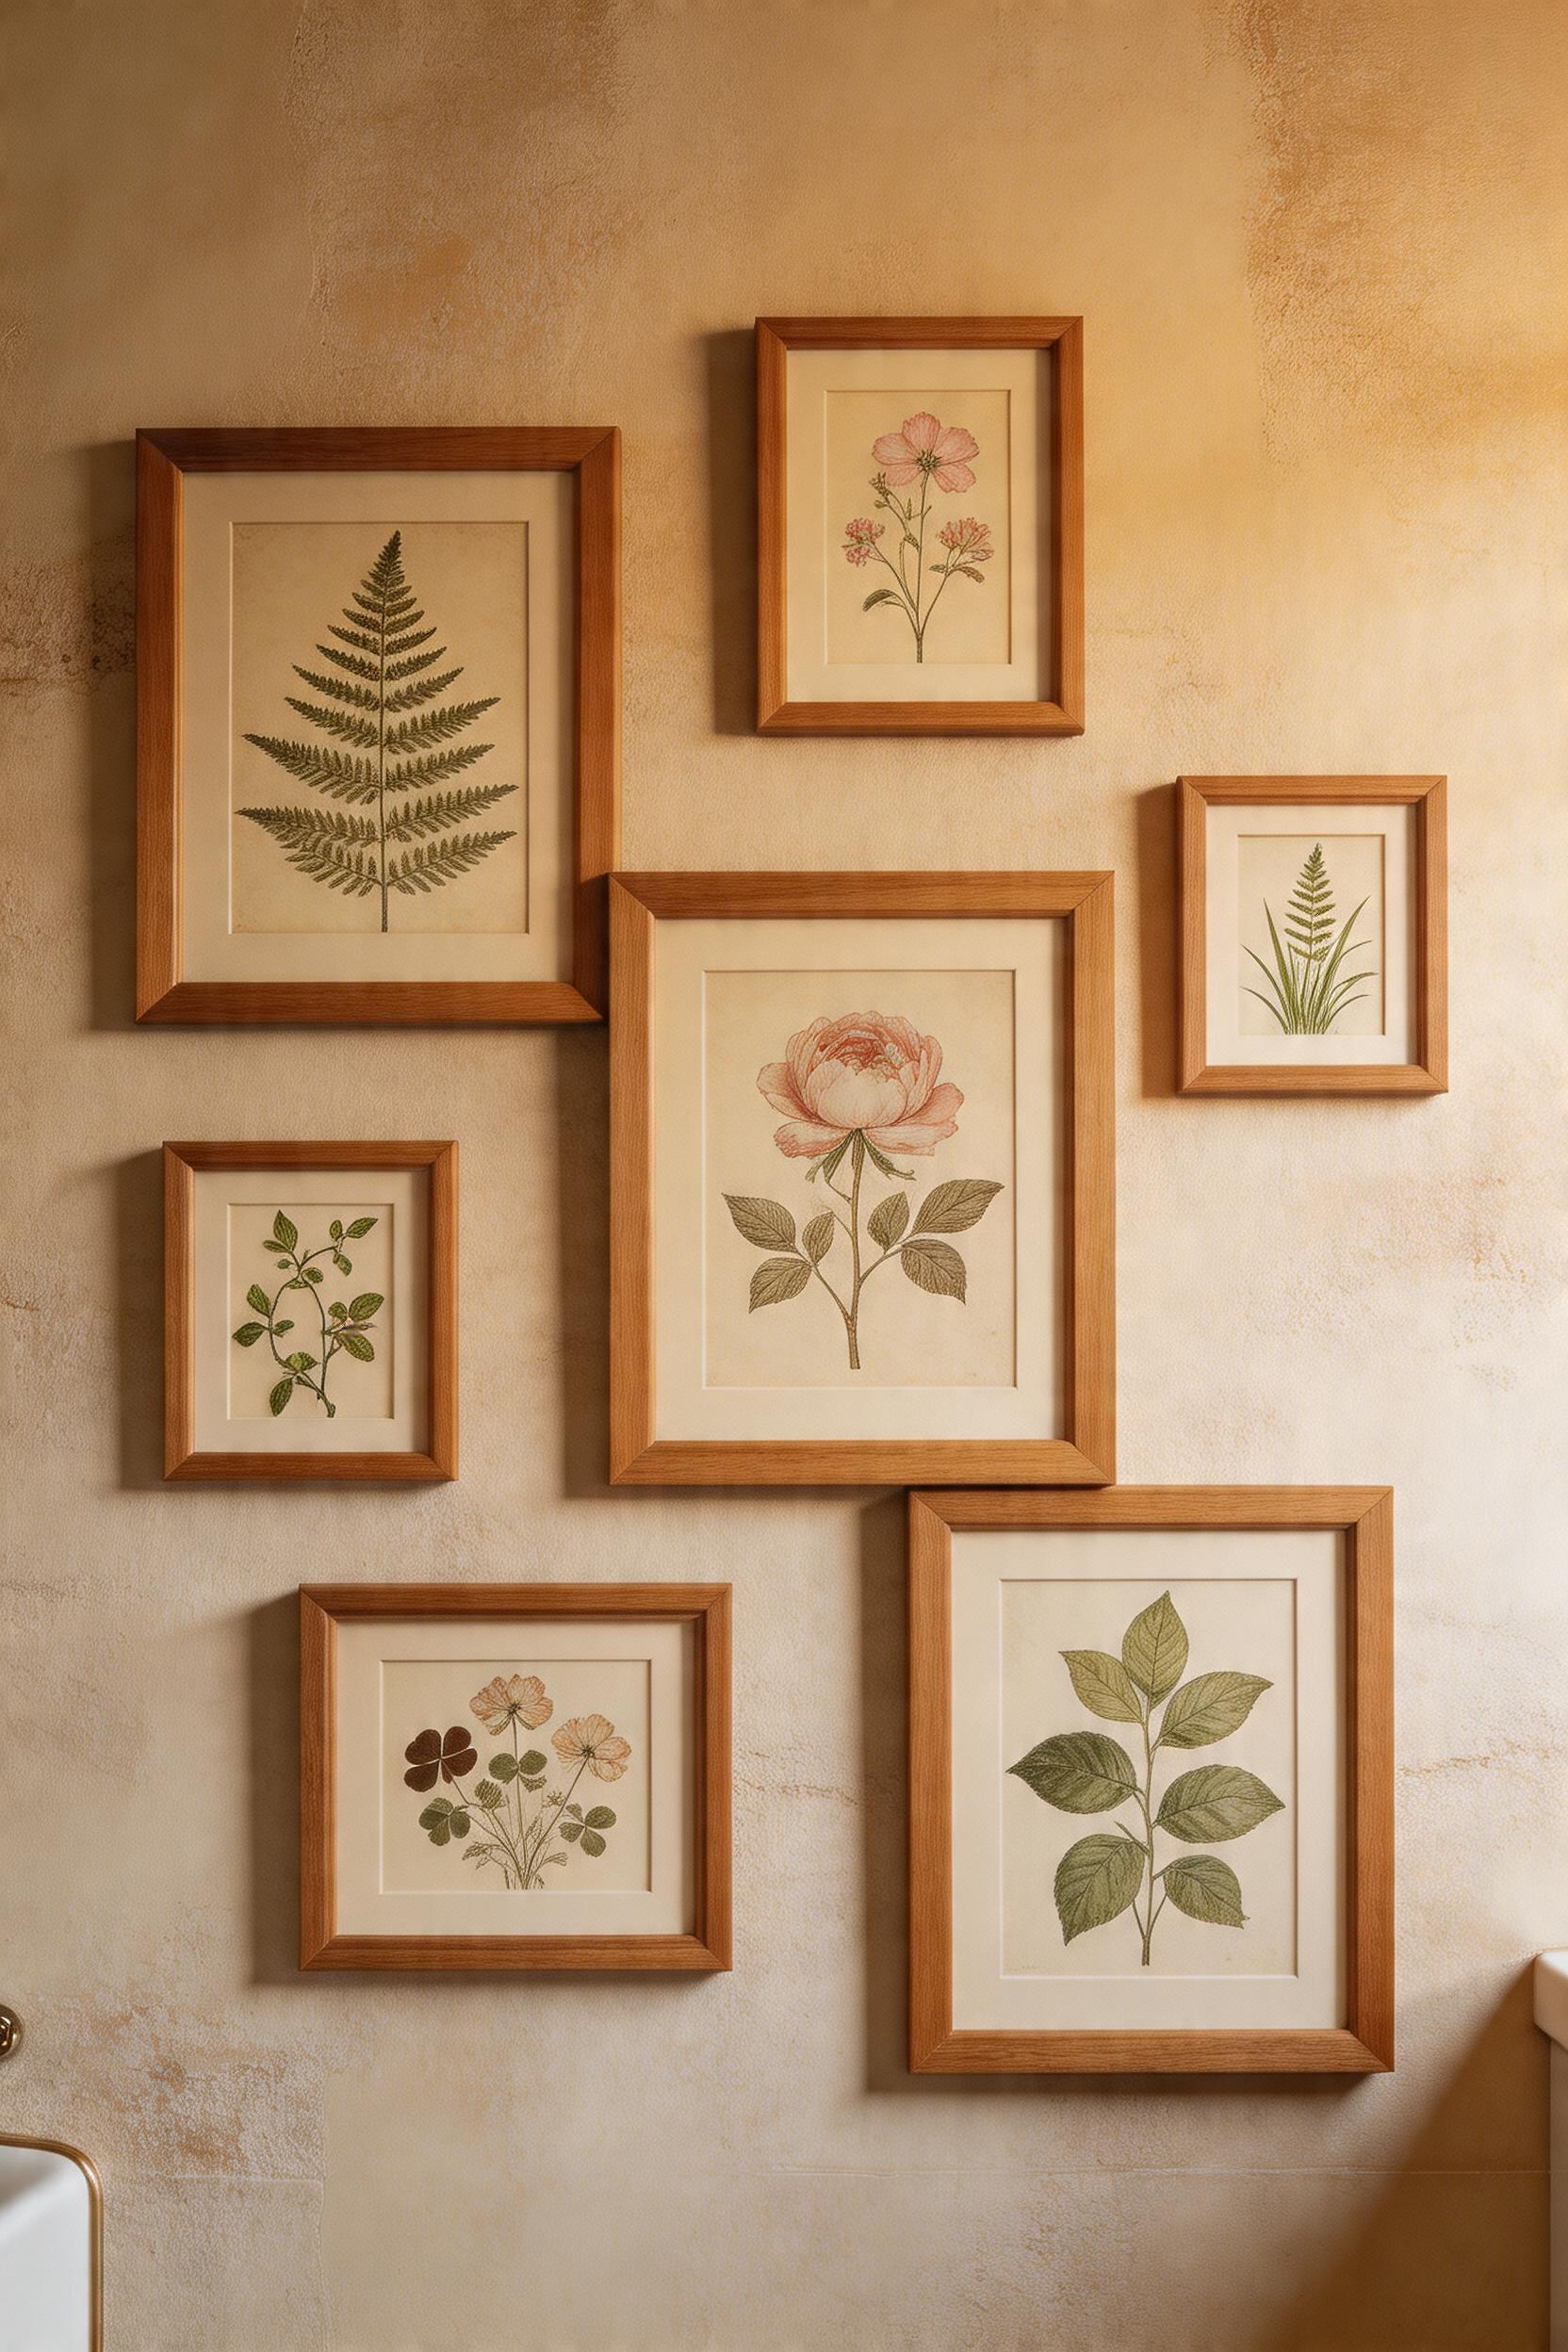
Art in a bathroom is the final detail. It softens architecture. It adds personality after everything else—materials, fixtures, hardware—has done its work.
Antique botanical illustrations are ideal. Redouté’s hand-colored engravings (roses, lilies) are historically valued and widely reproduced. Curtis’s Botanical Magazine’s scientific illustrations have consistent quality. Thornton’s aquatint prints are extraordinarily detailed. These are not high-art reproductions; they’re historical scientific documents that happen to be beautiful.
Public domain sources like the Biodiversity Heritage Library (biodiversitylibrary.org), Royal Botanical Gardens archives, and NYPL Digital Collections offer free downloadable images. Commission archival prints from Etsy sellers ($10–30), art print sites ($5–25), or use professional framing services (Framebridge, $100–200).
Framing for bathrooms is specialized. Acrylic glazing ($2–5 per square foot) is safer than glass—won’t shatter, traps less moisture. Glass is traditional but hazardous in bathrooms; it condenses and can trap humidity. Sealed frames with acid-free mats, humidity-control packets inside, and silicone-sealed corners protect prints from environmental stress. Aluminum frames (non-absorbent) are better than wood; sealed wood is acceptable.
Placement is tactically important. Keep framed botanical art 1 foot+ from direct shower spray. Humidity-controlled areas (vanity wall, far from shower) are better than splash zones. Even sealed frames can be overwhelmed by direct steam.
Grouping follows design principles. Display odd numbers (3, 5, or 7; never 2, 4, or 6). Space frames 2–3 inches apart consistently. Arrange in grid patterns for formal symmetry or salon-style (staggered) for eclectic feel. Small prints (8×10) suit powder rooms; larger prints (11×14 or 16×20) anchor spacious bathrooms. Cover 40–60 percent of the feature wall, leaving breathing room.
You don’t renovate a rustic bathroom all at once. You begin where it matters most: the foundation.
Start with flooring. This is the largest visual plane, the highest cost, and the hardest to change later. Choose stone, encaustic tile, or sealed wood. This decision anchors the entire aesthetic. Everything else filters through this choice.
Next, walls. Paint, shiplap, wainscoting, brick—whatever gives the room texture and period character. These two decisions (floor and walls) establish the bones of your rustic bathroom.
Then fixtures. Vanity, faucet, tub or shower. These should complement floor and walls but offer more flexibility in timing and budget. If your stone floor is slate grey, your vanity can vary—reclaimed wood, painted dresser, manufactured reproduction—but it should feel compatible with that grey.
Lighting and hardware come next—accent choices, easier to upgrade, less costly. These should refine rather than redefine the space.
Finally, accessories. Mirrors, shelving, textiles, art. These layer personality without architectural weight.
This sequencing prevents expensive restarts. You won’t install beautiful reclaimed wood shelving, then realize your floor choice makes them visually compete. You won’t select a vanity, then discover it clashes with wall texture you chose later.
Budget frameworks help. For a full renovation: flooring 20–30 percent, vanity 30–40 percent, fixtures and lighting 15–25 percent, accessories 5–10 percent. For targeted upgrades (keeping existing floor and walls): vanity 40–50 percent, mirror 10–15 percent, lighting 10–15 percent, accessories and hardware 20–25 percent.
The rustic bathrooms that feel most lived-in aren’t the most expensive. They’re the ones where someone thoughtfully chose foundational materials—real stone, real wood, real age—and then resisted the urge to decorate. The materials do the work. Everything else is just honoring them.