Physical Address
304 North Cardinal St.
Dorchester Center, MA 02124
Physical Address
304 North Cardinal St.
Dorchester Center, MA 02124
Discover 19 expert tips for choosing and customizing traditional kitchen cabinets. Learn how to create a timeless, functional kitchen that's the true heart of your home.
Picture this: You walk into a kitchen. The cabinets are that weird “honey oak” from the 90s, the doors don’t quite line up, and one of them hangs open like it’s given up on life. Under the sink, the particleboard is puffed up like a wet cracker from a slow leak nobody noticed. It feels… sad. It’s the set of a domestic drama nobody wants to be in.
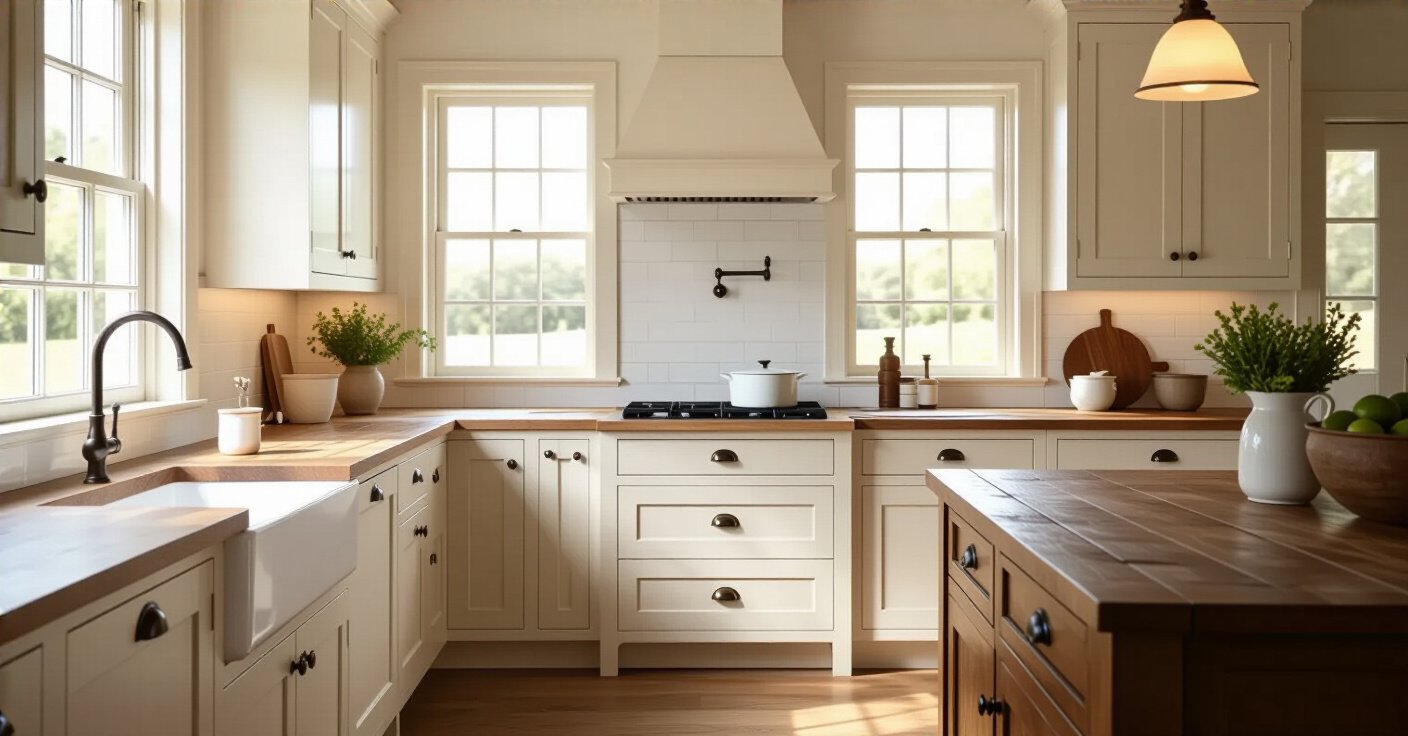
Now, picture this instead: You walk into a kitchen that feels solid, graceful, and permanent. The cabinet doors are perfectly aligned, with a deep, rich finish that makes you want to touch them. The layout just flows. You can imagine Thanksgiving dinners, late-night talks over a glass of wine, and kids doing homework at the island. This kitchen is the heart of the home, the main stage for all the best scenes of family life. Getting there isn’t about luck or just spending a ton of money. It’s about understanding the script—making the right choices on construction, style, and finish. It’s about production value. And that’s what I want to talk to you about.
Before you build anything, you pour the foundation. For a kitchen, that foundation is the cabinet style, the wood they’re made from, and how they’re put together. Get this part wrong, and no amount of fancy countertop or backsplash—the set dressing—is going to save the scene. This is where you decide the fundamental character of your kitchen.
You know what people always ask me? “What cabinet door should I get?” It sounds like a simple question, but it’s like asking a director who to cast as the lead actor. The door style is the main character of your kitchen’s story. It sets the entire tone. A simple, clean Shaker door tells a different story than an ornate, raised-panel door. And picking the wrong one feels… off. Like casting a comedian in a serious historical drama.
The noise you hear everywhere is “Shaker, Shaker, Shaker.” And yes, Shaker is popular for a reason. But true traditional design has so much more depth. Think Raised Panel for a formal, classic look, or Beadboard for a charming, cottage feel. The key isn’t just picking a name you’ve heard; it’s picking a style that matches the architectural story of your house. I once saw a client spend a fortune on gorgeous traditional cabinets for their sleek, modern home. The craftsmanship was stunning, but the story was all wrong. It felt disjointed, and they ended up regretting it.
Once you’ve chosen the story you want to tell with your cabinet doors, you need to choose the material that will bring that character to life, day after day.
Everyone says solid wood is the only way to go. Here’s what actually happened when a client insisted on it for a painted white kitchen. They chose a beautiful, but soft, wood. Within two years, in the humid summers and dry winters, tiny cracks appeared in the paint at every joint. It looked old, but not in a charming, patina-rich way. Just… broken. Solid wood is fantastic for stained finishes where you want to see that beautiful grain, but for paint, it can be a problem.
The real story is you have to cast the right material for the role. For stained cabinets, absolutely go for hardwoods like cherry, maple, or oak. They’re durable and take stain beautifully. But if you’re painting them? Your best bet is often MDF or HDF (High-Density Fiberboard) for the center panel. It’s a dirty word to some purists, but it’s a director’s secret weapon. It’s incredibly stable, won’t expand and contract like solid wood, and gives you a flawless, smooth-as-glass painted finish that will actually last. For the door frames, you still use solid maple or birch for strength. It’s the best of both worlds.
Next, we need to talk about the skeleton holding it all up—the very frame of your cabinetry.
Can we talk about why everyone gets framed vs. frameless cabinets wrong? The common misconception is that frameless, or “European style,” cabinets are somehow cheaper or less sturdy. That’s pure corporate-speak nonsense designed to sell you on one or the other. The truth is, high-quality construction is high-quality construction, regardless of the style. The difference isn’t about quality; it’s about aesthetics and function.
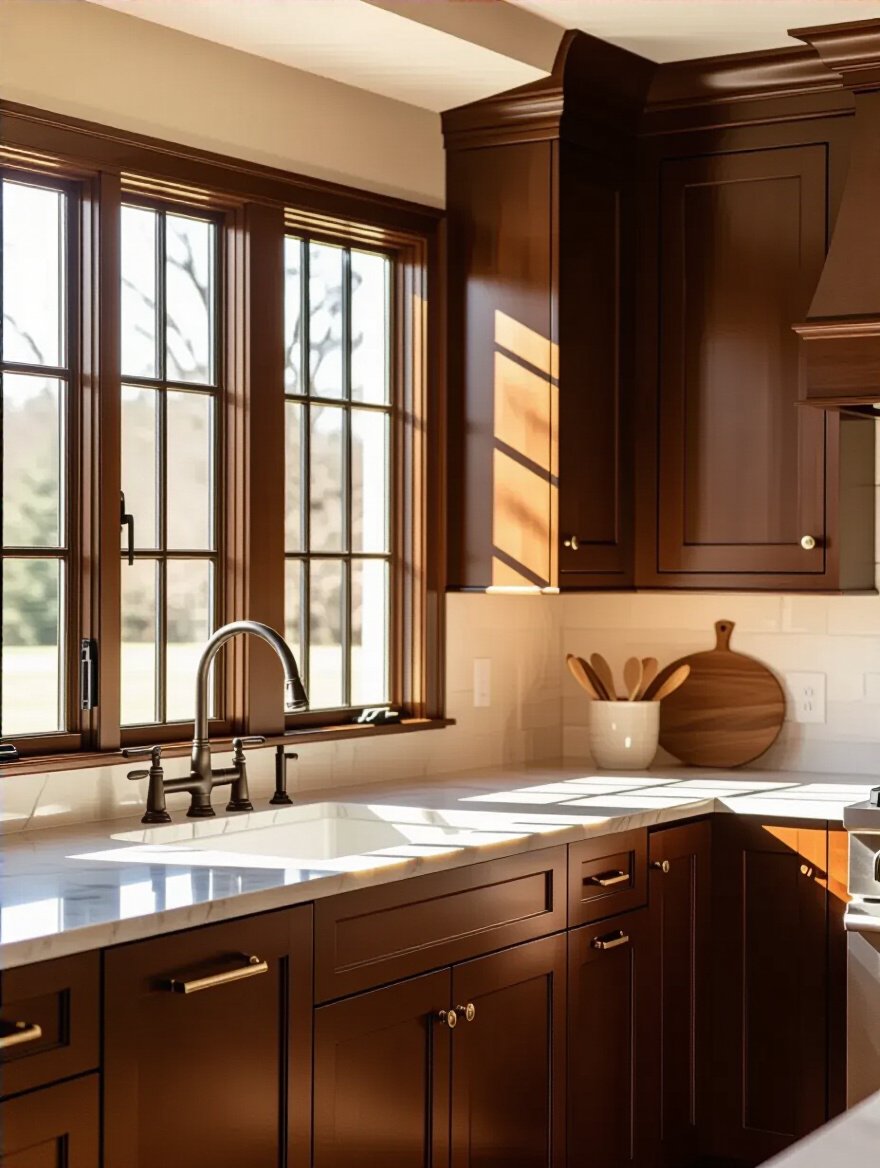
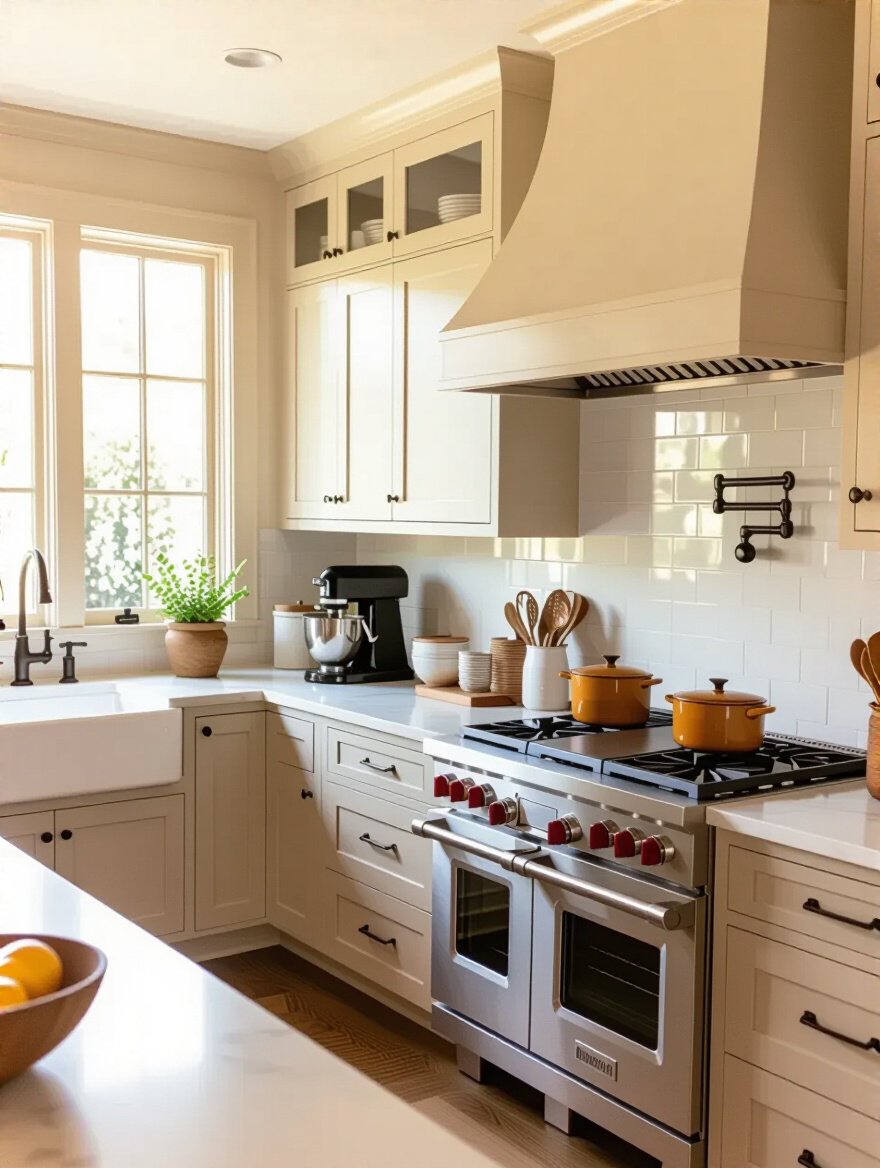
Think of it this way: framed cabinetry is like traditional, hand-drawn animation. There’s a visible frame around every door and drawer, which gives it a classic, furniture-like feel. It’s essential for achieving truly historic looks, like inset doors. Frameless is like modern CGI—it’s a sleeker, full-access system. Because there’s no face frame in the way, you get a little more usable space inside. For a small kitchen, that extra inch can be the difference between fitting your pots and pans or not. The shortcut? Forget the sales pitch. Just go to a showroom and open a door on each. You’ll see the difference in a second.
With the structure decided, it’s time to talk about the costume—the finish that gives your cabinets their final, powerful look.
I used to think picking a finish was simple. Then I helped a friend who chose a gorgeous deep blue for her cabinets based on a tiny 2-inch paint chip. When the cabinets arrived and were installed, her sunny kitchen made that deep blue look electric, almost cartoonish. It was a disaster, and a very expensive fix. The light in your room is the cinematographer, and it has the final say on how any color or stain will look.
The shortcut everyone should know is to get a big sample. I’m talking a full sample door, at minimum 12×12 inches, painted or stained in your chosen finish. Take it home. Look at it in the morning light, under your artificial lights at night, and next to your countertop and floor samples. The other piece of BS is that all paint is created equal. Ask for a catalyzed conversion varnish. It’s a much tougher, more durable finish than standard lacquer and will stand up to the abuse of a real working kitchen. It’s the difference between a costume that falls apart after one scene and one that lasts the whole production.
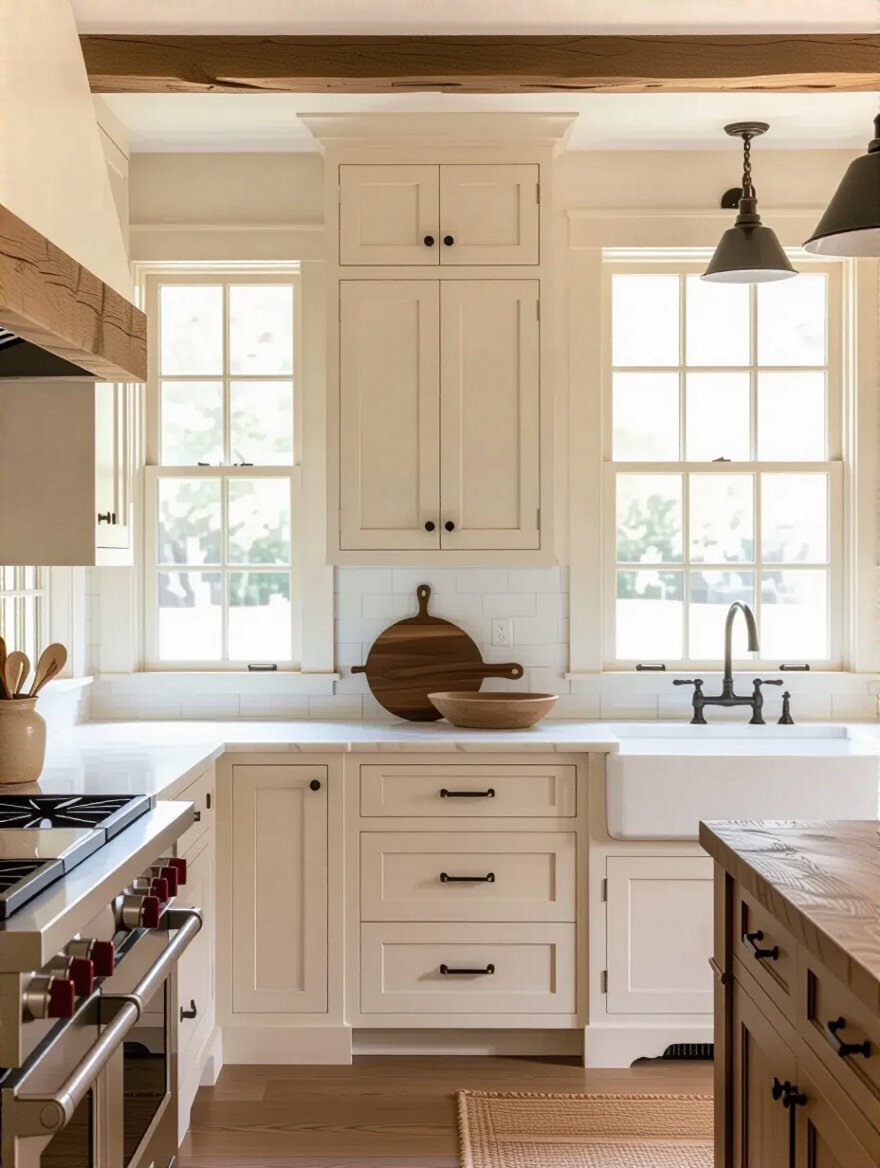
Now for the final touch, the small details that complete the character’s look and make it believable.
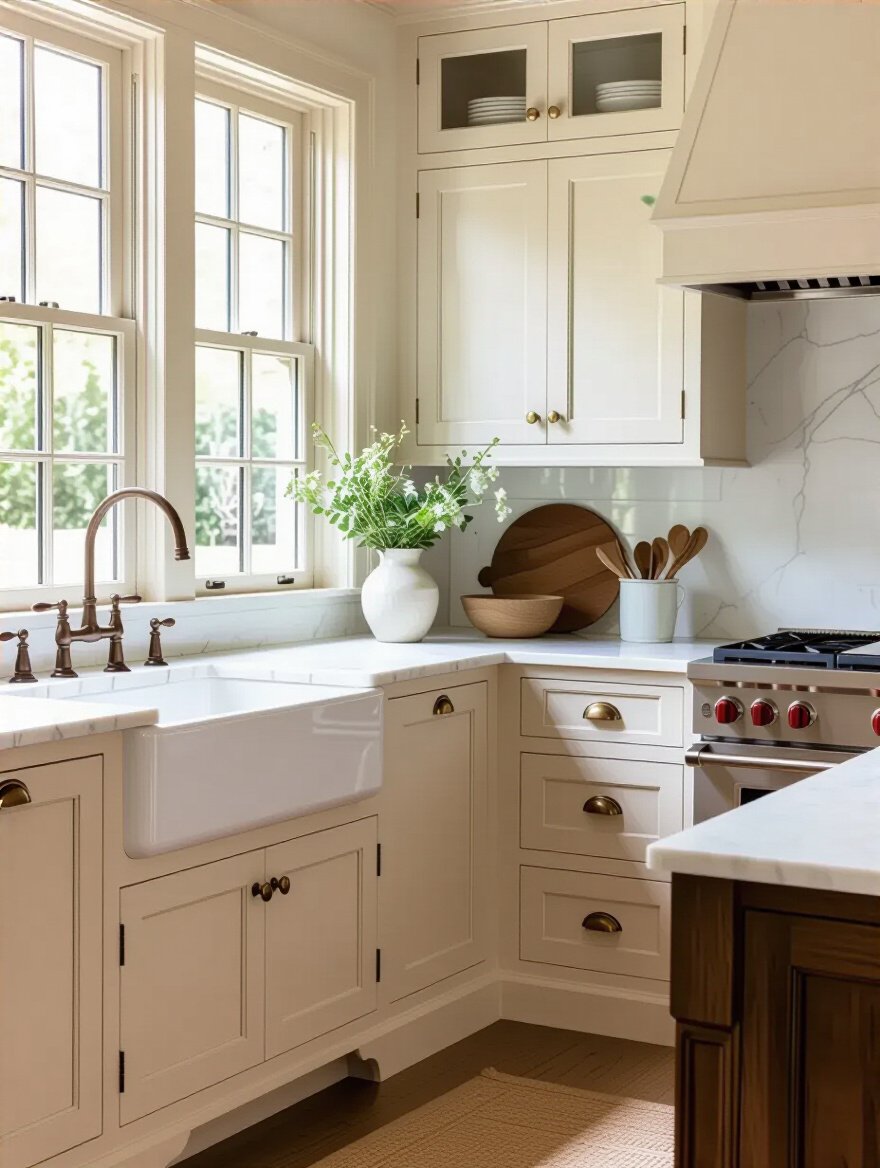
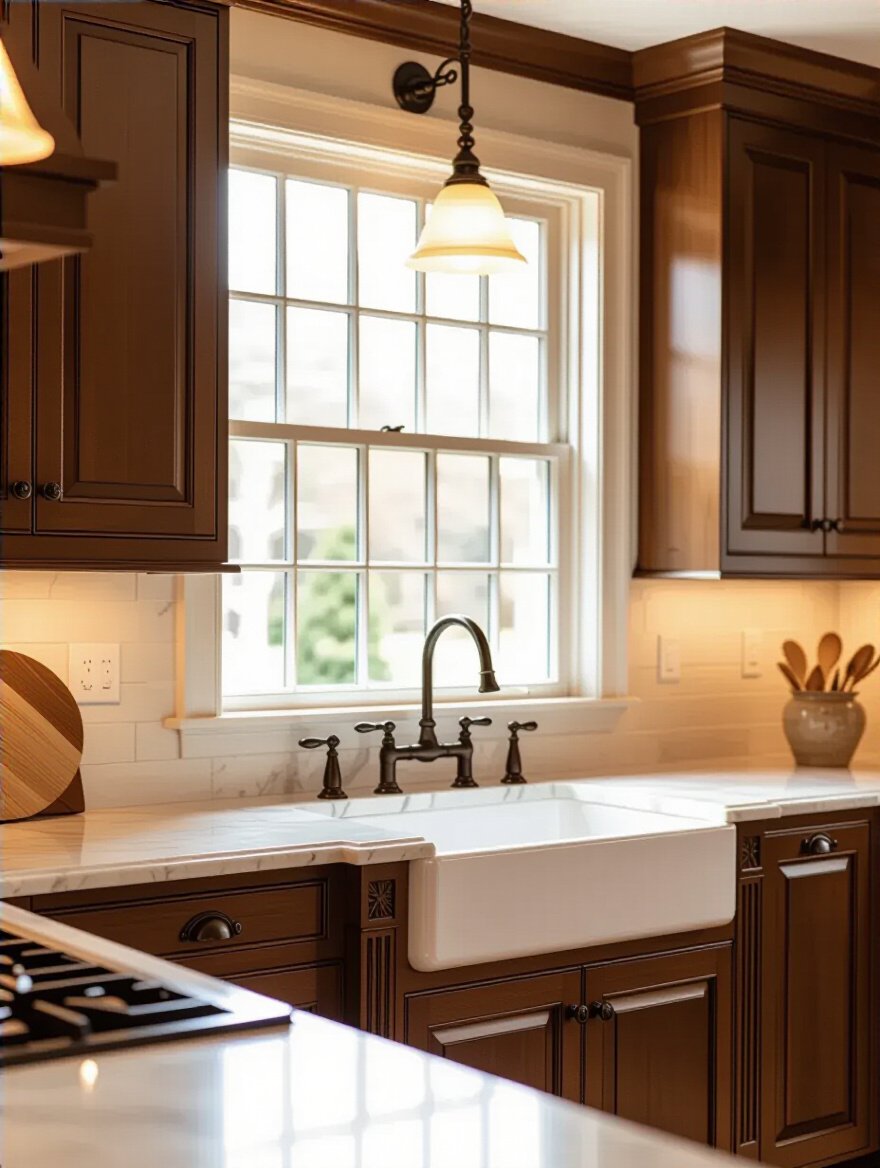
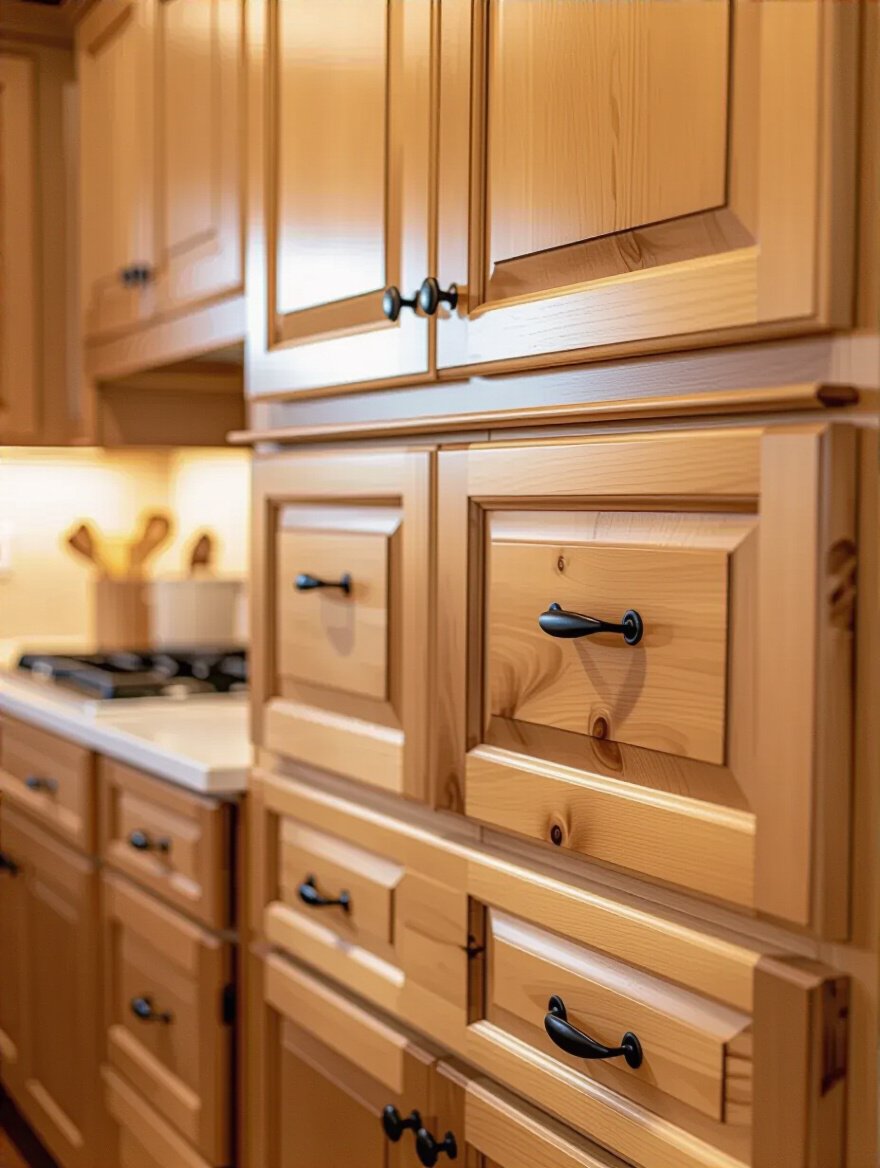
Here’s my pet peeve: seeing a beautiful, thoughtfully designed traditional kitchen with the wrong hardware. It’s like watching a period film where a character is wearing a digital watch. It completely shatters the illusion. The hardware—the knobs, the pulls, the hinges—is the jewelry of the kitchen. It has to match the era and style of the cabinets, or the whole look feels cheap and inauthentic.
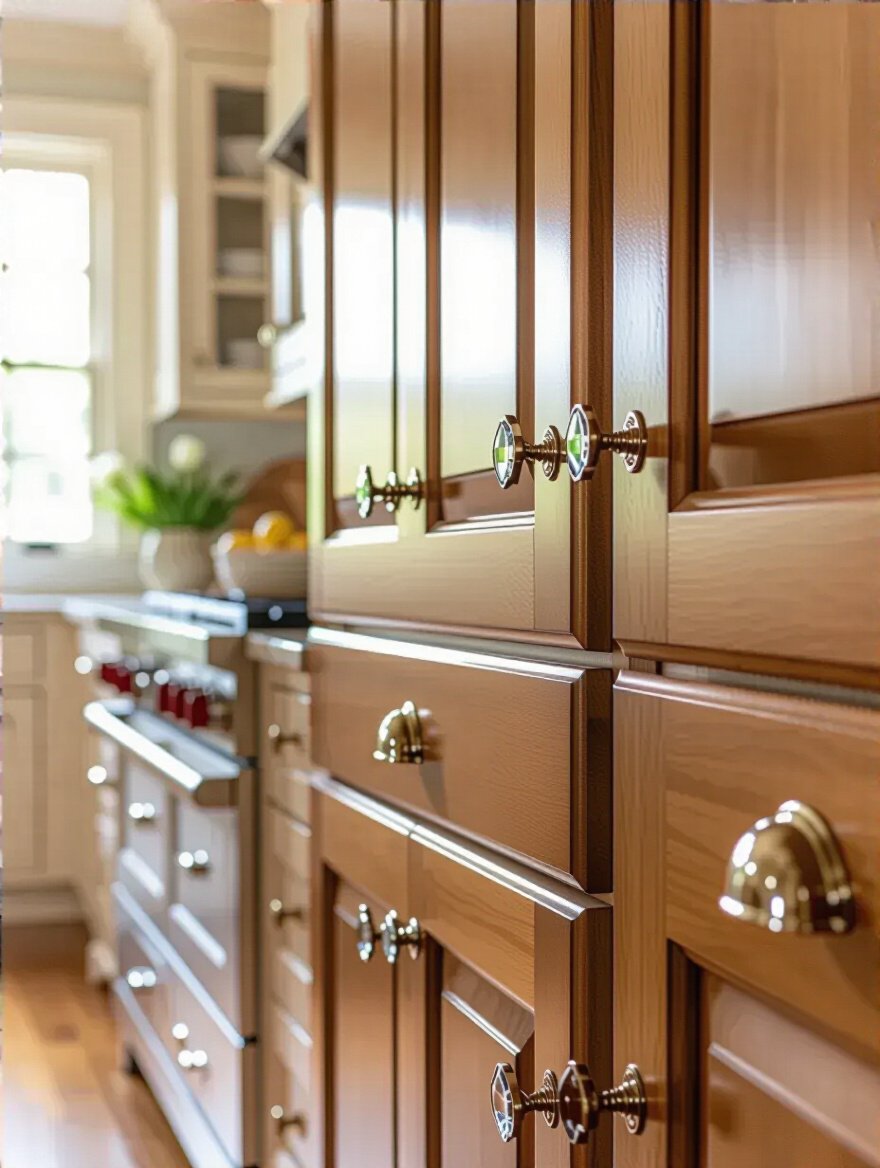
You wouldn’t put sleek, modern stainless steel bar pulls on a rustic, farmhouse-style cabinet. It just clashes. You need to do a little research. A Victorian kitchen might call for ornate brass pulls. A simple Shaker kitchen looks best with simple wooden knobs or classic cup pulls. A client of mine was restoring a 1920s Arts and Crafts home. They agonized over every detail, but almost put generic brushed nickel knobs on the cabinets. I convinced them to hunt down some hammered copper hardware true to the period. It was a small change, but it elevated the entire project from “nice renovation” to “authentic restoration.”
With the core aesthetic choices made, it’s time to block the scene and make sure everything flows perfectly.
This is where the cinematic vision meets the practical reality of daily life. A kitchen can look like a million bucks, but if the layout is clunky and you’re constantly walking in circles, it’s a failed production. We’re designing a set that needs to work for the actors—your family—every single day.
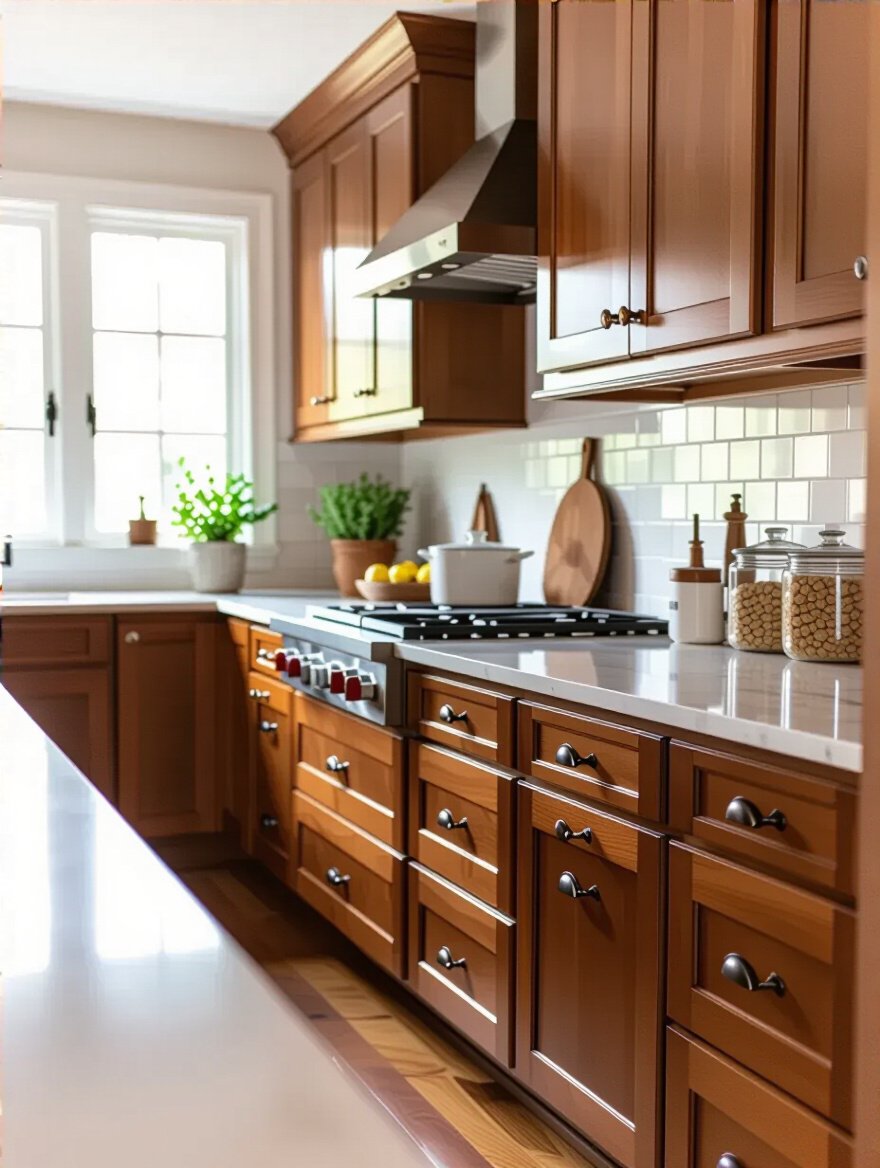
A kitchen layout isn’t just about where the fridge and stove go. It’s about choreography. It’s about creating a flow that makes cooking, cleaning, and just living in the space feel effortless. The “work triangle”—the path between the sink, stove, and refrigerator—is the classic rule for a reason. You want that path to be clear and efficient, without an island or a dog bowl in the middle of it.
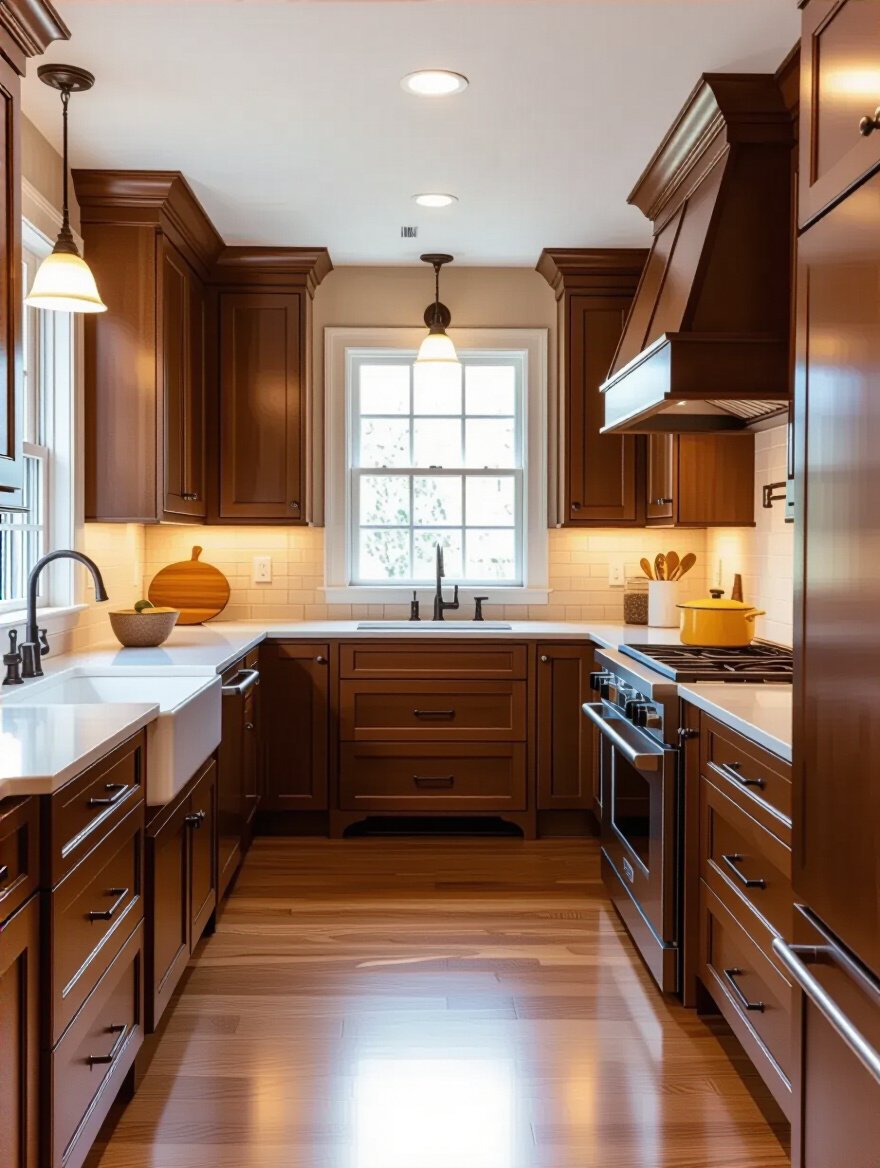
I learned this the hard way in my own first apartment. It was a galley kitchen, and the previous owner had put the trash can right next to the stove. Every time I needed to throw something away while cooking, I had to do this awkward side-shuffle. It was a tiny annoyance that grew into a major frustration. When I design a space now, I think about those movements. Where will you chop vegetables? Where will the dishes go after they’re washed? We create zones—a prep zone, a cooking zone, a cleanup zone—and ensure the cabinetry in each zone supports its function.
Next, let’s talk about the details that make standard cabinets look like they were custom-built for a movie star’s home.
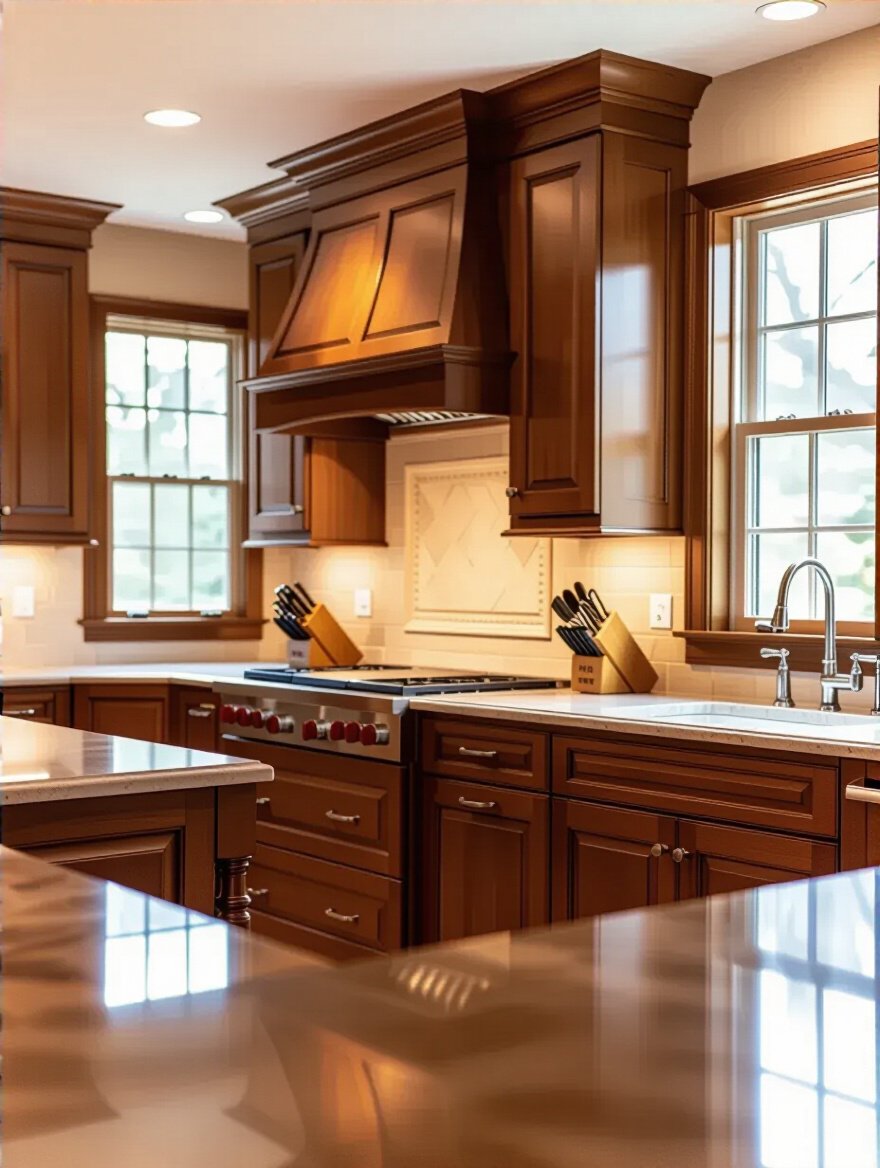
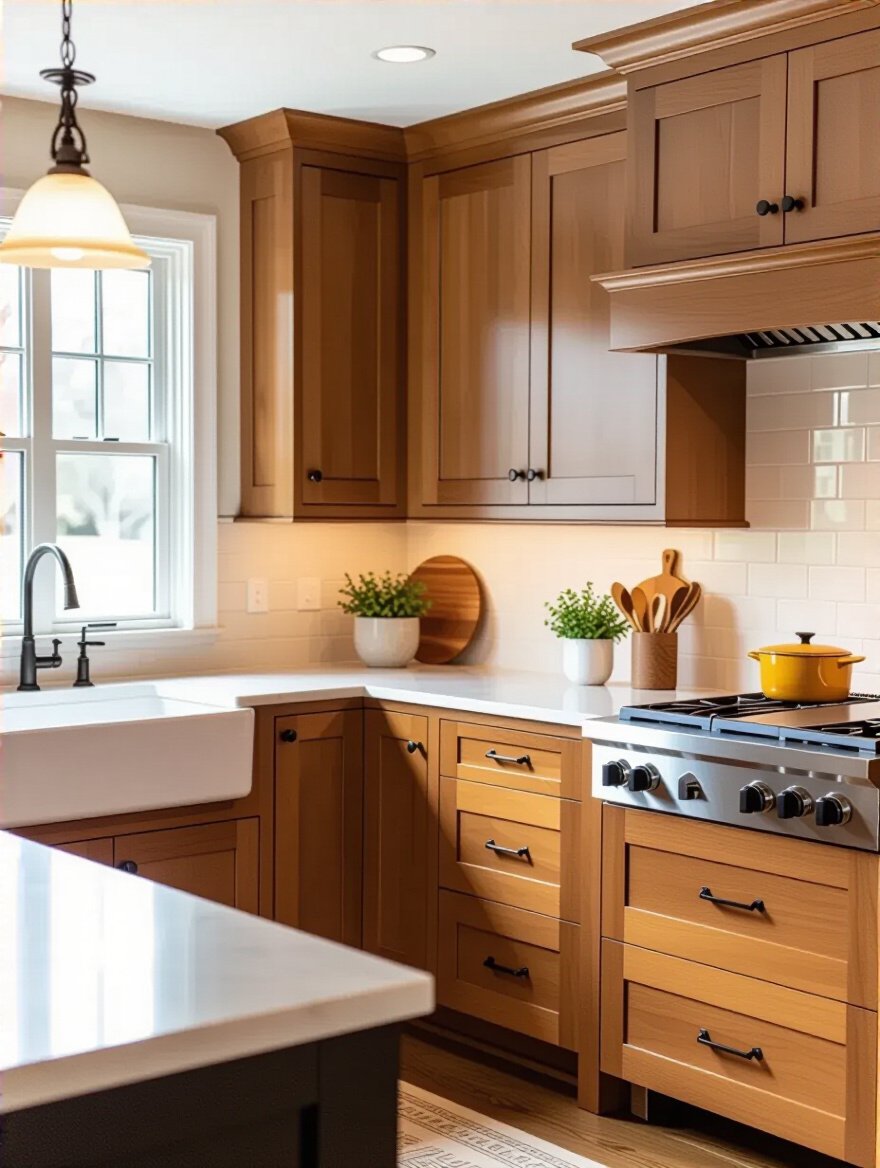
Want to know the secret to making off-the-shelf cabinets look like they cost three times as much? It’s all about the trim. Crown molding at the top, light rail at the bottom, and decorative baseboards along the floor. These elements are the architectural equivalent of a perfect picture frame. They bridge the gap between the top of the cabinets and the ceiling, making everything look intentional, built-in, and grand.
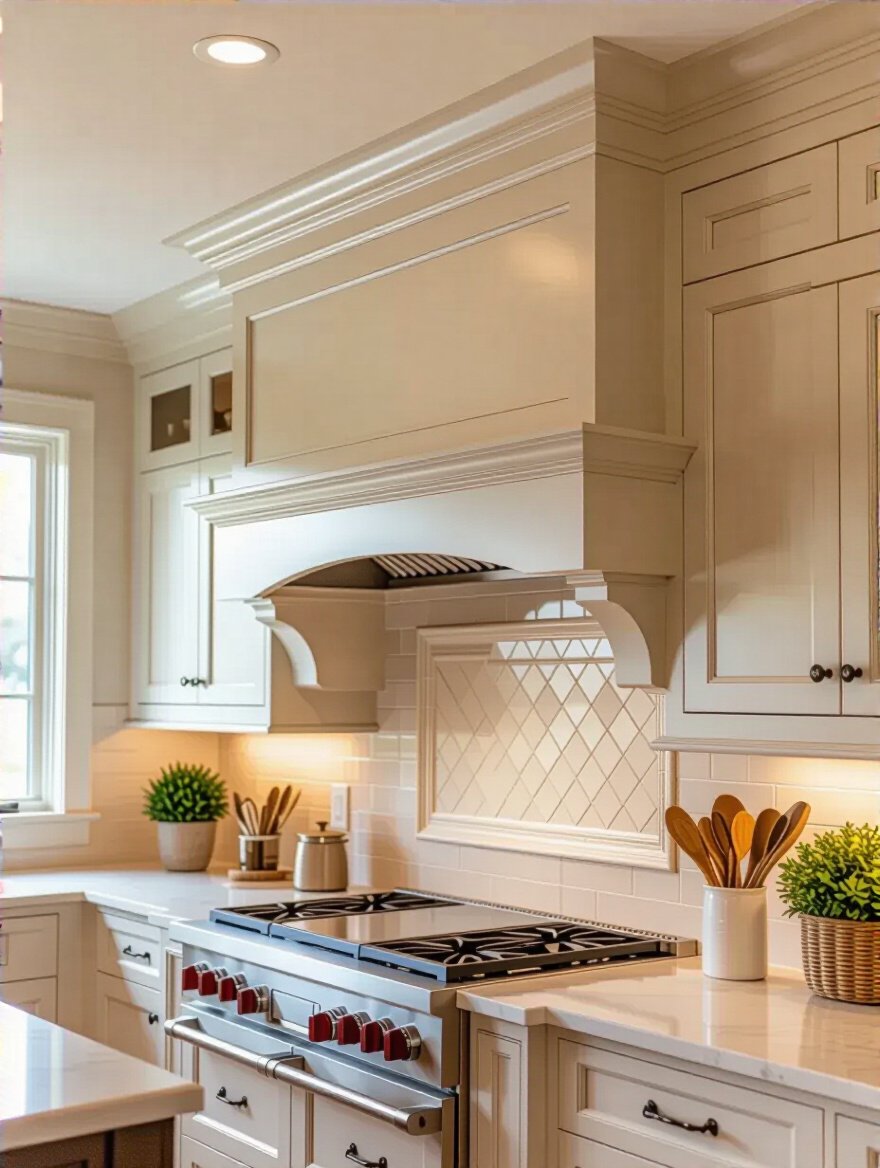
A good cabinet installer is an artist with a miter saw. They can make trim work seamlessly conceal uneven ceilings or walls, which, trust me, almost every house has. I once watched a client’s kitchen transform from “a bunch of boxes on a wall” to a “stunning, custom-built kitchen” in the two days it took to install the crown molding. It adds height, depth, and a sense of permanence that you just can’t get without it. Don’t let anyone tell you it’s an unnecessary expense. It’s the detail that sells the entire look.
For those truly committed to an authentic, high-end feel, there’s one choice that stands above the rest.
If you want the undisputed mark of high-end, traditional craftsmanship, you choose inset doors. This is where the cabinet door sits perfectly inside the cabinet frame, flush with the front, instead of sitting on top of it like most modern cabinets. It’s a style that dates back centuries, and it screams quality because it requires an insane level of precision to get right. The gaps around the door have to be perfectly even, usually just 1/16th of an inch.
This isn’t a place to cut corners. A bad inset job, with uneven gaps and rubbing doors, looks worse than a standard overlay door. You need a true craftsman to build and install them. But when it’s done right, the result is breathtaking. It looks like a beautiful piece of custom furniture. One of my favorite projects was a historic farmhouse where the client invested in inset cabinets with exposed butt hinges. It wasn’t a cheap choice, but it made the kitchen feel like it had been there for 100 years, in the best possible way. It honored the home’s soul.
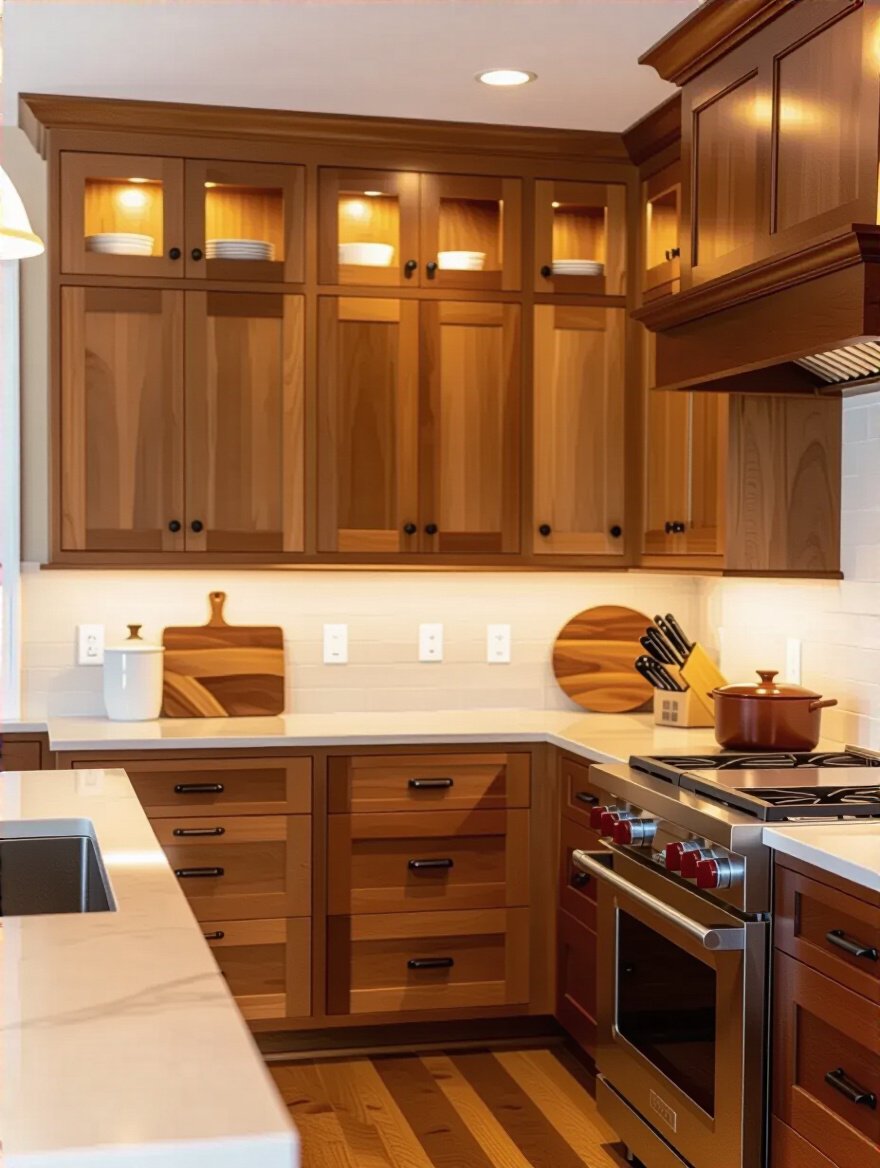
Now let’s look at the supporting cast—the surfaces that have to harmonize with your beautiful cabinets.
The biggest mistake I see people make is falling in love with individual elements in a showroom without seeing how they work together. They’ll pick a busy, dramatic granite countertop, a flashy mosaic backsplash, and a heavily patterned floor tile. Each one is beautiful on its own, but together? It’s a visual riot. It’s like having three divas on set all trying to upstage each other. The result is chaos.
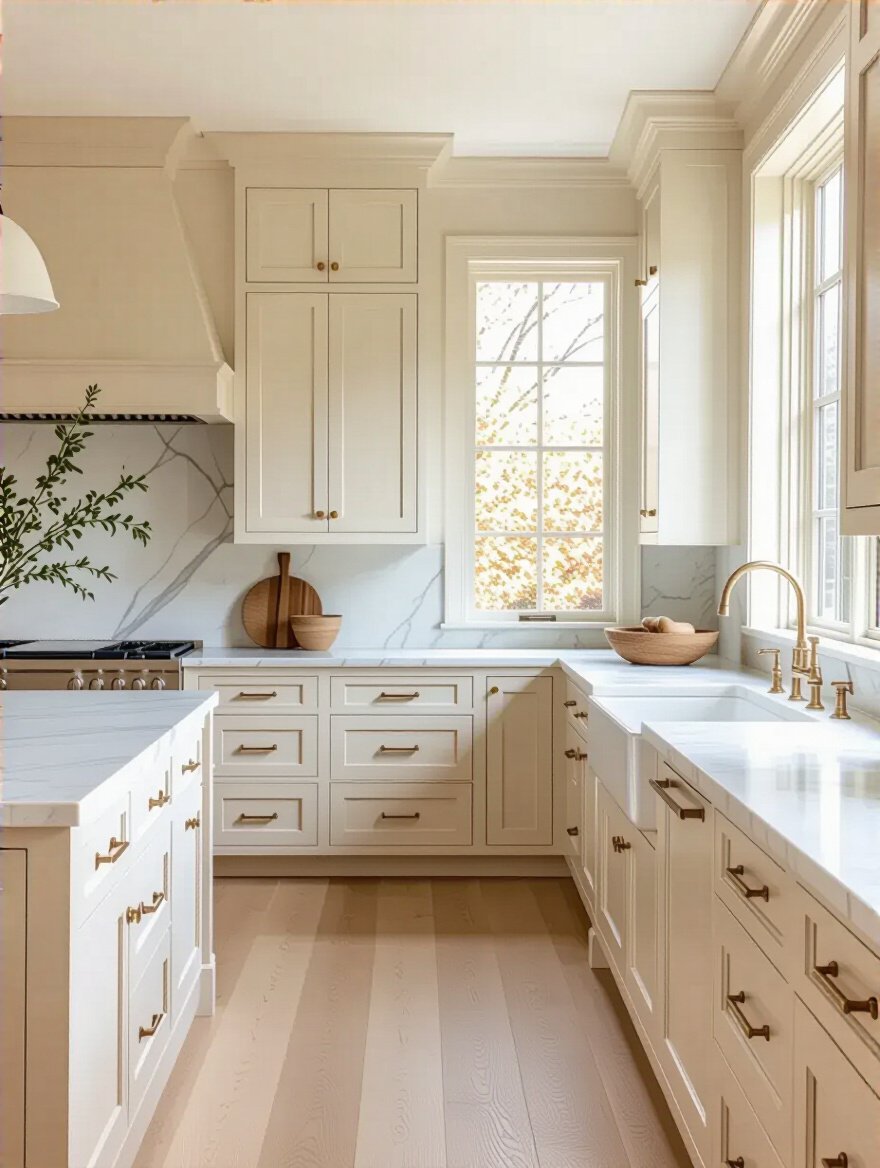
The key is to let your cabinets be the star and choose countertops and flooring that are strong supporting actors. If you have richly-grained wood cabinets, maybe a quieter, solid-colored quartz countertop is the way to go. If you have simple, white-painted shaker cabinets, you have more room to play with a dramatic marble or soapstone. The shortcut is simple: get all your samples together—the cabinet door, the countertop, the floor, the backsplash tile, the paint swatch—and put them together in your actual kitchen. Live with them for a few days. See how the light hits them. Let them tell you if they belong in the same scene.
Of course, none of this incredible design can happen without securing the funding for the production.
“How much will it cost?” is the first, and most important, question. And here’s the brutal truth: quality cabinetry is going to be the biggest line item in your kitchen budget. Everyone sees the TV shows where they remodel a kitchen for $15,000 and thinks that’s realistic. It’s not. That’s reality TV, not reality. For a good quality, semi-custom traditional kitchen, you should expect the cabinets alone to eat up 30-50% of your total budget.
The most important thing you can do is get at least three detailed quotes from reputable dealers or cabinet makers. And make sure you’re comparing apples to apples—same wood, same construction (plywood box, not particleboard), same finish, same hardware. Then, whatever that final number is, add a 15-20% contingency fund on top of it. Always. I’ve never seen a renovation project, not once, where there wasn’t an unexpected surprise. Maybe the wall isn’t straight, or the plumbing isn’t where it should be. That contingency fund isn’t a “nice to have”; it’s what keeps your project from grinding to a halt.
Once the budget is locked, we can start adding the clever features that make a traditional kitchen truly shine in the modern world.
A beautiful set is one thing. A beautiful set that works is another. This is where we embed modern functionality so seamlessly into the classic design that you get all the convenience without sacrificing any of the charm. These are the practical special effects that make life easier.
If you do only one thing to upgrade the function of your kitchen, do this: make almost all of your lower cabinets drawers, not doors with shelves. A cabinet with a shelf is a dark cave where Tupperware lids and old appliances go to die. You have to get on your hands and knees with a flashlight to find anything. It’s terrible design, and yet it’s everywhere.
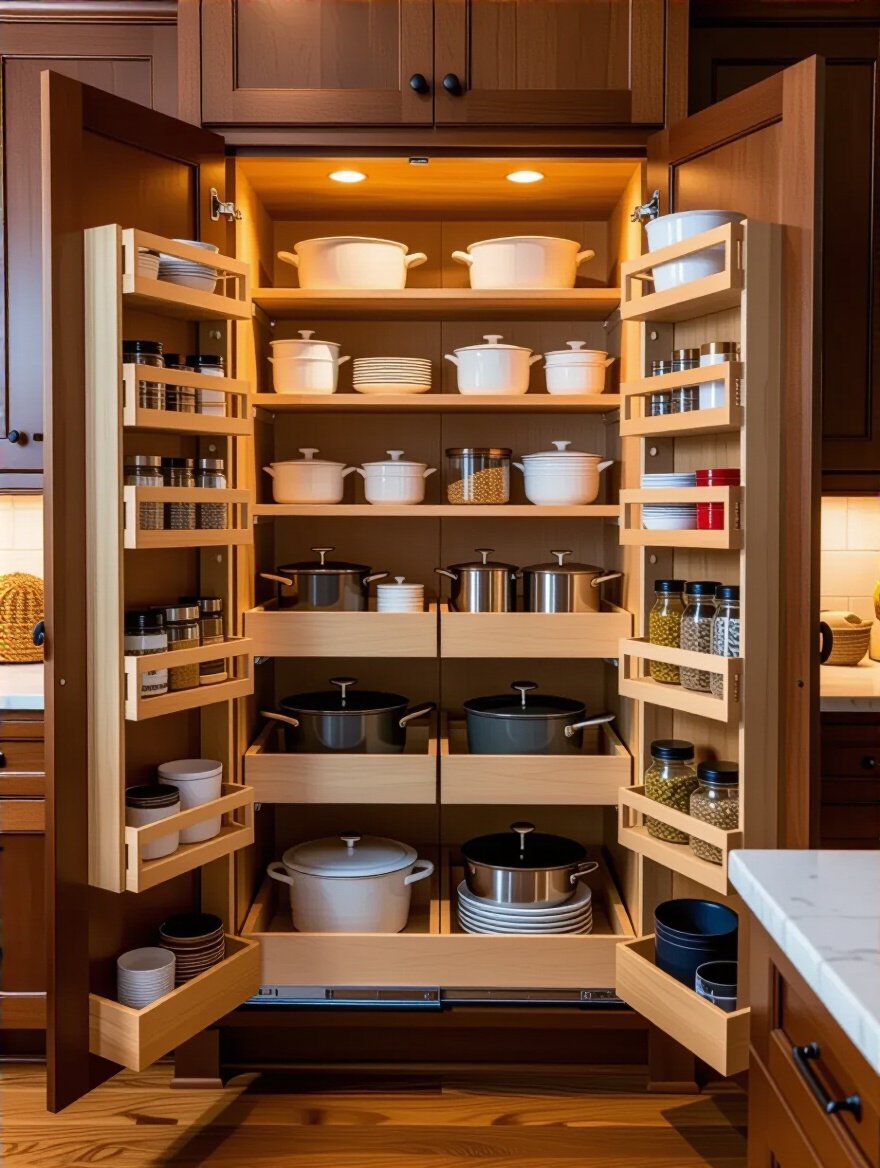
Full-extension pull-out drawers and shelves are a complete game-changer. You pull it out, and you can see everything from above, all at once. Nothing gets lost in the back. For your tall pantry cabinet, get pull-out trays. For your spice cabinet, get a narrow pull-out rack. I had a client who was adamant about her traditional kitchen having “no modern gimmicks.” I convinced her to put drawers in the island. A month after it was done, she called me just to say, “The drawers. I can’t believe I ever lived without them.” It’s the single best functional upgrade you can make.
Now, let’s make sure the tools you use every day have a designated home.
A great set design anticipates the actor’s needs. A great kitchen design does the same for the cook. Instead of scattering your appliances all over, you create dedicated zones. For example, a “beverage station” with the coffee maker, mugs, and maybe a small fridge for milk, all in one spot. Or a “baking zone” with the stand mixer on a lift that pops out of a cabinet, with drawers below for flour, sugar, and pans.
This isn’t about being overly rigid; it’s about being smart. It reduces traffic jams in the kitchen and makes your daily routines smoother. A client who was an avid coffee lover had her espresso machine on one counter, the grinder on another, and the mugs in a cabinet across the room. We designed a small, dedicated coffee bar for her new kitchen. It consolidated a three-stop process into one elegant, efficient station. It just makes sense.
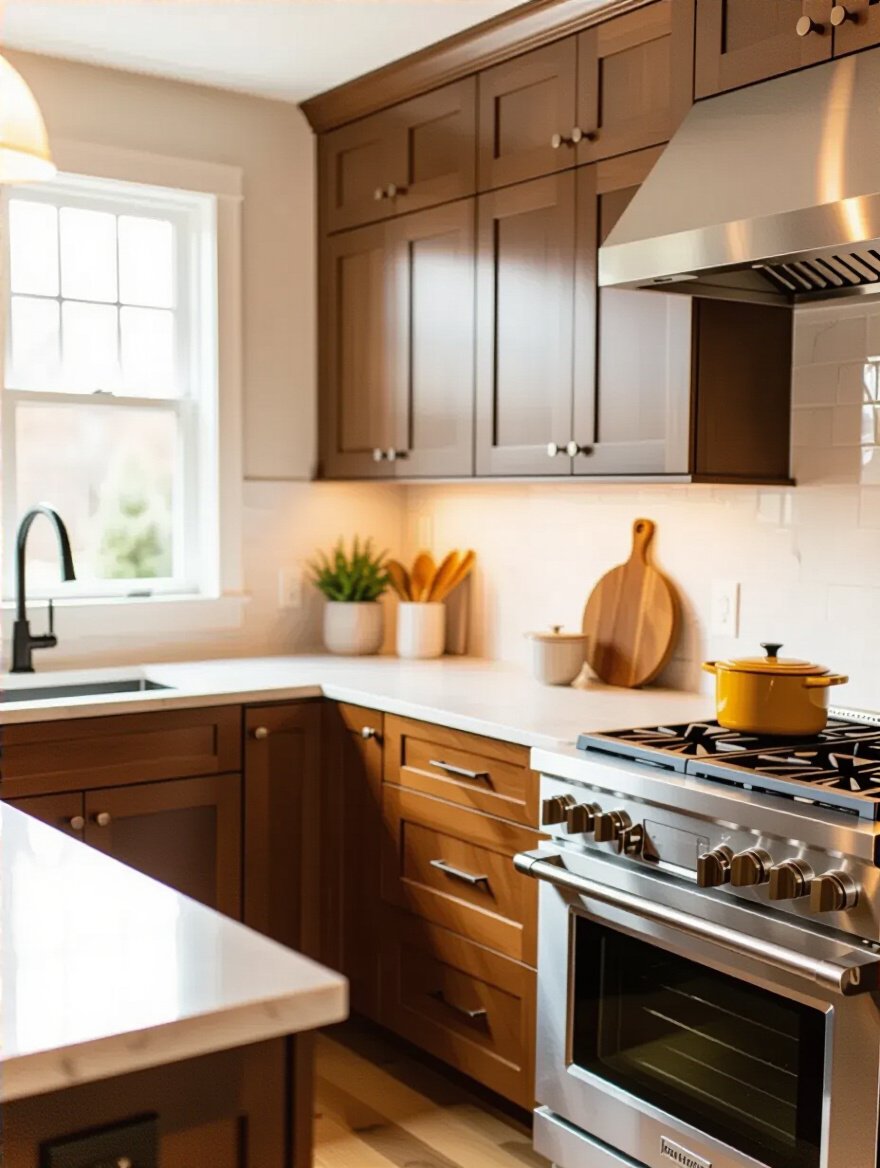
Now for a touch of elegance that adds light and personality.
Solid walls of wood cabinetry can feel heavy and monolithic. The best way to break that up, add a sense of depth, and bring in light is to use glass-front doors in a few strategic spots. Think of it as opening a window into your kitchen’s personality. It’s the perfect place to display your beautiful glassware, your grandmother’s china, or a collection of cookbooks.
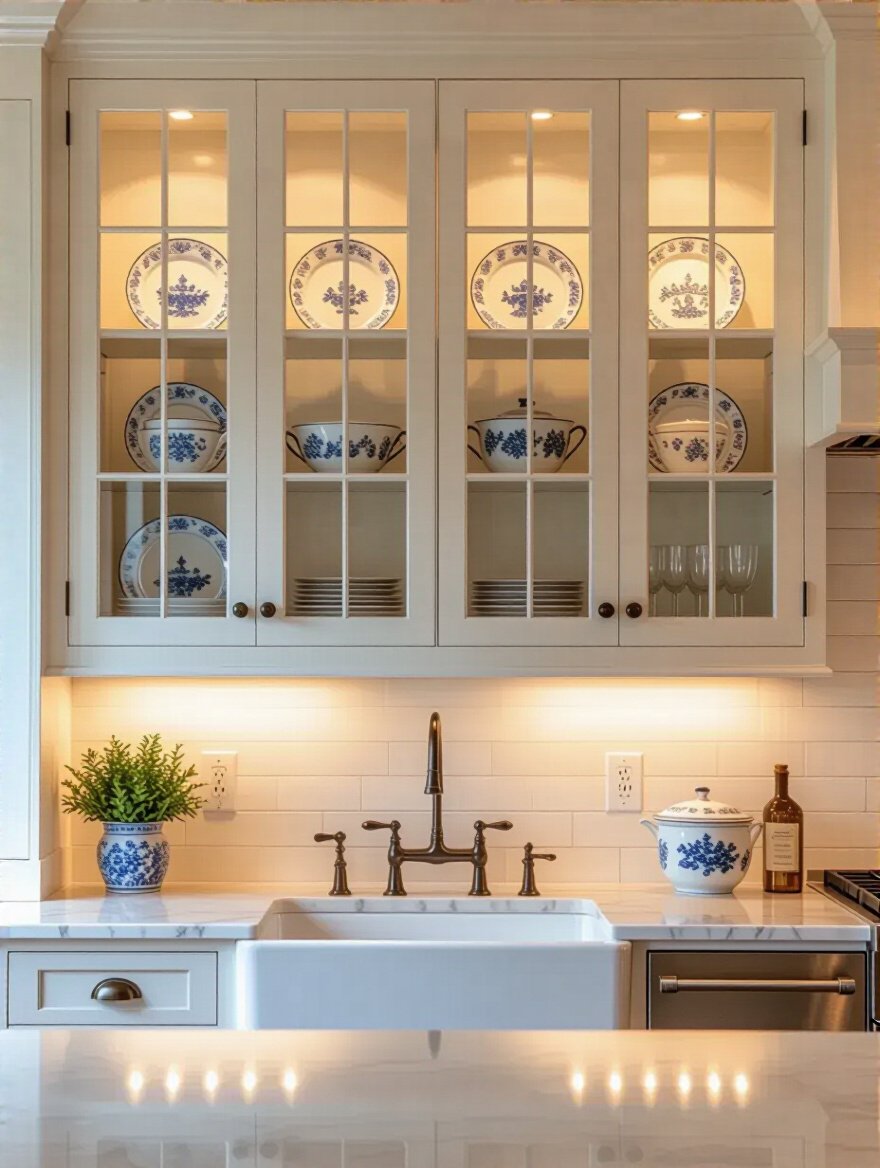
The key word here is strategic. Don’t put glass doors on the cabinet where you stuff your plastic containers and mismatched coffee mugs. This is for curated display. A pair of glass-front cabinets flanking a range hood or a sink looks fantastic. And you don’t have to use plain clear glass. Seeded glass gives a wonderful vintage, slightly obscured look, while reeded or fluted glass adds texture and elegance. It’s a chance to add a layer of custom detail that really elevates the entire design.
To make those glass cabinets truly pop, you have to light them from within.
As someone who designs home theaters, let me tell you: lighting isn’t an accessory, it’s everything. It sets the mood, directs the eye, and makes a space functional. A kitchen with only a single, harsh overhead light is like a movie shot under fluorescent office lights—it’s flat, uninviting, and makes everyone look terrible. A truly great kitchen has layers of light.
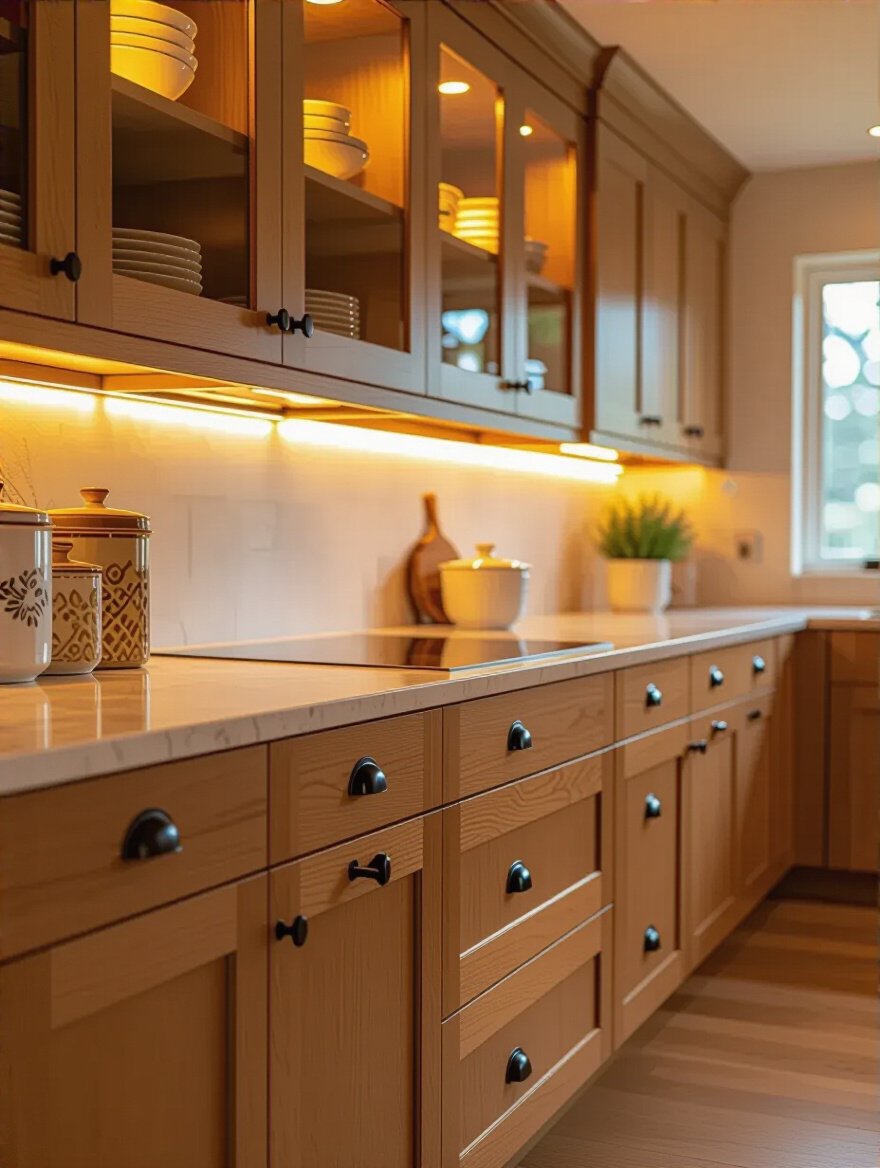
Under-cabinet lighting is non-negotiable. It illuminates your workspace on the countertops, eliminating shadows cast by your body. It’s the most important task lighting you can have. Then, you add lighting inside those glass-front cabinets I mentioned. This is your accent lighting. It turns your displayed items into a beautiful feature and provides a warm, ambient glow in the evening. Add dimmers to everything, and you have complete control over the scene, from bright and functional for cooking to low and intimate for a late-night chat.
Finally, let’s add the kind of architectural details that announce “this is a high-end production.”
Corbels and pilasters—those carved, decorative support brackets and columns—are the elements that transform cabinets from mere boxes into pieces of fine furniture. Placing corbels under a countertop overhang on an island, or using pilasters to frame a range hood, adds a level of architectural heft and gravitas that you can’t get any other way.

This is another area where “less is more.” You don’t need them everywhere. Used sparingly, they create powerful focal points and make the whole kitchen feel more custom and substantial. We used two oversized, elegantly carved corbels to support the range hood in an English Country-style kitchen I designed. That simple addition turned the cooking area into a grand, hearth-like centerpiece for the entire room. It’s those kinds of details that add immense perceived value.
Once your masterpiece is built, you have to protect your investment for the long run.
The final act isn’t the installation; it’s the ongoing care. A well-built traditional kitchen is an asset that should last for decades. But like any high-performance machine or work of art, it requires a little maintenance to keep it looking and working its best.
People get this so wrong. They see a greasy spot and reach for some harsh, all-purpose cleaner or an abrasive scrub sponge. That’s the fastest way to ruin your cabinet’s protective top coat, leaving the finish dull and vulnerable. All that fancy, expensive catalyzed varnish can be stripped away by the wrong chemicals.
Here’s the only cleaning recipe you will ever need: a soft, microfiber cloth, a squirt of gentle dish soap (like blue Dawn), and warm water. That’s it. Wipe down the cabinets, then immediately wipe them dry with another clean, dry cloth. Never let water sit on the wood. For stubborn grease, you can use the same solution, just let it sit for a minute before wiping. Forget the oily polish sprays; they just attract dust and build up a sticky film over time. Simple is best.
And when minor accidents happen, you need to act fast.
It’s going to happen. Someone’s going to bang a chair into a cabinet, or a dropped can is going to leave a dent. Don’t just sigh and ignore it. That tiny break in the finish is an open invitation for moisture and grime to get in and start doing real damage. What starts as a tiny scratch can eventually lead to the paint peeling or the wood underneath swelling.
Go to the hardware store and get a good quality set of touch-up markers and wax sticks that match your cabinet’s finish. They cost next to nothing and are your best friend. For a small scratch, you just color it in with the marker. For a small dent or gouge, you rub the wax stick into it to fill the gap. It takes five minutes, costs a few dollars, and can prevent a repair that could cost thousands down the road. It’s the easiest, cheapest insurance policy for your kitchen.
These small acts of care pay huge dividends when it’s time to sell.
A dated, worn-out kitchen can be a deal-breaker for home buyers. But a beautiful, classic, well-maintained traditional kitchen? That sells houses. It’s one of the few renovations where you can reliably see a significant return on your investment. Traditional styles have broad appeal; they feel warm, inviting, and timeless, which is exactly what most buyers are looking for in the “heart of the home.”
The key is that the quality has to be there. Buyers can spot cheap materials from a mile away. Plywood construction, solid wood or HDF doors, soft-close hardware, and a durable finish—these are the details that signal a quality investment. I worked with a real estate investor who only ever puts in classic, white Shaker kitchens. He says his properties consistently sell faster and for a higher price than comps with trendy but cheap kitchens. It’s a proven formula.
To ensure that quality endures, you just need to do one last, simple thing.
This is my last piece of advice, and it’s the one most people skip. Twice a year, maybe when you change your smoke detector batteries, give your kitchen a 10-minute check-up. Open every door and drawer. Do the hinges feel loose? Do the drawer glides run smoothly? Look under the sink with a flashlight. Any signs of a slow leak? Look at the cabinets around the dishwasher and stove. Any signs of heat or moisture damage?
This is your director’s walk-through of the set. You’re just looking for small problems before they become big ones. A loose hinge screw can be tightened in 30 seconds. If you ignore it, over time it can strain the wood and damage the door. A tiny, slow drip under the sink can be fixed for a few bucks. If you ignore it, you could be looking at thousands in mold remediation and cabinet replacement. This simple habit is the key to making sure your kitchen lasts a lifetime.
So there you have it. Creating a truly timeless traditional kitchen isn’t about chasing trends or having an unlimited budget. It’s about being a good director for the most important room in your house. It’s about casting the right materials, designing a set that flows, getting the lighting just right, and paying attention to the small details that create a sense of lasting quality. You’re building the backdrop for decades of memories—the messy pancake breakfasts, the celebratory dinners, the quiet morning coffees. By making these thoughtful choices, you’re not just renovating a room; you’re investing in the story of your home.


