Physical Address
304 North Cardinal St.
Dorchester Center, MA 02124
Physical Address
304 North Cardinal St.
Dorchester Center, MA 02124
Tried-and-tested bathroom design small ideas from a Nordic design expert — floating vanities, frameless screens, full-height tiles, and more.
Most people believe you need a large bathroom to have a great one. Home improvement shows repeat it. Mainstream bathroom guides assume you’re working with at least 6m². However, after more than a decade designing Nordic-influenced interiors — many of them in Scandinavian apartments where a compact bathroom is simply the norm — I’d argue the opposite is true. Constraint forces clarity. When you can’t fill a room with stuff, you have to make every choice count. The 15 ideas below come directly from that discipline. So, whether you’re working with a converted cupboard under the stairs or a standard 4m² en suite, these principles apply. Some cost almost nothing. Others involve a one-time investment that pays off every time you walk in. None of them involves knocking down walls.
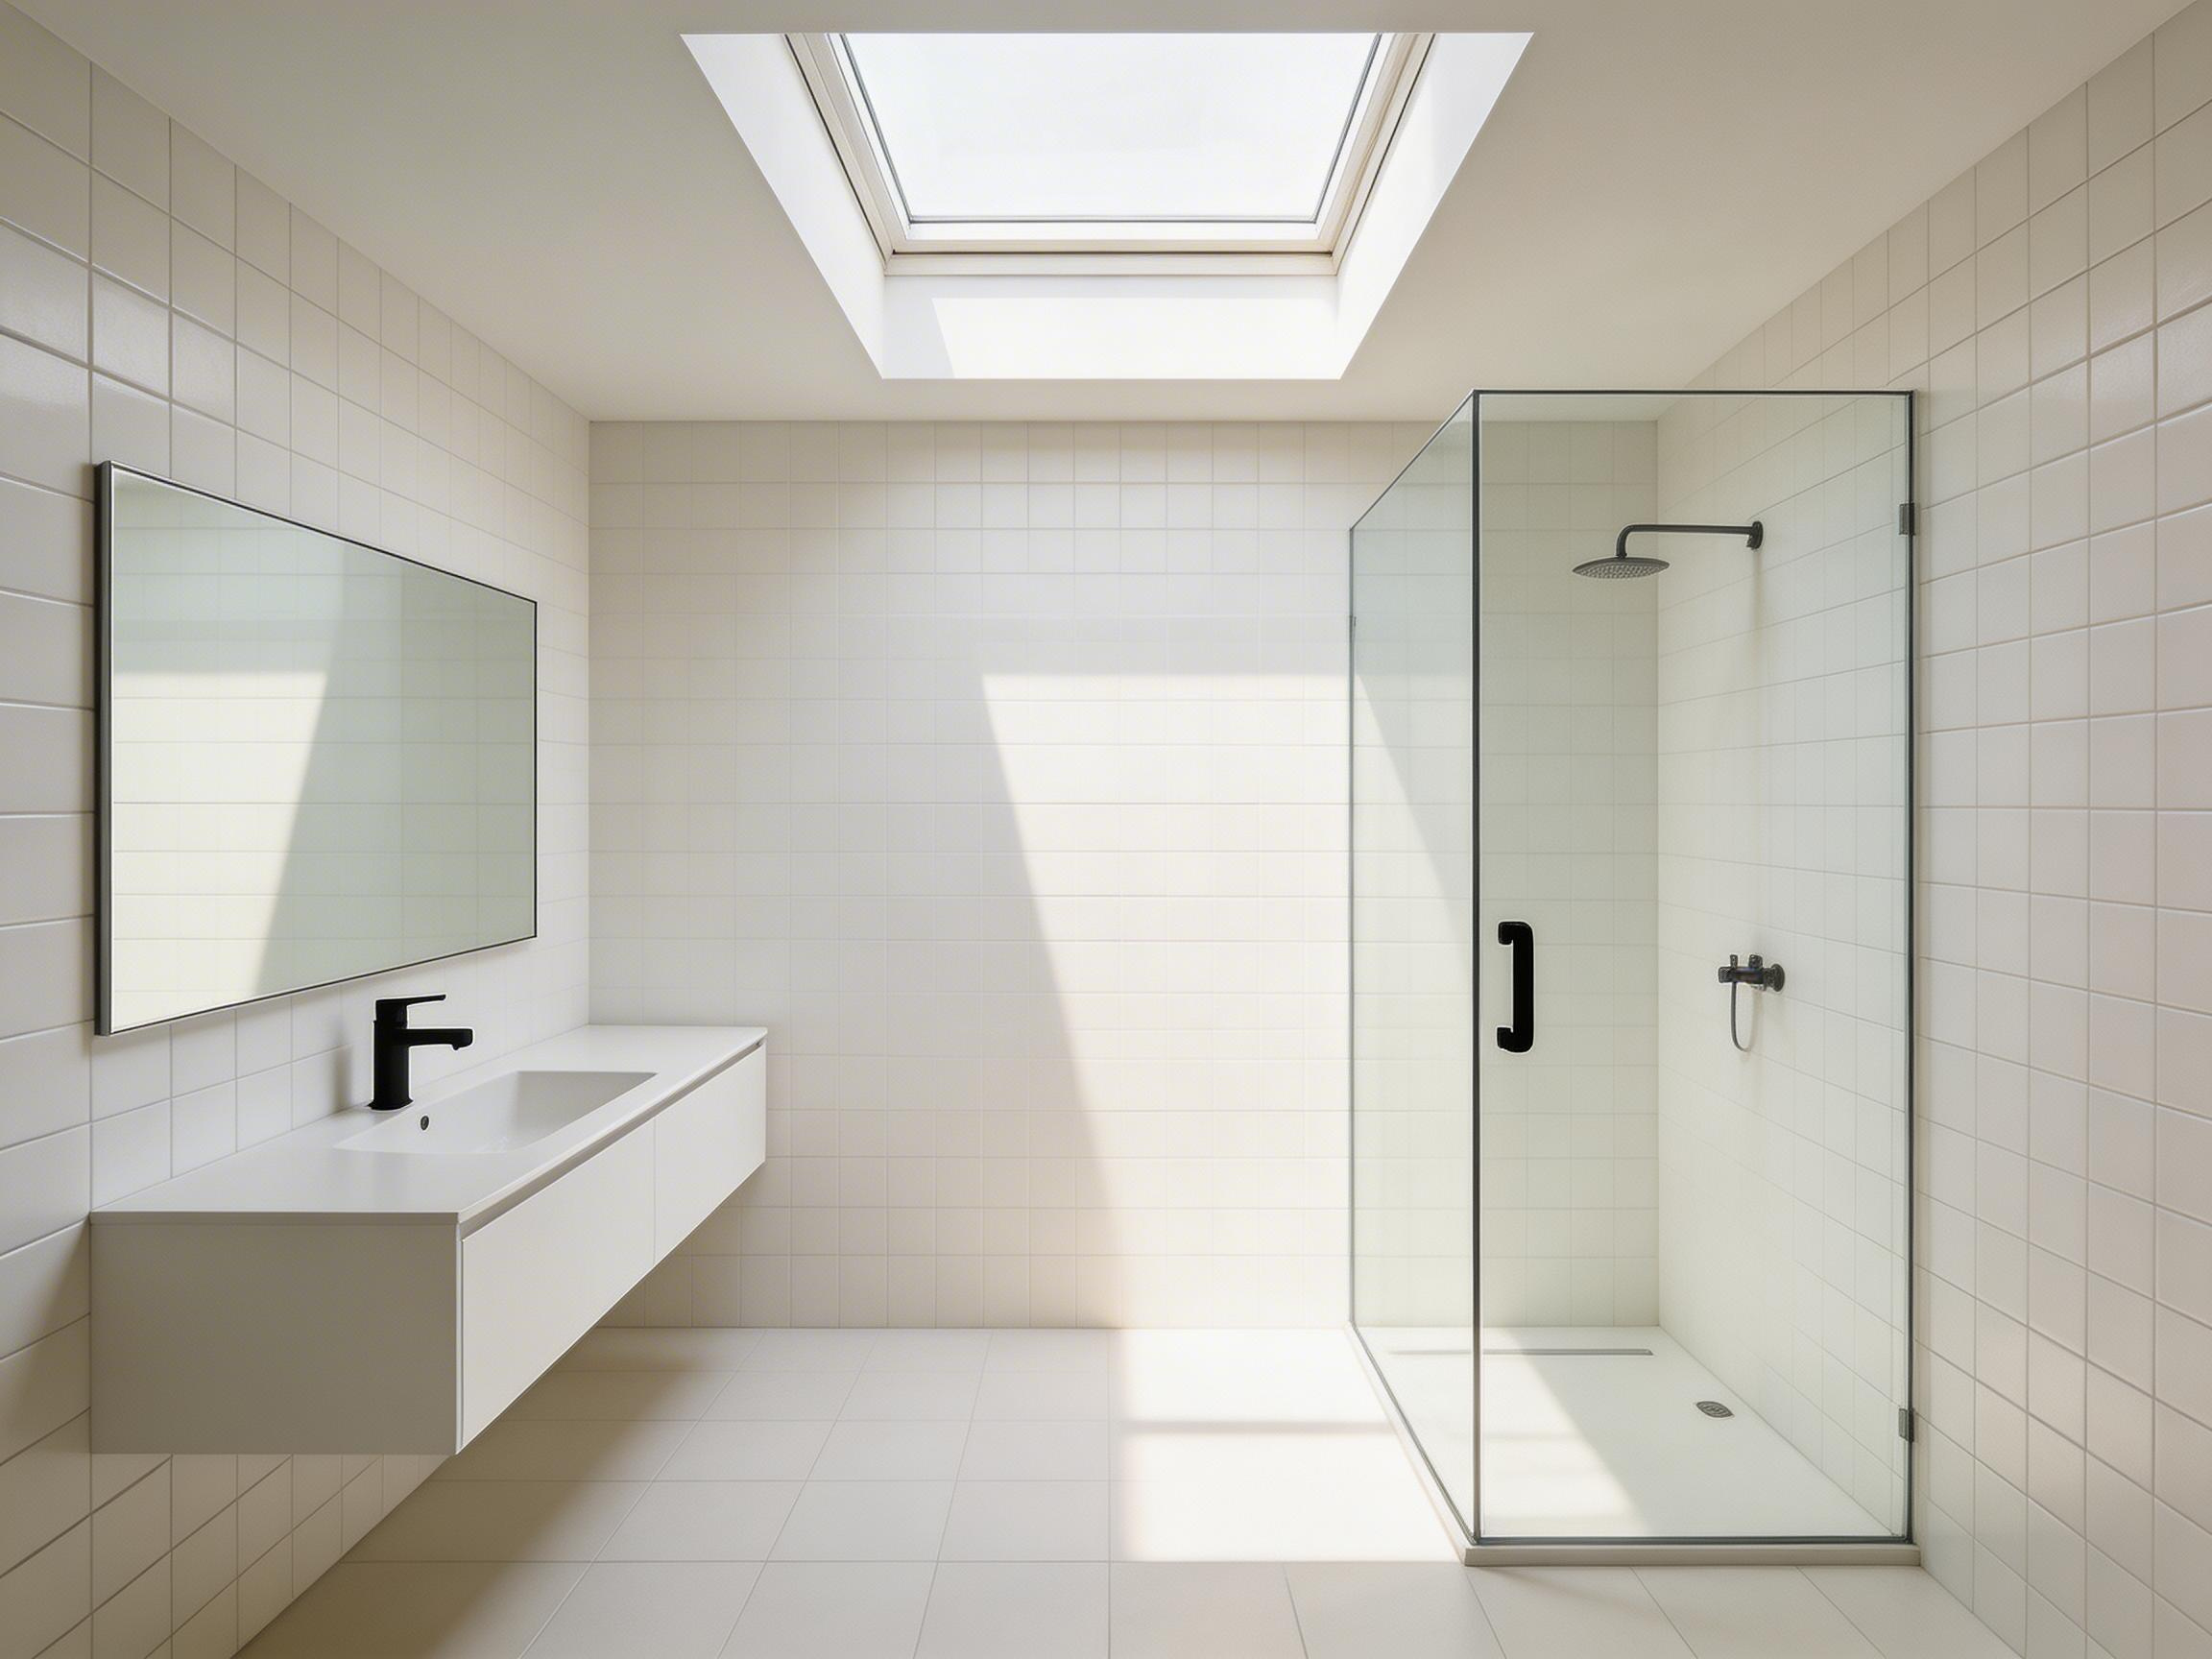
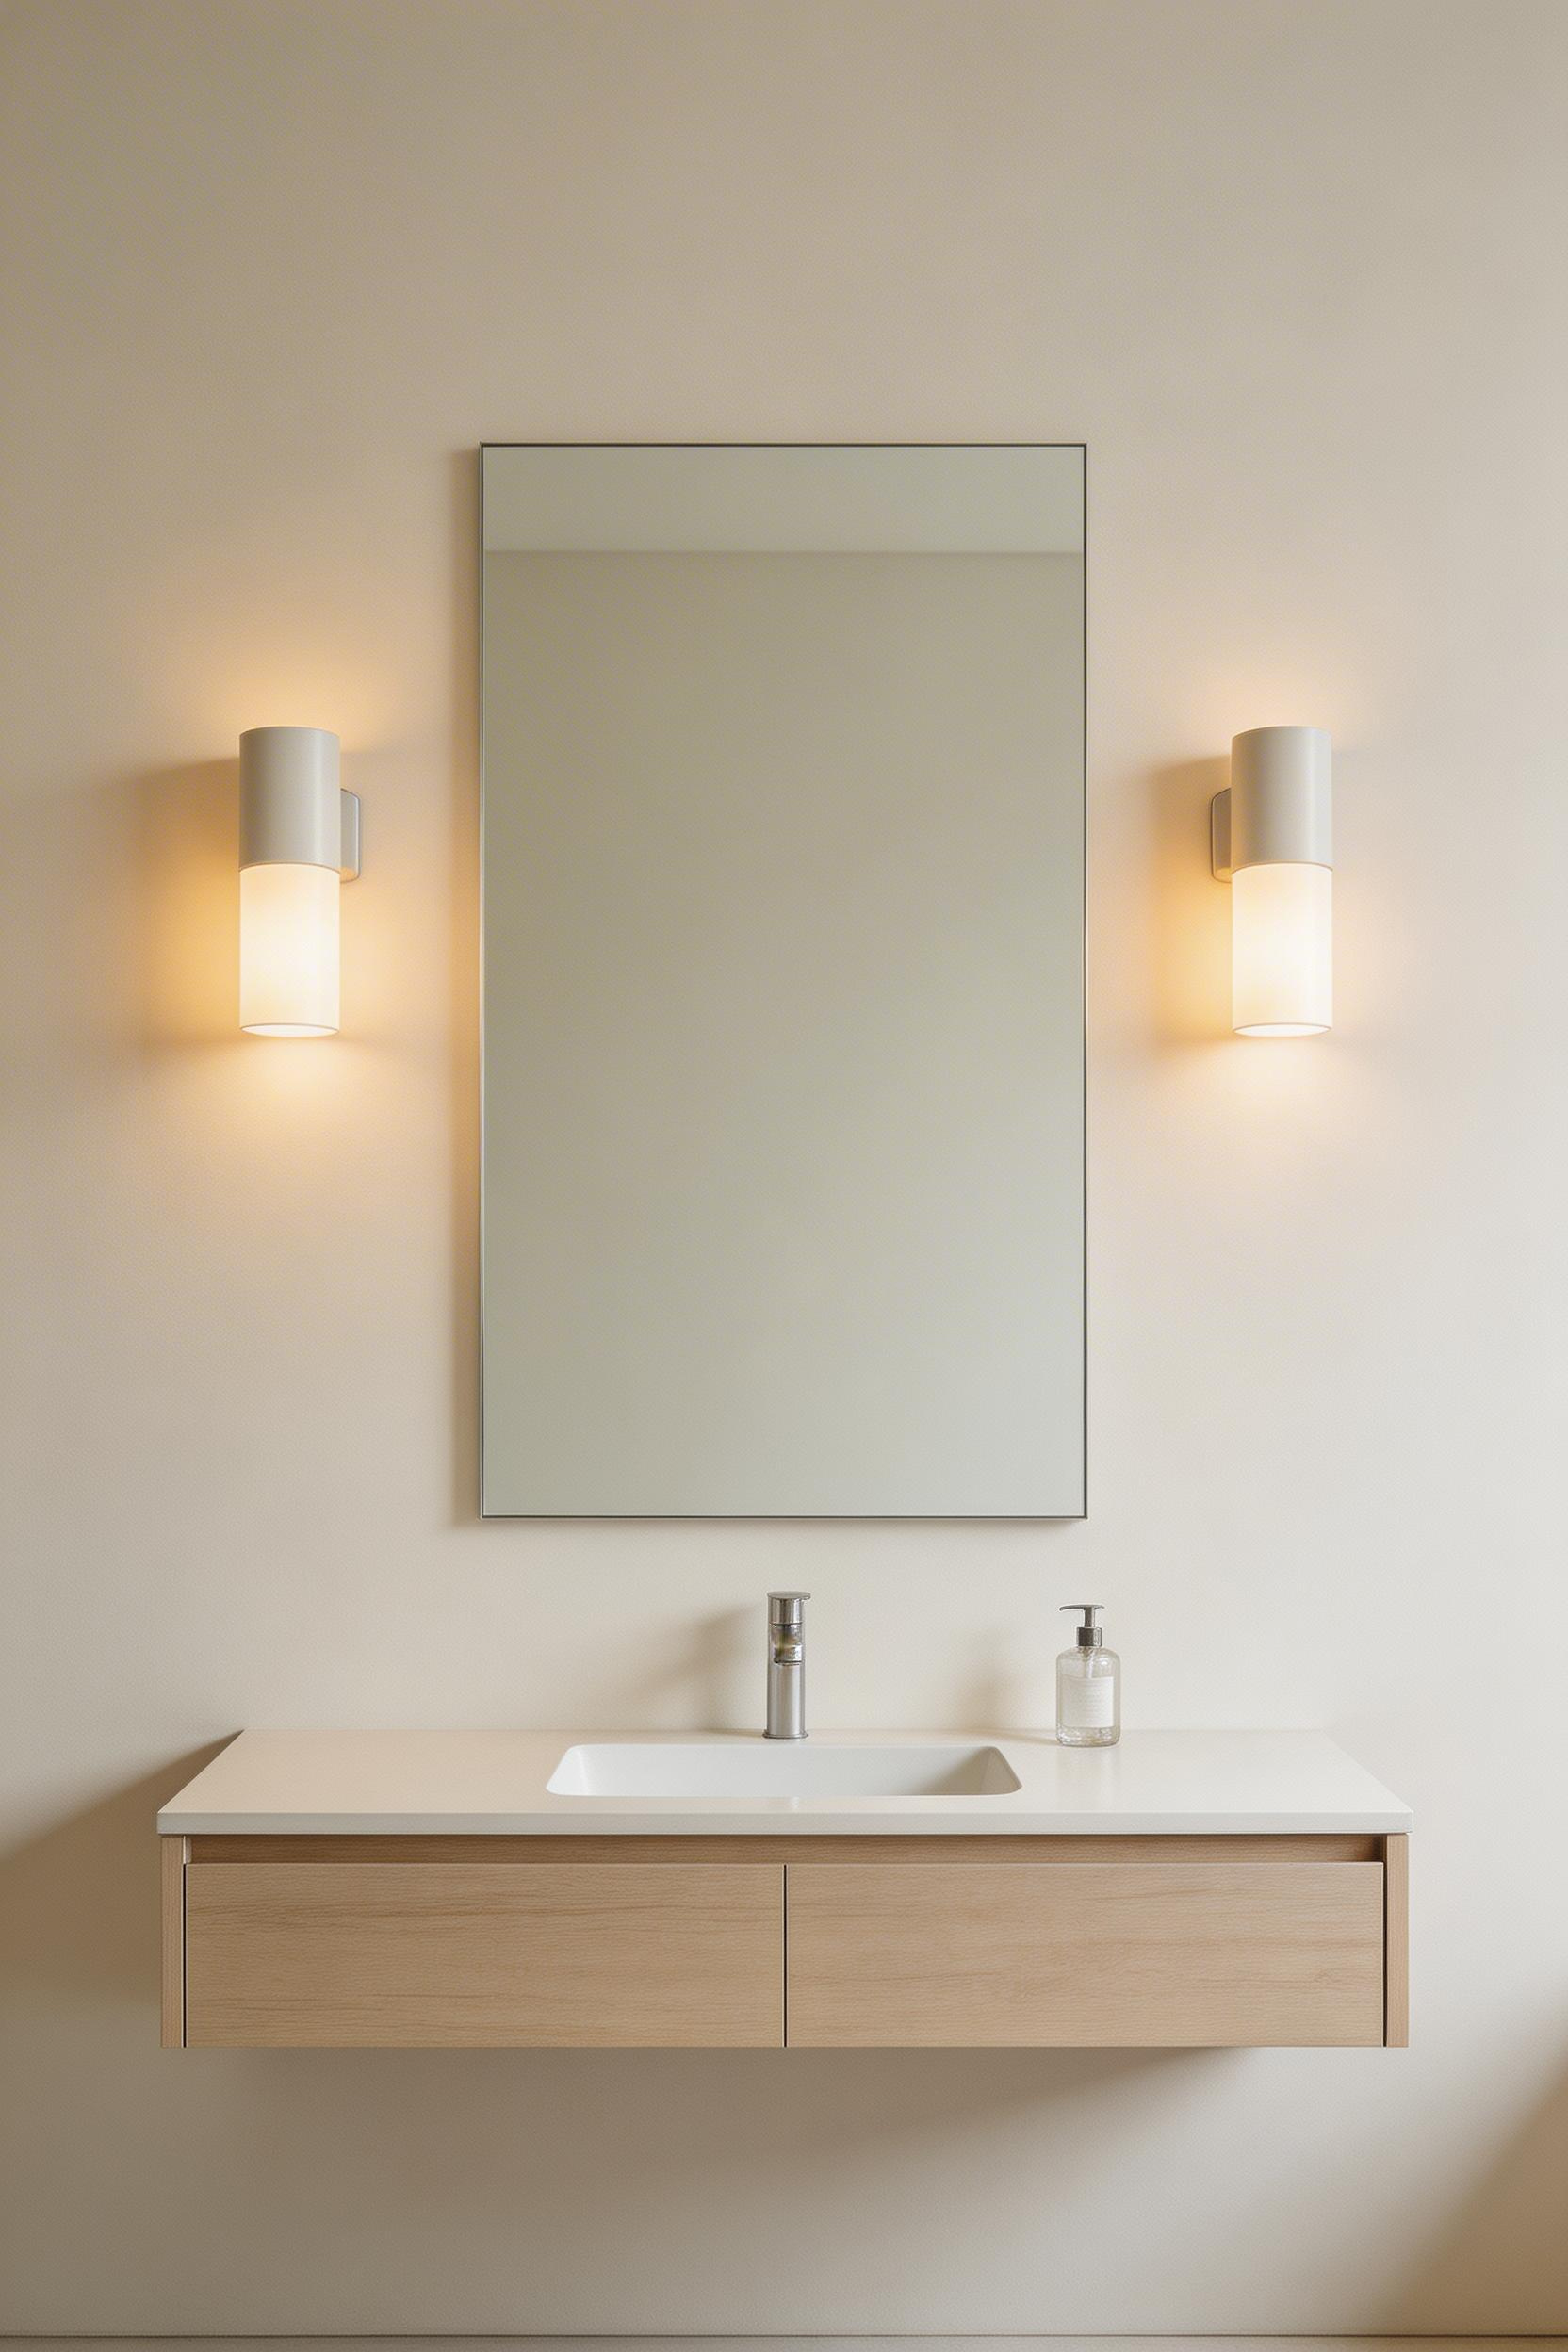
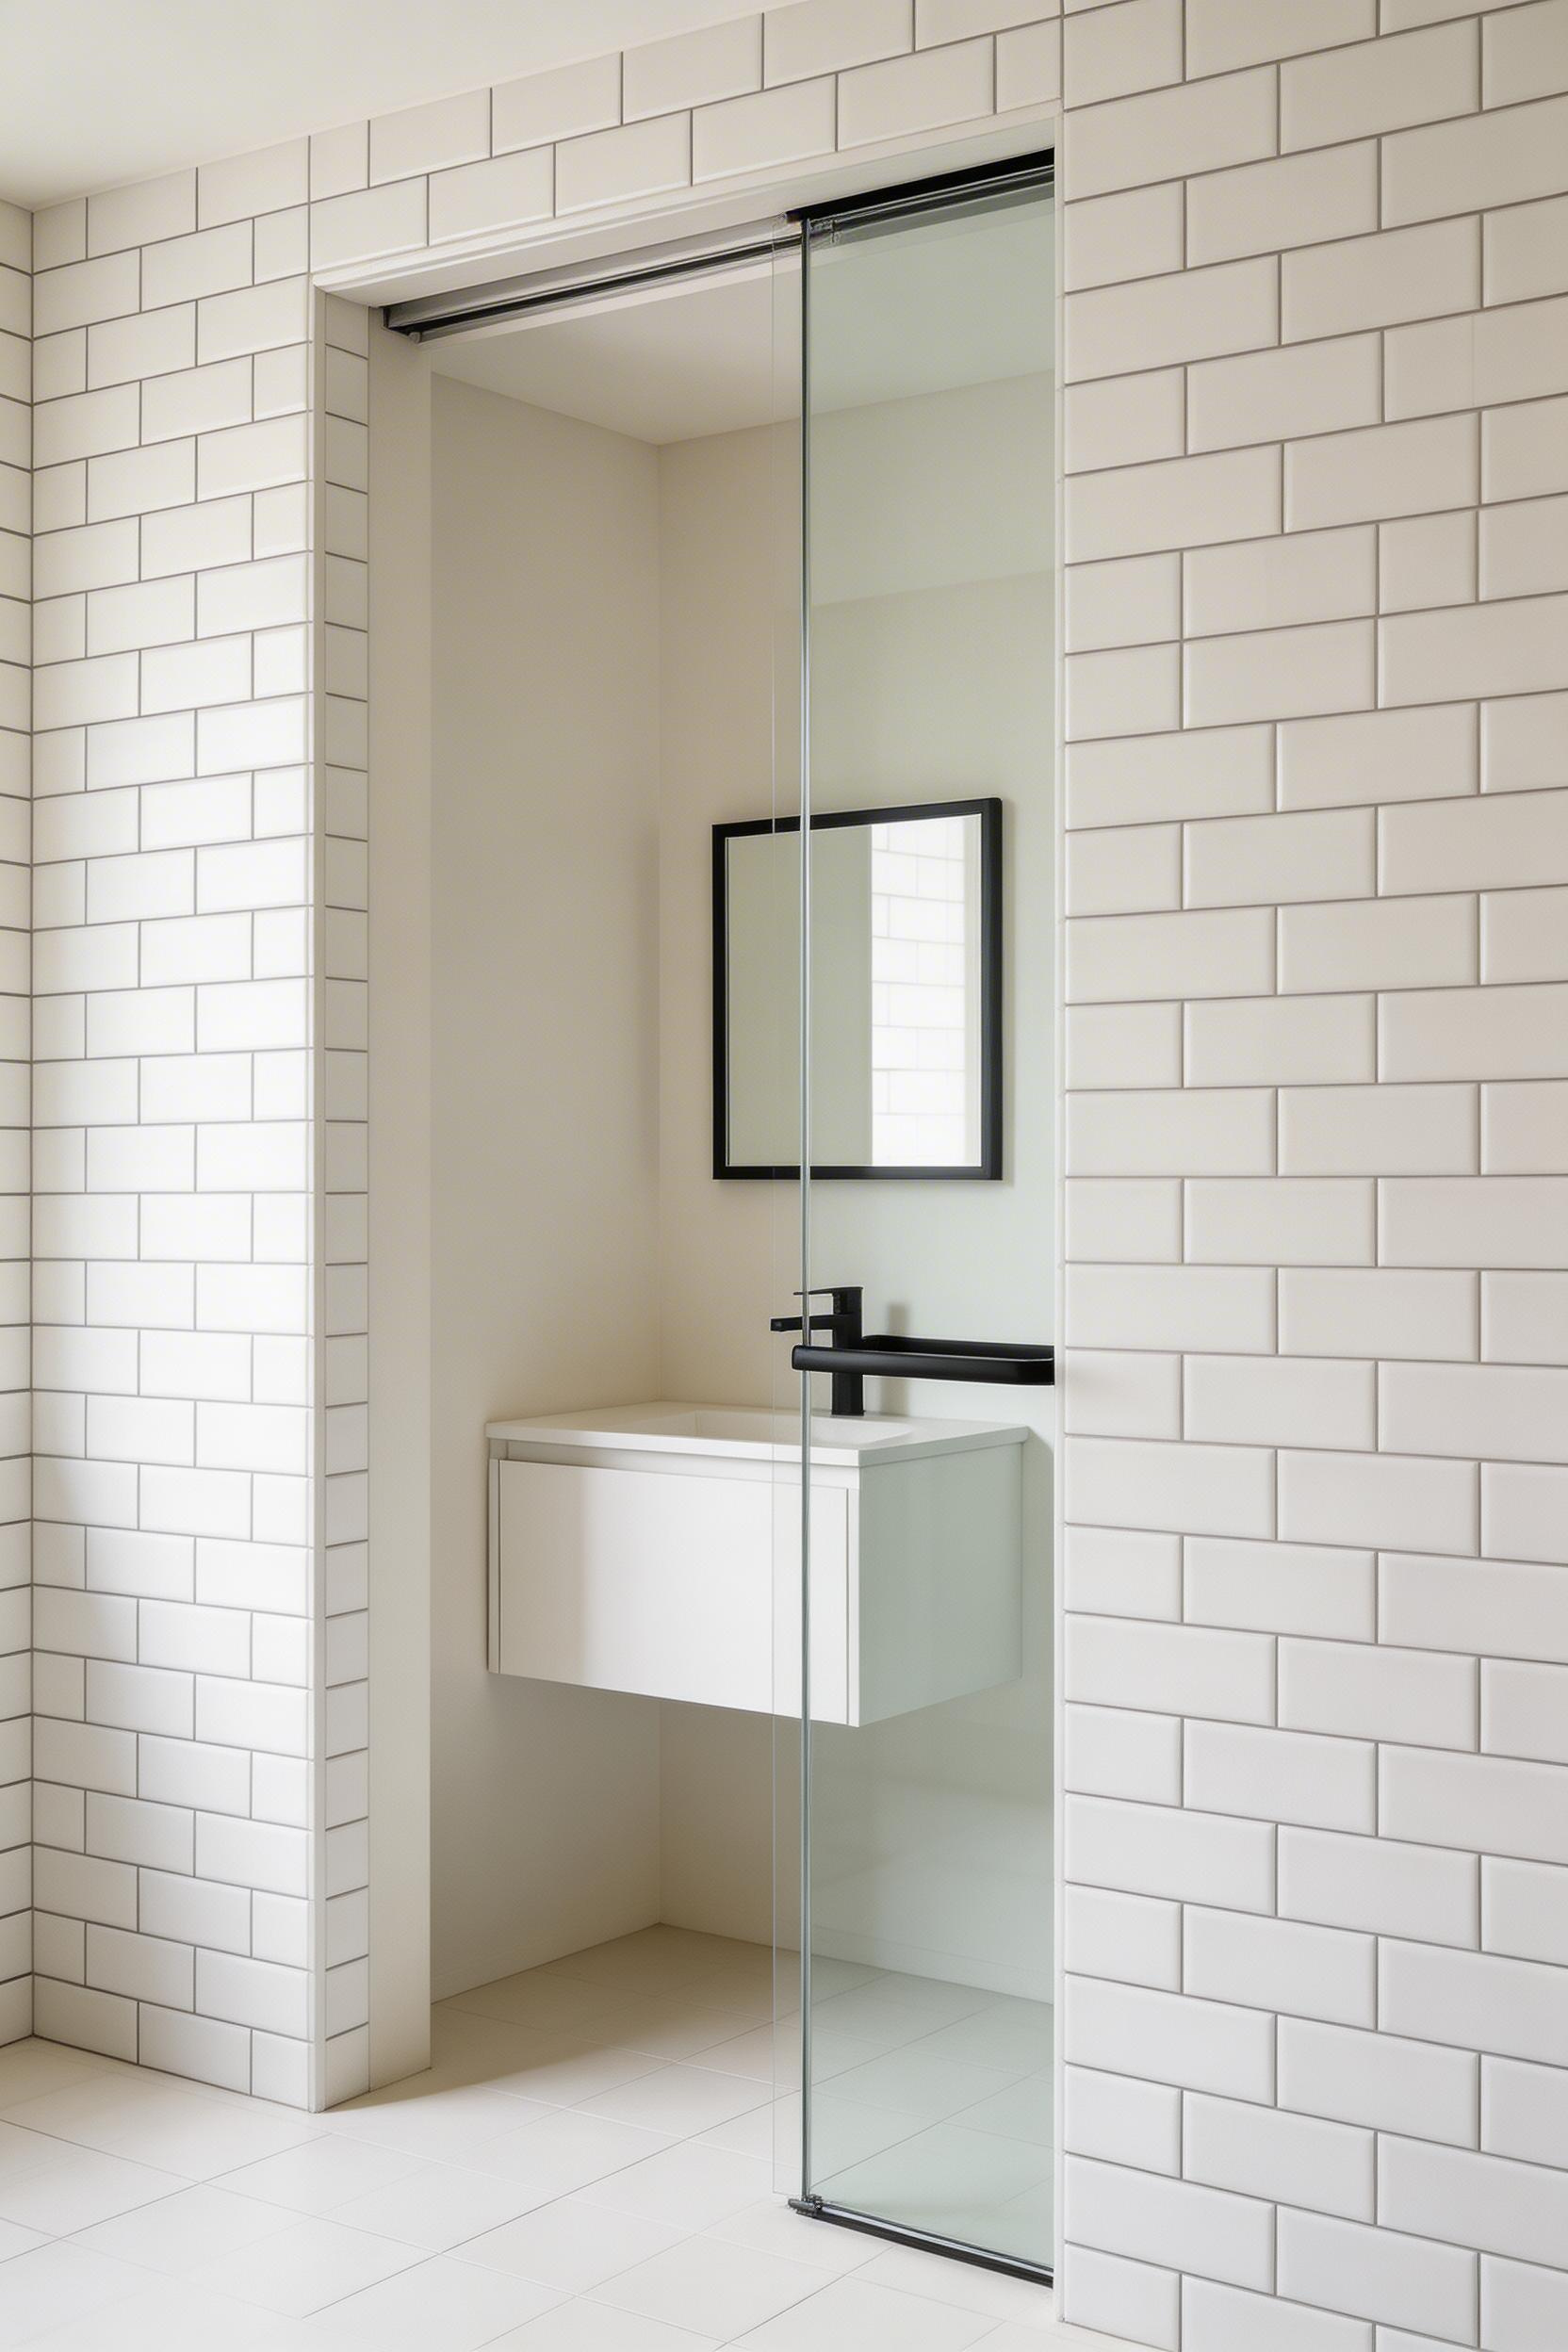
The single most effective change you can make to a bathroom design small enough to matter doesn’t involve tiles or colour. It involves height — specifically, 150mm of it.
Wall-mounted vanities sit on brackets or a steel frame. This leaves a clear gap between the base of the unit and the floor. That gap is the key. When you can see the floor tiles running under the vanity and beyond, your eye reads the floor as continuous. It appears larger than it actually is. Research on spatial perception suggests this visual continuity increases perceived floor area by up to 15% in rooms under 5m².
The standard mounting height for a wall-hung vanity is 800–900mm from floor to worktop. Most adults find 850mm comfortable, but go slightly higher if you’re tall. Your wall needs structural support. If it’s dry-lined (plasterboard on stud), you’ll need noggins added before plastering — or a proprietary installation frame such as a Geberit Duofix. These frames also conceal the waste pipe in the wall, which keeps the floor completely clear.
For budget compact bathroom projects, the IKEA Godmorgon 40cm wall-hung unit at around £149 is hard to argue against. If you want to move upmarket, the Vitra Integra 500mm is a well-proportioned mid-range option at £420–550. The Geberit Xeno2 450mm is the premium choice at £850–1,100. All three give you the visual benefit from that 150mm floor gap.
Vertical lines create the impression of greater ceiling height. It’s a principle from gestalt psychology applied in architecture for decades. It applies just as well in a bathroom design small enough to be awkward.
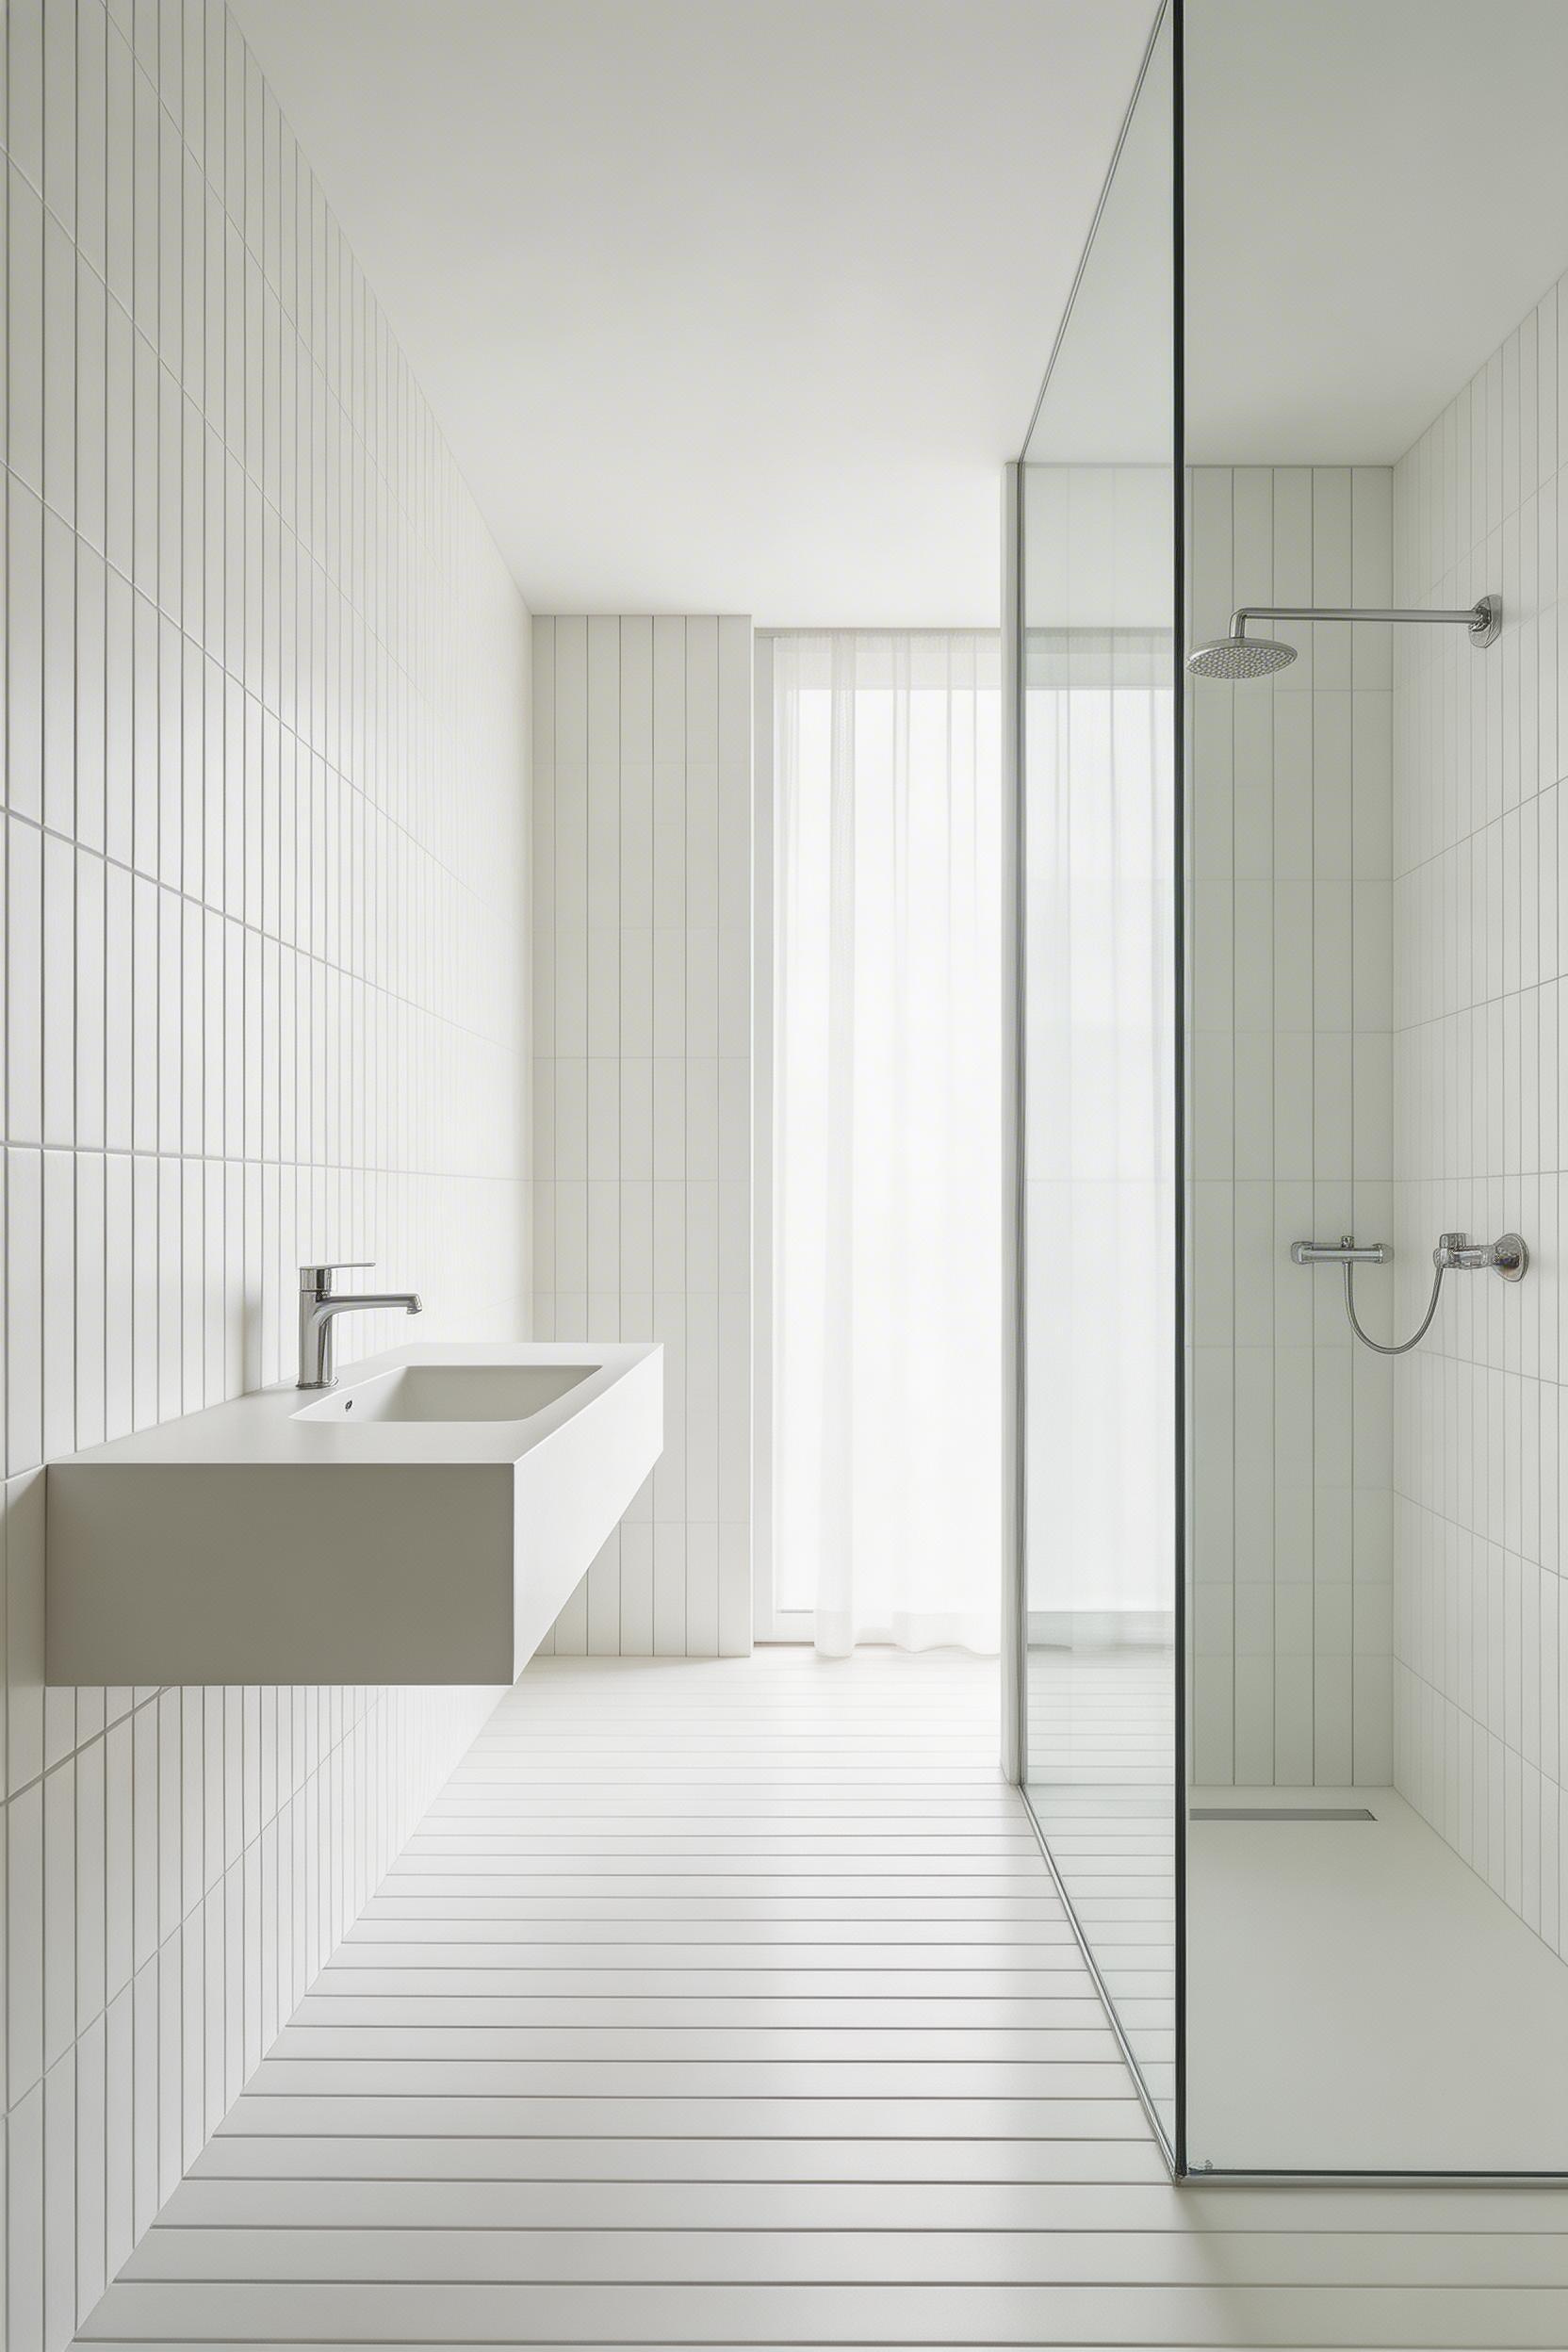
The key is two decisions made together: the tile format and the bond pattern. Long, narrow tiles — 75x150mm metro or the taller 31x90cm formats — emphasise height when laid in a vertical stack bond. That means stacking them directly on top of each other rather than offset. Large-format tiles (60x120cm, 80x160cm) achieve the same effect through fewer grout lines. Less visual noise means the eye travels up rather than stopping at every joint.
Taking tile from floor to ceiling typically adds 10–20% to your tiling costs. There’s more waste at cuts near the ceiling and cornice. However, it also removes the cost of painting the upper half of the wall, which can offset some of that difference. Porcelain large-format tiles run from £20–60/m² for supply; you’ll need flexible S1 adhesive for anything above 30x60cm on walls.
Budget option: Wickes Metro White 20x10cm in a vertical stack bond at £14/m² is as effective as any expensive tile for this purpose. The bond pattern, not the price, is what creates the height illusion. Mid-range: Porcelanosa Nassau White 31.6x90cm at £32/m² is a good length-to-cost ratio. And if you’re doing a full small bathroom remodel and want minimal grout lines throughout, Topps Tiles Rimini White 60x120cm at £38/m² is worth budgeting for.
A shower curtain or a framed screen with aluminium channels does two things you don’t want. It stops light moving across the room. Also, it creates a visual boundary that chops the space into zones.
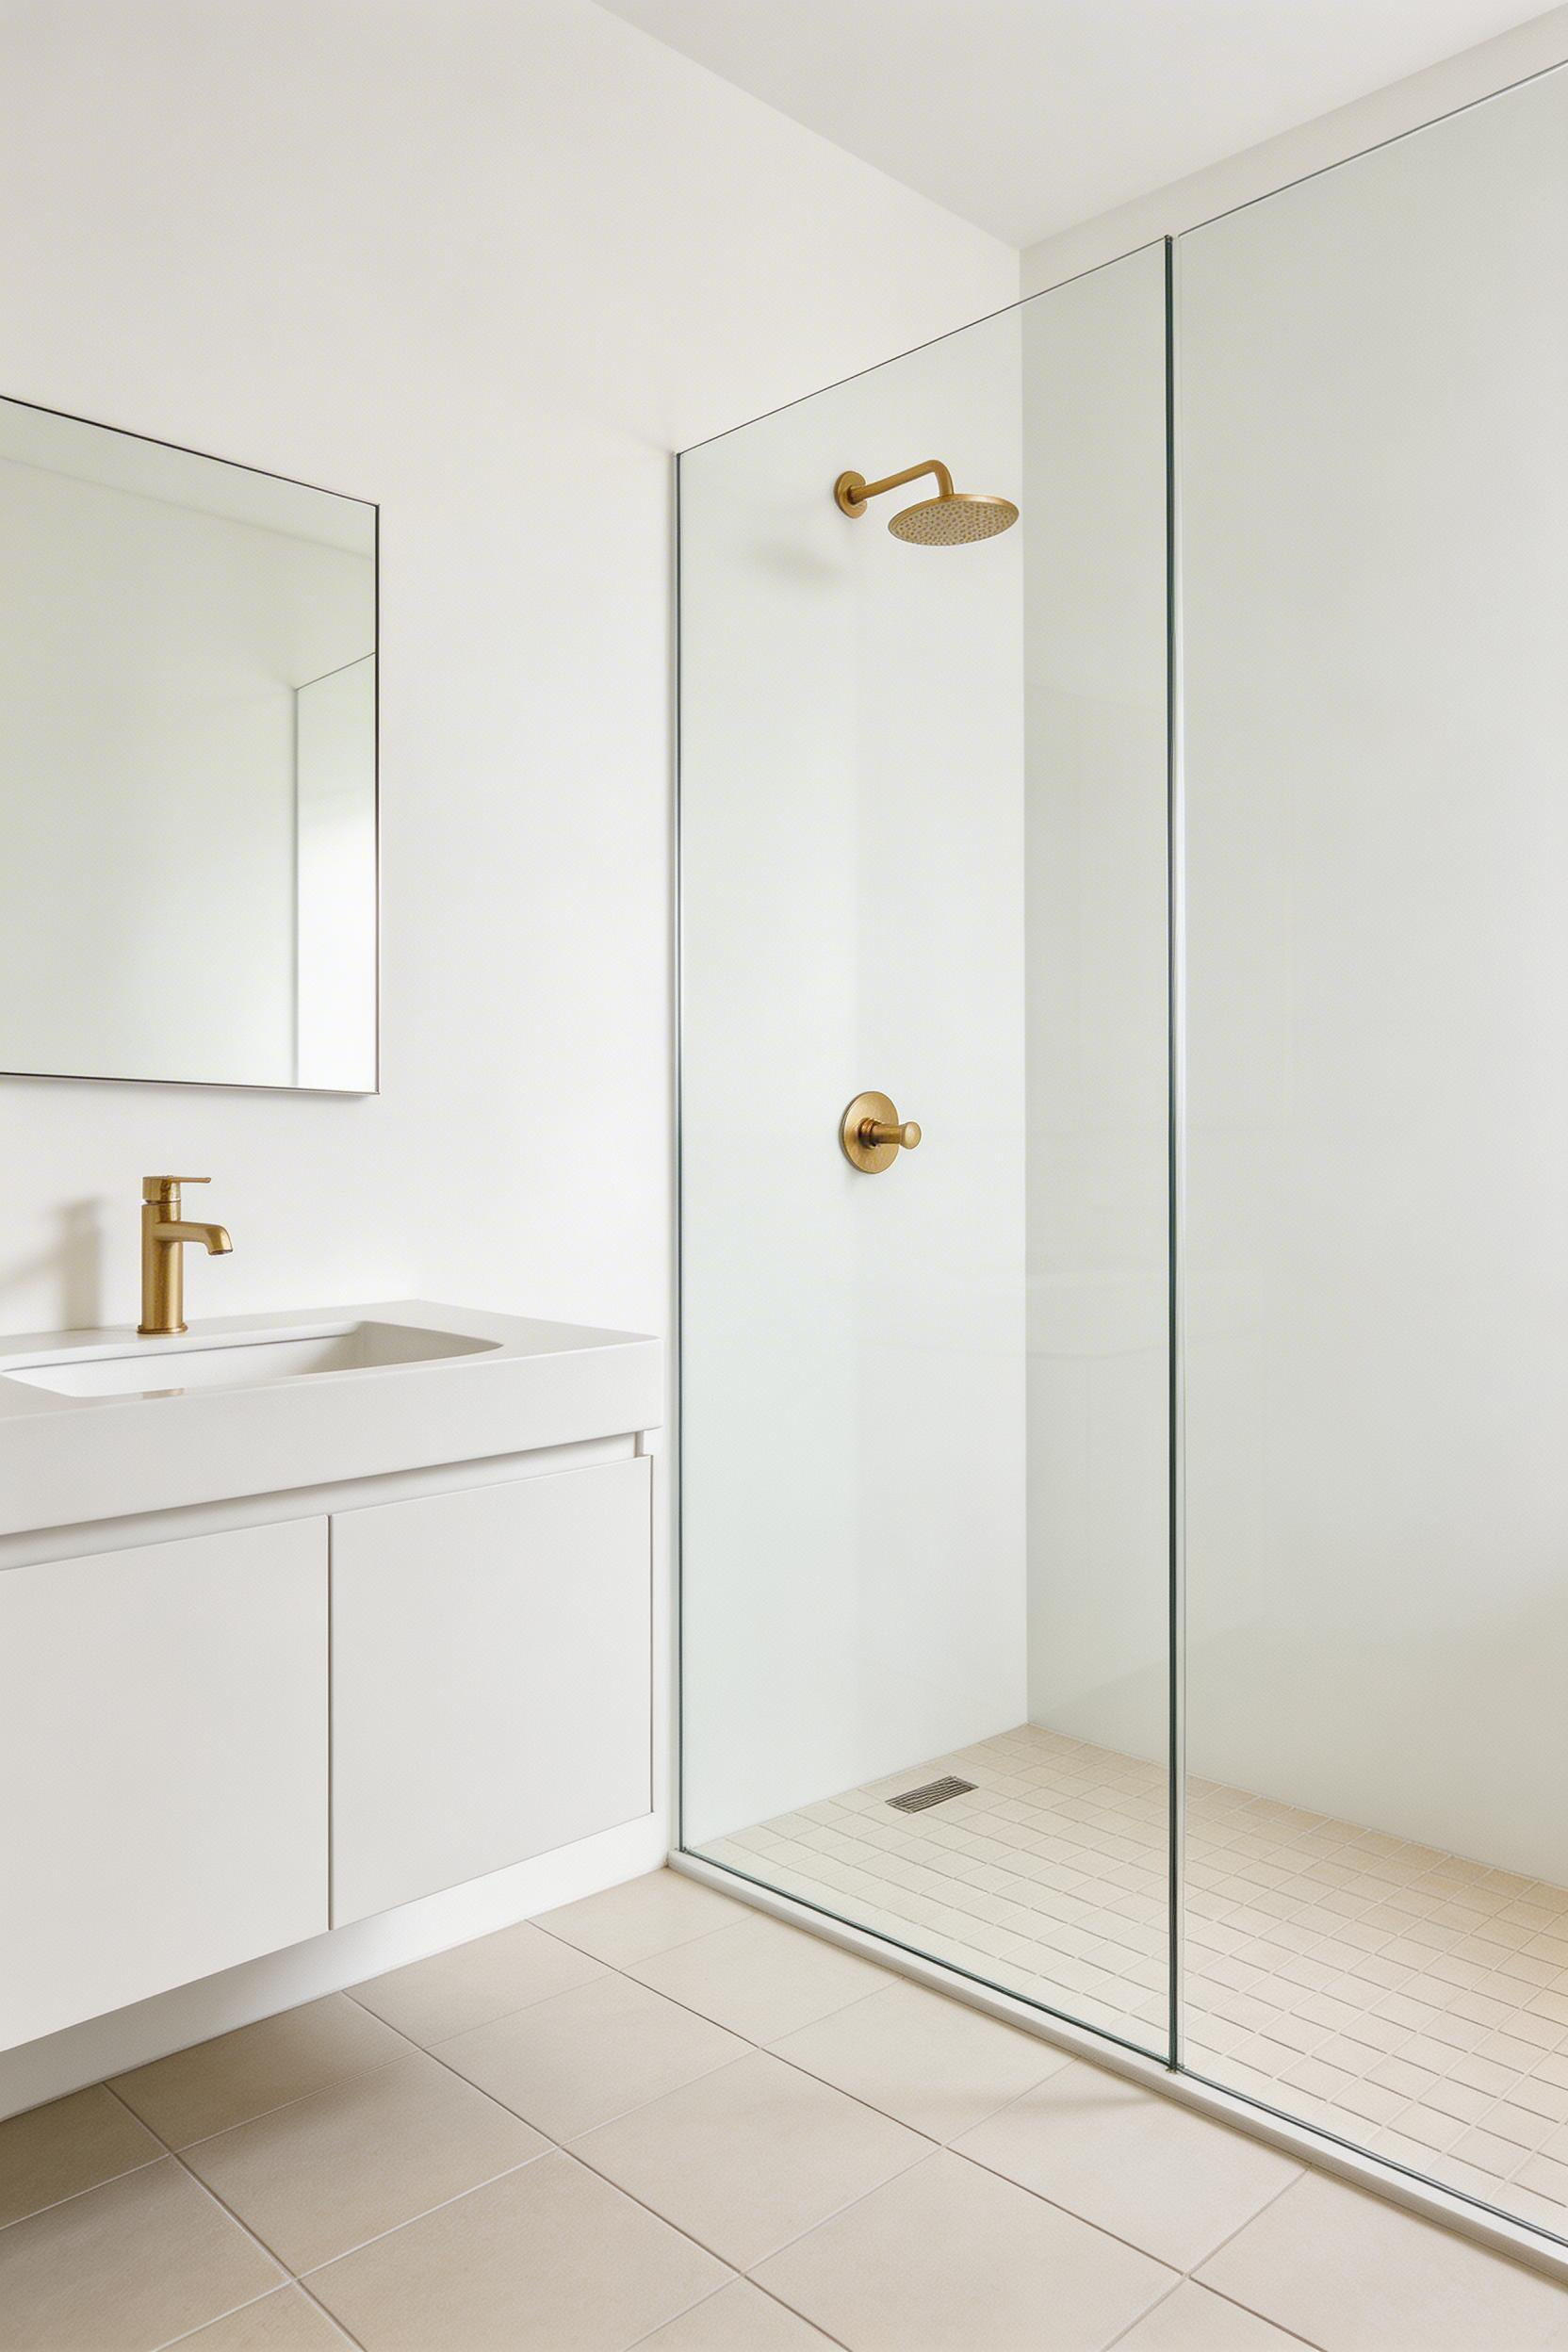
In a bathroom design small enough to feel enclosed, a frameless walk-in panel changes everything. A single sheet of 8–10mm toughened glass fixed to the wall lets light pass through and bounce around the room. Your eye reads the full depth of the space rather than stopping at an opaque curtain. The difference in perceived roominess is immediate.
If your shower occupies a corner, a walk-in panel angled at 45° gives access without a 90° enclosure eating a full corner. This is a configuration common in Swedish and Danish apartment bathrooms, where a tight bathroom footprint often means a shower zone of around 700x700mm. For slightly larger spaces, a fixed panel with a hinged return is the cleanest look.
On budget: the Lakes Classic 760mm walk-in panel at around £189 is a solid entry-level option. Step up to the Roman Decem 1000mm at £495 for UK-made quality with a 25-year guarantee. If you’re doing a full renovation, the Matki Eauzone Plus at £850–1,200 is worth the investment. The seal quality and glass clarity are both noticeably better.
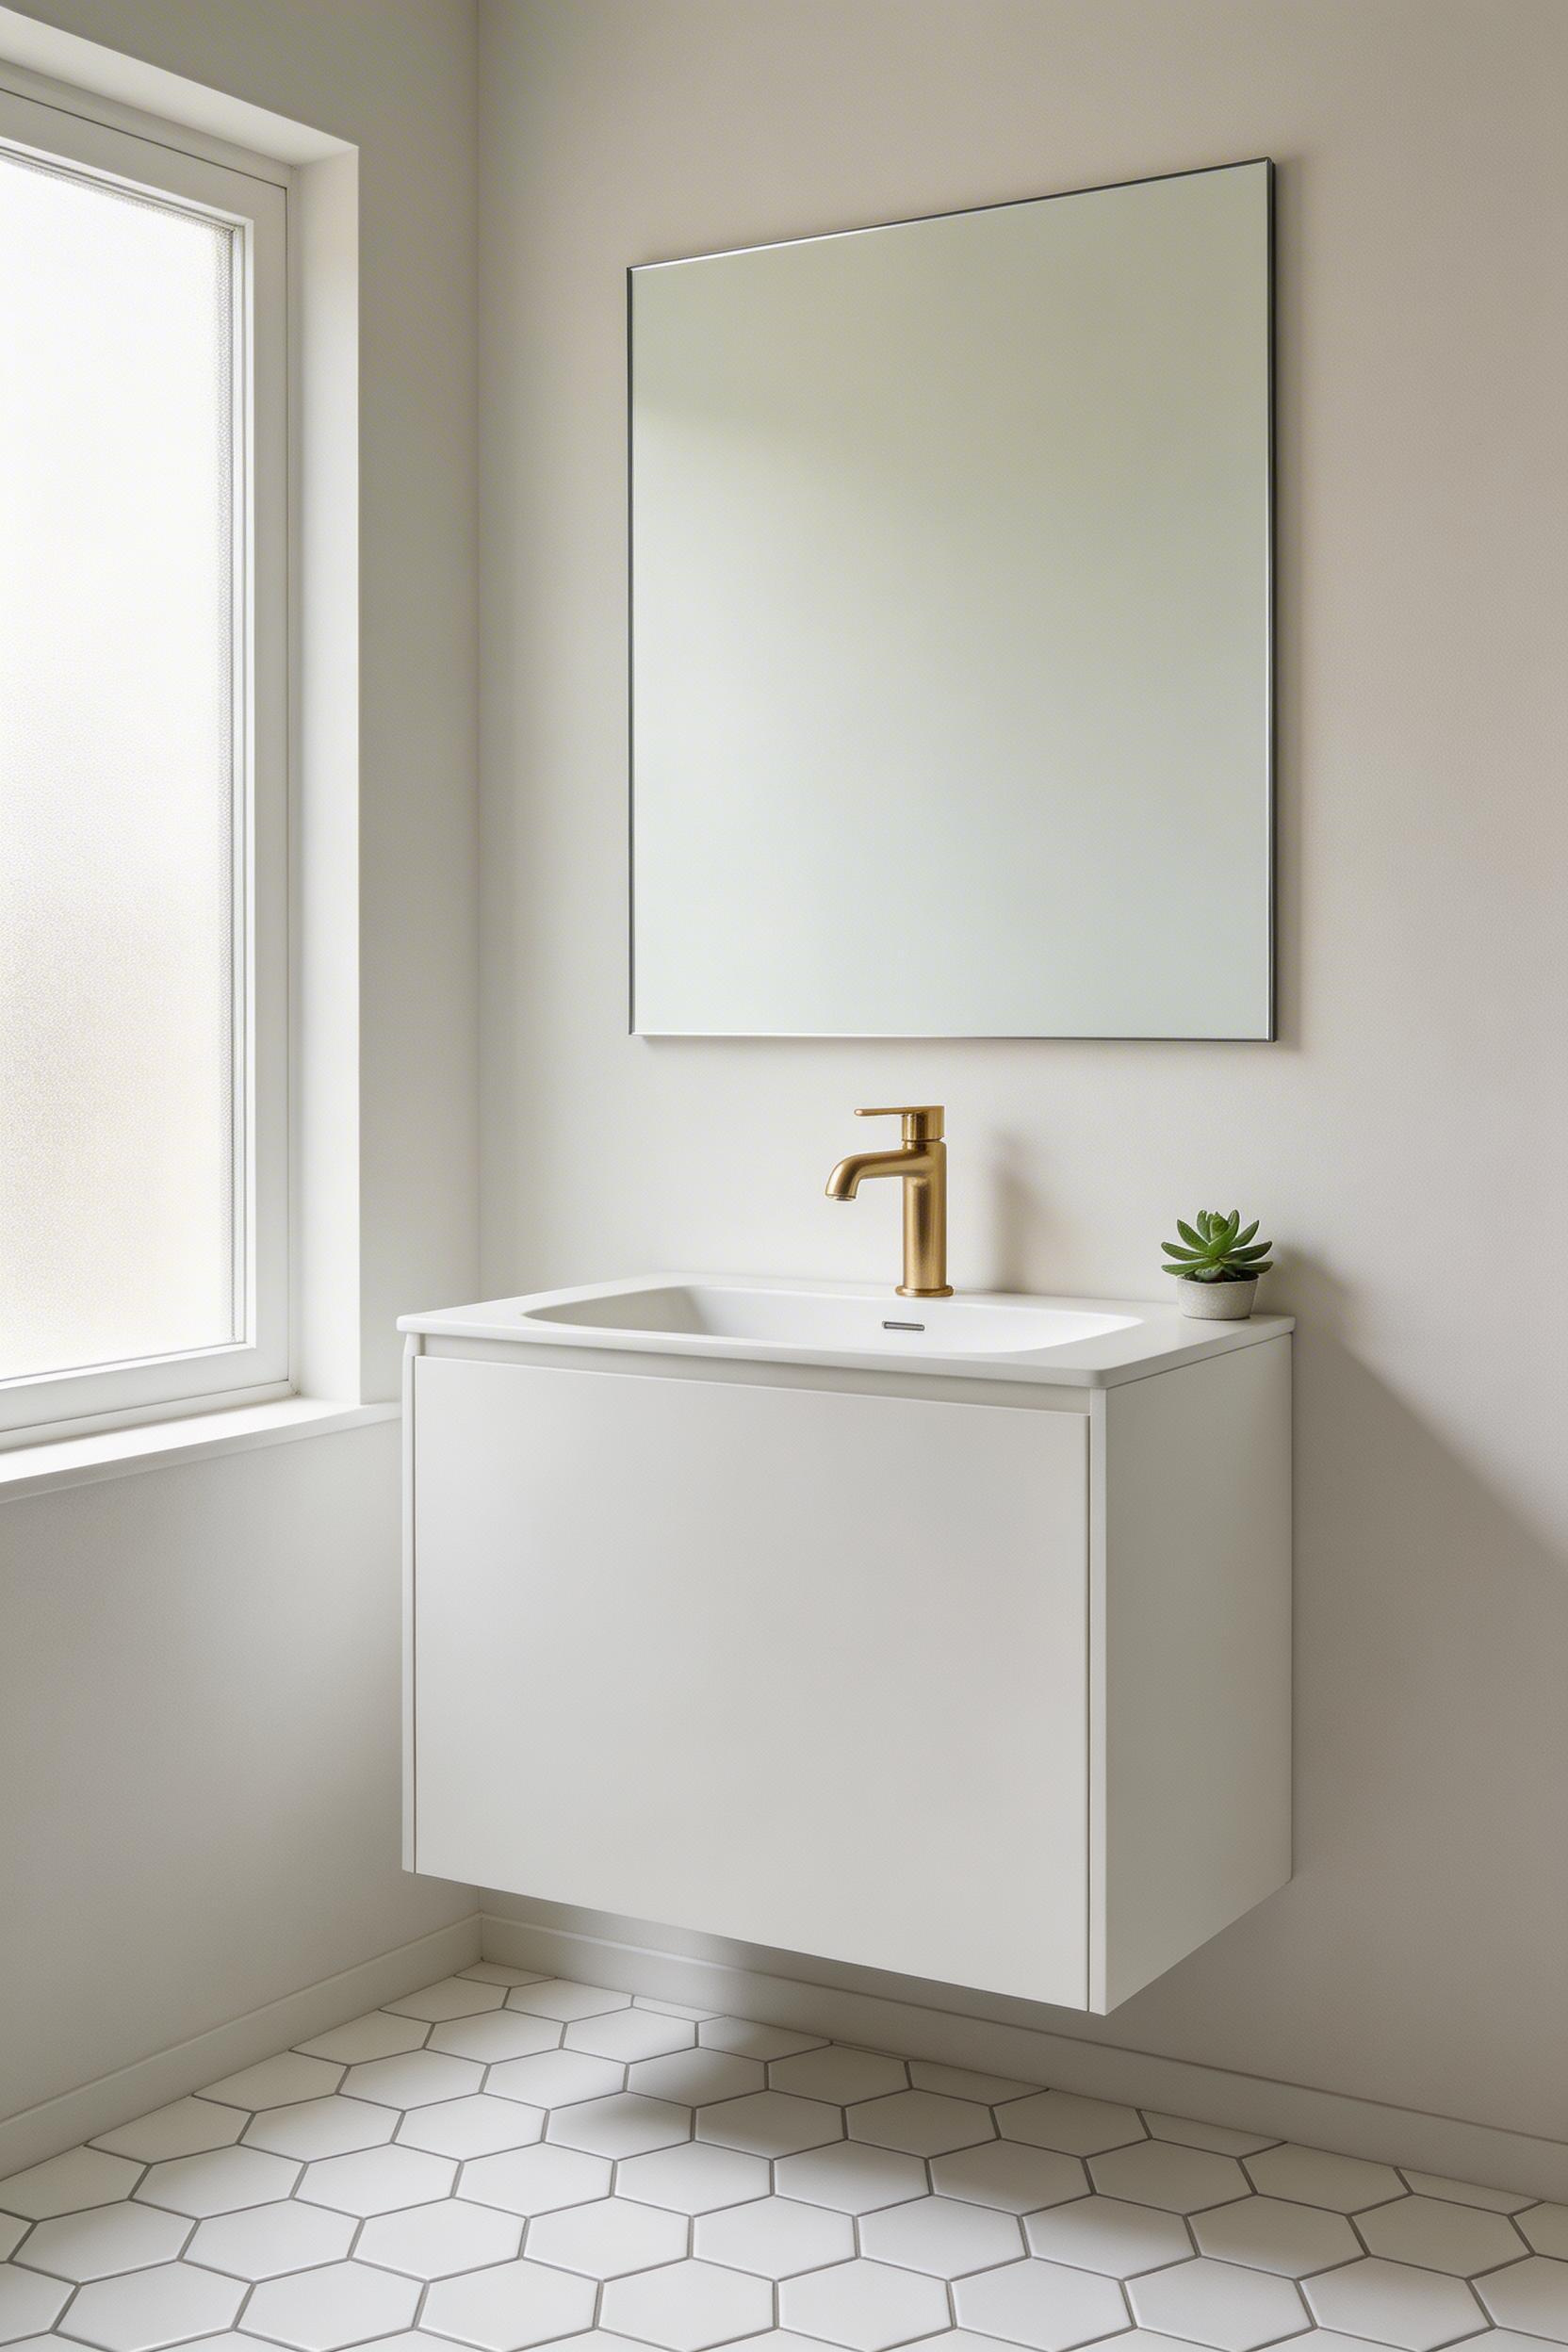
This is the most counterintuitive entry on the list. People often assume that a smaller bathroom design calls for smaller fittings. But a mirror spanning the full width of the vanity wall doesn’t just double light. It doubles the apparent depth of the room.
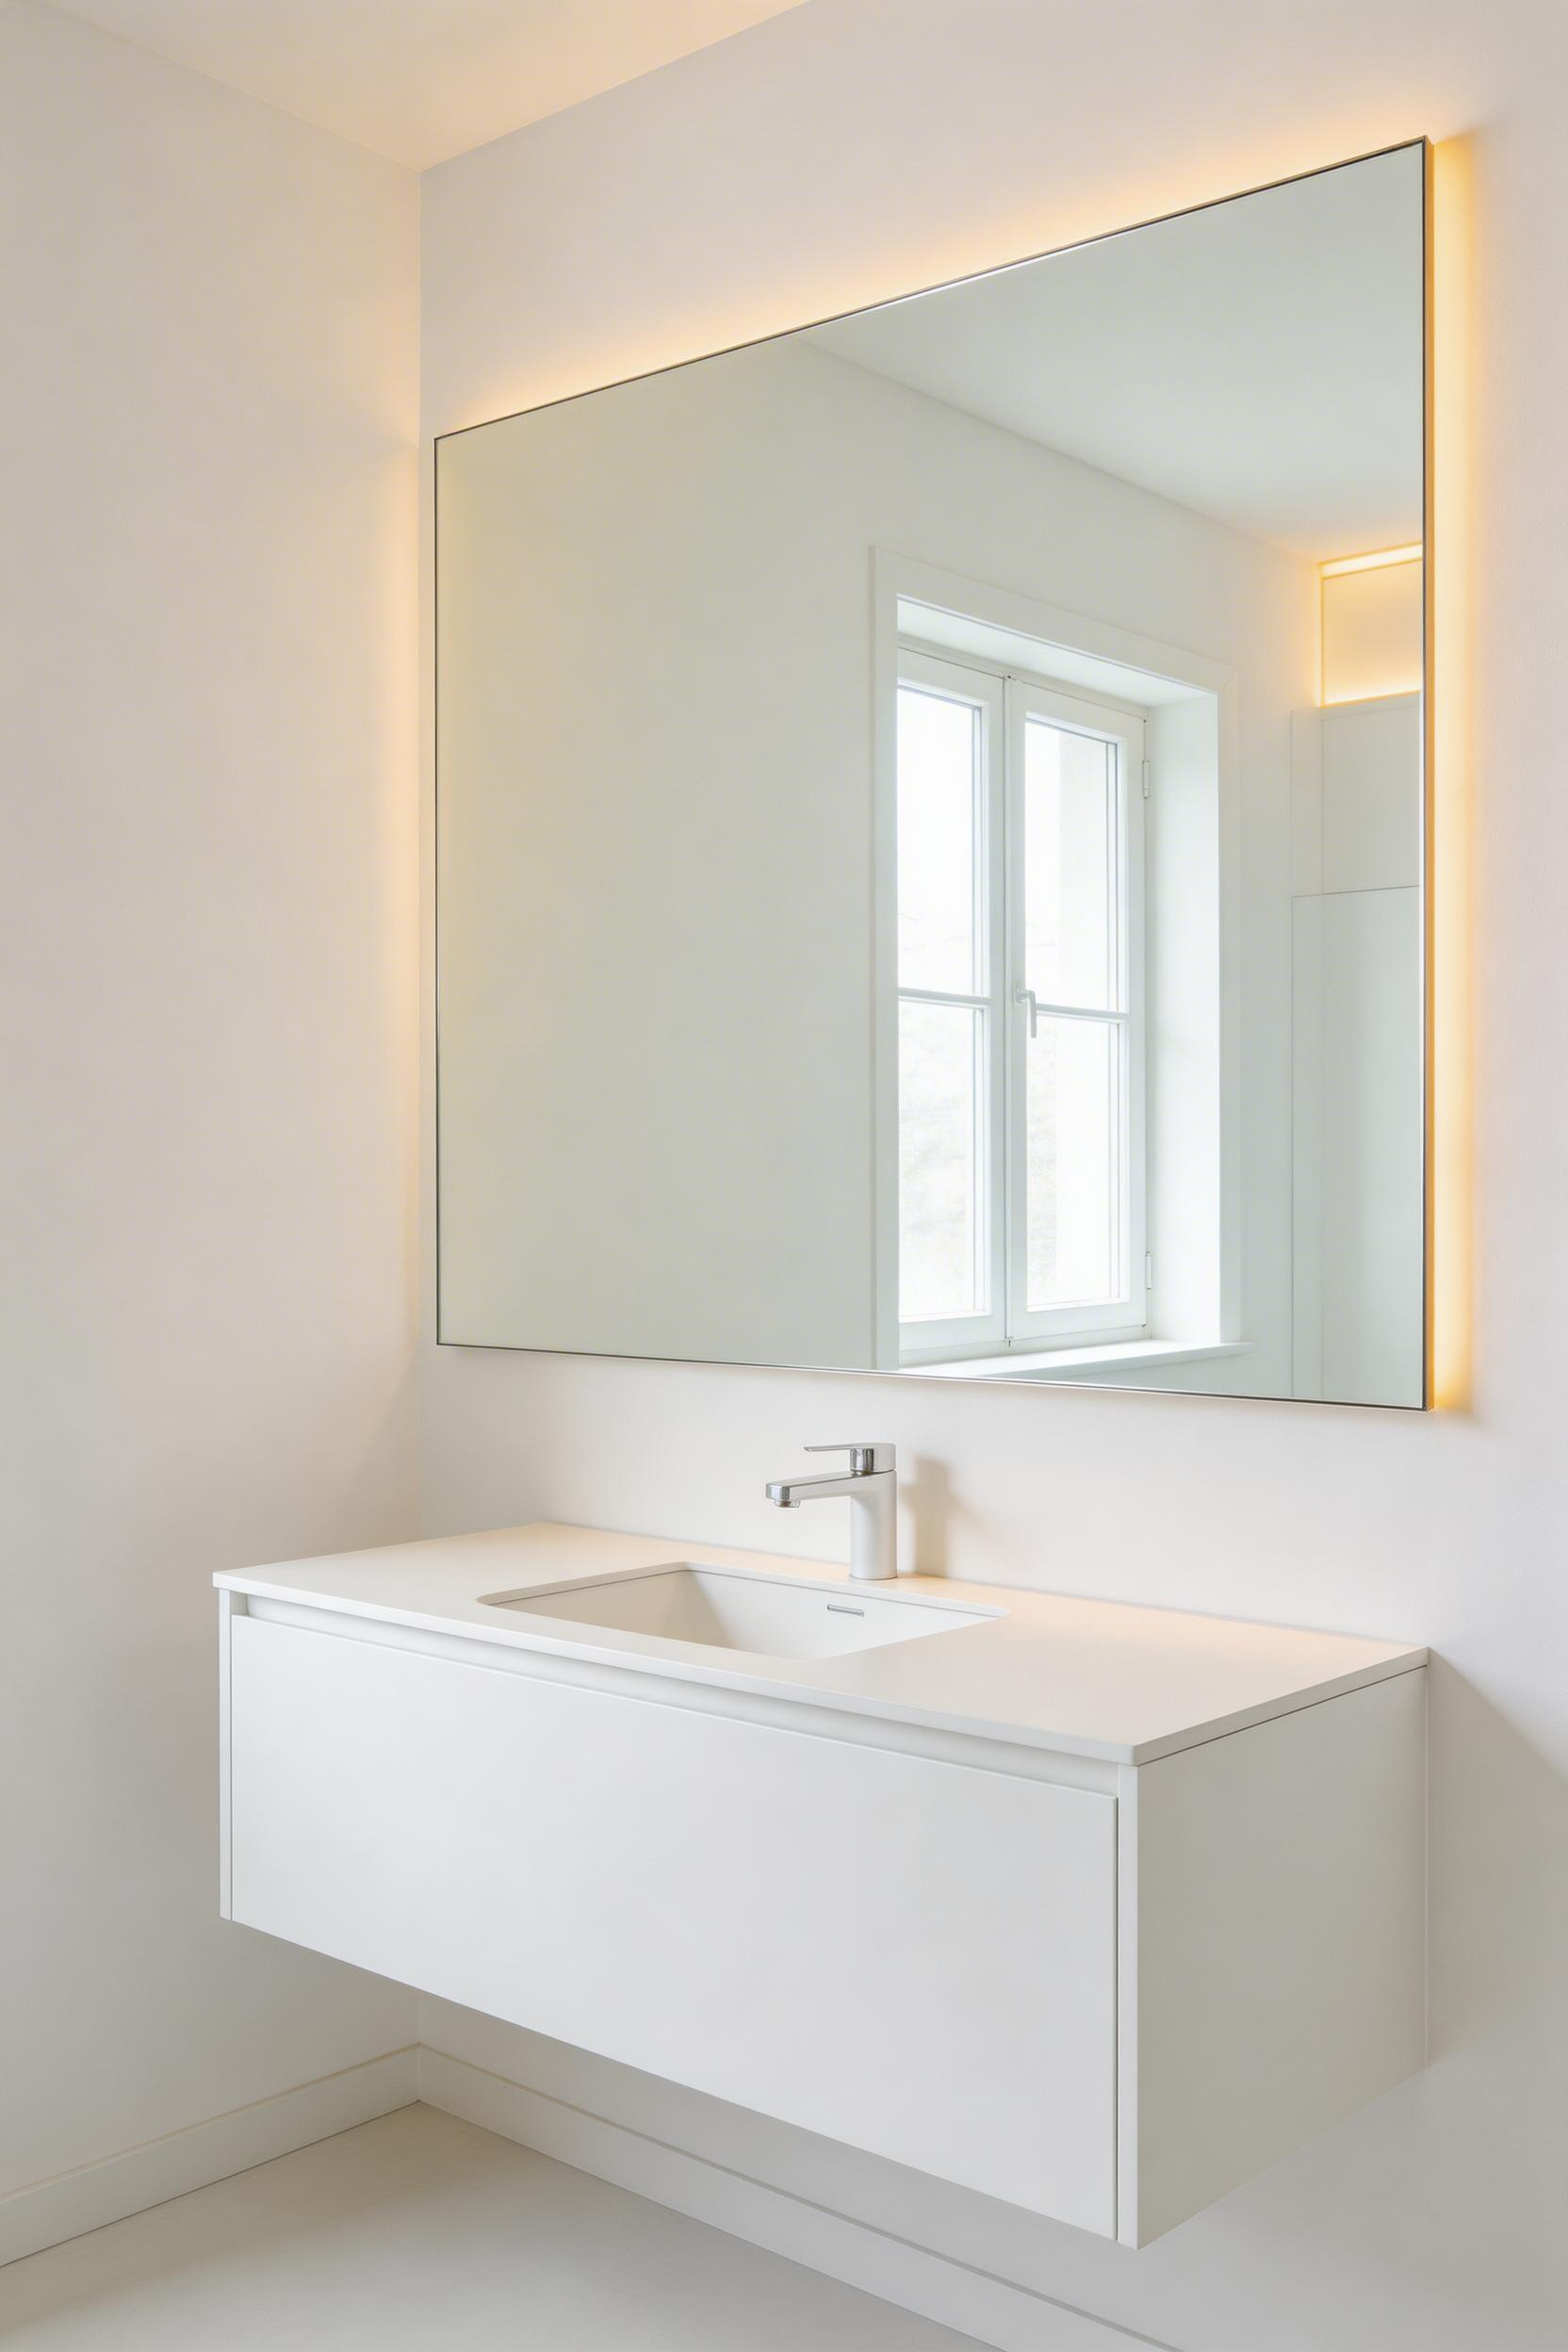
When you look into a mirror that spans your vanity wall, you see a reflected room behind you. Your brain reads this as depth — actual depth, not just the illusion of it. A small mirror gives you a small reflected room. A large mirror gives you what appears to be twice the space. In a room small enough that you can touch both walls, that reflection is the most effective spatial tool available.
The honest recommendation at the budget end is the IKEA Nissedal 65x150cm at £55. The tall portrait format is particularly good in a compact space that benefits from vertical emphasis. If you want integrated lighting and a demister — both genuinely useful — the Roper Rhodes Niko LED mirror at £249 for 700mm width is excellent. It puts out 3000K warm white light, and the demister means you can use it immediately after a hot shower. The HIB Fold 800mm backlit at £385 is the best option for larger walls.
Mirror width should match or exceed the vanity width. A 600mm vanity should have a 600mm+ mirror. Many designers go to 700–800mm to avoid the pinched look of a narrow mirror above a wide unit. Height: aim for the top of the mirror at 1800–1900mm from the floor.
In a bathroom design small in floor area, a surface-mounted cabinet or wire caddy hanging from the shower head is the enemy. A recessed shelf built into the wall gives you the same storage with zero projection into the room.
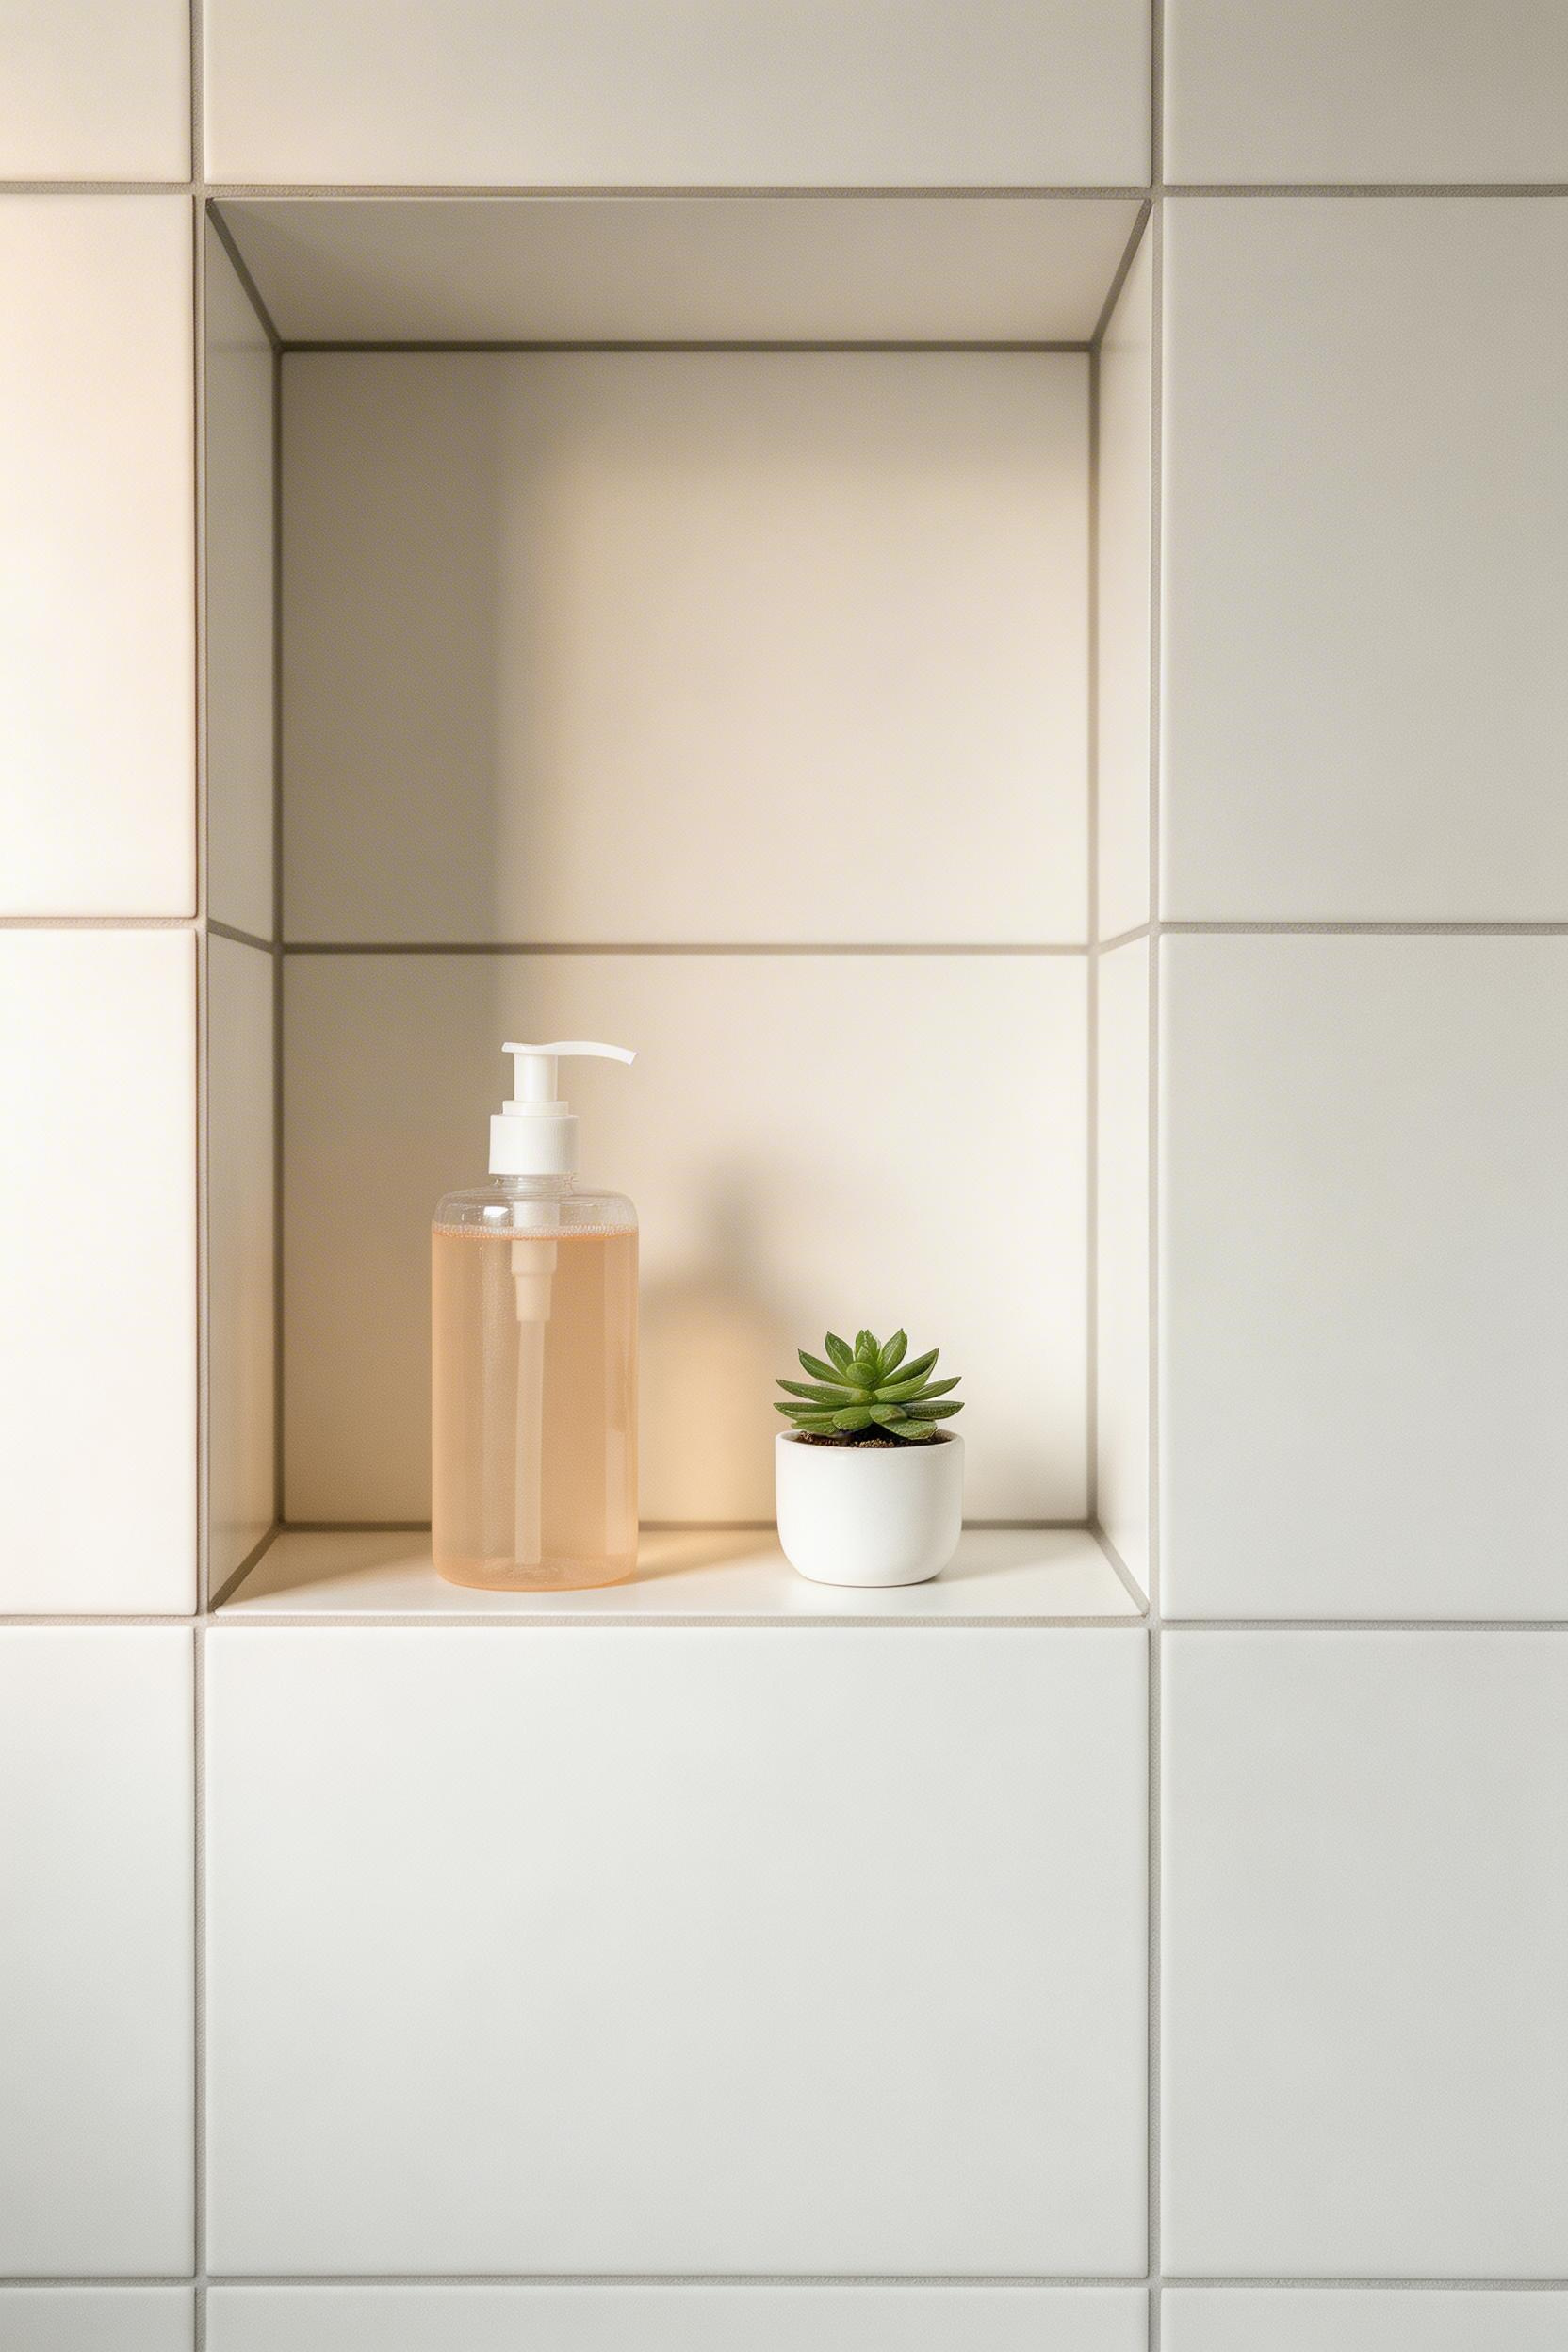
A standard stud wall — 100mm timber stud plus 12.5mm plasterboard each side — gives you 75–80mm of clear depth. That’s enough for most shampoo and shower gel bottles. Build the niche between two studs. Waterproof all six faces with a Schluter Kerdi membrane or tanking slurry, then tile to match.
If your tiler isn’t confident building a custom niche, the Schluter Shelf-E is a pre-fabricated stainless steel insert at £89–110. This fits between standard stud spacing and can be tiled around rather than built into. The Wedi Fundo Niche at £125 is larger (800x325mm) and gives you a full-height shelf — useful if you have tall bottles. For a budget DIY compact bathroom project, cutting and waterproofing a niche from cement board or Wedi board and tiling it yourself costs £30–60 in materials.
Elbow height (1100–1200mm from the floor) is correct for a shower niche. You want to reach it without raising your arm. It should sit at a level where you can see the contents without bending. Don’t place it at shoulder height — that forces an awkward reach every time you’re standing under the shower.
A standard basin is 500–560mm wide. In a small bathroom where you’re working at the margins, a compact basin at 360–450mm returns 50–200mm of wall length. That’s the difference between a toilet that opens freely and one that clips the vanity every time.
The compact basin also changes the proportions of the room. A basin that fills the wall from side to side draws the eye to its width. A slightly smaller basin, centred above a storage unit, reads as furniture rather than plumbing.
Integrated vanity units combining a compact basin and storage drawers are the most practical bathroom design small solution. The IKEA Odensvik 40cm with Godmorgon cabinet at around £280 combined is the best-value option. For a step up in quality, the Roca Debba 400mm at £120–160 paired with any 400mm vanity unit gives good results. The Duravit No.1 45cm compact vanity at £580–750 is designed specifically for small bathrooms and shows — the proportions are right, the storage is well thought through, and the integrated waste sits flush with the basin underside.
Here’s a thought: in a small bathroom where you’re compromising on basin size, invest what you save in a better-quality tap. A £200 tap on a £120 basin looks significantly better than a £40 tap on a £300 basin. And the quality of the tap internals — ceramic disc rather than rubber washer — matters more for longevity than the basin material does.
Contrasting grout draws attention to every tile boundary. In a bathroom design small in depth, high-contrast grout reads as a grid — and a grid fragments the visual field.
The solution is simple: choose grout in the same colour family as your tile, within one shade lighter or darker. A warm white tile needs warm white or pale warm grey grout, not bright white. A mid-grey tile needs mid-grey grout. Tone-on-tone grout makes the wall read as a single surface, which is exactly the effect full-height tiling is trying to create — but grout that fights the tile colour undermines the whole approach.
Cement grout: Mapei Ultracolor Plus FA at £12–18/kg is the most widely available. It comes in 180+ colours and has water-repellent properties built in. Epoxy grout (Laticrete Spectralock at £35–50/kg) is stain-proof with very precise colour matches. It’s worth the extra cost in the shower zone, especially for pale grout that would otherwise mark within months. Minimum joint width: 2–3mm for rectified tiles, 5–8mm for non-rectified.
Order a small sample of your chosen tile and take it to the grout display, not the other way round. Grout looks different at 3mm in a joint than on a colour card, and tile colour changes when wet. Match grout colour in both dry and wet conditions before committing to a full bag. That extra 20 minutes saves a regret you’ll live with for years — industry surveys show 34% of DIY tilers wish they’d chosen a closer colour match.
A standard single-panel radiator in a small bathroom design is typically 600x600mm and projects 60–80mm from the wall. A ladder-style heated towel rail in the same rough space is usually 500mm wide and 25–40mm deep. That difference — 20–55mm of projection — matters in a room where you’re already navigating tight clearances.
The dual function is the real advantage. You get room heating and towel storage from one wall-mounted fitting. It takes up less floor clearance than a standard radiator. In a bathroom design small enough that the toilet, basin, and shower are in close proximity, reclaiming 30–40mm of projection on the heating element is a meaningful improvement to daily movement through the room.
Electric towel rails can go anywhere there’s a fused spur connection. Plumbed rails connect to the central heating circuit. Dual-fuel rails (plumbed, with an optional electric element) let you run them in summer without turning on the boiler — worth the extra cost in a bathroom you use year-round.
For a small bathroom at 3m², a 500mm wide, 1200mm tall rail outputs 1,200–1,800 BTU/hr — adequate heating with good insulation. Size the rail taller rather than wider. A tall rail heats more effectively in a narrow room — towels hang better, and the convective pattern suits the space. Budget pick: Kudox Slimline 500x800mm electric at £79–99 (25mm projection, IPx4 rated). Mid-range: Vogue Hex Straight 500x1000mm at £285–320. Premium: Bisque Athena 480x970mm at £495–580, UK-made and available in any RAL colour.
A bathroom without natural light is a room you tolerate rather than enjoy. However bright your artificial lighting, any windowless bathroom always feels enclosed. If there’s a roof space above your bathroom, a skylight or solar tube is the most transformative single change you can make — and it’s more achievable than most people assume.
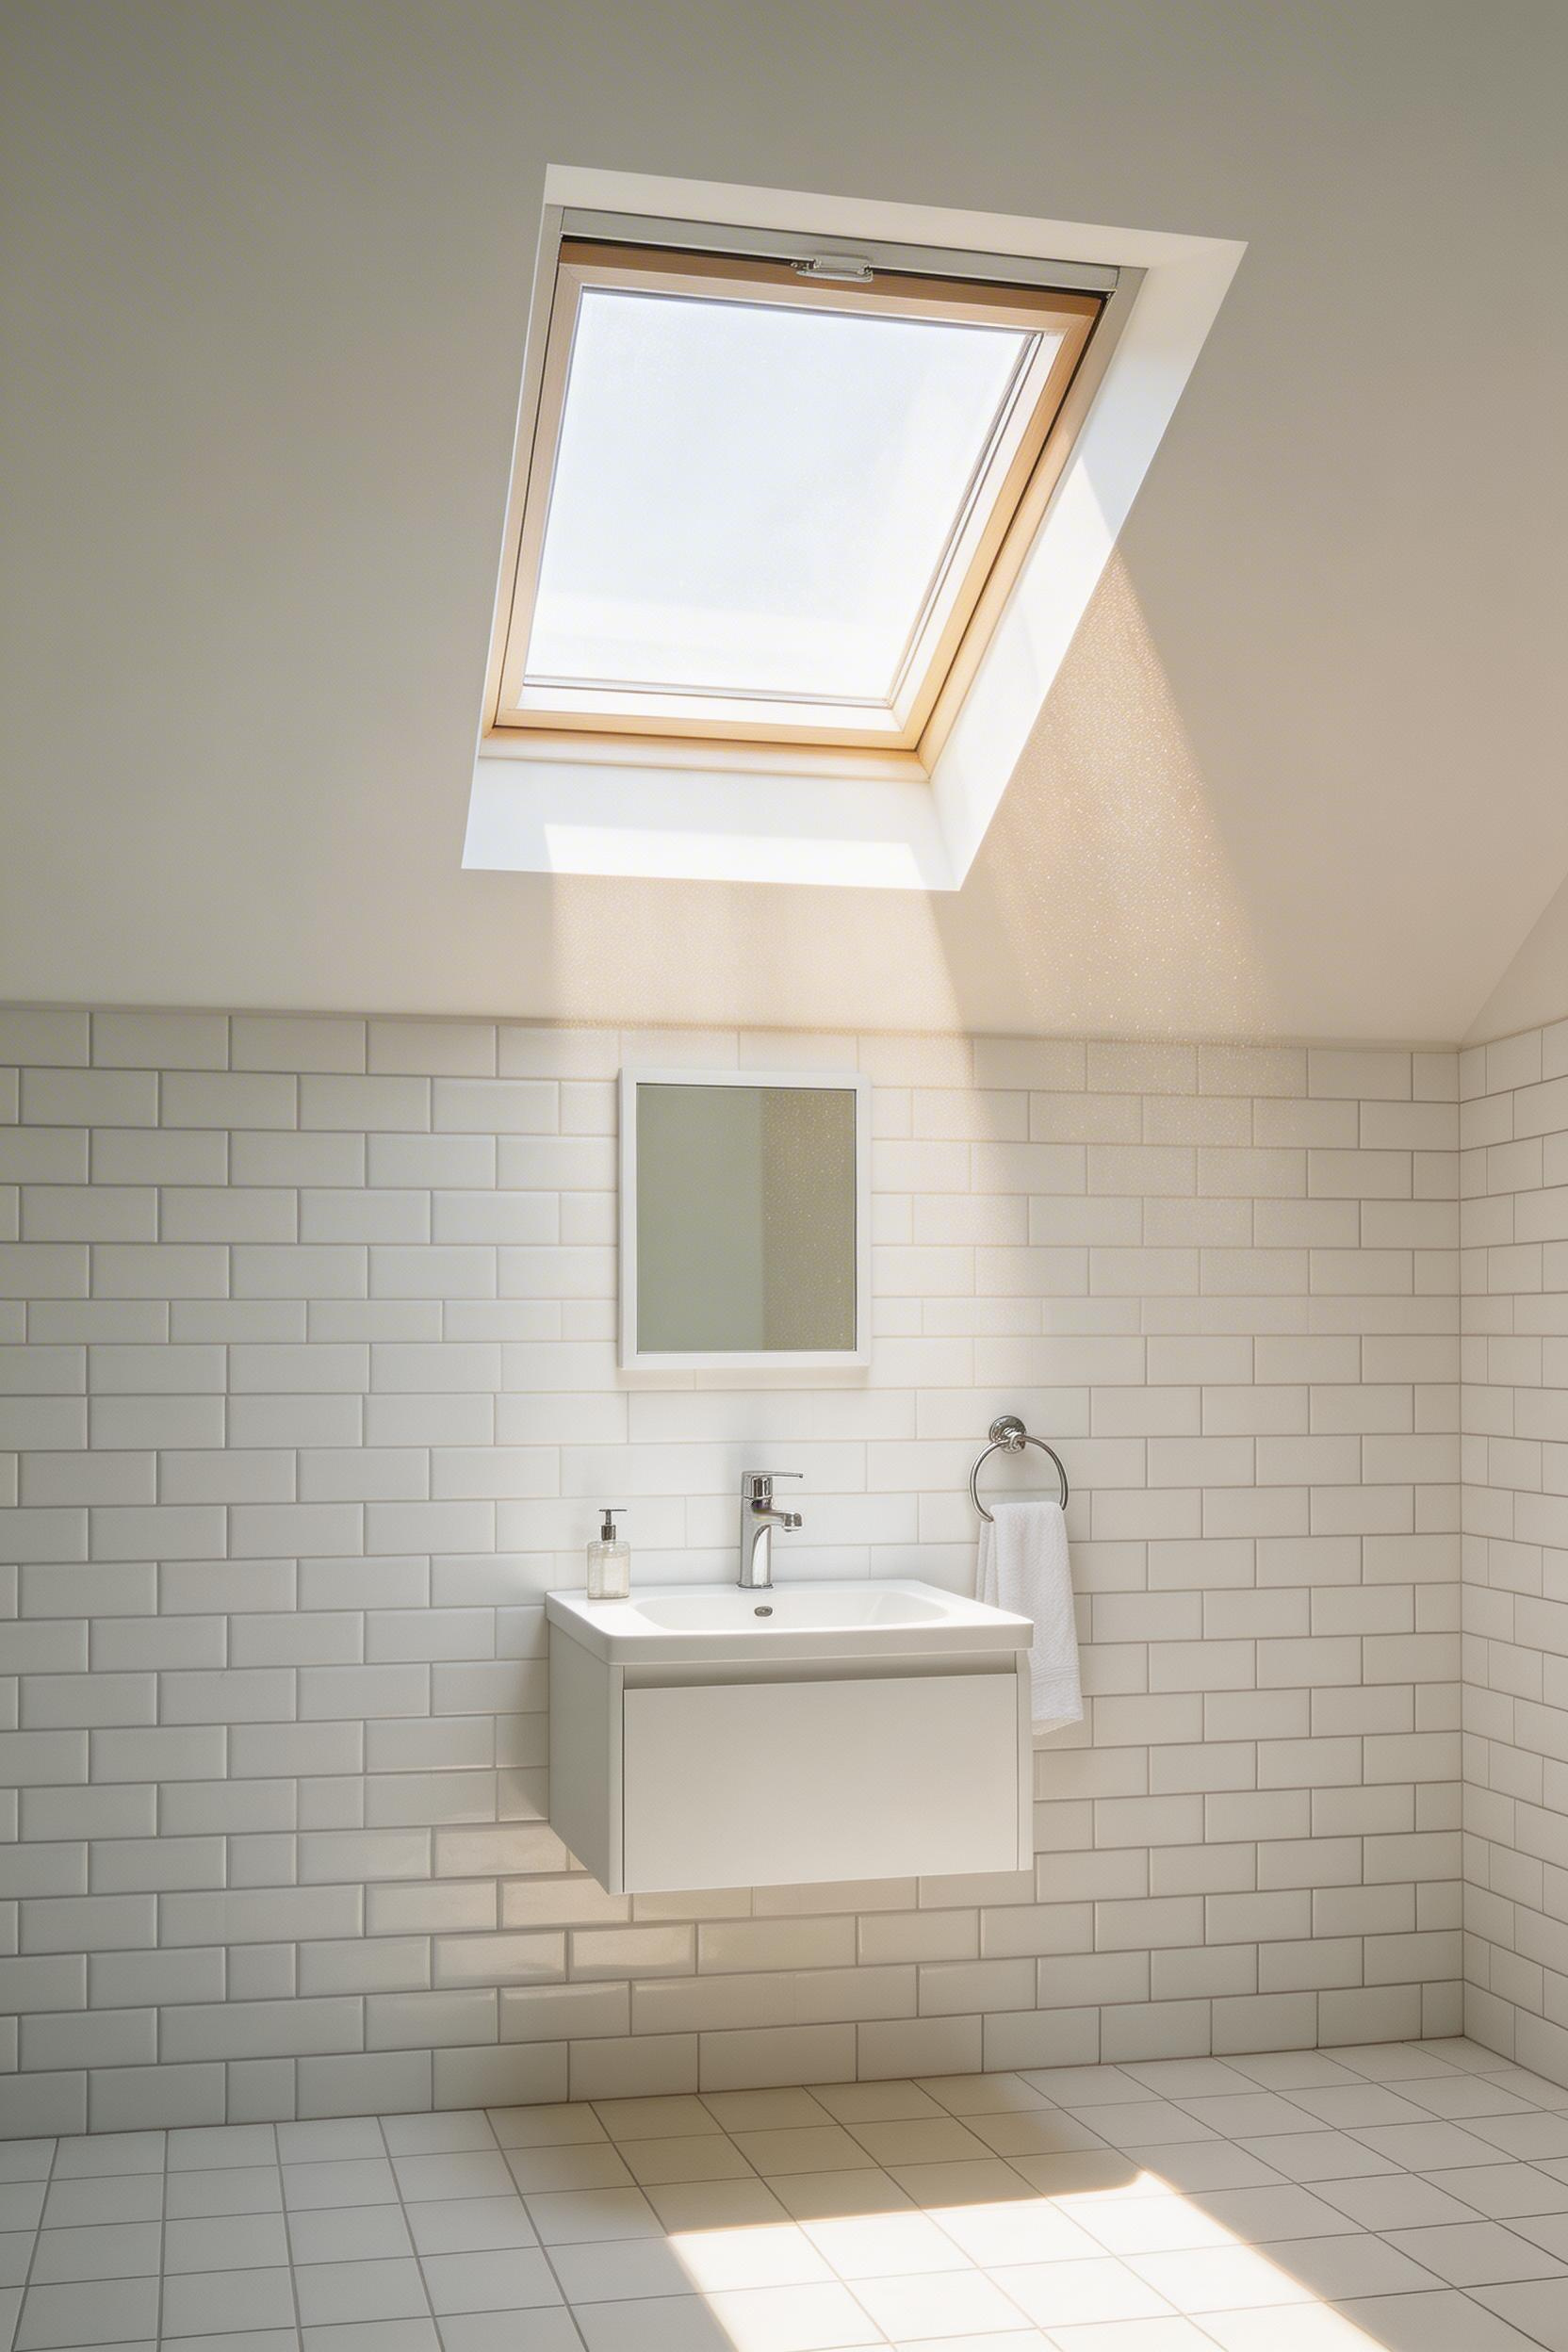
Research published in Building and Environment found that access to natural light reduced self-reported stress levels in bathroom users by 22%, and that small bathrooms with skylights rated higher for perceived luxury than larger bathrooms without natural light. That’s a significant finding for a bathroom design small in footprint: you don’t need a bigger room, you need a better connection to the outside.
A Velux GGL 3060 Fixed Skylight CK02 (the most popular bathroom size) starts at around £285 supply-only. Opening versions with humidity auto-vent run from £350–550. They’re worth the extra cost in a shower room where condensation management matters. If a full skylight isn’t structurally practical, a Velux Sun Tunnel at 35cm diameter costs £220–350 installed. It delivers daylight equivalent to a 100–200W bulb on a cloudy day. It’s an honest solution where the ideal isn’t possible.
For flat-roofed extensions: Fakro FTU-V fixed dome units start at £310–420 and work down to near-zero roof pitch.
Overhead-only lighting is the most common bathroom lighting mistake. A single downlight above a mirror creates unflattering shadows under the nose, chin, and eyes — because the light source is above you rather than in front of you. In a small bathroom where you’re standing very close to the mirror, this is particularly noticeable.
A survey by Roper Rhodes found that 71% of people are unhappy with their bathroom lighting, with shadows when using the mirror cited as the most common complaint. The fix is simple: add a light source at eye level, flanking the mirror. Wall-mounted sconces at 1600–1700mm height provide light from the front and sides simultaneously. This eliminates the overhead shadow problem entirely.
Zone 1 (inside the shower) requires IP65+ fittings. Zone 2 (within 600mm of a shower rim) requires IP44. Outside these zones, standard fittings are fine. The Astro Mashiko 400 IP44 wall light at £89–110 is a good, clean choice for flanking a mirror — a cylinder form that works with both modern and traditional small bathroom schemes. If you want a more integrated approach, a mirrored cabinet with integrated LED side strips (such as the HIB Xenon 80 at £425–495) combines storage, mirror, and eye-level lighting in one fitting.
For a bathroom design small enough to have one light only, choose a large diffused globe fitting rather than a downlight — a frosted opal globe throws light more evenly and reduces shadows better than a tight-beam recessed fitting.
A shower tray — even a slim stone-resin one — introduces a visual edge that breaks the floor plane. In a bathroom design small enough that the floor is one of your main spatial assets, that break matters. A wet-room style floor using continuous tile throughout the shower zone and the bathroom proper removes it.
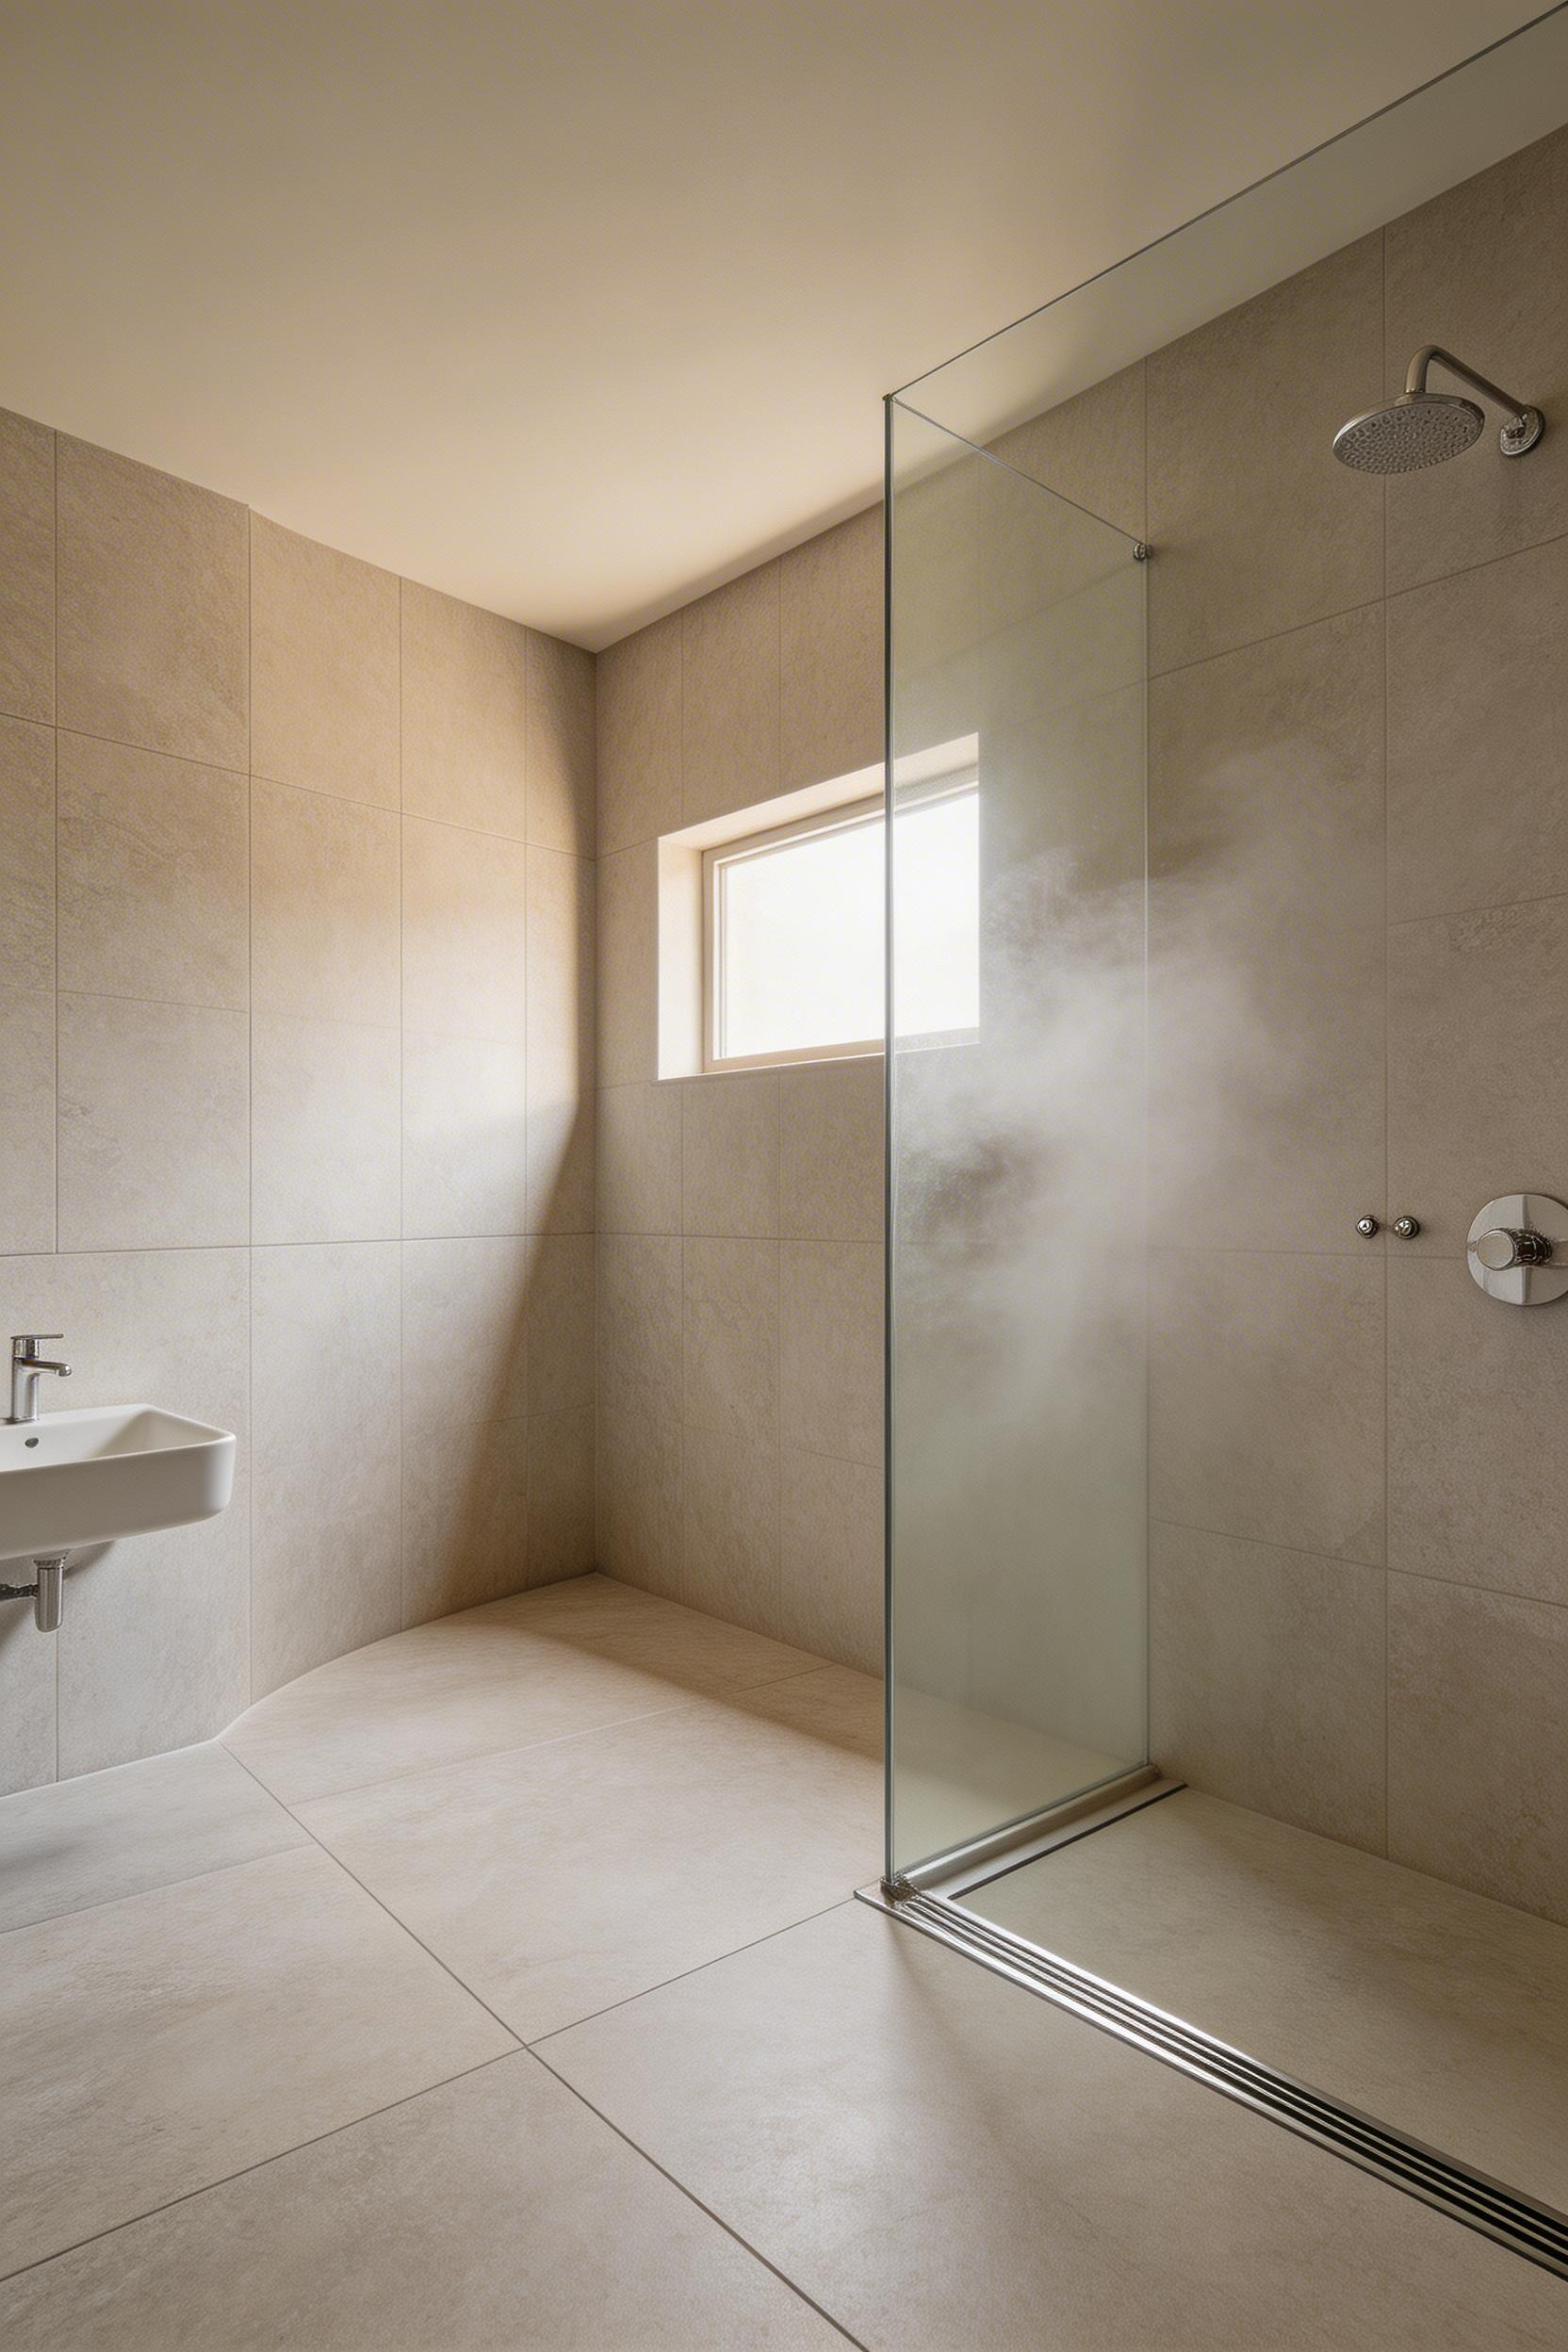
The wet-room approach requires a proper waterproofing system. The Schluter Kerdi-Shower Kit (£185–240, 900x900mm) provides a pre-formed shower former with the correct fall to drain built in — 1:80 minimum, or 12.5mm per metre. A waterproof membrane laps up the walls by 150mm. Don’t skip this. The Property Care Association estimates that 25% of bathroom insurance claims in the UK relate to water ingress from shower areas, with inadequate waterproofing as the primary cause. In a bathroom design small this way, there’s nowhere for moisture to escape. A leak under the tiles causes far more damage than in a larger room.
For clean tile runs, a linear drain at one edge — Geberit CleanLine 80 at £280–350 or Schluter Kerdi-Line — lets you lay tiles in full runs without a central drain interrupting the pattern. The floor tiles need a non-slip rating of R10 minimum for the wet zone — which is satisfied by most textured porcelain tiles, including many that look smooth from a distance.
If you’re concerned about linked bathroom interior ideas like this one, there’s a detailed guide to bathroom interior ideas that covers wet-room waterproofing and tile selection in more depth.
Light colours reflect more light and make a room feel larger. In a bathroom design small enough that the wall is arm’s length away, how that wall reflects light has a direct impact on how closed-in the room feels. But an all-white bathroom can feel clinical and characterless. This is especially true in a small space where there’s little else to look at.
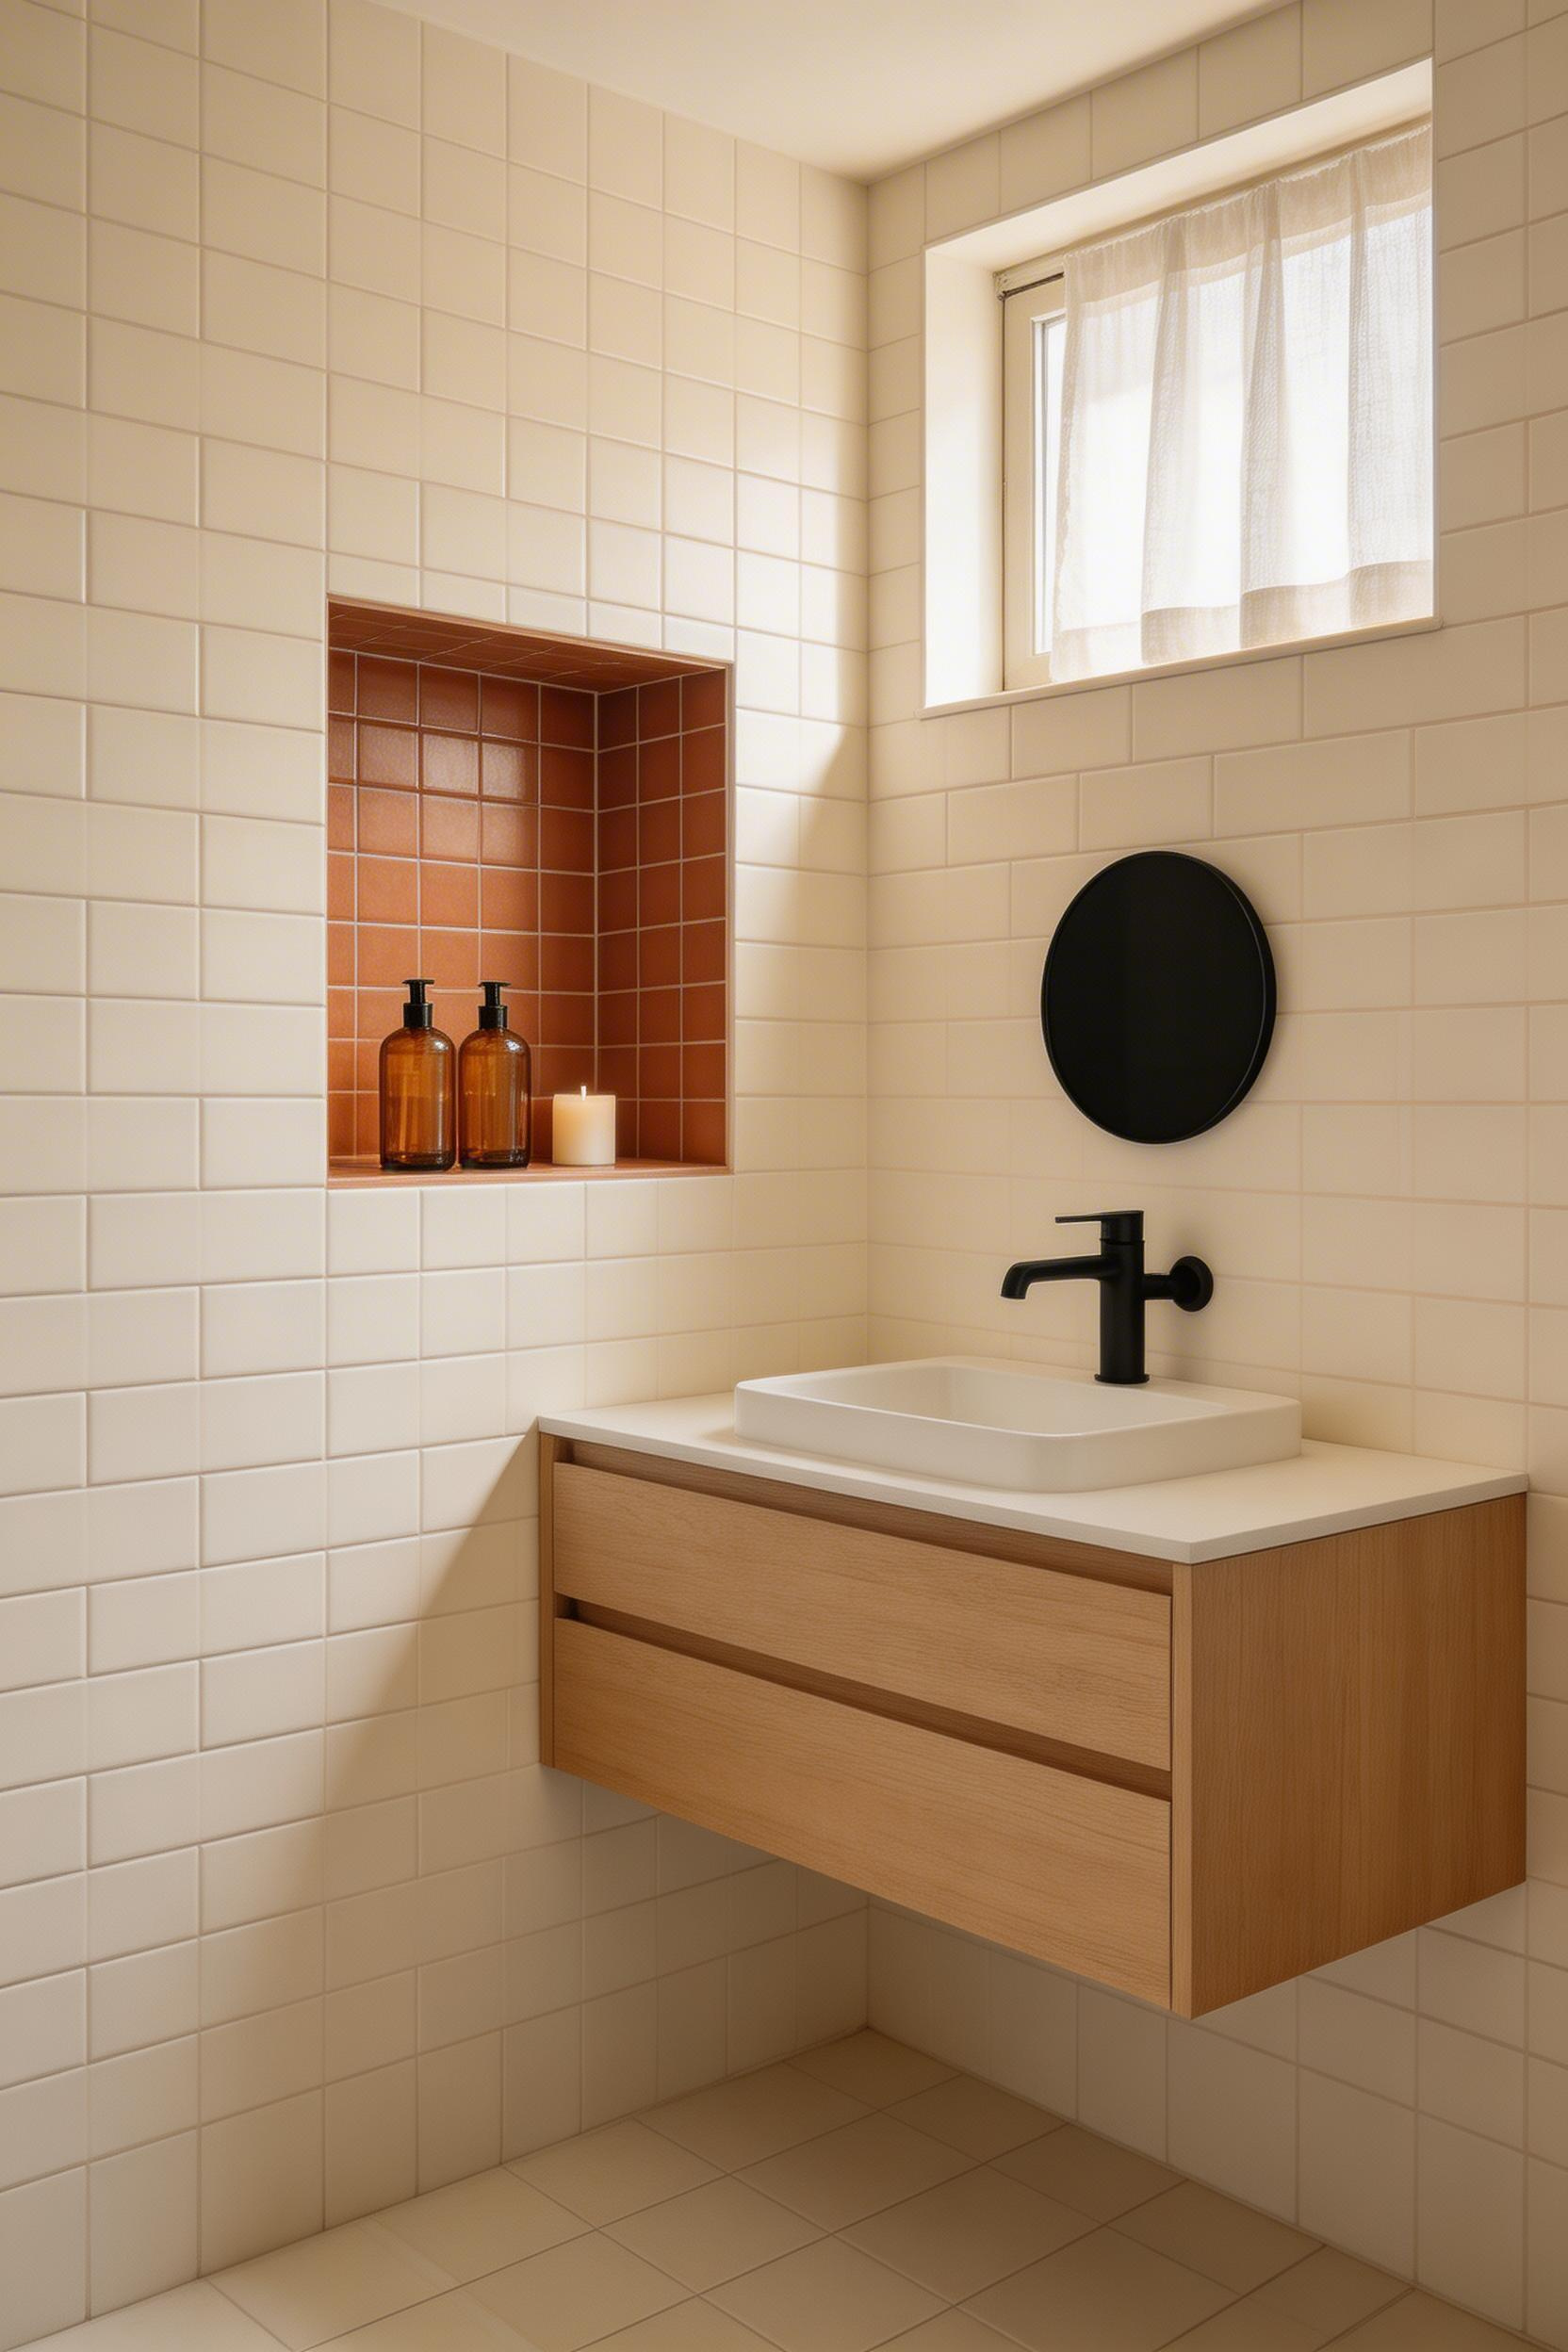
The solution is a light base with exactly one bold accent. A dark niche interior, a coloured cabinet, a contrasting floor tile, a bold hardware finish — one of these, not all of them. Nordic bathroom design excels at this. A warm white tile throughout, a recessed niche tiled in terracotta, matt black tap hardware — nothing else. The accent does all the work because the base colour gets out of the way.
Popular light base colours for this approach: Farrow & Ball All White No.2005 (warm, not stark), Little Greene Gauze 92 (warm beige-grey, pairs well with oak and terracotta), and Dulux Timeless (reliable neutral, widely available, good value). For the accent: a deep terracotta niche tile from Fired Earth at £45–65/m² is minimal in area but high in impact. Matt black hardware from Vado, Hudson Reed, or Hansgrohe costs no more than chrome equivalents but reads as more intentional in a simple scheme.
The key commitment is hardware consistency. If you choose matt black taps, also choose a matt black toilet roll holder, towel ring, and shower fitting. Mixing matt black and chrome in a compact space looks like a mistake rather than a decision. Pick one metal finish and apply it to every fitting in the room.
A mirrored cabinet does two jobs at once: it gives you a full-width mirror and practical storage, without occupying two separate sections of wall. In a bathroom design small enough that wall space is genuinely rationed, this matters.
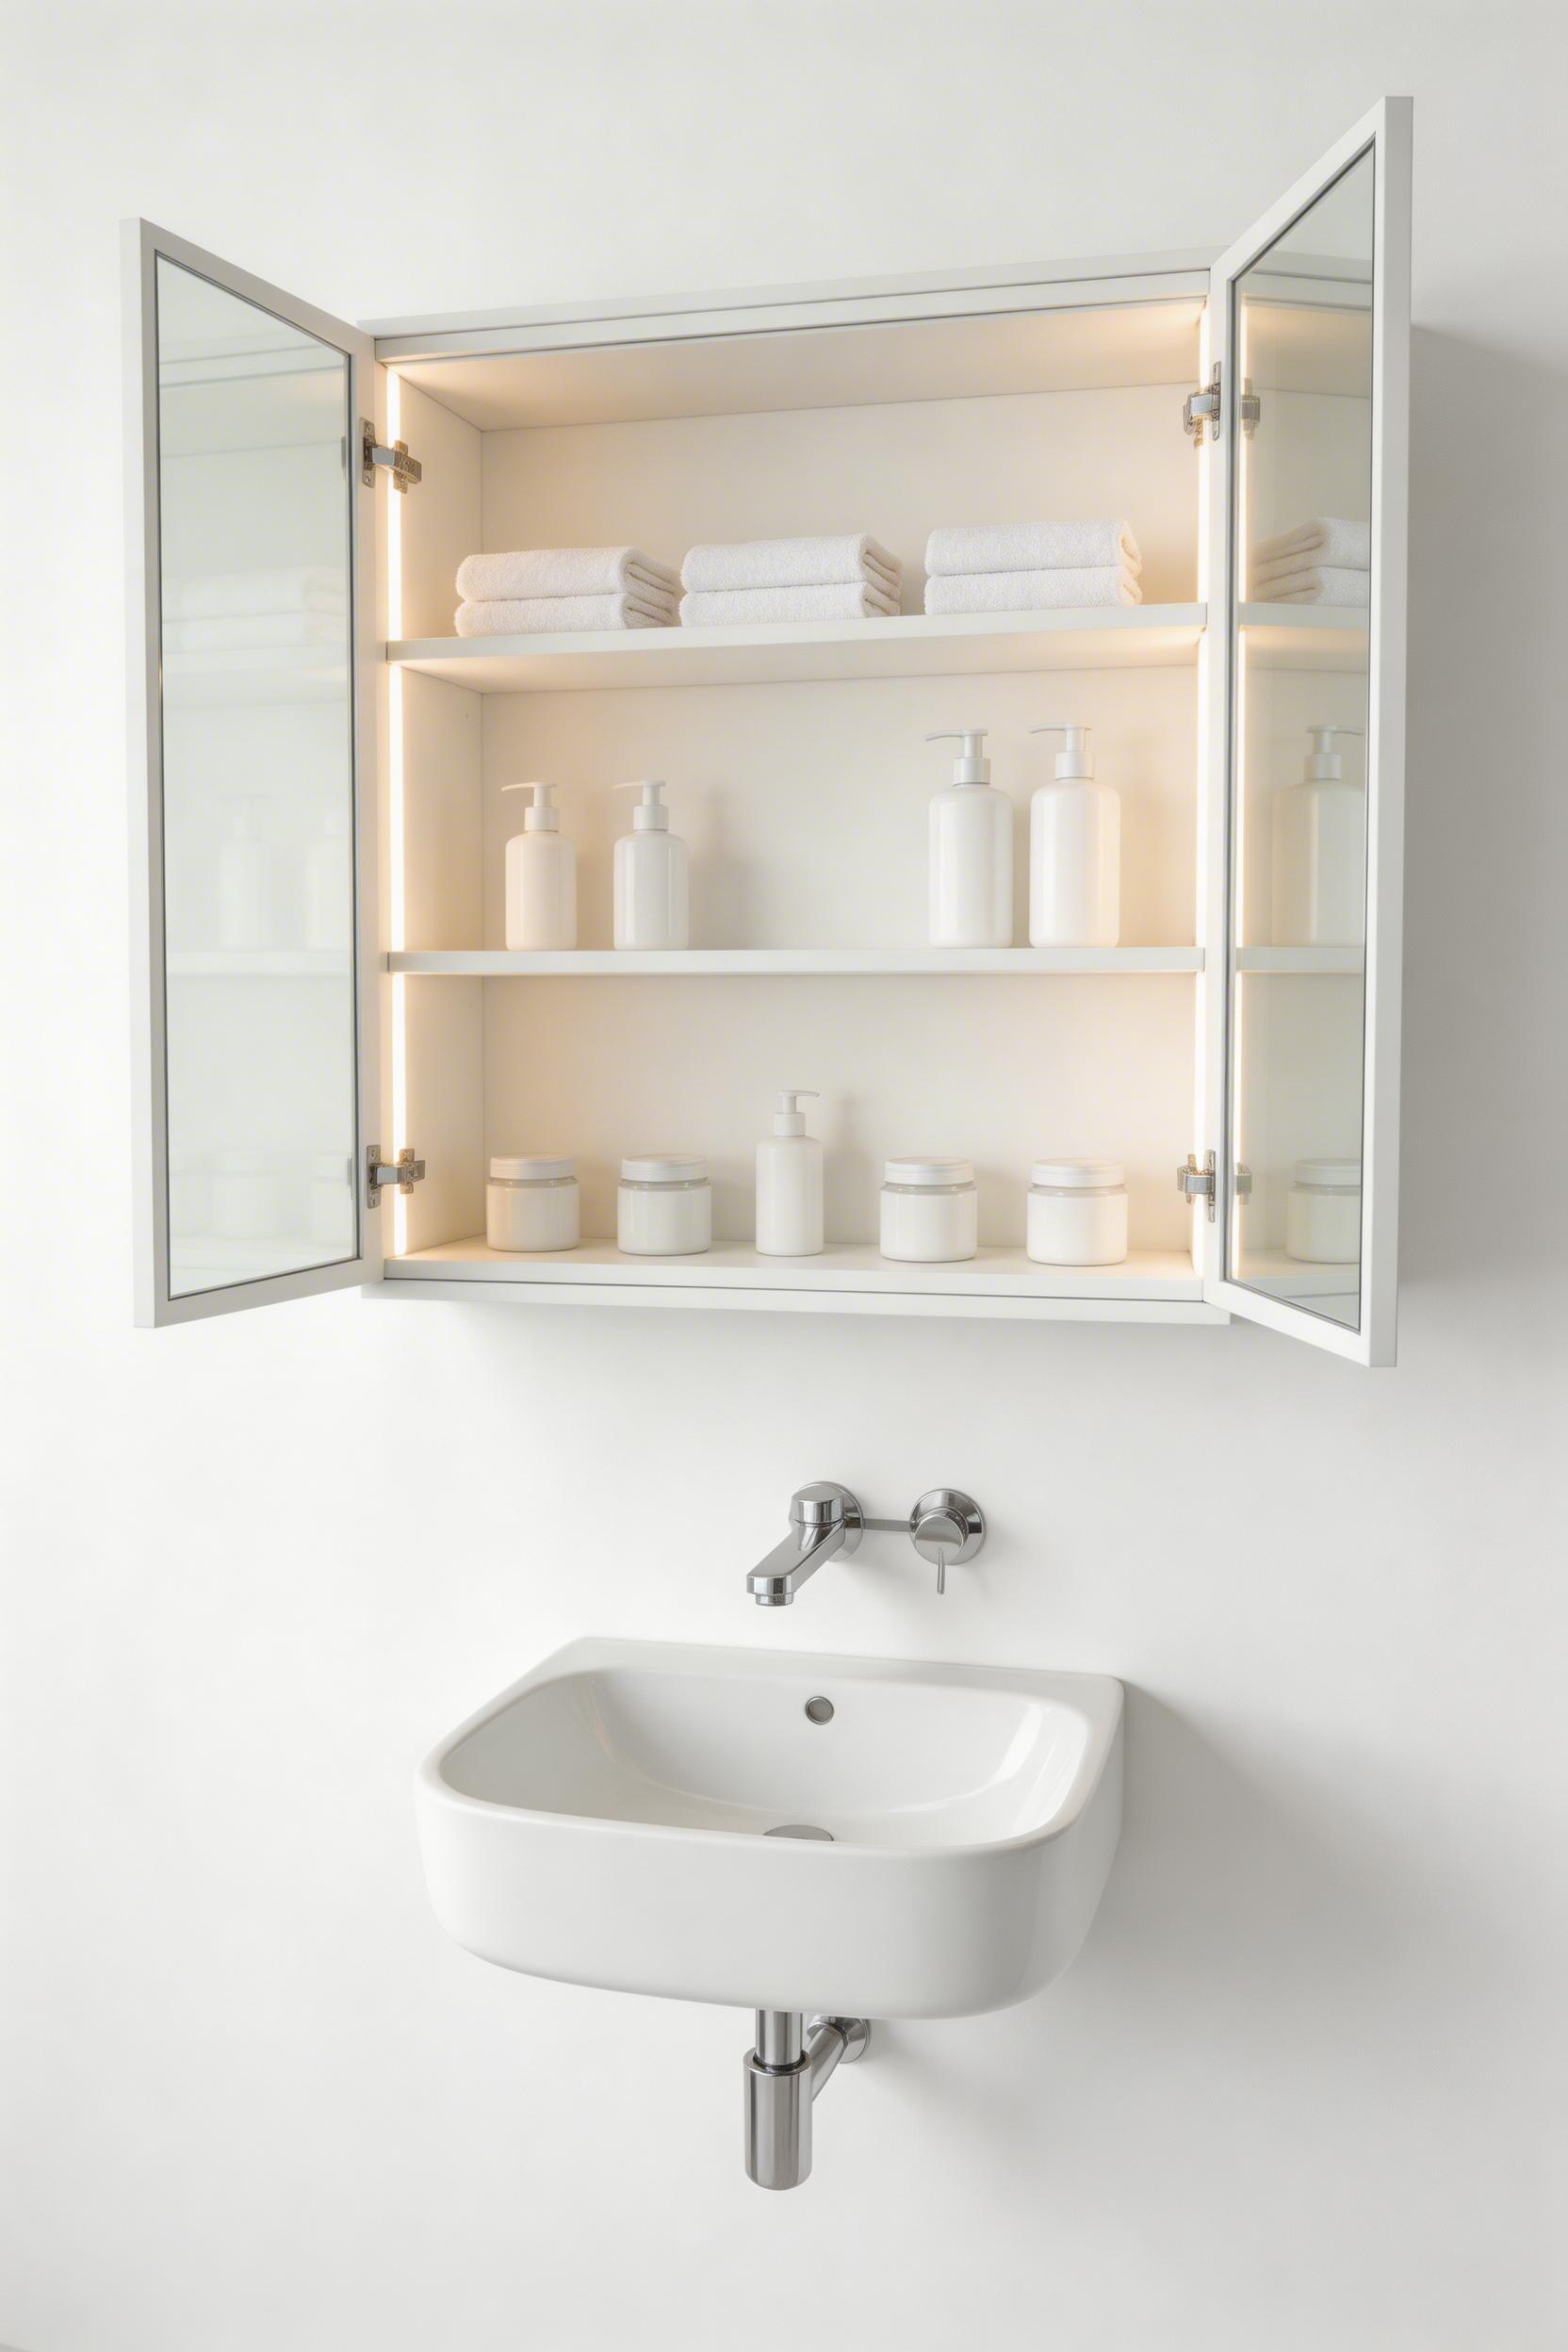
Surface-mounted cabinets project 100–150mm from the wall — less than a standard shelf bracket plus lip. A 600mm cabinet typically provides 60–70 litres of storage, which covers most households. The mirror surface on the front face adds to the room’s reflected depth at the same time.
The hinge quality is the deciding factor between good mirrored cabinets and disappointing ones. A soft-close mechanism should be smooth throughout its full travel, not just at the end of the swing. Open and close the showroom door 20 times before deciding. Cheaper cabinets use spring-loaded hinges that feel stiff or bouncy — you’ll notice every time you open it.
Budget: Croydex Medstead 600mm at £85–110 is a reliable entry point with soft-close hinges and a clean look. Mid-range: Roper Rhodes Vista 650mm at £265–295 adds internal LED lighting that illuminates the shelf contents and spills gently through the mirror edges. Premium: HIB Xenon 80 at £425–460 includes integrated side LED strips that provide the flattering eye-level light discussed in item 10, plus a demister. In a room this tight, where you’d otherwise need to spec both a cabinet and separate mirror lighting, the HIB does everything.
The 78% of homeowners who chose a mirrored cabinet in a bathroom renovation would choose it again in a future project, according to HIB’s own customer surveys — which aligns with what I’ve seen in practice. It’s consistently the fittings that combine function with considered bathroom vanity designs that people never regret.
A standard 762mm door requires 0.55m² of floor space to open. In a bathroom under 3m², that’s nearly 20% of the total floor area. Pocket and barn doors solve this by eliminating the swing arc entirely.
A pocket door slides into the wall cavity on a steel frame. It requires planning before plastering. You need a Johnson Hardware 153 frame kit (£120–160) or an Eclisse Unico system (£275–320) installed before the wall is finished. If you’re doing a compact bathroom renovation from scratch or strip-out, this is the moment to specify it. Barn doors are the retrofit alternative: they slide on an external wall-mounted track and don’t require opening the wall. Häfele’s barn door kit at £125–175 handles doors up to 120kg and needs no floor track.
Pocket doors need a minimum 100–120mm wall thickness plus the door thickness. A 35mm solid door needs a 35mm pocket plus the frame sides. The rough opening is door width plus 50mm, door height plus 40mm. One practical note: specify the Eclisse system with soft-close included, or budget £30–50 extra for a soft-close mechanism on the Johnson frame. Without it, the door crashes against the latch on every close — amplified in any compact bathroom where sound echoes. Barn door track length should be twice the door width to allow full opening.
A National Kitchen and Bath Association survey found that 23% of US bathroom designers specify pocket or barn doors for rooms under 35 sq ft. That compares to just 4% for larger bathrooms. The decision is driven by exactly this floor-space recovery logic.
The most beautifully designed bathroom design small space will feel cluttered if there are too many objects in it. And clutter in a small space feels worse than clutter anywhere else — there’s nowhere for the eye to rest.
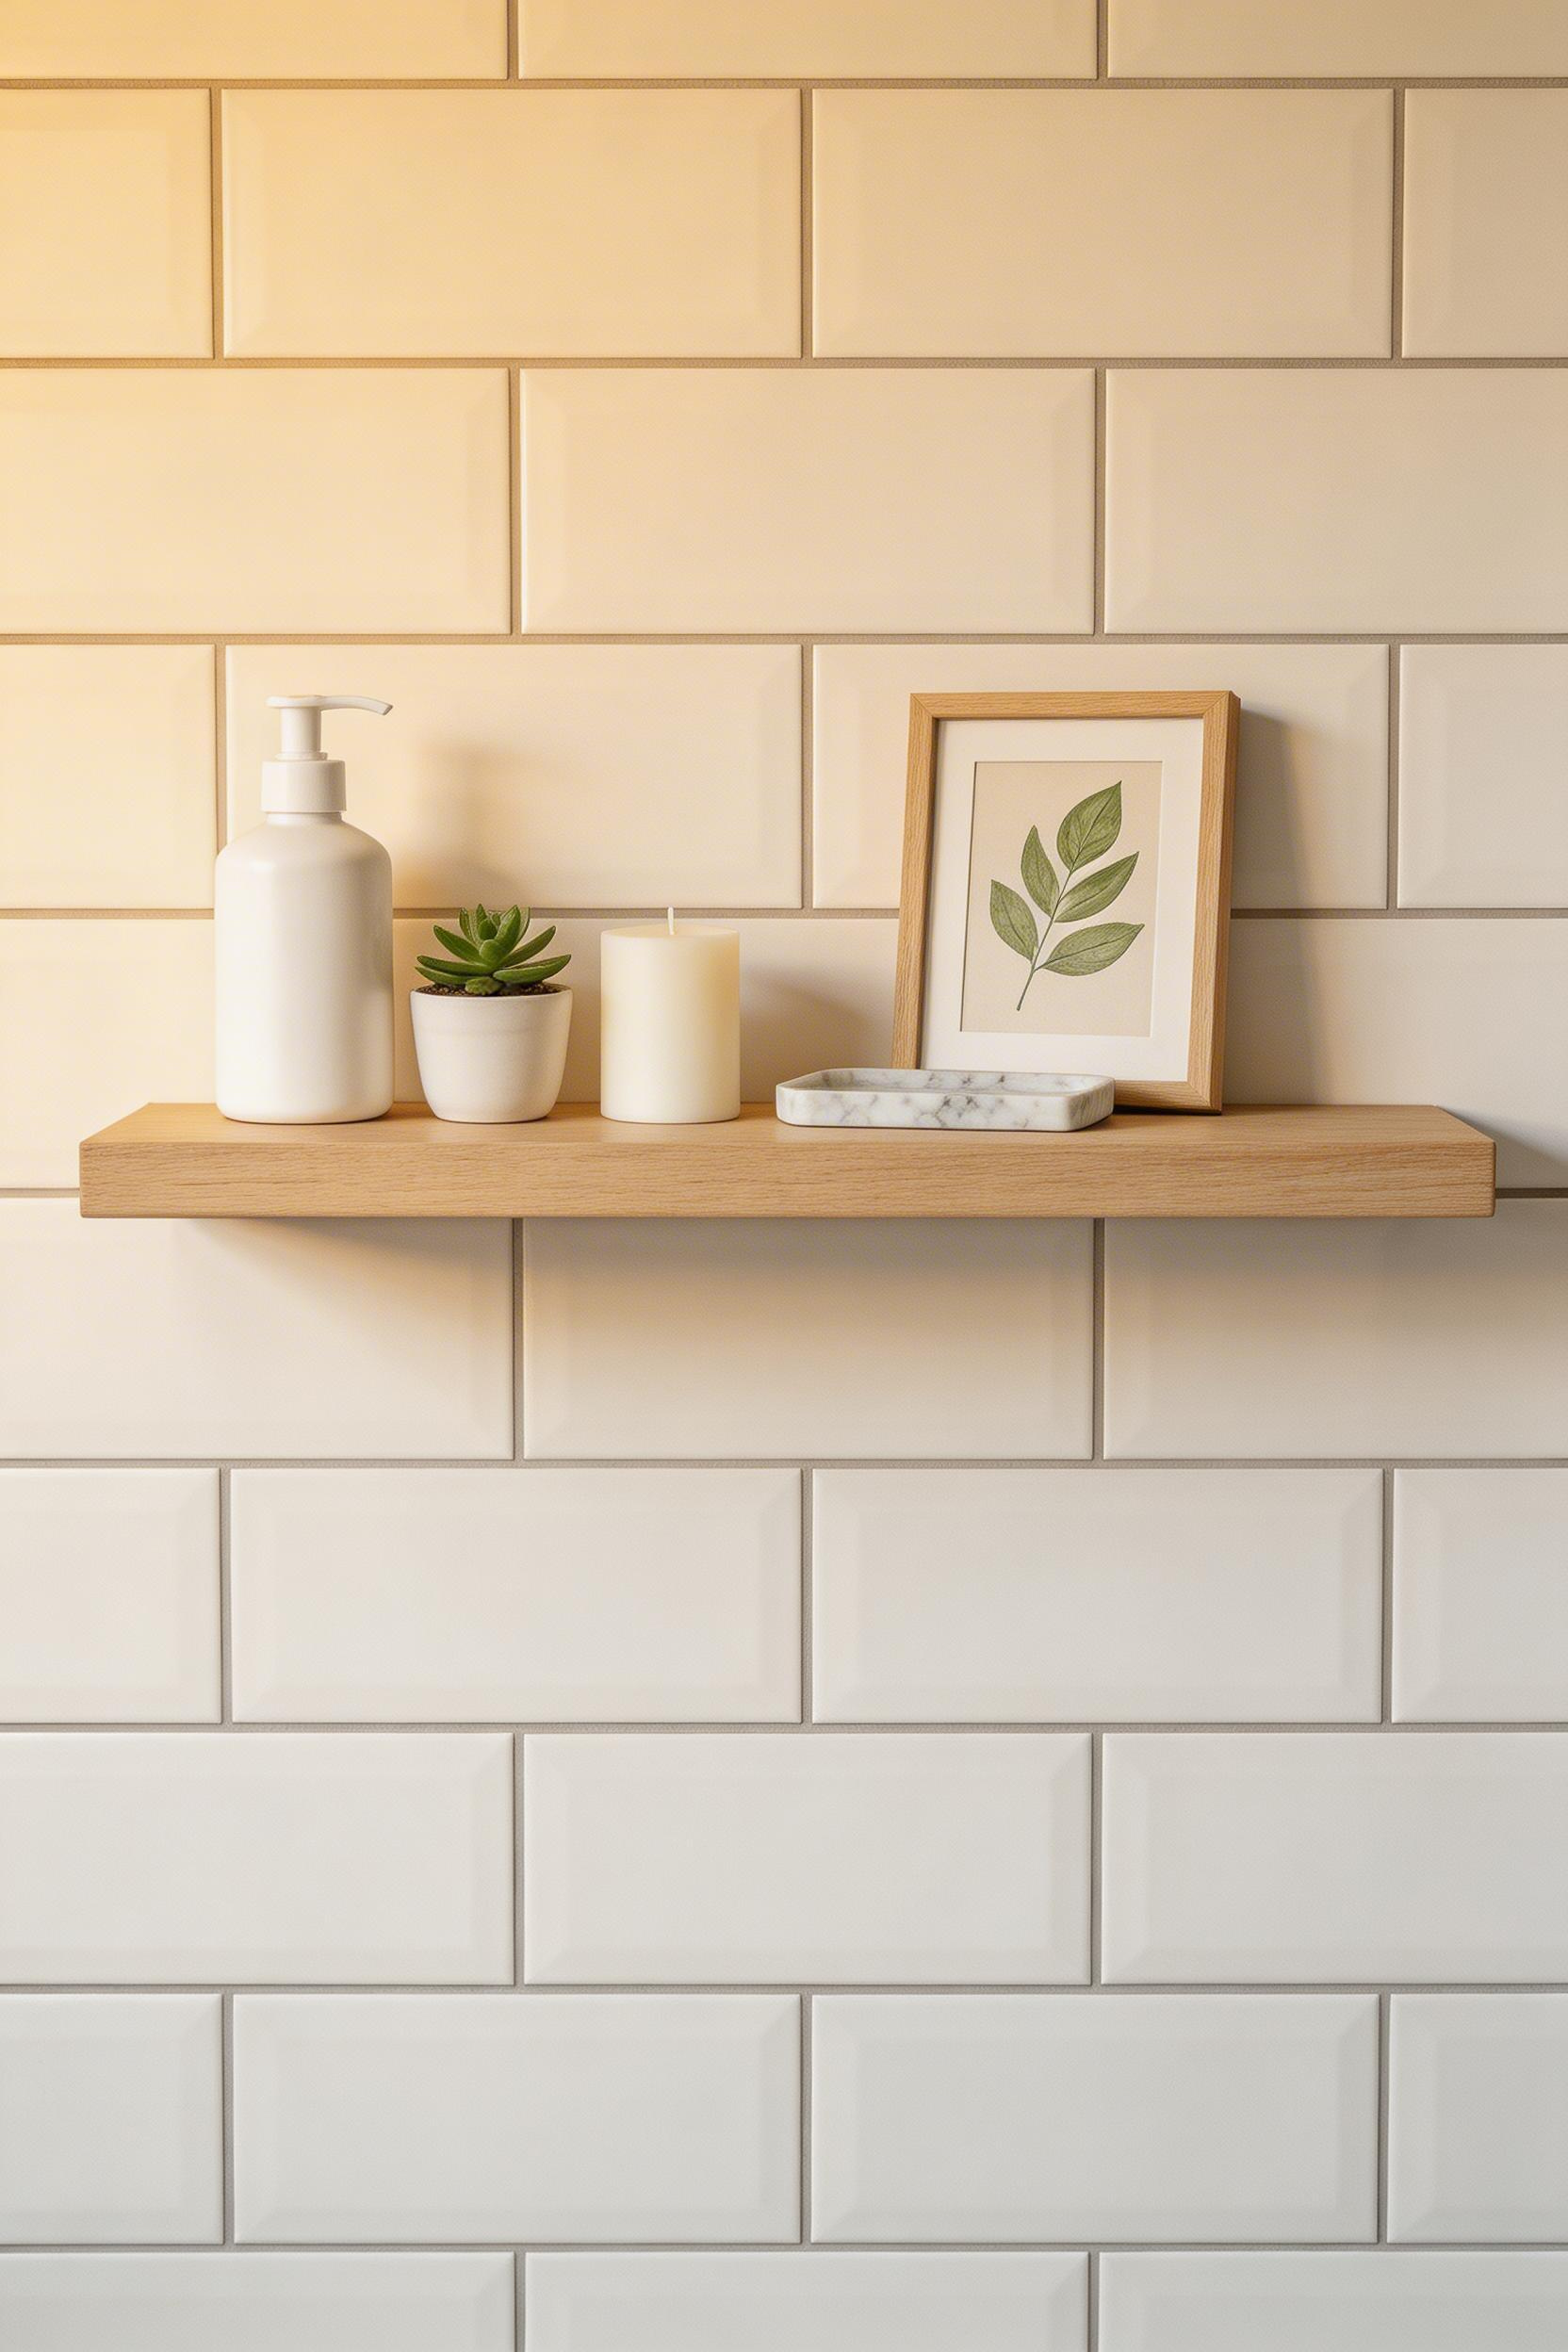
The rule of five: one soap dispenser, one plant, one candle, one tray (with two items on it, which counts as one visual element), one piece of art or decorative object. That’s it. Interior designer Sophie Liard found that bathrooms with five or fewer objects rated 40% higher for calm and relaxation than bathrooms with 10+ objects of similar quality. So, you’re not sacrificing style — you’re editing to it.
The tray is important. A marble, bamboo, or lacquered steel tray groups small items and stops them reading as clutter. It’s borrowed from Nordic home styling, where the tray is almost standard bathroom equipment. A Bloomingville marble soap tray at £18–24 is the right scale for most compact vanity surfaces.
For the plant: choose humidity-tolerant species. Spider plants (Chlorophytum comosum) tolerate low light and occasional neglect. Bird’s nest ferns (Asplenium nidus) thrive in steam. Snake plants survive near-zero light — good for north-facing bathrooms. For art: one botanical print in a proper frame reads better than a gallery wall in a space under 4m². A Desenio botanical A3 print at £12–18, properly framed, is sufficient.
The rule works because it forces editing. If you’re standing in your small bathroom looking at five things and thinking it needs one more — it doesn’t. It needs one removed. That’s almost always the right answer.
The 15 ideas above share a common thread: they work with constraint rather than against it. A floating vanity, a frameless screen, a full-width mirror, continuous flooring — none of these require extra square metres. They require clear decisions made in sequence, and a willingness to choose what to leave out as carefully as what to include.
However, not all of these need to happen at once. If budget is a factor, the highest-impact changes in order of visual return are: the wall-hung vanity (item 1), the full-width mirror (item 4), the frameless shower screen (item 3), and the rule of five edit (item 15). These four changes cost between £450 and £1,200 combined depending on choices, and they address the most common reasons a bathroom design small space feels worse than it should.
For a fuller remodel including the wet-room floor, skylight, pocket door, and full-height tiles — sequence the work carefully. Structure first (pocket door frame, skylight opening). Waterproofing second (tanking, wet-room former). Tile and fittings third, accessories last. Also, if you’re planning a bathroom makeover on a budget, there’s useful guidance on prioritising spend and sequencing work in this bathroom makeover on a budget guide.
For reference on timeless bathroom design principles, those are worth reading alongside this list. The fundamental principle of small bathroom design is this: a room that’s edited with intention reads as bigger than it is. A room that’s filled with compromise reads as exactly the size it is. Nordic design arrived at this understanding a long time ago, and it still holds.