Physical Address
304 North Cardinal St.
Dorchester Center, MA 02124
Physical Address
304 North Cardinal St.
Dorchester Center, MA 02124
16 kitchen design remodel ideas from heritage renovation expert Rachel Blackwood — from open-plan wall removal to painted cabinets, backsplash tiles, and period hardware.
Standing in a client’s kitchen a few months ago, the owner said something I’ve heard dozens of times: “I don’t hate it. I just don’t love it.” She’d lived with the same tired cabinets, the same dim ceiling light, the same cramped layout for eleven years. The kitchen worked, technically. But nothing about it invited her to stay, or to cook, or to feel at home in her own home. That moment of recognising the gap between what a kitchen is and what it could be is exactly what a kitchen design remodel is for.
I’ve spent twelve years working on kitchens in period homes — opening walls, restoring original floors, finding ways to bring modern function into rooms built before refrigerators existed. What I’ve learned is that the most transformative changes aren’t always the most expensive ones. Sometimes it’s the sequence of decisions that matters as much as the decisions themselves.
These 16 ideas cover the full range of a kitchen design remodel, from structural moves that fundamentally change the room’s character to finishing details that most people overlook until they see them done well. Whether you’re planning a complete gut renovation or a targeted refresh, these are the upgrades worth understanding before you commit to anything.
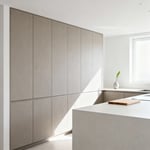
Some walls should never have existed. The closed kitchen was a Victorian inheritance — a servant’s workspace, deliberately separated from the rest of the house. Most of us have been cooking in rooms designed around that premise ever since, isolated from the dining table and the living room, turning our backs on family conversations to stir something on the hob.
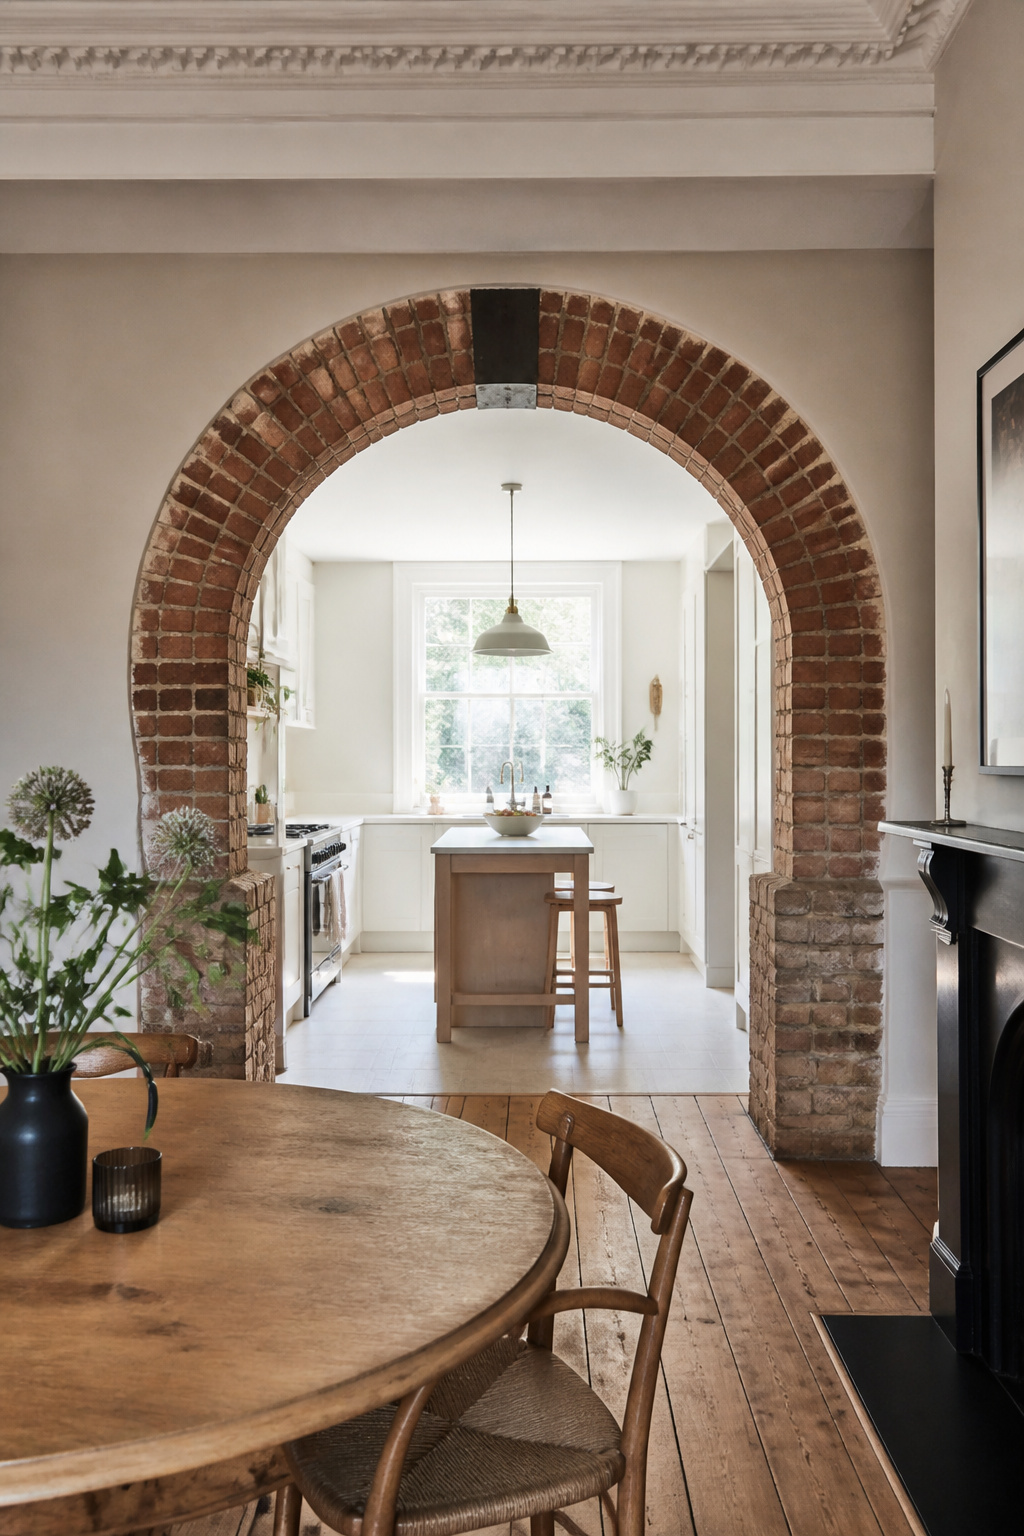
Removing a partition wall to open the kitchen into an adjacent room is the single highest-impact structural change you can make in a kitchen remodel. The perceptual shift is immediate — the room feels twice as large even before a single cabinet is installed. Natural light that was previously blocked by an interior wall floods in from both ends of the space.
The practical requirements are real. Before anyone lifts a sledgehammer, a structural engineer must assess whether the wall is load-bearing. If it is, and more often than not it is, a steel RSJ beam spans the opening above, supported by padstone bearings in the walls on either side. In the UK, RSJ materials run £40–£100+ per metre depending on span; the complete project including engineer, beam, plastering, building control approval, and labour typically costs £1,500–£2,500. That’s a modest budget entry for the most substantial spatial transformation available to a kitchen.
If a clean rectangular opening feels architecturally bland, a semi-circular arch or a chamfered brick reveal adds considerable character. Exposing the original brickwork within the reveal rather than plastering it flat is the difference between a structural opening and an architectural feature.
There is an honesty about bespoke joinery that flat-pack cabinetry cannot replicate.
It sits at exactly the right height, fills every awkward corner without filler strips, and, assuming it’s built from solid or solid-fronted hardwood, can be stripped back and repainted a decade from now without losing structural integrity. Flat-pack carcasses are often MDF-core construction that swells and delaminates after a single water event beneath the sink.
Custom cabinetry costs more. In the US, bespoke kitchen cabinets run $600–$2,500 per linear foot for full custom, versus $150–$650 for semi-custom. The argument for spending at the top of your budget here is straightforward: cabinets are the longest-lasting element in the kitchen. Countertops get replaced; appliances are swapped out; cabinet boxes are typically in place for 20–30 years.
Wood species drive cost significantly more than most people expect. Oak, red or white, remains the most practical choice: it takes paint and stain reliably, resists warping, and is widely available from sustainable sources. Maple is harder (Janka ~1,450 lbf versus oak’s ~1,290) and resists dents well, but its closed grain makes even staining genuinely tricky. Clear or near-clear finishes work best. Cherry adds warmth but darkens noticeably with UV exposure over the first five years.
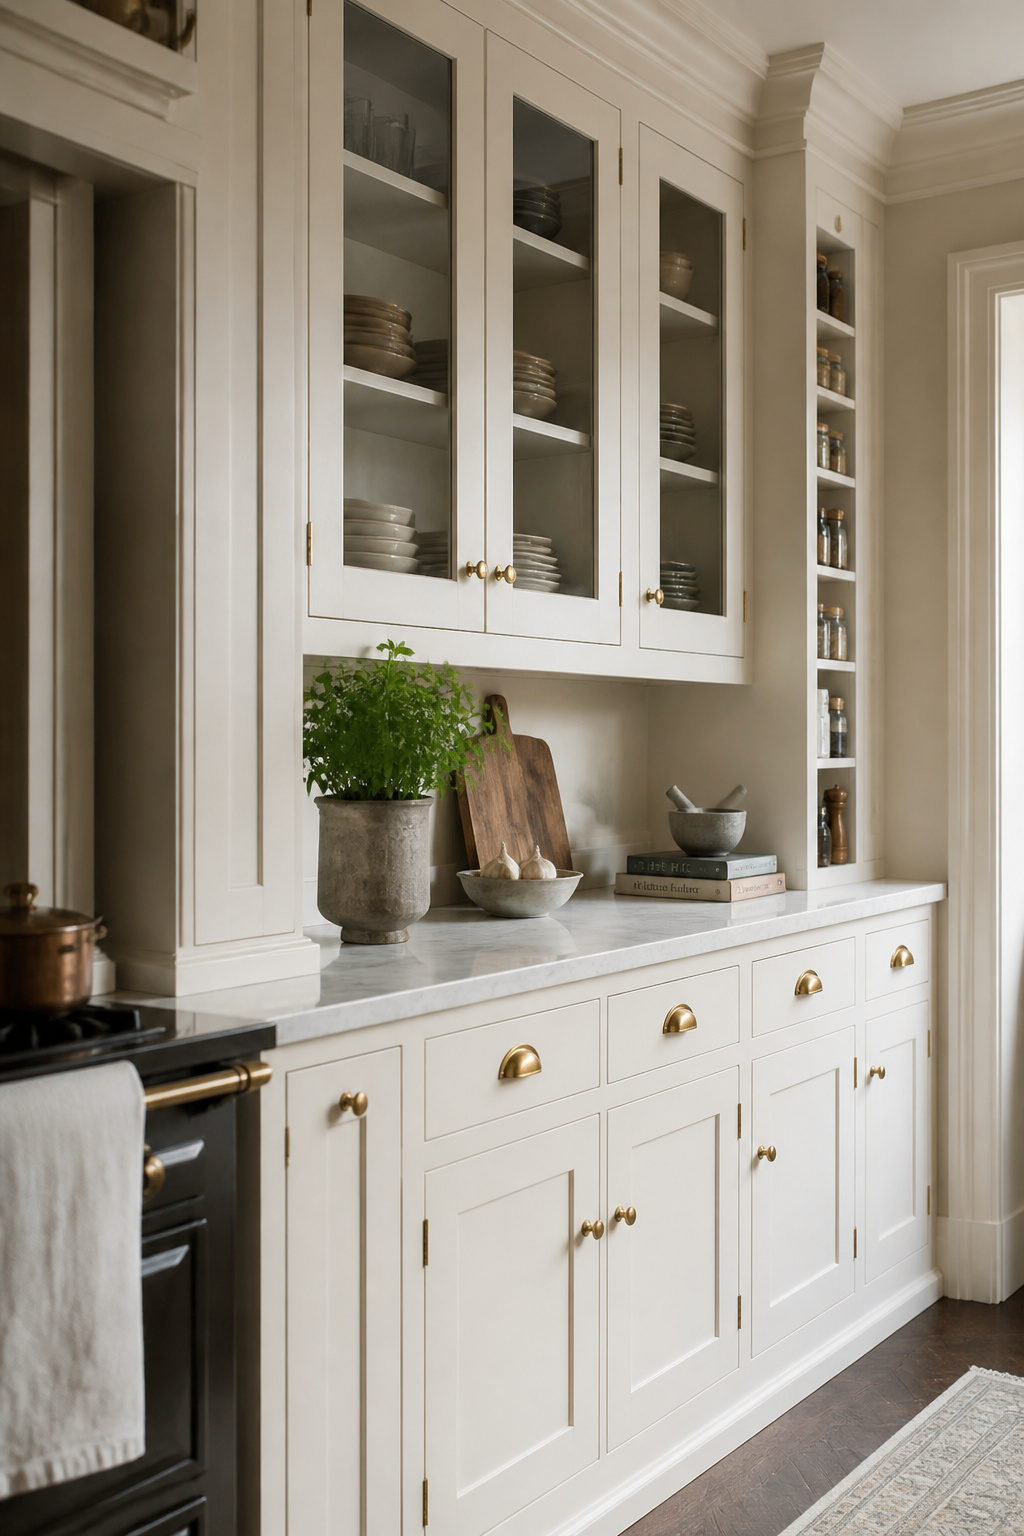
For door profiles, the Shaker five-piece recessed panel is still the most versatile choice for painted kitchens. It works across the range from traditional to contemporary depending on hardware and finish. In-frame construction, where doors sit flush inside the cabinet frame, is the hallmark of the highest-quality British joinery. It reads as furniture rather than fitted kitchen, costs more, but the visual result is unambiguous.
For paint colour inspiration once the cabinetry is in place, this guide on kitchen cabinet color ideas covers the full palette worth considering.
The countertop is the largest horizontal surface in the kitchen, and in any kitchen design remodel it’s one of the last decisions made but one of the first things visitors notice. Whatever you choose sets the tone for everything around it. Pale quartz with soft veining reads contemporary and calm. A dramatic bookmatched stone slab reads as a luxury investment. Butcher block reads as artisanal and warm.
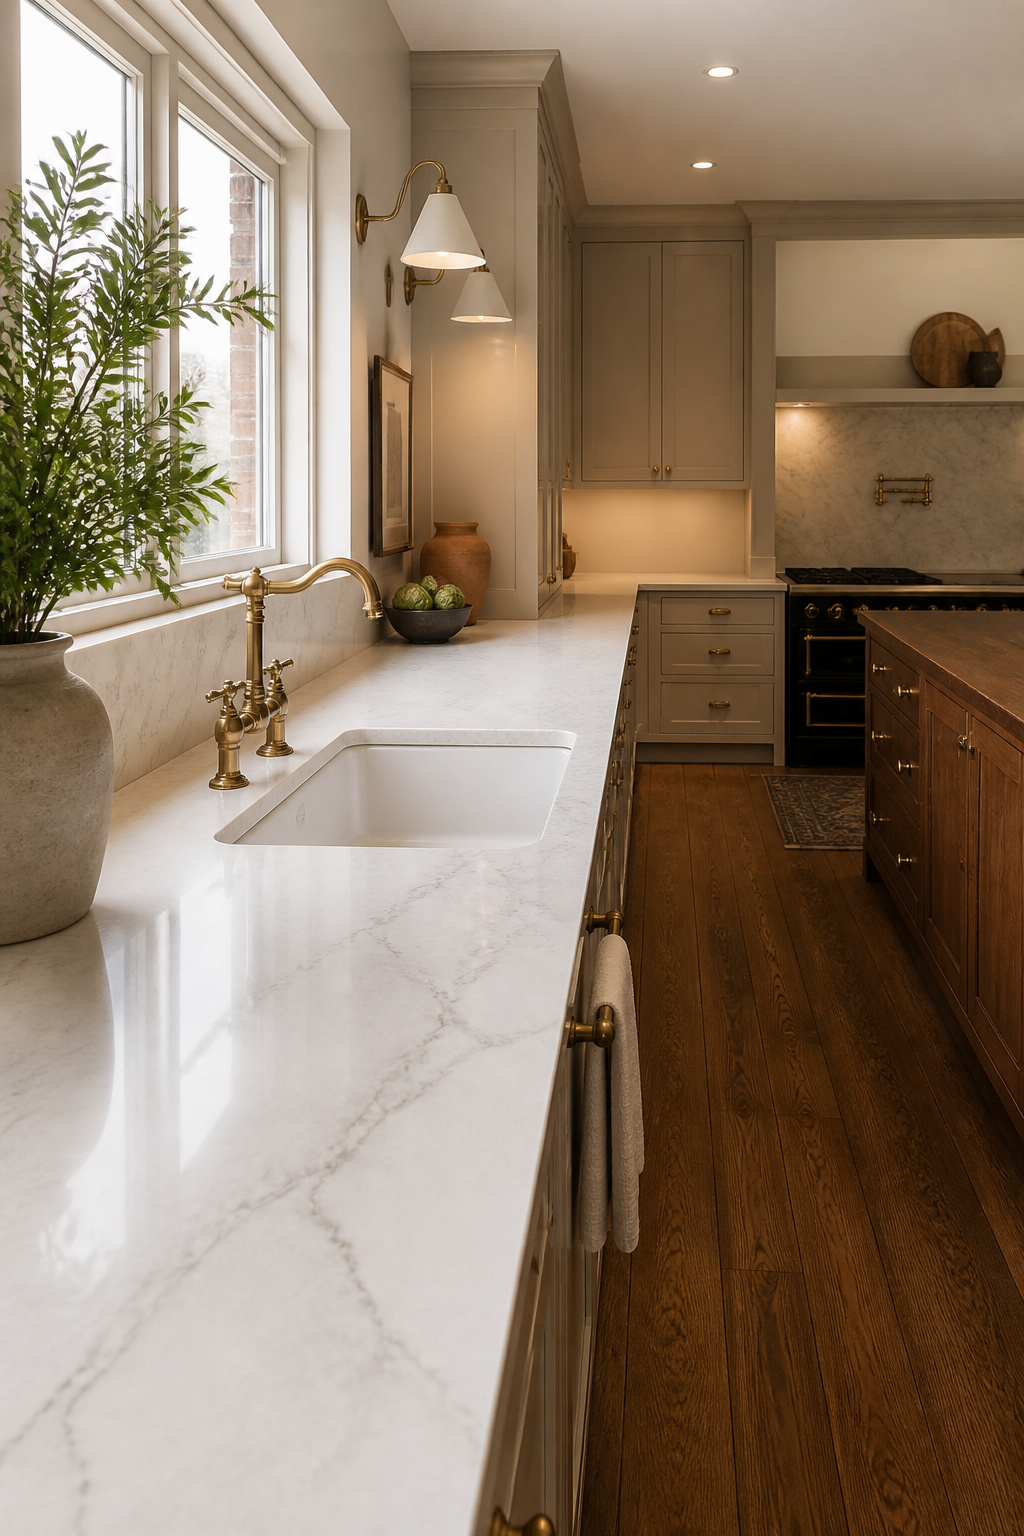
Quartz leads the market for low-maintenance performance. Engineered from quartz crystals bound with polymer resins, it’s non-porous, requires no sealing, and resists staining from wine, oil, and the other daily abuses of a working kitchen. Its one weakness is heat: the resin binders can discolour or crack from direct contact with hot pans. Always use a trivet.
For those drawn to natural stone’s organic variation, quartzite is the more practical choice over marble. It’s significantly harder, with similar veining but better resistance to etching from acids like lemon juice and vinegar. Granite handles heat better than either; it requires sealing every one to two years but otherwise asks little.
Butcher block is underrated in a working kitchen, especially on an island. The surface can be used as a cutting board, is repairable (sand out any deep marks), and adds warmth that stone cannot match. Pair it with a sealed stone countertop on the perimeter for the best of both: one surface for prep, one for durability.
Edge profiles finish the countertop’s character: a sharp eased edge reads contemporary; a bullnose reads softer and more traditional; a mitre-stack edge reads as European luxury. Overhangs beyond 12 inches need structural support brackets, especially for stone, which can crack under its own cantilevered weight.
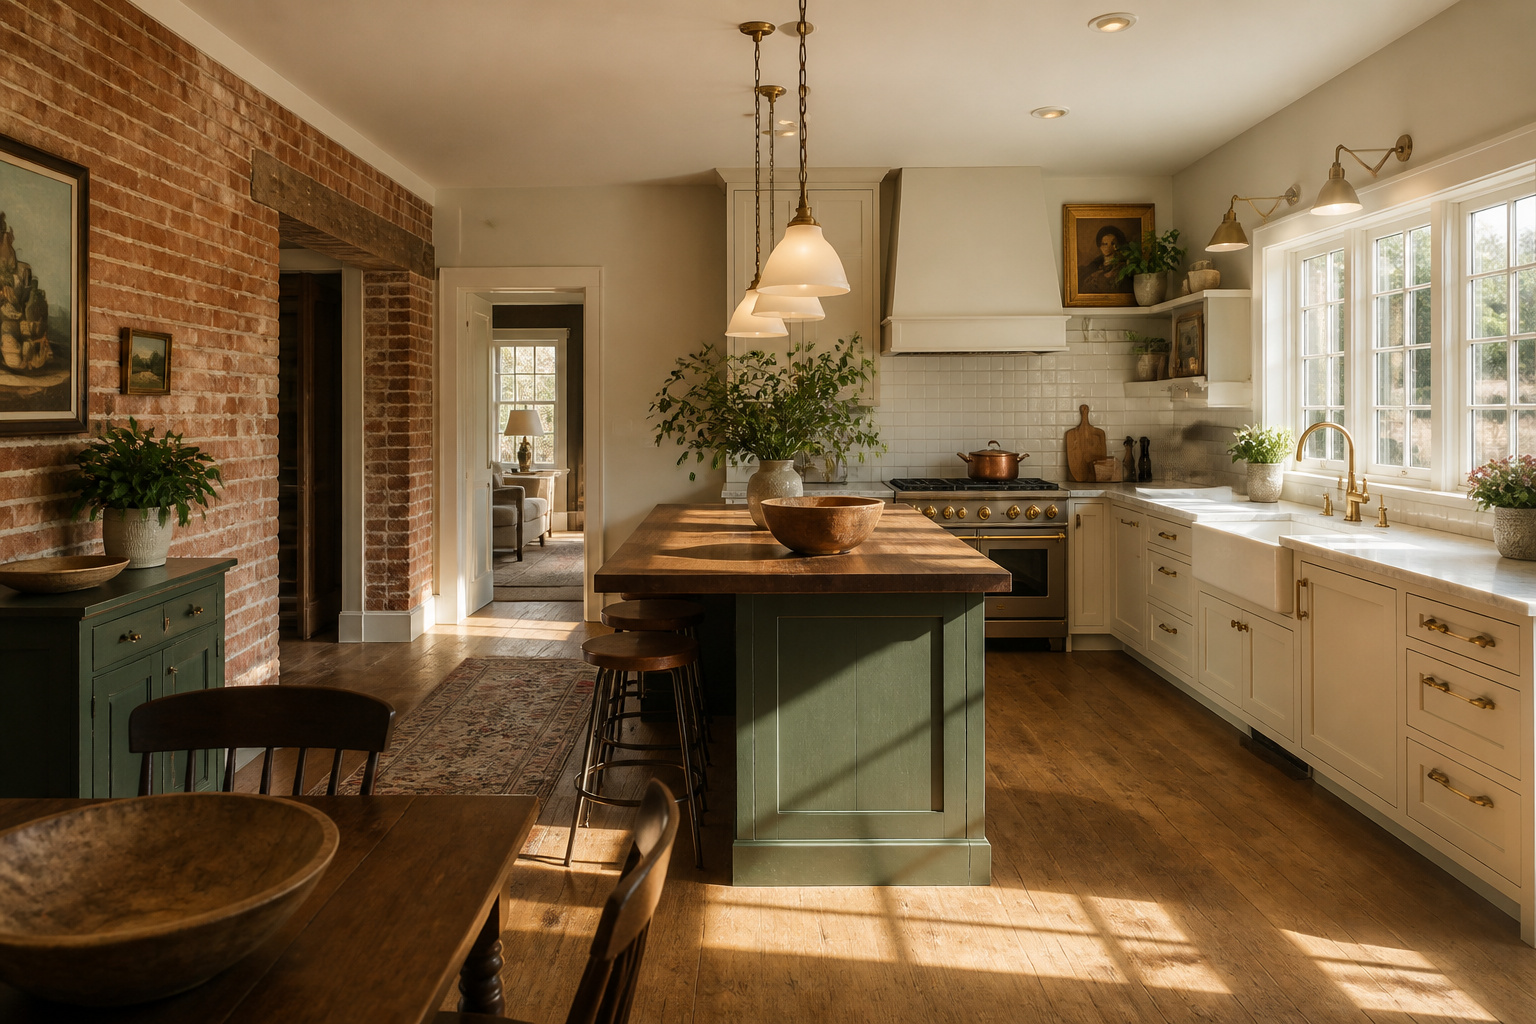
In a kitchen with floor-to-ceiling cabinetry and a stone countertop, the backsplash is the only exposed vertical surface that carries texture. It does disproportionate aesthetic work for its square footage, and it’s also the most reversible decision in the room.
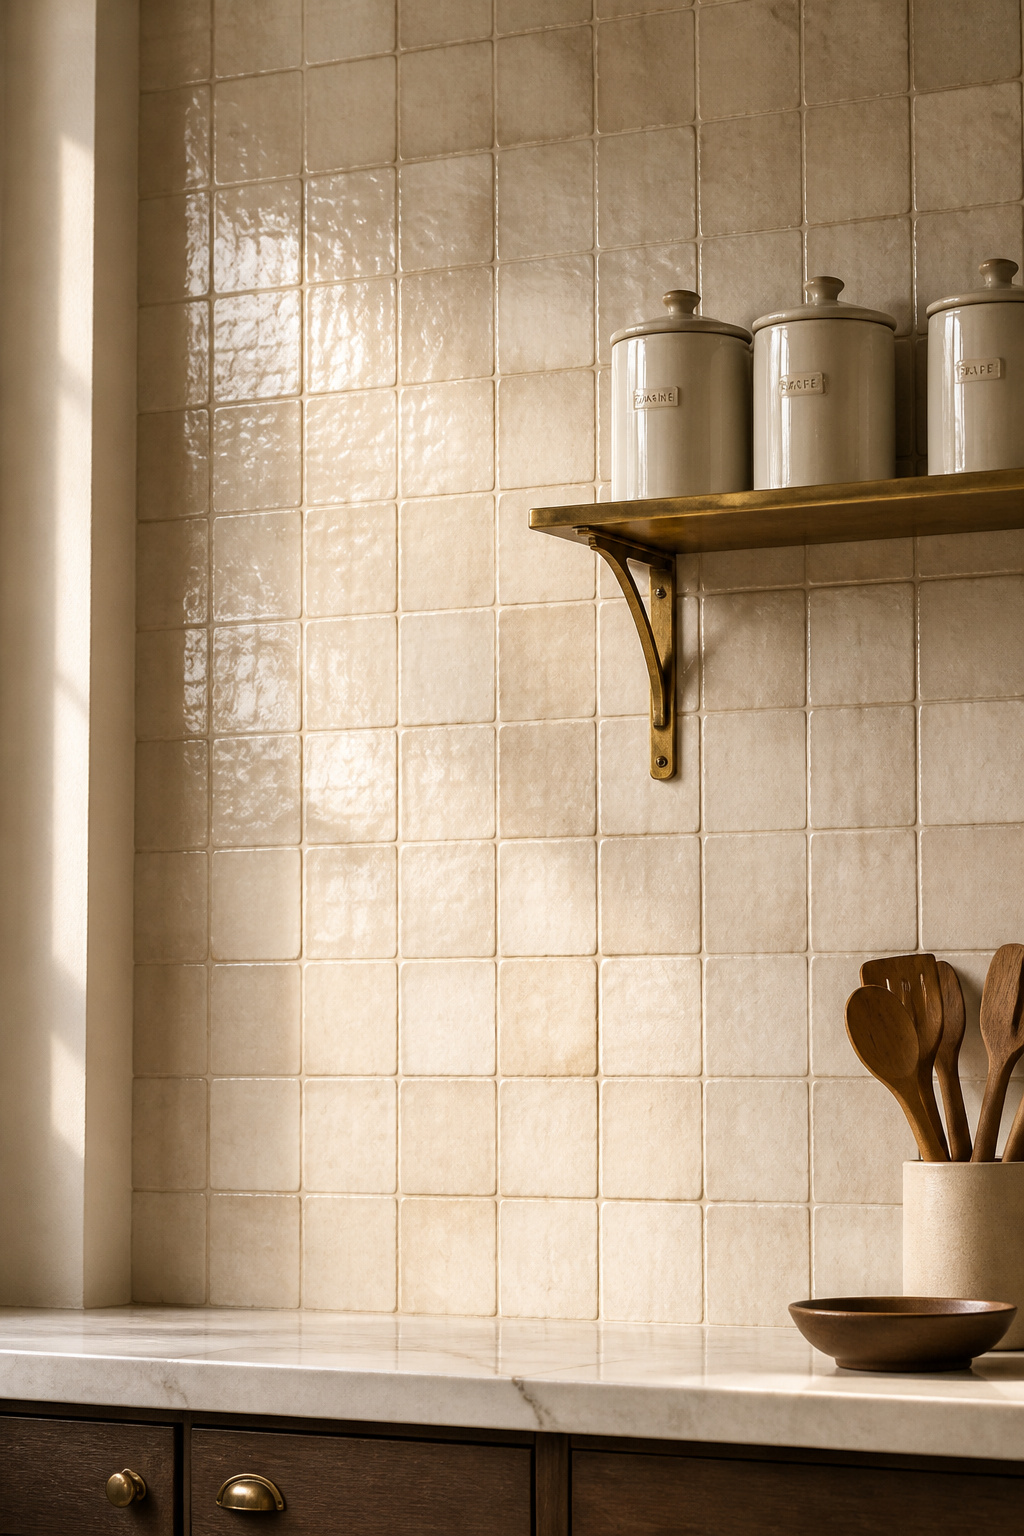
Zellige is the material I return to most often in period and character kitchens. These are traditional Moroccan handmade clay tiles, individually fired with mineral glazes: each one slightly different in tone, edge, and surface texture. The result is a wall that catches light in a way no machine-made tile can. The glaze is glossy but uneven, so it refracts rather than reflects, giving the surface a living quality. They cost more, at $15–$40+ per square foot versus $2–$5 for subway tile, but the effect is singular. You can read more about the full range of kitchen backsplash design principles if you want to explore the design decisions in depth.
Handmade ceramic from American or European workshops provides similar variation at a slightly lower price point, with less extreme warping. Better for clients who want character without the irregular joint widths that zellige demands. Encaustic cement tile, where the pattern runs through the full depth rather than sitting on a surface glaze, is increasingly used on backsplashes after years on floors. It requires sealing, but the geometric or floral patterns available are genuinely irreplaceable.
Subway tile remains worth defending. Its staying power isn’t a function of fashion — it’s a function of proportion. The 3×6 brick pattern is simply a good ratio. Grout colour matters as much as tile choice: matching grout to tile reads calm and seamless; contrasting grout makes the tile pattern a deliberate feature. For zellige and handmade tiles, a warm sand or putty grout integrates better than stark white.
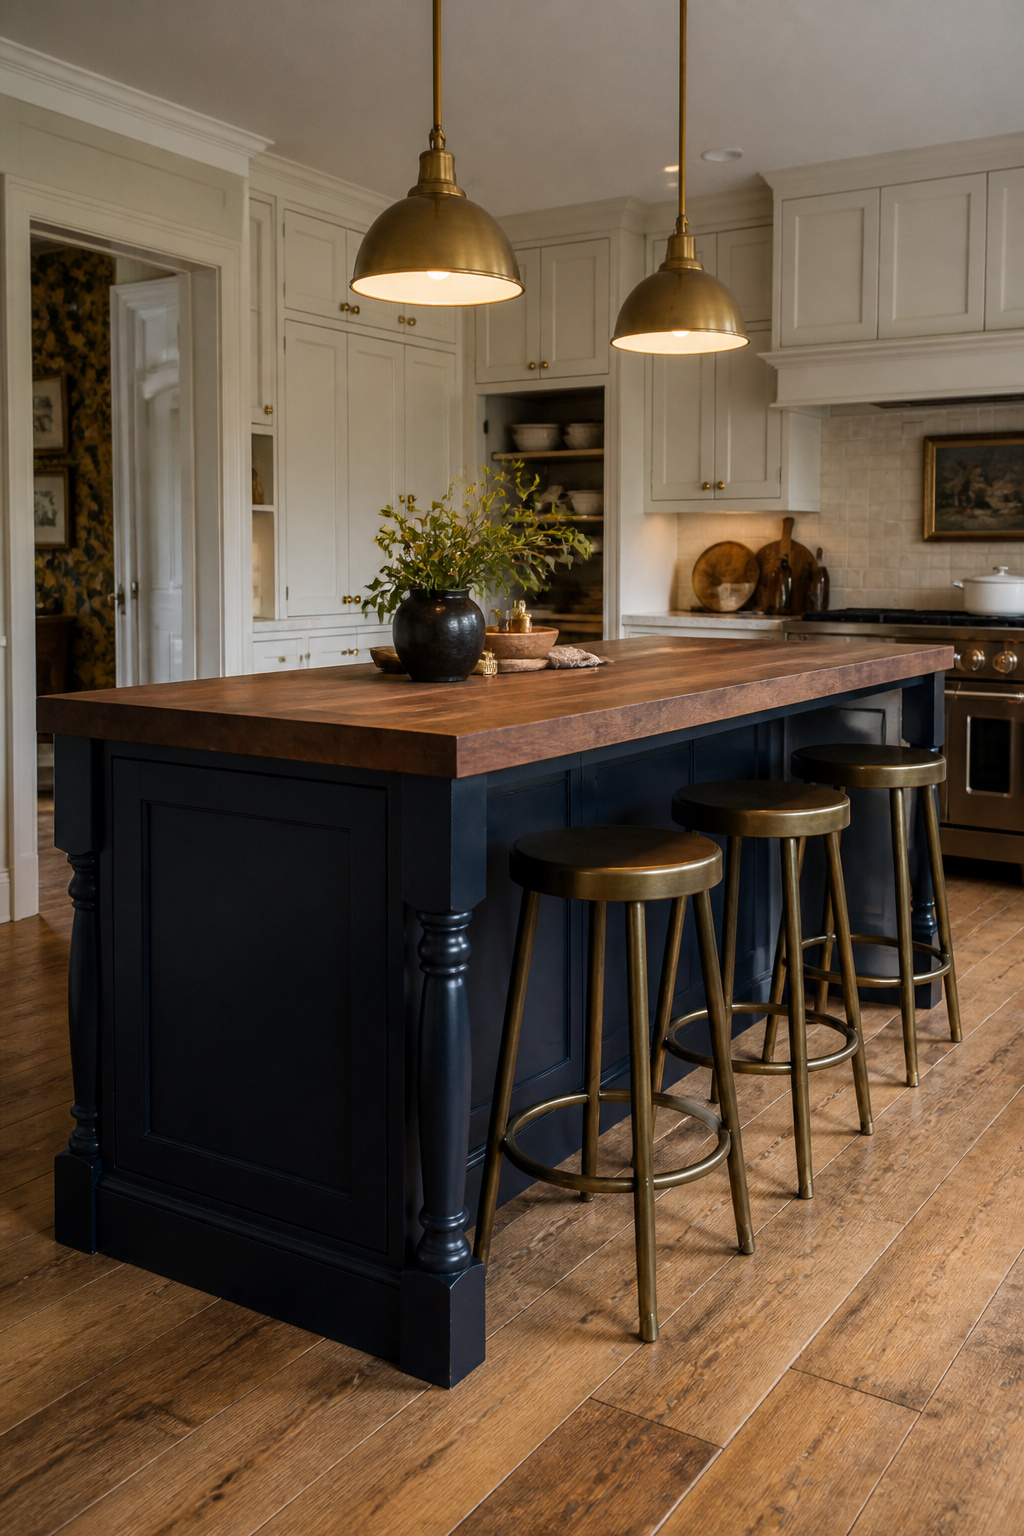
An island does three things simultaneously that nothing else in a kitchen can: it adds a second work surface, increases storage, and changes the cook’s relationship to the room. Instead of standing with your back to the family, you’re facing them.
The NKBA recommends minimum 42-inch clearance between the island and surrounding counters or walls: 48 inches for kitchens where two cooks work simultaneously. These aren’t arbitrary numbers. The minimum anyone will quote is 36 inches, but that’s dangerously tight when a dishwasher door is open or a toddler is underfoot. If your kitchen can’t provide 42 inches of clearance on all sides, a full island is the wrong solution; a peninsula or a rolling butcher block will serve better.
Seating requires a countertop overhang: 12–15 inches for counter-height seating at 36 inches, 15–18 inches for bar height at 42 inches. Any overhang beyond 10–12 inches in stone needs structural support brackets below. Allow 24 inches of linear width per seated person.
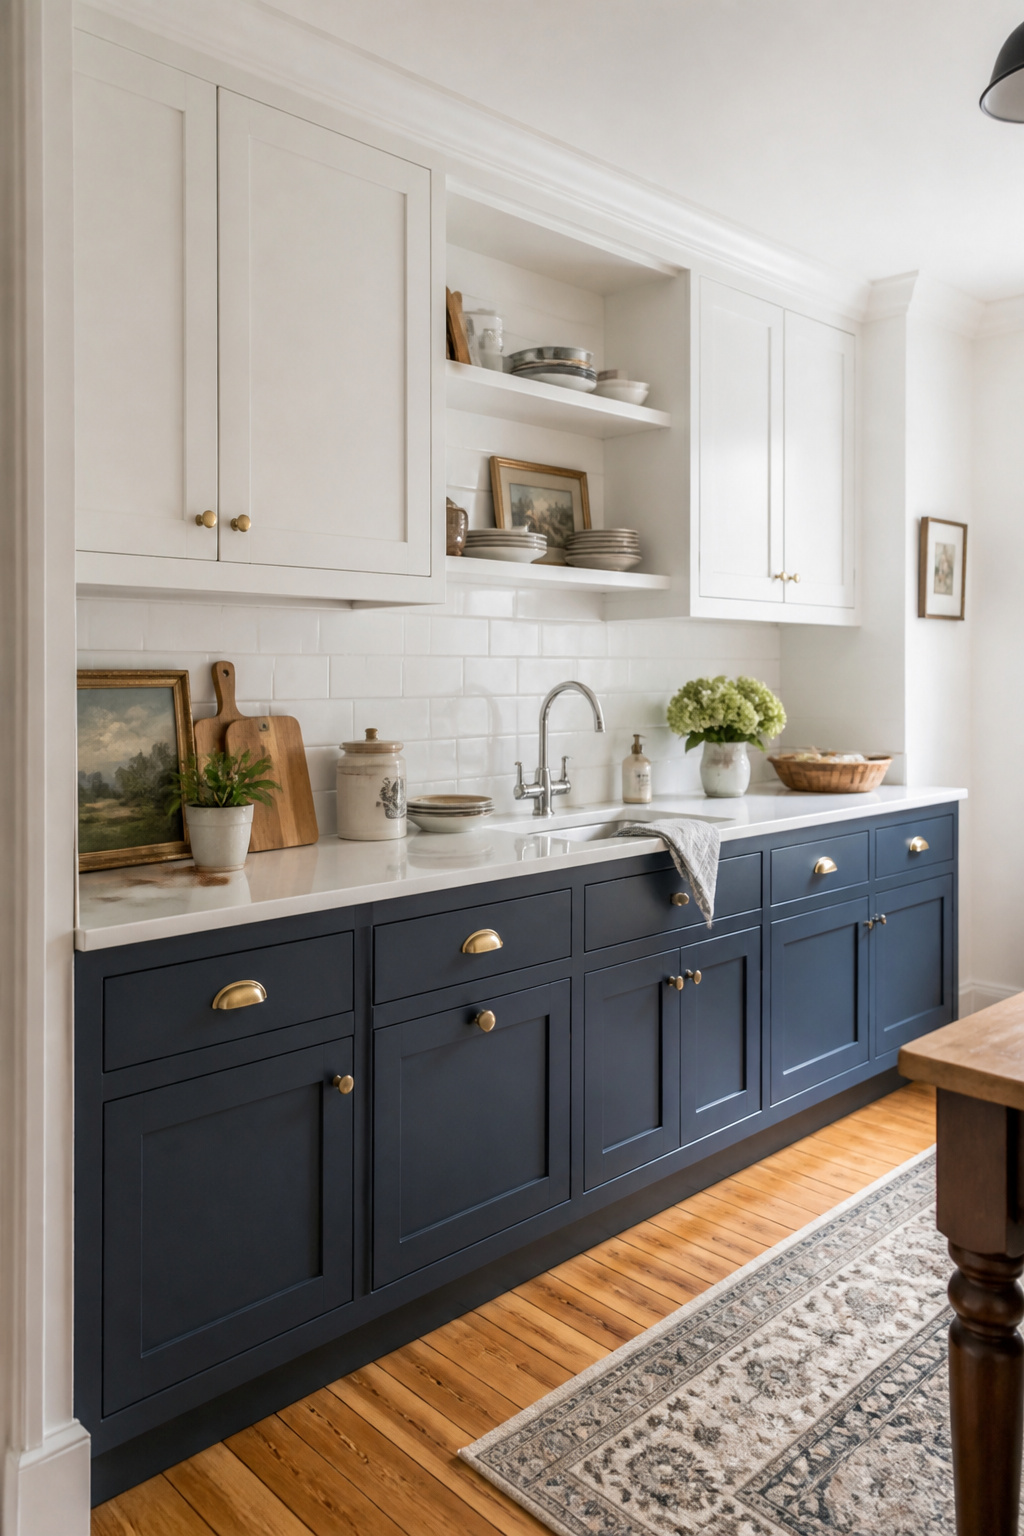
The most impactful design decision for an island is whether to differentiate it from the perimeter cabinetry. Painting the island a contrasting colour, dark green or navy against white perimeter cabinets, reads immediately as considered design. Using a different countertop, such as butcher block island against a quartz perimeter, reinforces the furniture-piece aesthetic and adds function. Turned or tapered legs rather than a standard toe kick give the strongest furniture appearance in period kitchens.
The kitchen island storage solutions guide goes into detail on maximising the cabinet runs underneath, worth reading before you brief your cabinet maker.
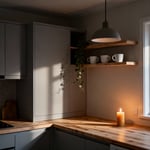
Most kitchens fail at lighting for the same reason: they treat it as one decision rather than three. A single central pendant or a row of recessed downlights provides one type of light across the entire room. Your body blocks it when you’re working at the counter. The perimeter is underlit. The kitchen feels bright at noon and flat at 7pm regardless of how many watts you’ve installed.
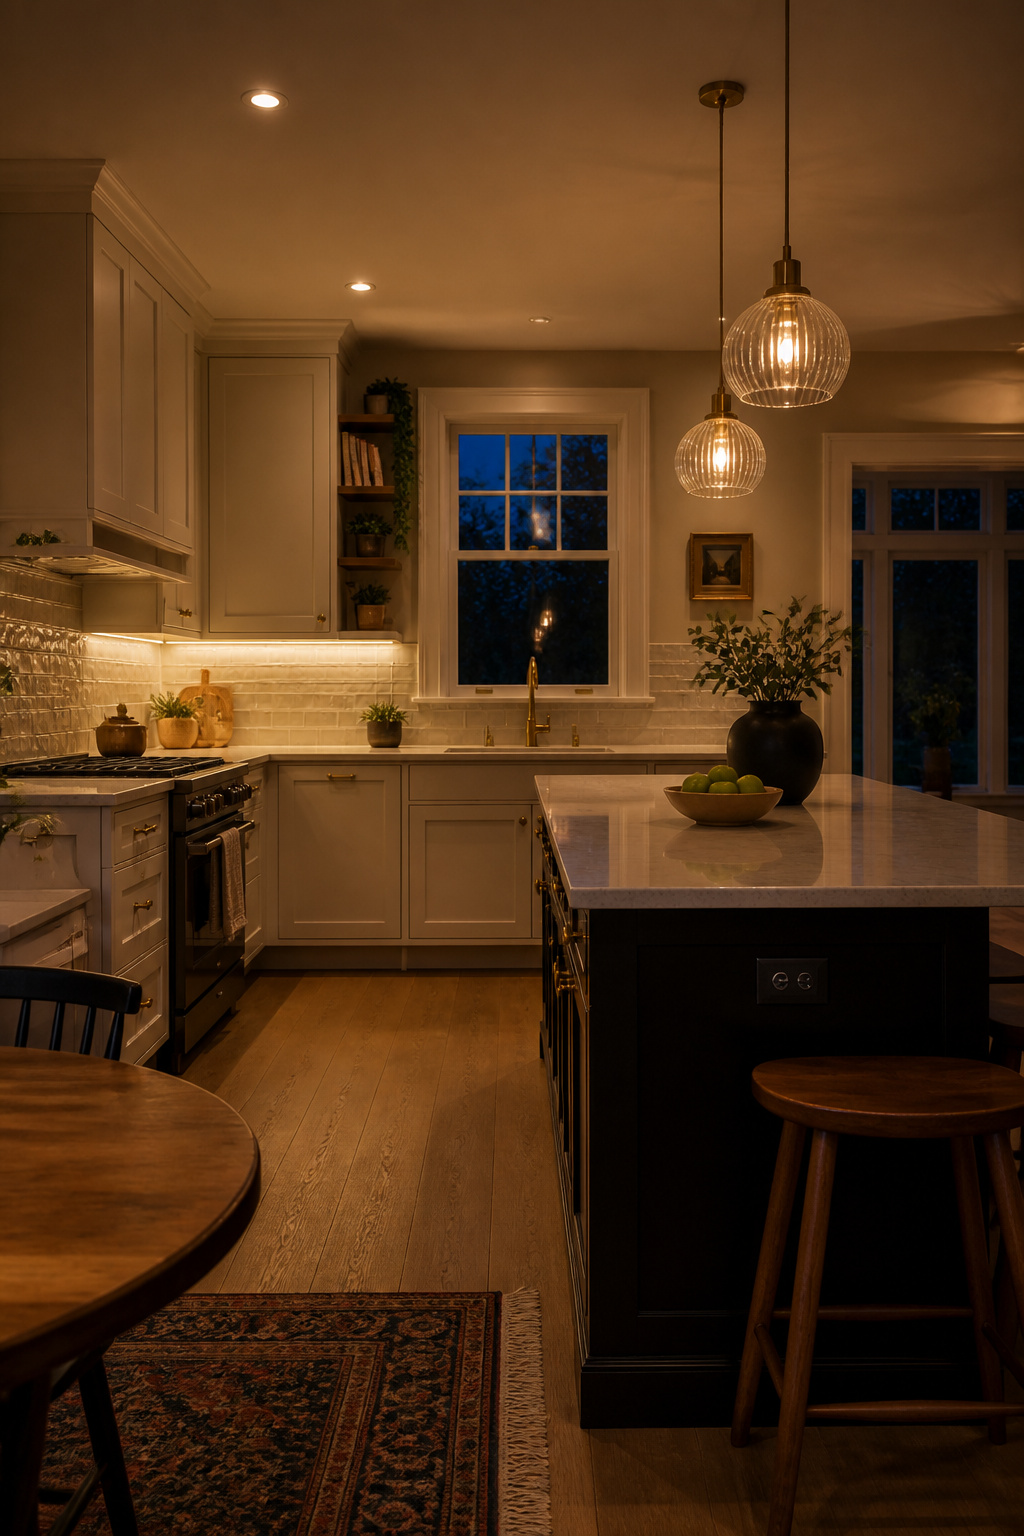
The three-layer approach solves this. Ambient lighting, typically recessed downlights or a cove above the upper cabinets, provides even background fill. Task lighting at specific work surfaces, including under-cabinet LED strips and pendants over the island, provides targeted brightness at exactly the height and position where food preparation happens. Accent lighting, inside glass-fronted cabinets, under a pelmet, or along a toe kick, creates the warmth and atmosphere that makes the kitchen a comfortable place to be after the cooking is done.
Under-cabinet LEDs deserve special mention. Positioned at the front of the cabinet underside rather than pushed back against the wall, they illuminate the full counter depth without creating the shadow your body would otherwise cast. The kitchen light fixtures that do this job best are strip LEDs with a CRI of 90 or higher. Below 90, food colours and cabinet finishes don’t look right under artificial light.
Pendant lights over an island should hang with their bottoms 30–36 inches above the countertop, with multiple pendants sitting 24–30 inches apart. Colour temperature: 3,000–4,000K for the kitchen, consistent across every source. Mixing 2,700K pendants with 4,000K downlights in the same room creates a visually disjointed effect. All circuits should be on dimmers.
The argument for restoring rather than replacing original hardwood floors in a kitchen design remodel is partly economic, partly irreplaceable. Refinishing runs $3–$8 per square foot versus $8–$15+ for replacement (materials plus labour). But the more compelling reason is that original boards, the wide pine in a Georgian townhouse or the narrow quartersawn oak in a Victorian terrace, have a grain, a colour, and a patina that new lumber simply won’t replicate. You cannot buy aged character.
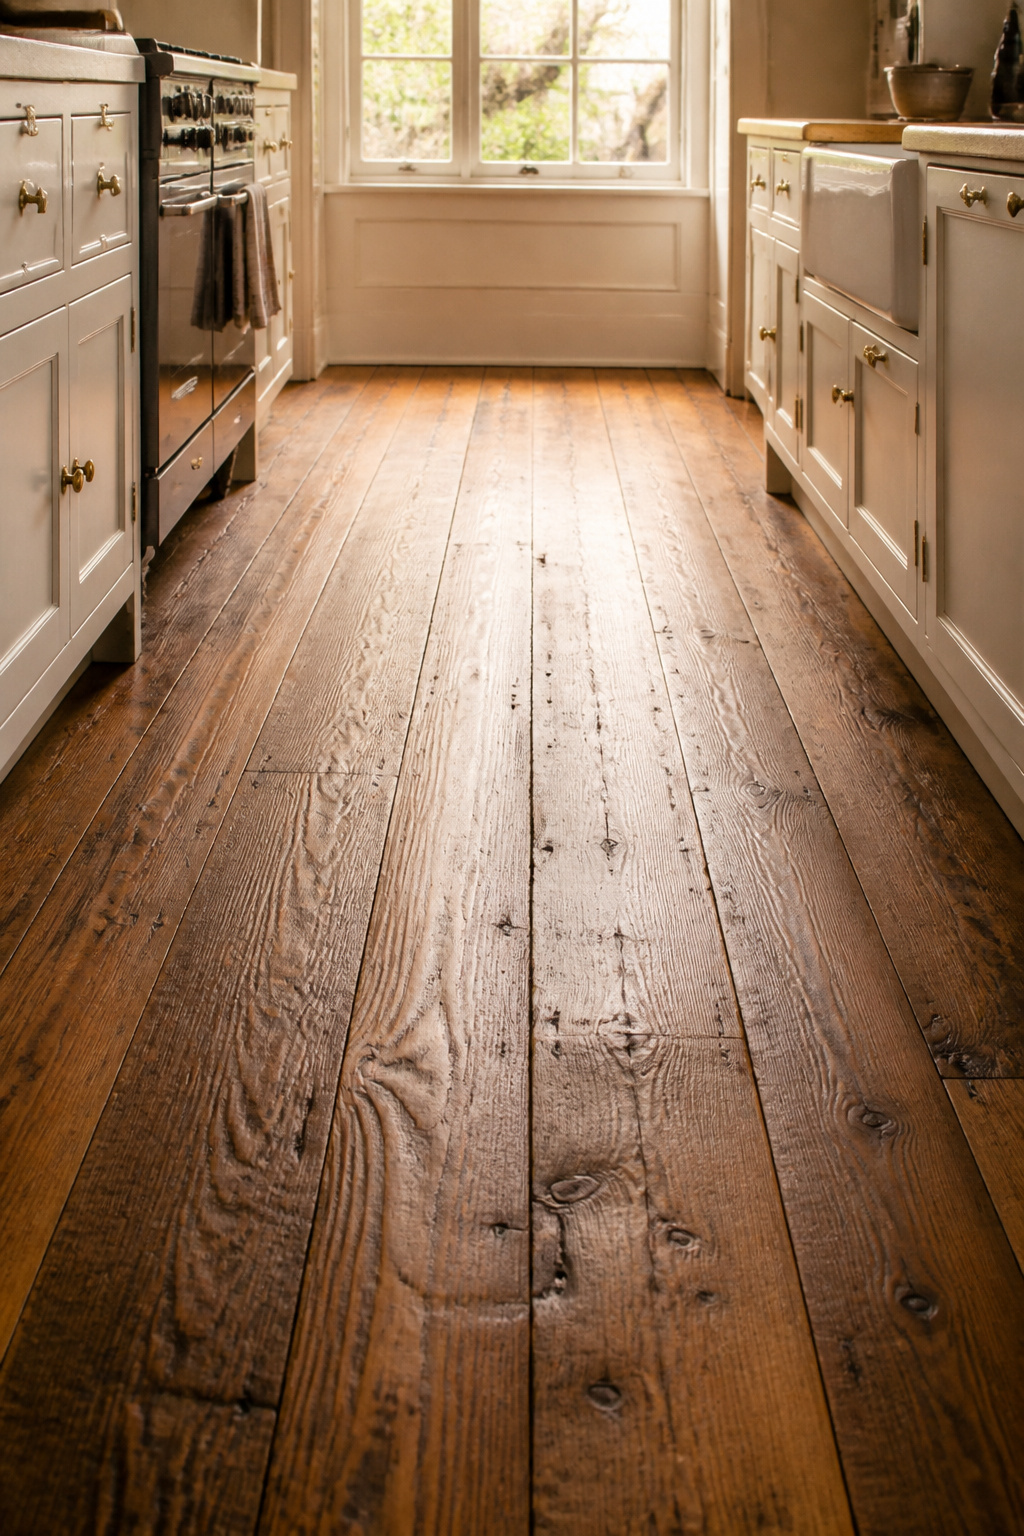
The practical constraint is remaining thickness. If less than 1/8 inch of solid wood sits above the tongue groove, or if nail heads are already visible through the surface, the floor cannot be safely sanded again without destabilising the boards. That’s the test that determines whether restoration is viable.
Assuming restoration is viable, the sanding sequence is: 36-grit for heavy finish buildup or old paint (24-grit if the floor has been painted), 80-grit second pass, 100-grit final screen with a buffer. Maple is so hard it often needs 36-grit even in good condition. Pine is soft enough to cross-grain scratch if you deviate from the grain direction. Always sand with the grain on pine, and apply a wood conditioner before staining to avoid blotchy absorption.
Finish choices: oil-based satin gives a warm amber glow and hides minor imperfections well, the preferred choice in Victorian and Edwardian kitchens where warmth is part of the character. Water-based finish dries clear and resists yellowing, better for light maple and pale timber. Penetrating oil (Osmo, Rubio Monocoat) goes into the wood rather than forming a surface film. It looks the most authentic in period homes and is easier to spot-repair, but needs reapplying annually in high-traffic areas.
Hardware is the detail that registers without being consciously noted. Visitors to a beautifully designed kitchen often struggle to explain why it feels so considered. Poorly chosen hardware is almost always part of the explanation when something feels slightly off. Wrong scale, wrong finish, cheap casting: any one of these reads as carelessness in a room where everything else is deliberate.
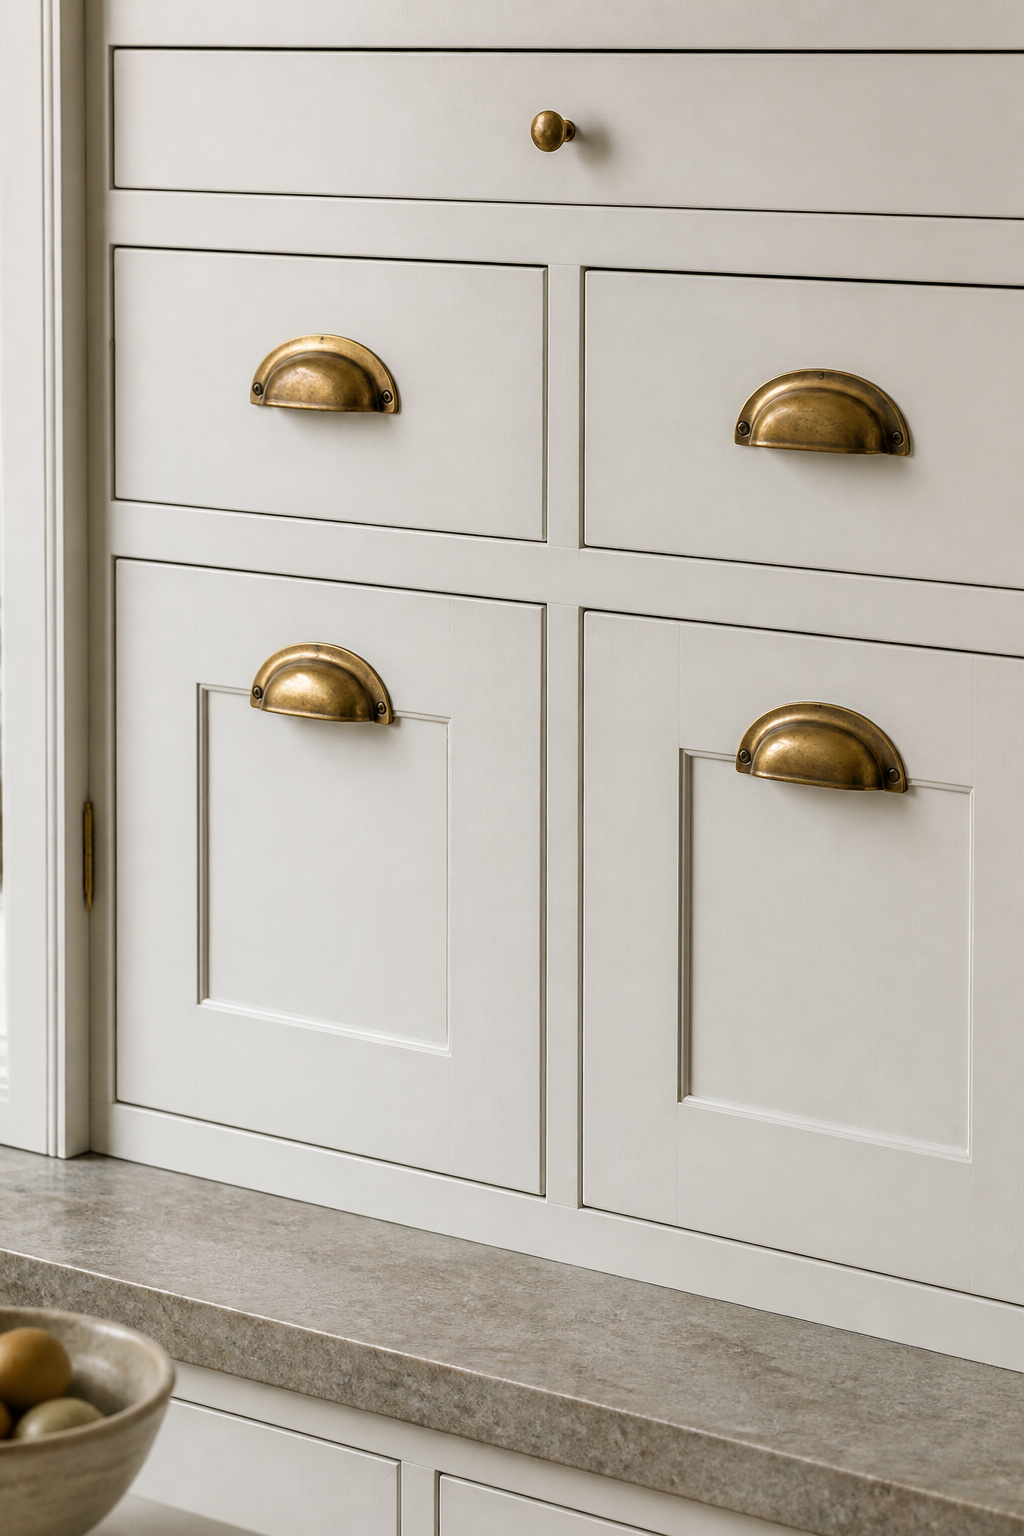
In a painted kitchen, hardware is typically the only element that introduces a different material into the composition. Its scale, finish, and casting quality carry the weight of an entire accent colour. The shift away from brushed nickel and chrome toward aged brass and matte black over the past decade reflects a broader move toward warmth and authenticity in kitchen design. Both are right choices; the decision should be driven by whether the kitchen reads warm (brass) or cool and contemporary (black).
Unlacquered brass is the version worth understanding. Unlike lacquered brass, which maintains a consistent polished finish indefinitely, unlacquered brass has no protective coating. It develops an uneven amber-to-brown patina over 12–24 months through contact with skin oils and air. The patina is variable and beautiful, and that variability, which would be a defect in a factory finish, is exactly the point. Sources include Rejuvenation, Forge Hardware Studio, and House of Antique Hardware.
Sizing requires attention. The centre-to-centre measurement, the distance between the two screw holes on a pull, must match the pre-drilled holes in your cabinet doors. Available in 3, 3.5, 4, 5, 6, and 8-inch spacings. Hardware length should be roughly one-third to one-half of the drawer or door width it serves. One rule on mixing metals: limit to two, and ensure they have a clear relationship. Aged brass and matte black work because they’re at opposite ends of the warmth spectrum. Aged brass and polished chrome don’t.
The traditional stainless steel kitchen creates a visual hierarchy where the appliances are the loudest element in the room. Every door, every handle, every vent grille draws the eye. Panel-ready appliances invert this relationship: the cabinetry tells the story, and the equipment disappears behind it.
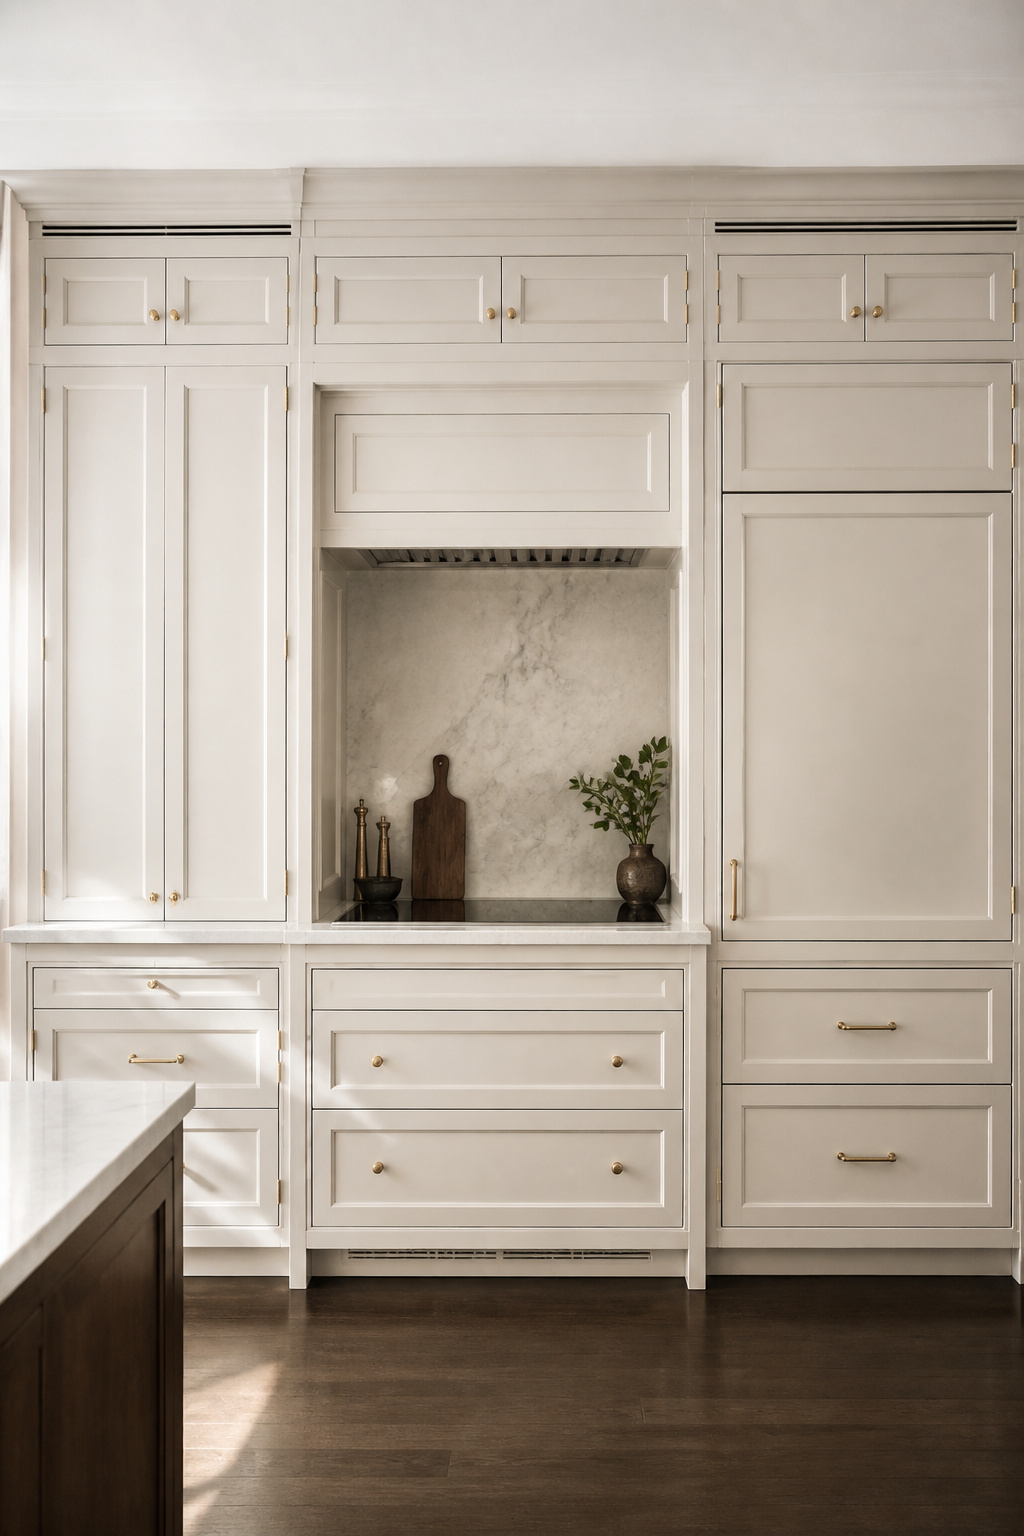
In a period kitchen being modernised, this matters enormously. An exposed stainless refrigerator in a room with Victorian cornicing and inframe oak cabinets is a conceptual conflict. Panel-ready appliances remove the conflict by making the refrigerator door another cabinet door.
Two types exist: overlay panel-ready (the ventilation grille remains exposed; a custom panel overlays the door face) and fully integrated (the grille is also concealed; the door sits completely flush with the surrounding cabinetry). Fully integrated costs 30–50% more. Both cost significantly more than standard appliances — expect to pay 2–3 times the price of a comparable standard model, plus $400–$2,500 per appliance for panel fabrication and installation.
Top brands with comprehensive integrated ranges: Thermador, Miele, Bosch (500 and 800 series), Gaggenau, and Fisher & Paykel. Each publishes detailed panel specification guides that your cabinet maker must have before designing the surrounding cabinetry. Most integrated refrigerators are built around a 3/4-inch (19mm) custom panel thickness with spacer and backer layers — confirm these dimensions before ordering either the appliance or the cabinet.
For hidden range hoods, plan the duct run during the structural phase of the remodel. The duct must exit to an outside wall. Routing it through finished cabinetry and plasterwork is the most expensive path. Minimum recommended extraction: 100 CFM per linear foot of cooking surface; a 36-inch range needs at least 300 CFM.
If a full cabinet replacement is out of the budget, or if the existing cabinet boxes are structurally sound and worth keeping, repainting the doors and fronts delivers one of the most significant aesthetic transformations available for the cost. A complete professional repaint on a medium kitchen of 20–25 doors typically runs $1,200–$3,500 in labour and materials. That’s a fraction of the $10,000–$30,000+ cost of new custom cabinetry.
The economic logic is in the box. The carcass, the part you never see, is the most expensive component of a custom kitchen. If the boxes are square, level, and dry, there’s no reason to replace them. You’re paying for the same structure at enormous cost when a new door, a bonding primer, and the right enamel paint achieve the same visual result.
Prep is 80% of the outcome. Neglect here guarantees peeling within 12–18 months regardless of which paint brand you buy. The sequence: degrease with TSP or a commercial kitchen cleaner; degloss with liquid deglosser or 150-grit paper to break the factory sheen; prime with a bonding primer such as Zinsser BIN (shellac-based) or Stix waterborne bonding primer. Do not skip the primer regardless of what the paint tin says about self-priming on cabinets.
Benjamin Moore Advance and Sherwin-Williams Emerald Urethane Trim Enamel are the two industry standards. Advance has an extended open time that allows the paint to level into a near-factory finish, slower drying (24 hours between coats) but it produces the smoothest result. Emerald Urethane dries faster (4-hour recoat), is slightly more resistant to daily abuse, and is the better choice for busy households.
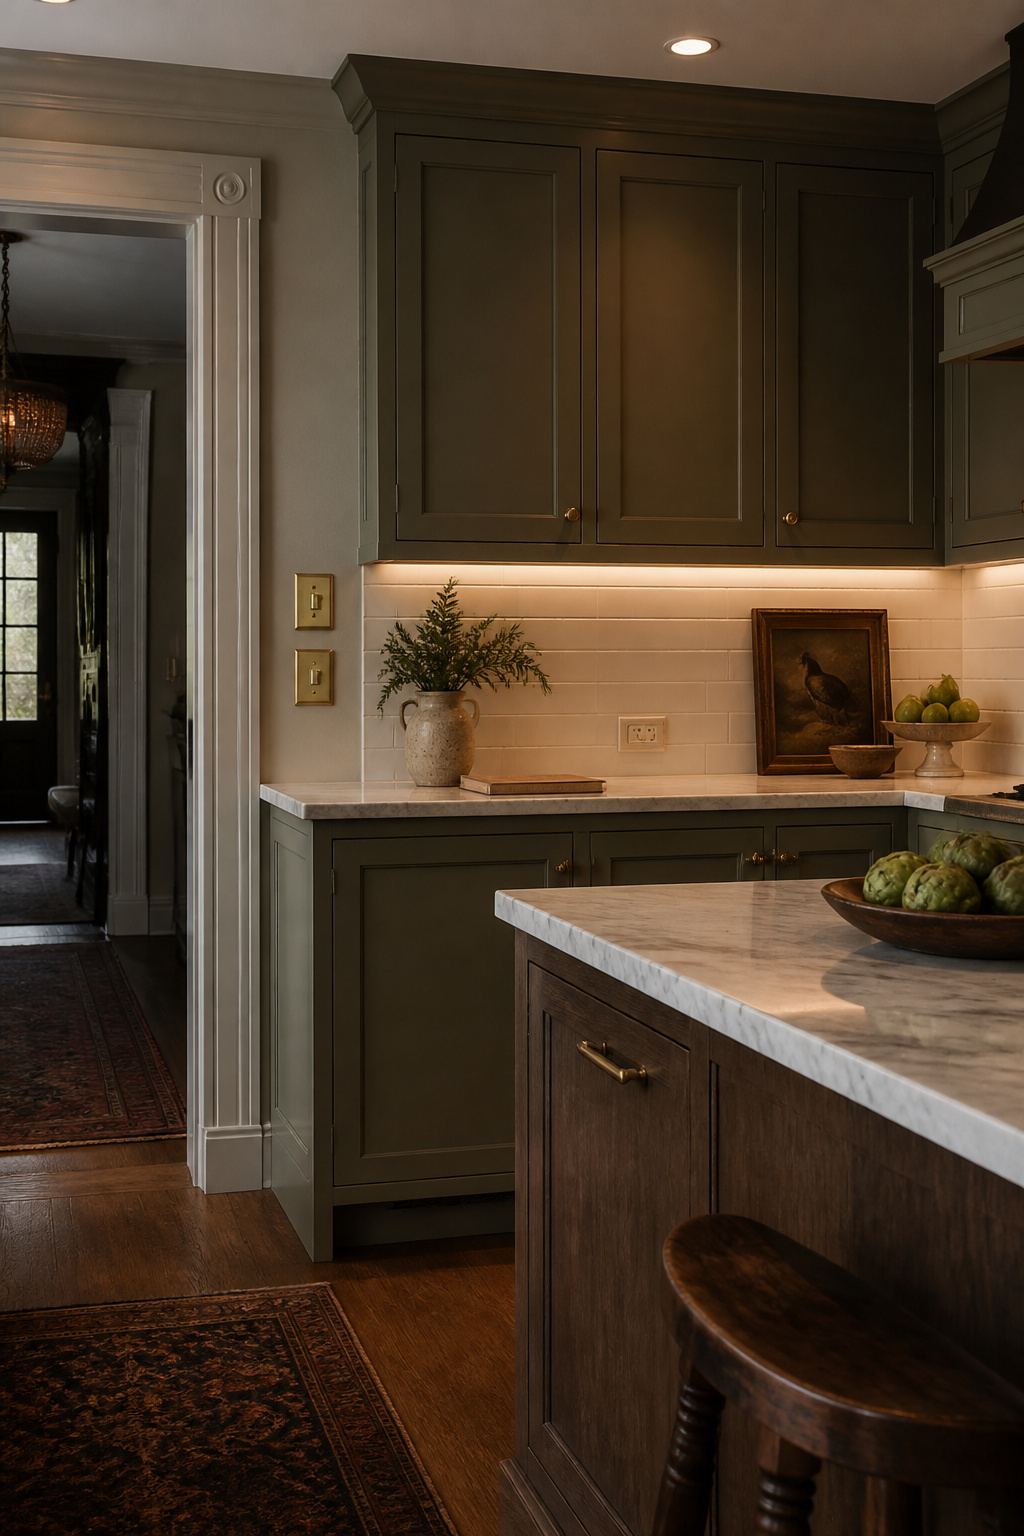
For colour: the shades that hold value over time include Benjamin Moore White Dove (OC-17), Sherwin-Williams Alabaster (SW 7008), warm navy, and greyed sage greens. Painting only the lower cabinets a colour while leaving the uppers white or cream is one of the most reliable techniques in the range. It grounds the kitchen without overwhelming it.
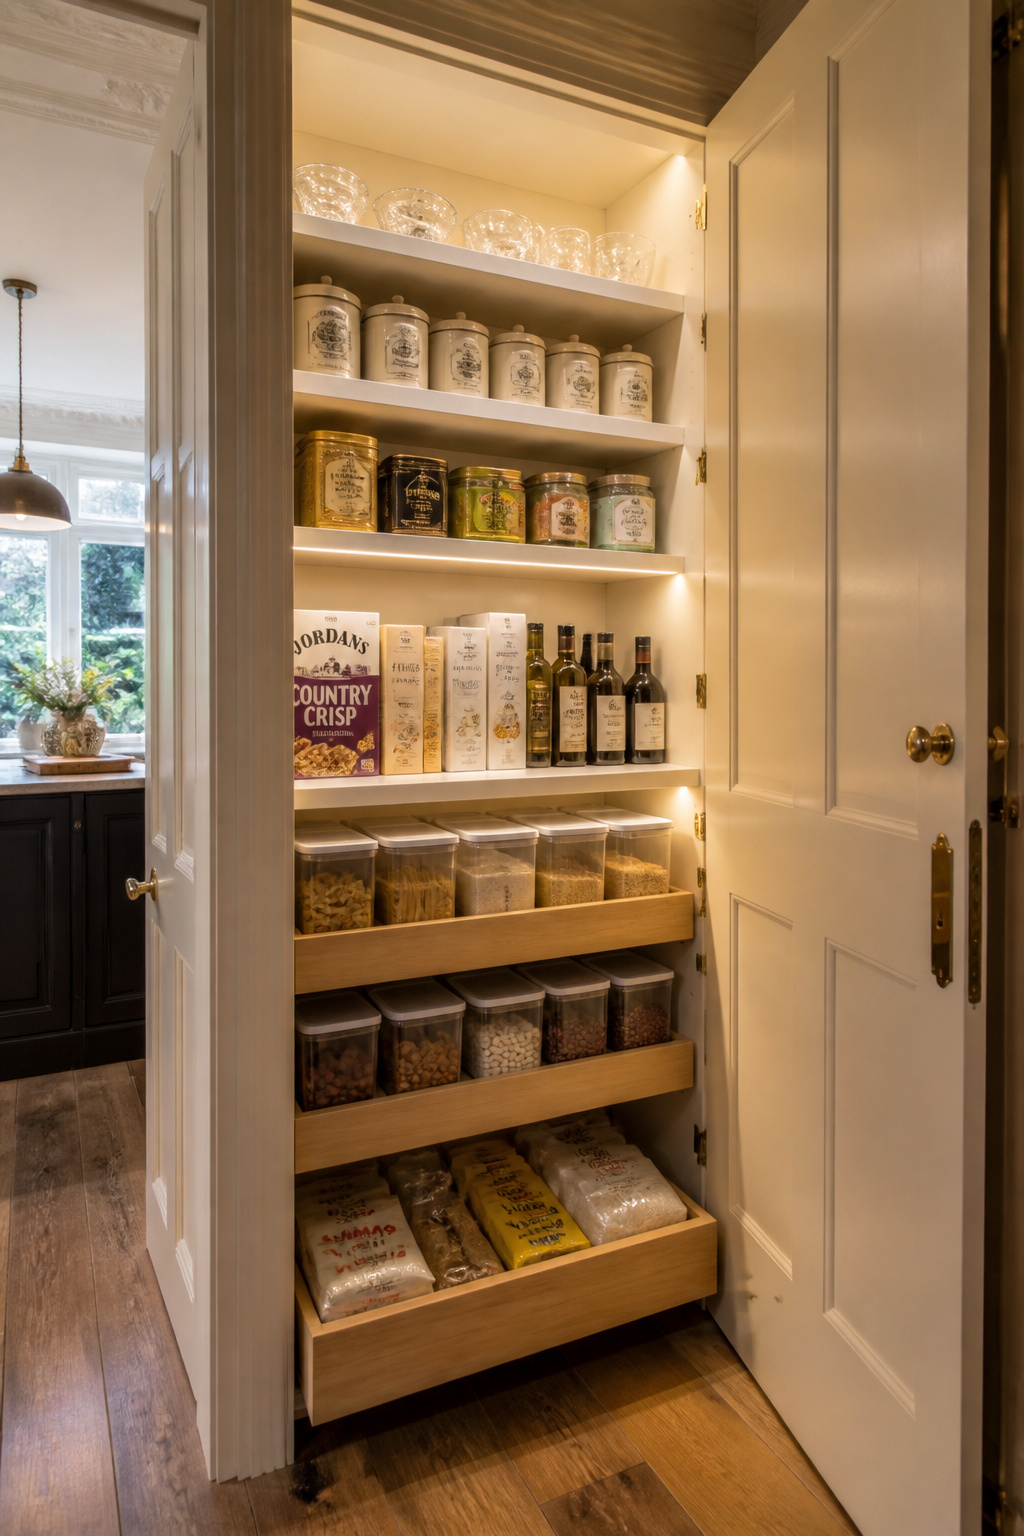
The pantry is the single storage upgrade that most changes daily kitchen life. Not because it adds the most volume, although it often does, but because it moves the right things out of sight. Cereals, oils, spices, appliances, the slow cooker you use twice a year: all of it off the counter and behind a closed door.
Most pre-1970 kitchens were not designed around the storage needs of modern grocery shopping. A dedicated pantry resolves what no amount of clever cabinet organisation fully can: the sheer volume mismatch between what people buy and what the original room was designed to hold.
The practical dimensions: shelf depth of 12 inches for spices, tins, and jars at the front; 16 inches for cereal boxes and tall bottles; 24 inches maximum for bulk items and small appliances. Anything deeper than 24 inches without pullout hardware creates dead storage. Standard vertical shelf spacing: 10–12 inches for dry goods, 14–16 inches for cereal boxes, 18–20 inches for stand mixers and blenders.
Pullout drawer systems are the most significant upgrade to an existing pantry cabinet or deep wardrobe conversion. A standard 24-inch cabinet accepts 22-inch deep drawer slides. Upper drawers at 3–4 inches function as shelves; lower drawers at 8–10 inches suit bulk and heavy items. Rev-A-Shelf and Häfele both make reliable systems in standard widths. For a comprehensive look at how pantry storage works within the wider kitchen storage context, kitchen storage pantry ideas is worth a look before you brief a joiner.
The most underused pantry opportunity in Victorian and Edwardian kitchens is the original chimney breast recess or the alcove beside the range. The depth is typically exactly right for a 12–16-inch pantry shelf without projecting into the room. The space already exists; adding a door with adjustable shelves inside takes a week.
The sink is used more times each day than any other surface in the kitchen. The countertop gets more attention in a design brief; the sink gets more actual use. In older kitchens it’s often the last thing upgraded: a stainless steel bowl installed in the 1990s, still functional, still boring, still collecting scale at the rim.
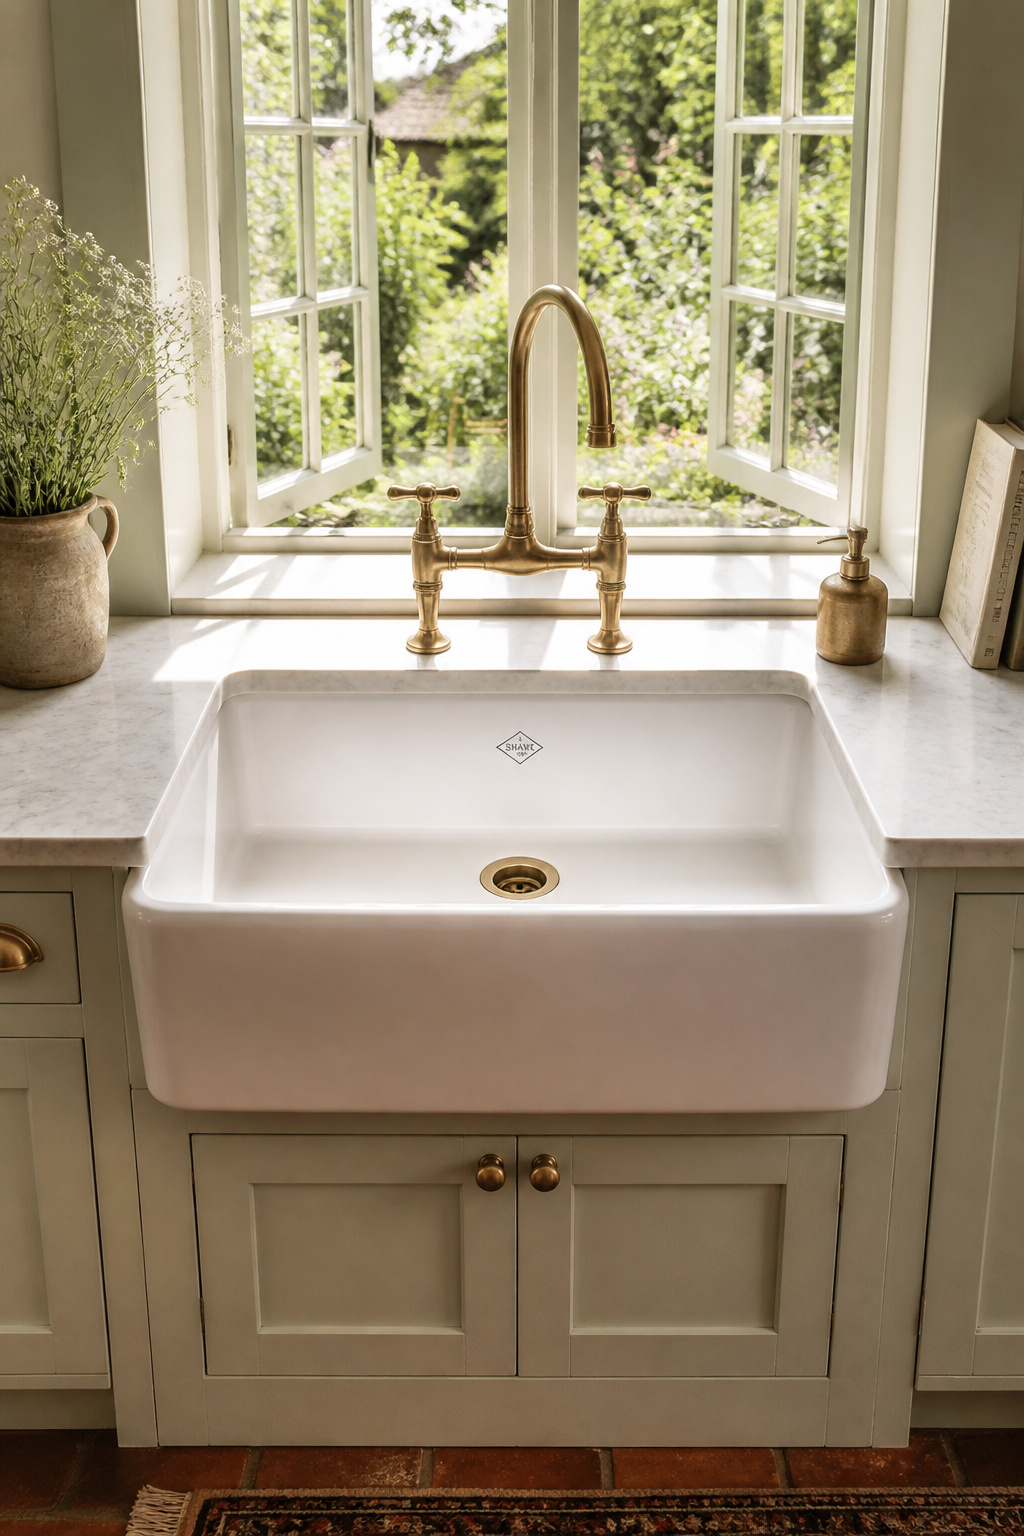
A sink replacement is one of the highest-return updates available in a kitchen design remodel. The work requires a plumber for the hookup, but the installation itself isn’t complex: an afternoon in most cases. The visual change can be dramatic.
Fireclay withstands 1,800–2,200°F and has a non-porous glazed surface that resists staining, the preferred choice for farmhouse apron-front sinks and for period kitchens where the porcelain look is part of the aesthetic. Its one limitation: it doesn’t tolerate a garbage disposal well, as vibration can crack the seal. Composite granite (ground granite bonded with acrylic resin) is the most practical material for busy families: nearly silent, highly scratch-resistant, invisible water spots. Stainless steel handles impact better than any other material but shows water spots and surface scratches over time. Choose 16-gauge for rigidity; 18-gauge rings.
For faucets: reach (spout reach) should extend to the basin centre. Pull-down heads suit deep single basins; pull-out heads work better for divided sinks and pot-filling off the counter. The features that outlast trends are ceramic disc valves (they outlast ball valves by decades), single-lever operation, and high-arc spout for pot clearance. The modern kitchen sinks overview covers the technical detail on specific models and specifications.
No artificial lighting scheme compensates for a dark kitchen at 8am. The quality of light in a kitchen at the start of the day sets the tone for the entire morning, and a room with a small, north-facing window or patterned glass that diffuses rather than transmits light is asking more of its occupants than it should.
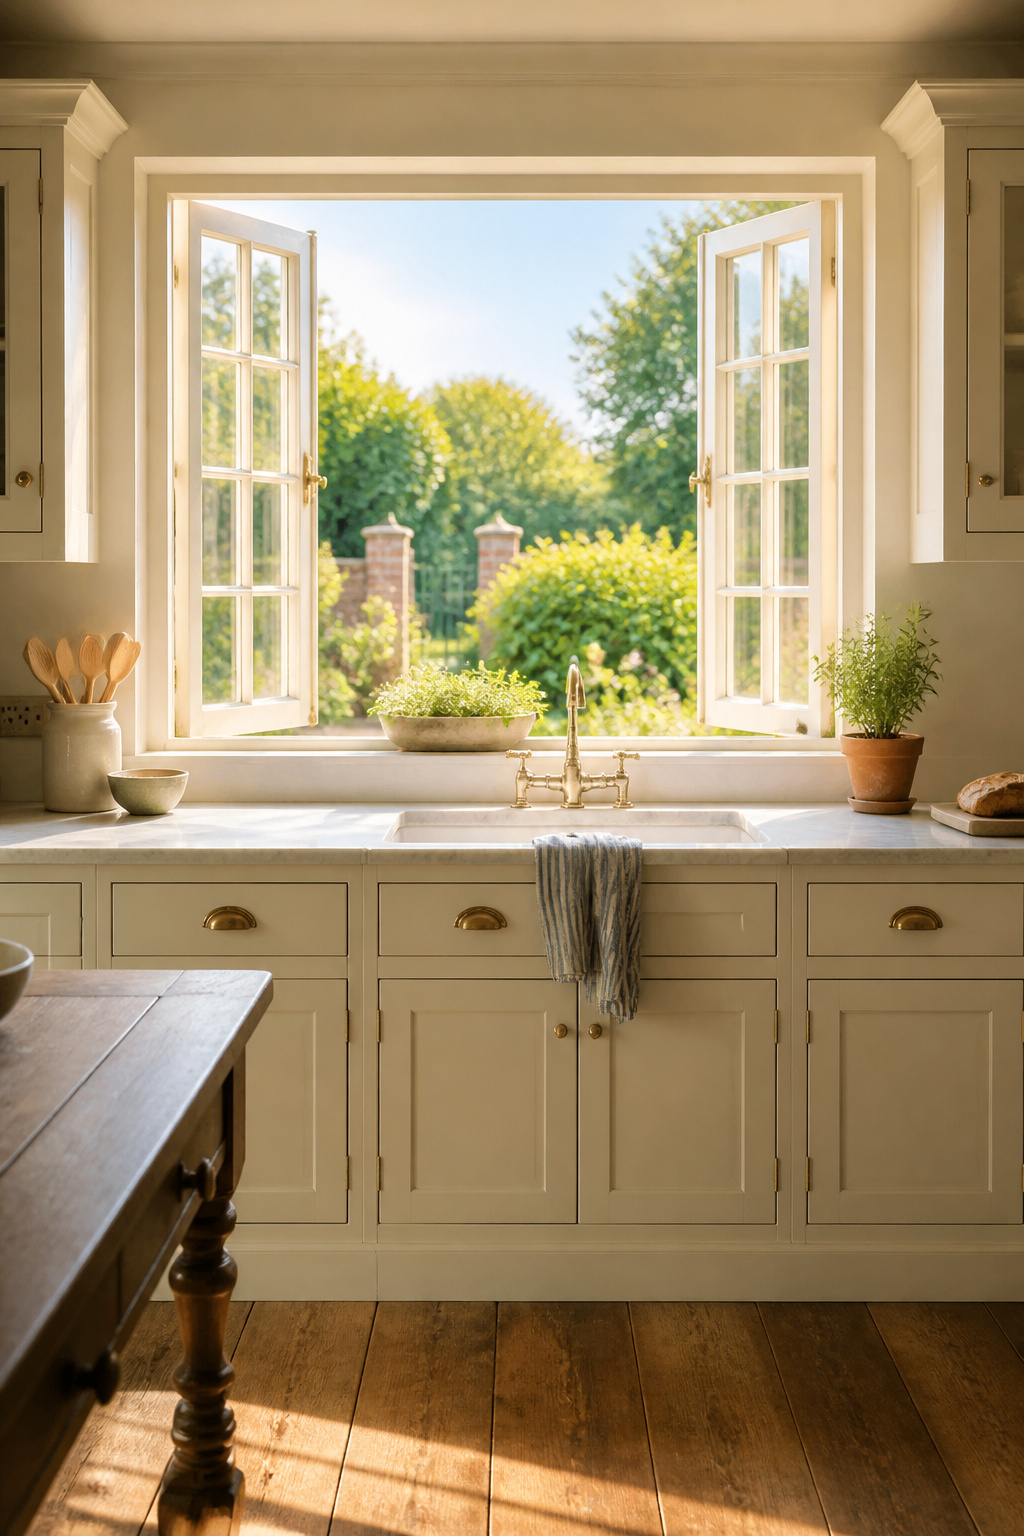
Window replacement is often the most overlooked structural opportunity in a kitchen design remodel, because it requires the same structural assessment as a wall opening and is therefore lumped into the “too complicated” category alongside wall removal. In reality, the two are often done simultaneously: one structural engineer visit, one RSJ assessment.
Casement windows, hinged at the sides and opening fully outward with a crank, are the best choice for above a kitchen counter. They open with one hand, direct a breeze into the room rather than deflecting it outward, and seal more tightly than sliding or single-hung windows. Awning windows, hinged at the top and opening from the bottom outward, can remain open during light rain. A useful property above a sink in a country that rains.
Glazing performance: look for a U-factor of 0.25–0.35 in double-glazed low-e units, where lower is better insulation. For south-facing kitchens, a low Solar Heat Gain Coefficient (SHGC) of 0.25 or below limits summer overheating. For north-facing kitchens, a higher SHGC (0.45+) captures solar warmth in winter. Before enlarging any kitchen window, check sight lines from the neighbouring garden and street. Obscure glazing in the lower third resolves privacy concerns without sacrificing the benefit of the additional area.
In any kitchen design remodel, there is one category of material texture that cannot be designed or ordered from a catalogue: it has to be uncovered. Original brick and timber beams in an old kitchen carry the accumulated history of the building in a way that brick-slip cladding and laminate beams cannot replicate, regardless of how good the reproduction is.
Exposed brick in a kitchen provides a tactile, historical quality that no cladding product can authentically replicate. It IS the building’s history, not a representation of it. Timber beams in a ceiling or over a range are increasingly rare in modern homes; exposing them during a remodel adds depth and warmth that cannot be bought from a catalogue.
For cleaning: start with a stiff non-metallic brush to remove loose material dry before introducing any liquid. Test diluted brick cleaner on a small area first, as brick varies significantly in hardness and porosity. For repointing damaged mortar joints, the critical specification for any building constructed before 1930 is lime-based mortar, Natural Hydraulic Lime (NHL 2 or NHL 3.5) rather than Portland cement. Modern cement is harder than the surrounding brick; it transfers thermal and moisture stress into the brick face rather than the joint, causing spalling over time. For sealing, use a water-based matte sealer in two coats. It stops dusting and makes the surface wipe-clean without changing the colour or texture.
Beams require a structural assessment before any surrounding plasterwork is removed. What appears decorative may be load-bearing. Common finish approaches: natural penetrating oil (Osmo or linseed) preserves the timber’s natural colour; lime-wash creates a whitened, chalky appearance that suits Scandinavian-influenced and coastal kitchens; dark wax suits Victorian and Arts & Crafts periods.
Smart kitchen technology installed as an afterthought creates a particular kind of visual problem: visible cable runs, wall-mounted hubs, plug-in adapters, and smart speakers sitting on countertops in a kitchen designed without space for them. The technology works. The kitchen looks cluttered.
The remodel window, when walls are open, electricians are on site, and the cabinet maker hasn’t yet installed a single cabinet, is the only cost-effective moment to integrate technology invisibly. Running conduit through finished plasterwork retroactively costs 5–10 times as much as running it at rough-in stage and involves patching, repainting, and general misery.
The practical additions that genuinely improve daily kitchen life: in-wall USB-A and USB-C outlets in the island backsplash and below the upper cabinets (they replace standard duplexes with no additional wiring; UL-listed units include overload protection), smart switches for the lighting circuits (Lutron Caseta or Leviton Decora at $50–$100 per switch; they require a neutral wire at the device location), and hardwired LED strips under the upper cabinets tied into the smart lighting system. The hardwired version looks significantly better than plug-in tape lights: no visible power bricks, no cords running down the wall to an outlet.
Future-proofing is less glamorous but genuinely valuable. Add a dedicated 20A circuit for the appliance zone during the remodel; the incremental electrical cost at rough-in is minimal compared to a future panel upgrade. Run empty conduit from the panel to the island to allow future outlet additions without opening the floor. GFCI protection is required by code on all kitchen countertop outlets and within 6 feet of any sink; verify with your electrician during rough-in, before any plasterwork goes up.
A kitchen remodel that stops at the kitchen’s boundary misses the opportunity that open-plan design creates. The dining area that flows from a remodelled kitchen, if designed in isolation or left with existing furniture that pre-dates the renovation, reads as a before-and-after composition rather than a unified room.
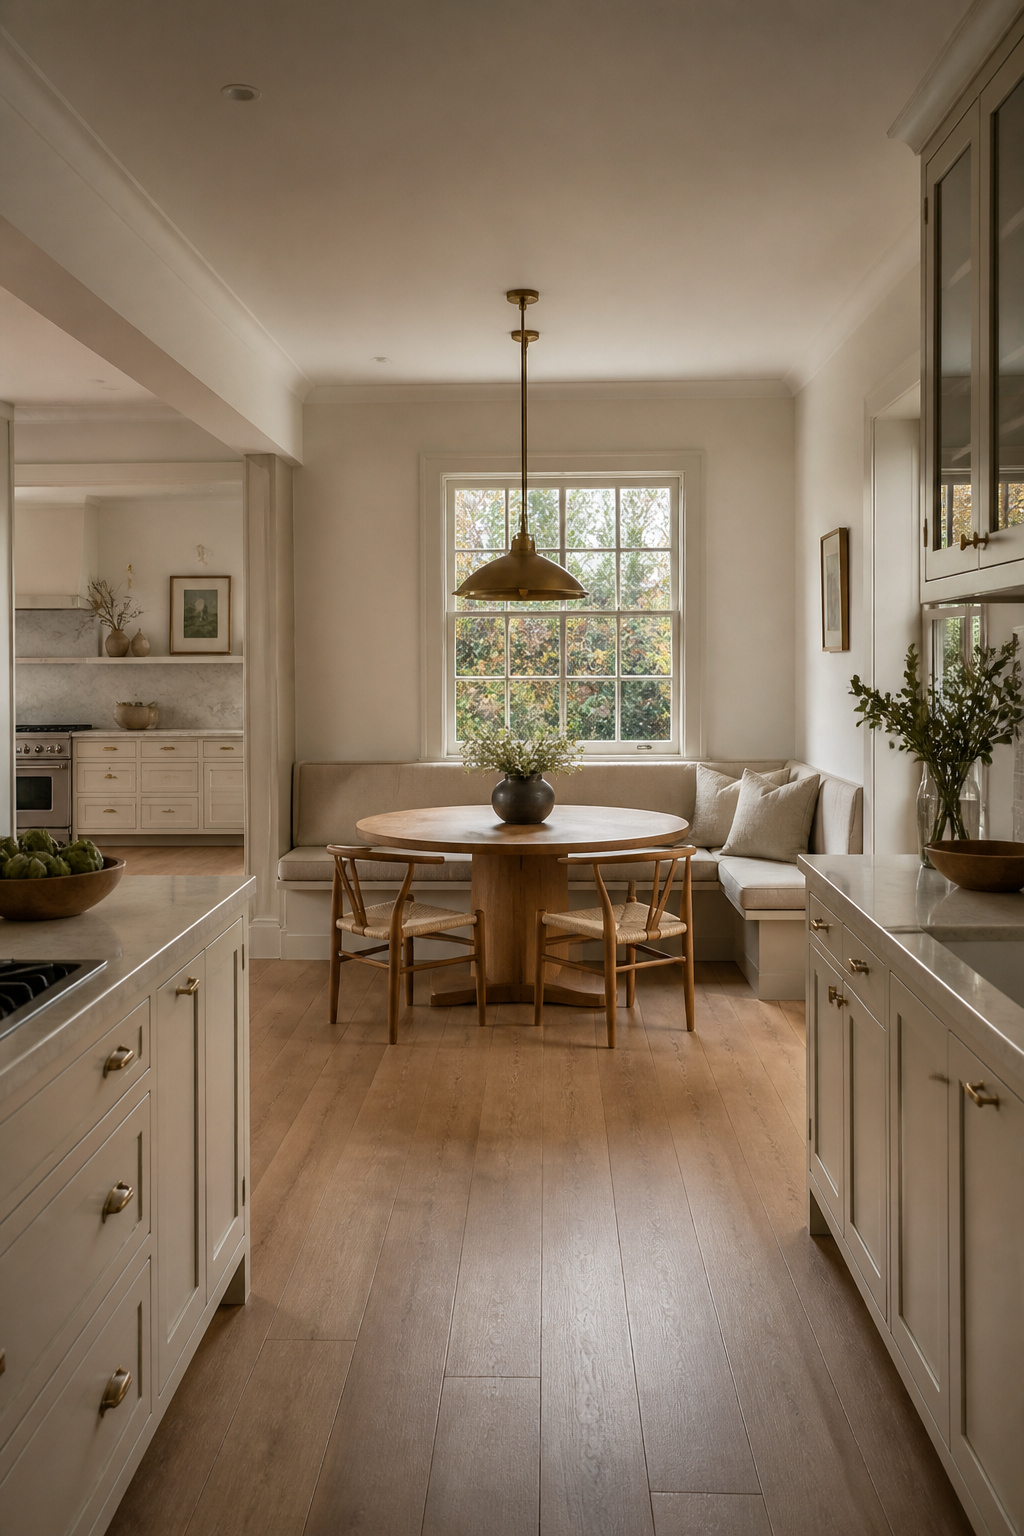
The kitchen and dining zone should be designed as a single spatial story. That doesn’t require matching everything; it requires sharing enough material language that the eye moves between the two zones without registering a conceptual gap. If the kitchen has white cabinetry and oak sections in the island and shelving, an oak dining table reads as connected; a dark walnut table reads as separate. One floor material running continuously across both zones is the single most effective unifying decision available.
Built-in banquette seating is the best option for most kitchen-adjacent dining areas: seat depth 18–24 inches, seat height 19 inches for dining, back angle 7–9 degrees for comfort. A 48-inch table seats two comfortably (24 inches per person is the standard allocation); a 96-inch table seats four. Storage drawers below the bench seat add meaningful kitchen storage in a room often short of it.
Clearance around a banquette table: 12–14 inches between table edge and wall for a tight but functional setup; 24 inches minimum for comfortable entry and exit; 36 inches if a circulation route runs behind the seated diners. Built-in seating recovers 18–24 inches of floor space versus chairs on all four sides, which in a combined kitchen-dining room of 200–250 square feet is material gain.
Pendant lighting over the dining table should share a metal finish with the kitchen faucet and hardware. The eye makes these connections without being asked, and when they’re consistent the room feels resolved rather than assembled. For dining table options that work within a connected kitchen-dining scheme, this range of modern kitchen tables covers proportion, material, and style in useful detail.
The most expensive kitchen renovation mistakes aren’t the bad material choices; those can usually be lived with or eventually replaced. The most expensive mistakes are sequencing errors: cabinetry installed before the rough electrical is complete; countertops templated before the appliances arrive; backsplash tiled before the faucet is in and the sealant line is known. Each one requires undoing finished work.
The correct sequence: design and planning, then demolition, then structural work (walls, windows, beam exposures), then rough mechanical (plumbing, electrical, gas), then plaster and drywall, then floor installation, then cabinet installation, then countertop templating and installation (two weeks after cabinets), then appliances, then backsplash and hardware, then finishing touches and lighting commissioning.
Structural and services work must happen in that order because plumbing and wiring run through the same cavities as structural elements, and those cavities close permanently when the plasterwork goes up. Countertop templating happens after cabinet installation because even the most carefully drawn plans produce minor variations in real installation. The stone fabricator must measure from the actual boxes rather than the drawings.
Before you take a single quote: measure everything twice (floor plan, ceiling height, existing door and window positions, service locations), photograph all four walls and the ceiling in detail, and decide on your non-negotiables. Appliance brand, countertop material, and whether you’re keeping or replacing the existing cabinet boxes are the three decisions that determine whether quotes are even comparable. Bring dimensions and decisions to the first meeting. Contractors who have to come back twice to quote spend time they don’t have and, understandably, price accordingly.