Physical Address
304 North Cardinal St.
Dorchester Center, MA 02124
Physical Address
304 North Cardinal St.
Dorchester Center, MA 02124
Discover 18 kitchen lighting fixtures that work across every style and budget — from Scandinavian globe pendants to smart dimmers, with placement tips.
Kitchens get renovated thoroughly — new countertops, fresh cabinet doors, sometimes new floors — and then the lighting gets replaced with whatever fits the existing wiring. It’s the one element where most people stop short of intentional decision-making, and it’s the one element that quietly undermines everything else you’ve done.
In Scandinavian design, we treat lighting as a fourth material, placed alongside wood, stone, and fabric in the hierarchy of decisions that shape how a room feels. That thinking comes from necessity — Nordic winters mean months of relying almost entirely on artificial light — but the principle is useful everywhere. The kitchen lighting fixtures you choose determine not just how well you can see, but what you can see. Textures, tones, the way a countertop reads at 7pm versus 7am — all of it is shaped by light source and placement.
Here are 18 kitchen lighting fixtures that work across styles, ceiling heights, and budgets. From the pendant that makes an island look considered to the under-cabinet strip that most people install in year three and wish they’d done on day one.
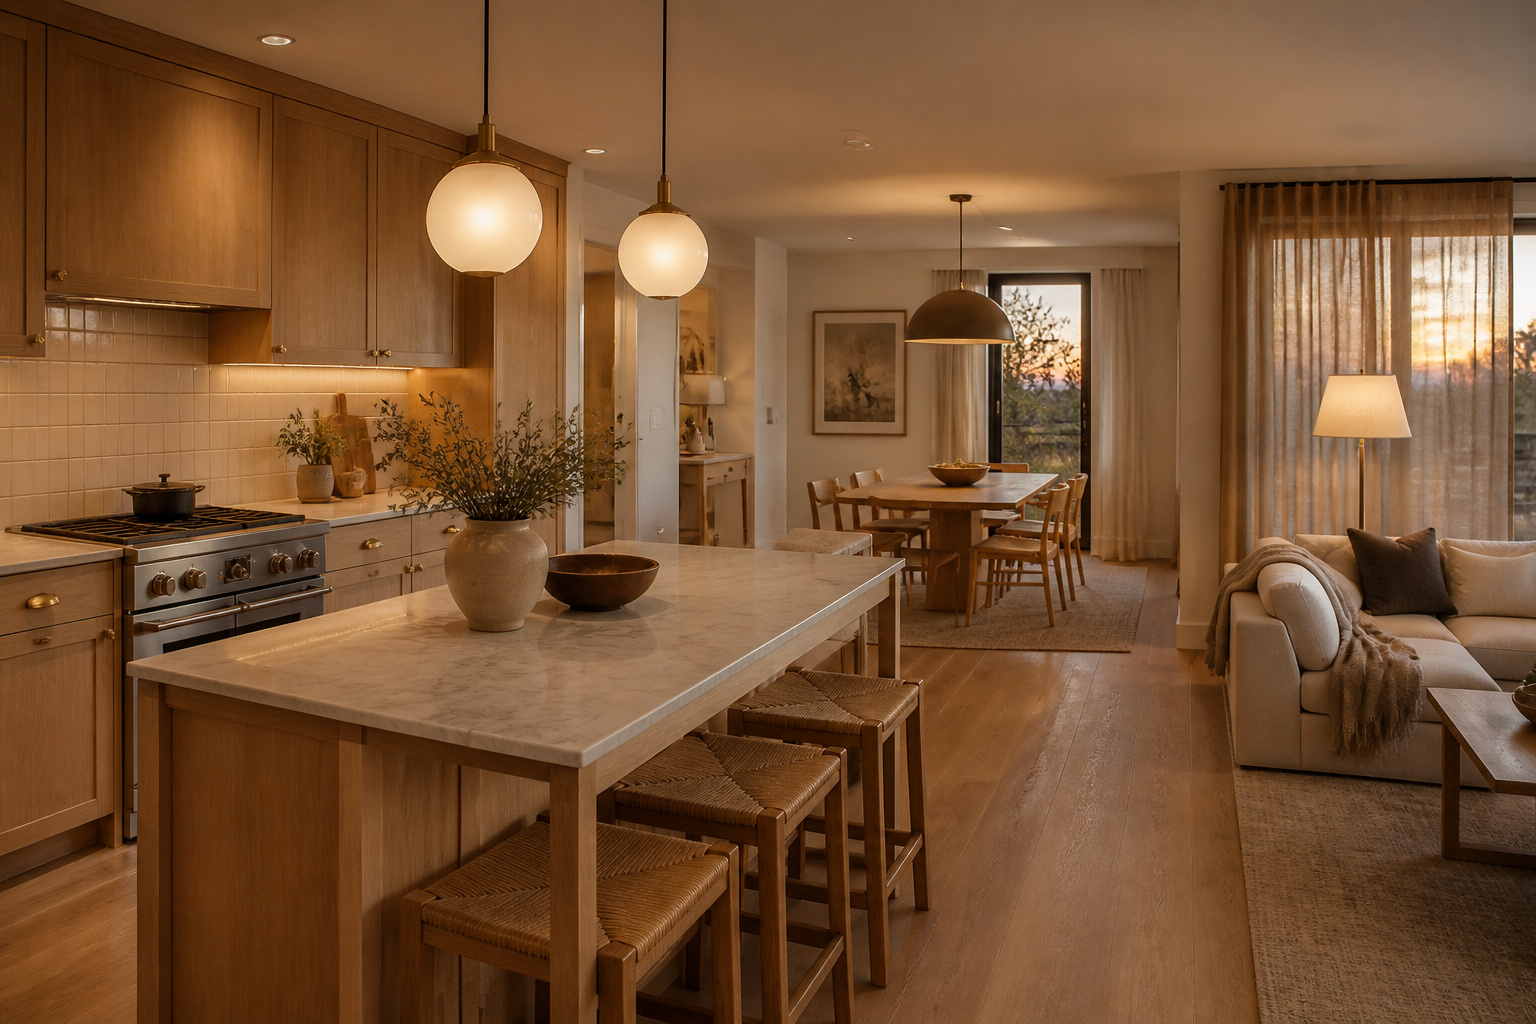
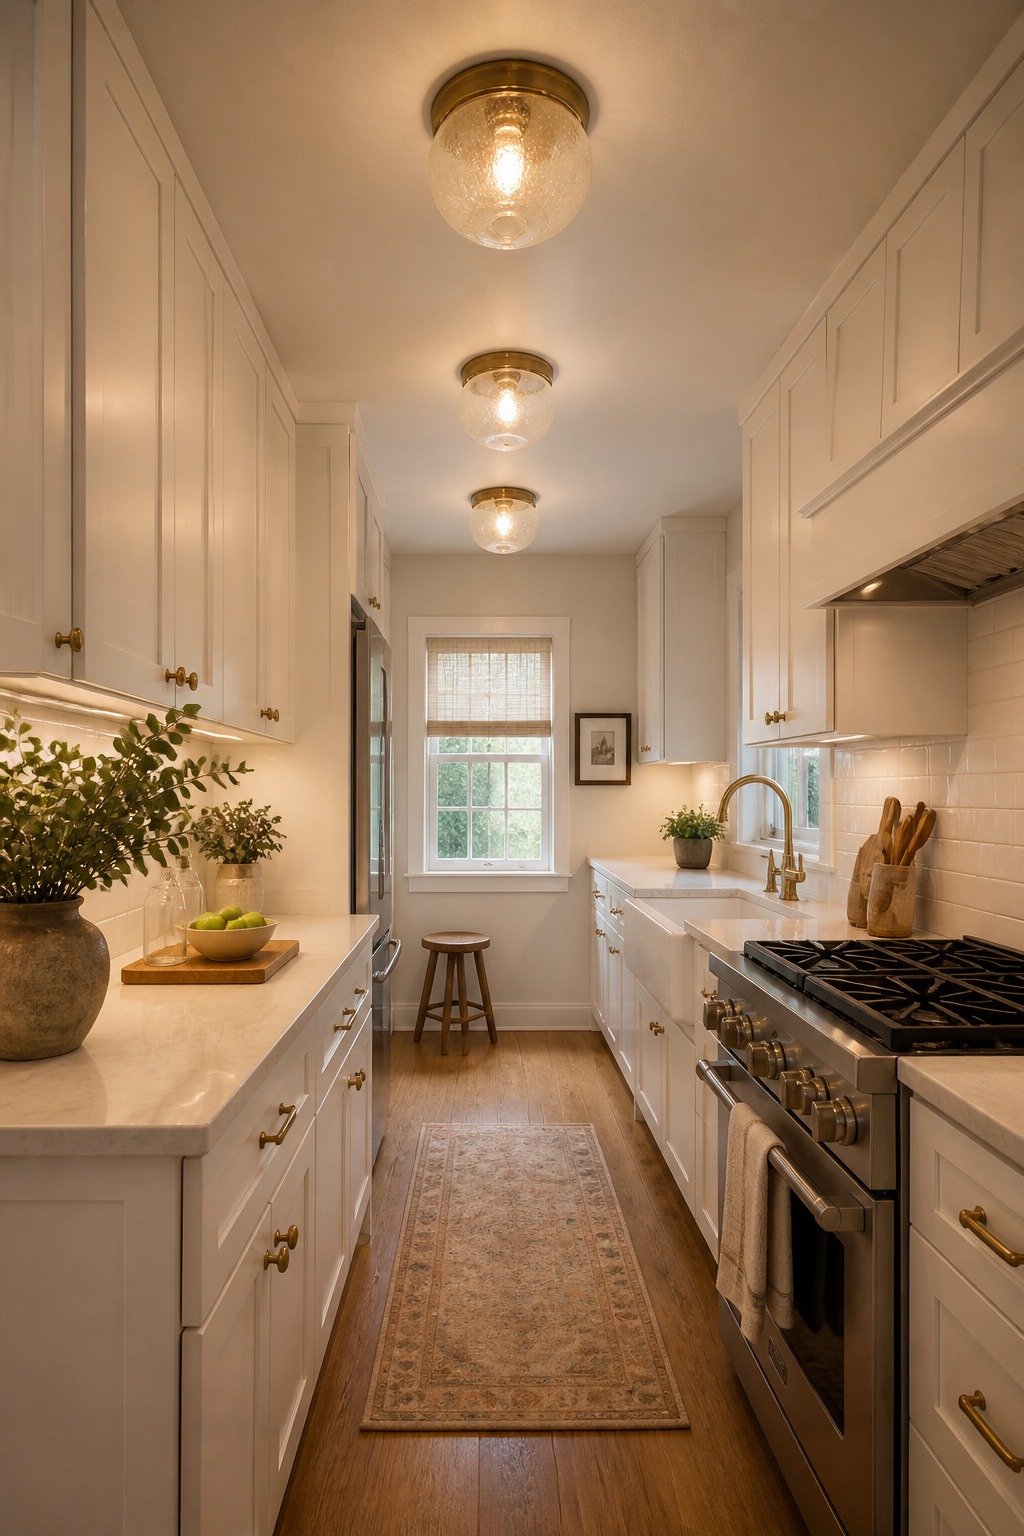
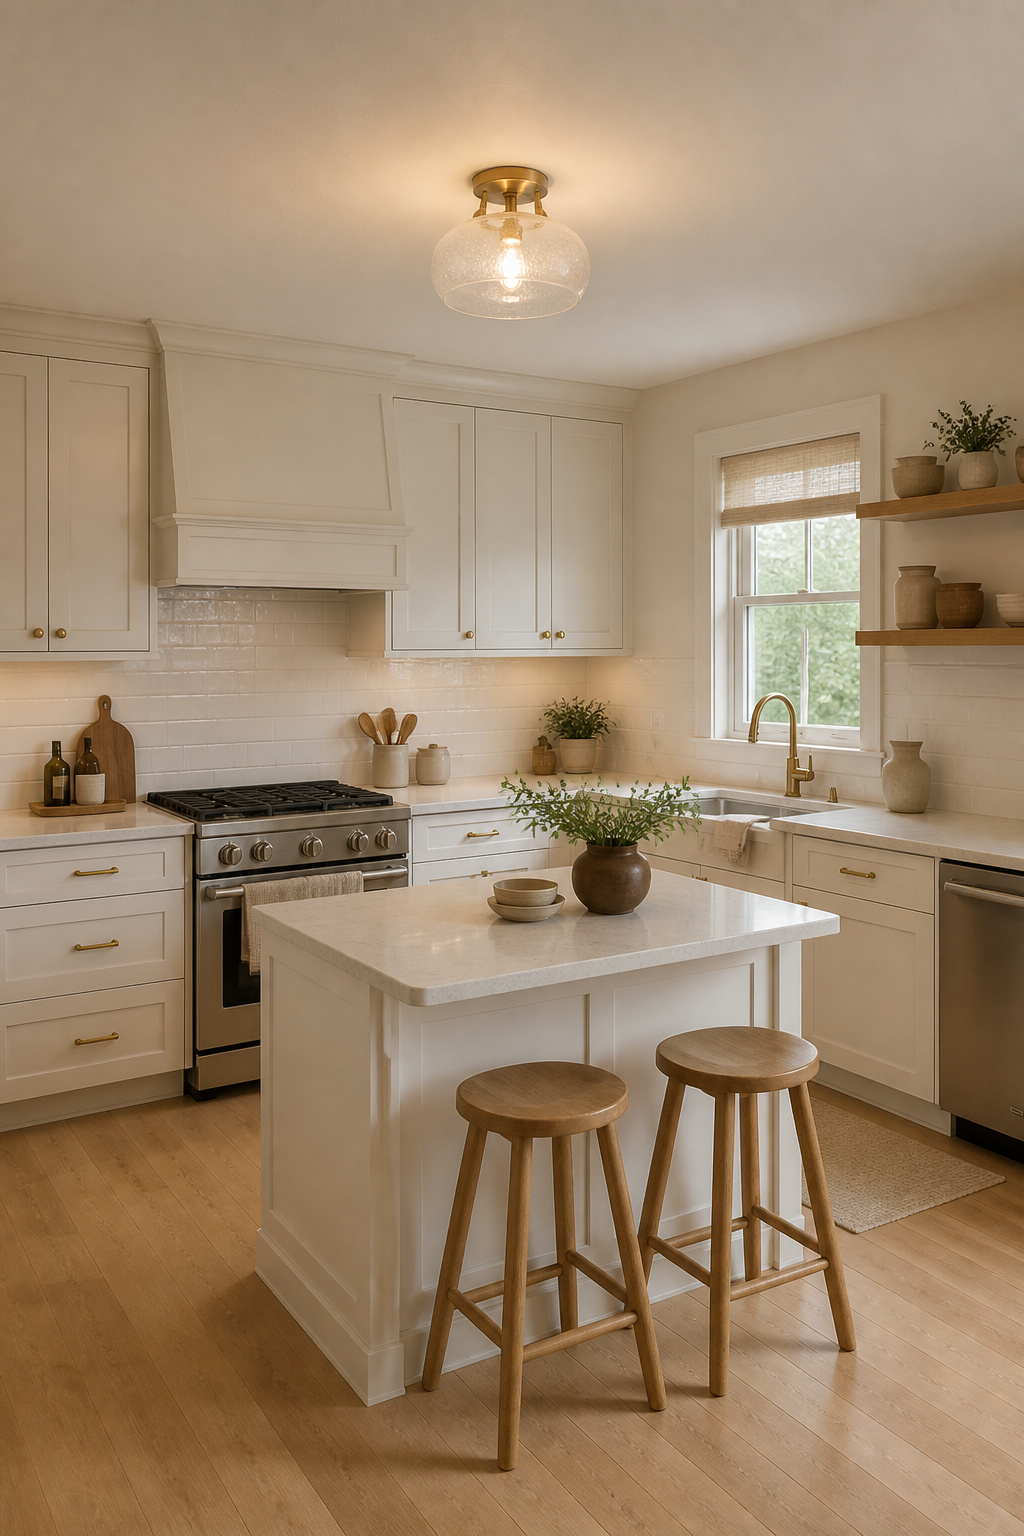
Frosted opal glass does something that no other pendant material achieves quite as well: it makes the fixture disappear. The bulb inside becomes a soft, diffused glow rather than a visible light source, and the globe reads as a quiet object rather than a piece of hardware. That’s what makes these pendants so compatible with Scandinavian and minimalist kitchens — they contribute warmth without demanding attention.
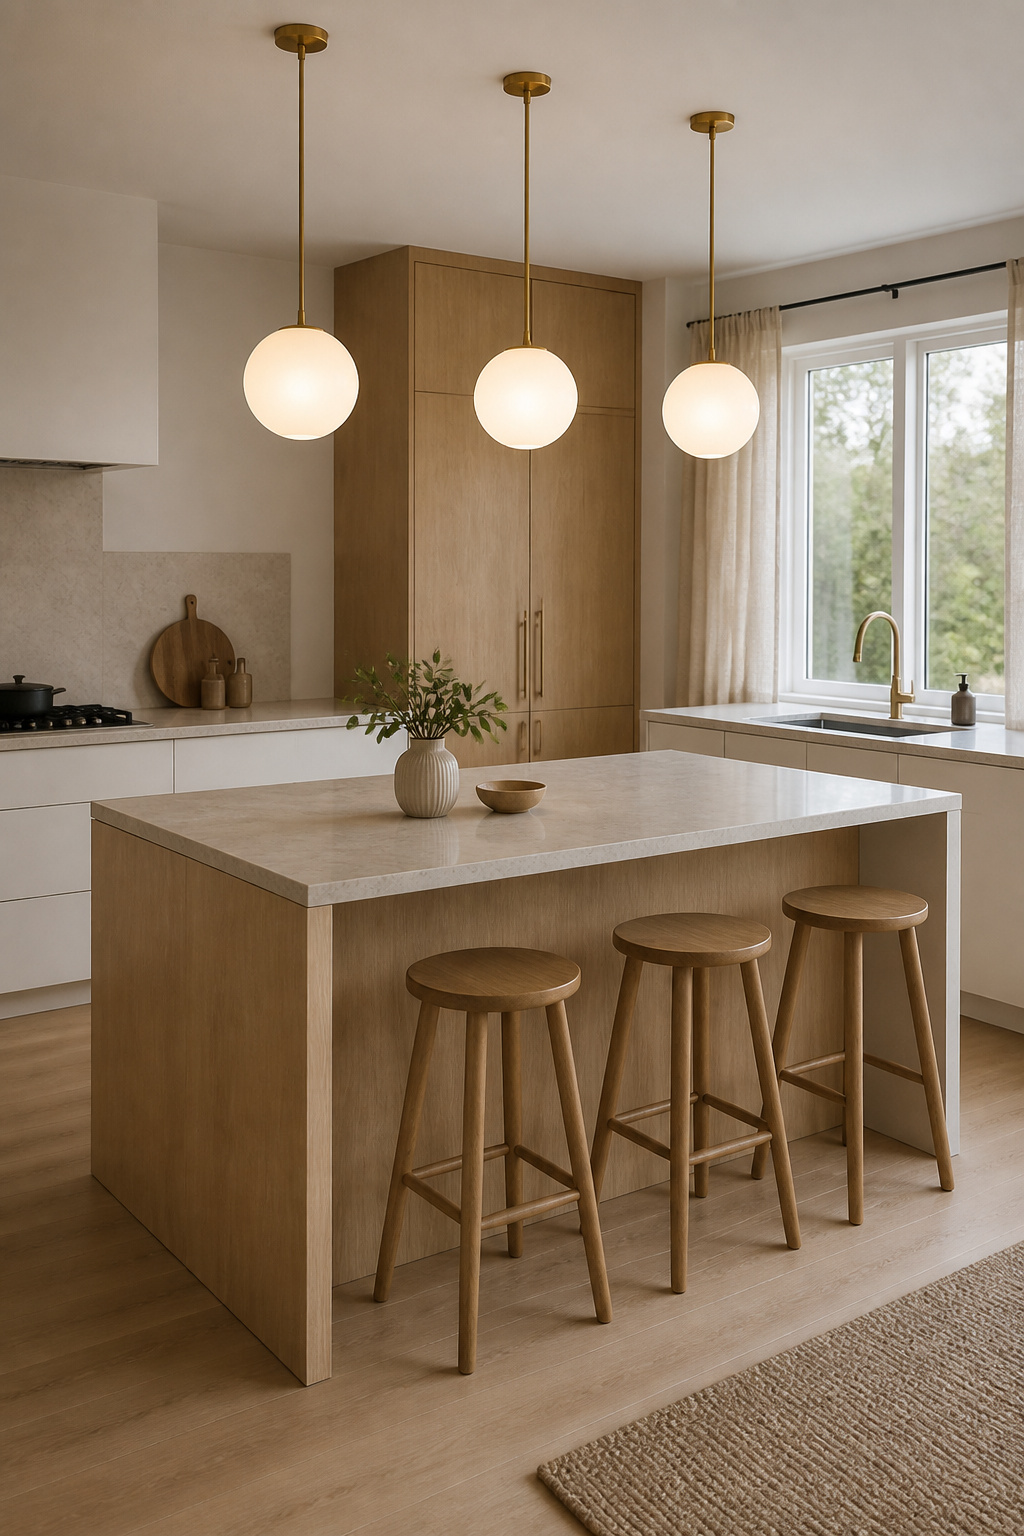
The science behind it is straightforward. Frosted glass disperses light at roughly 160 degrees, eliminating hotspots on walls and counters and producing an even ambient wash rather than a directional beam. That matters especially in kitchens with white or light-toned cabinetry, where a harsh beam creates visible contrast and undermines the calm aesthetic.
For island placement, the standard is 30–36 inches of clearance between the bottom of the pendant and the counter surface. On a 7-foot island, three globe pendants at 13–18 inches diameter, spaced 24–30 inches apart, creates the right visual density. The meaningful difference between Danish originals and more accessible alternatives is the quality of the frosted diffuser — Louis Poulsen and Normann Copenhagen produce glass with a consistency that cheaper options often can’t match. That said, IKEA’s MOLNART line delivers a genuinely good frosted globe at a fraction of the price. (No apology needed for choosing it — the light quality holds up.) If you want your kitchen to sit comfortably within the Scandinavian kitchen decor essentials tradition, a frosted globe pendant is probably the most efficient single purchase you can make.
These kitchen lighting fixtures solve a problem that most kitchen layouts create without anyone planning for it: the junction box is rarely centred over the island. Standard pendant installation requires the electrical connection to be directly above the intended fixture position — track decouples that entirely. You mount the track to whatever ceiling junction box exists and run it toward the island, then position the heads where the light actually needs to go.
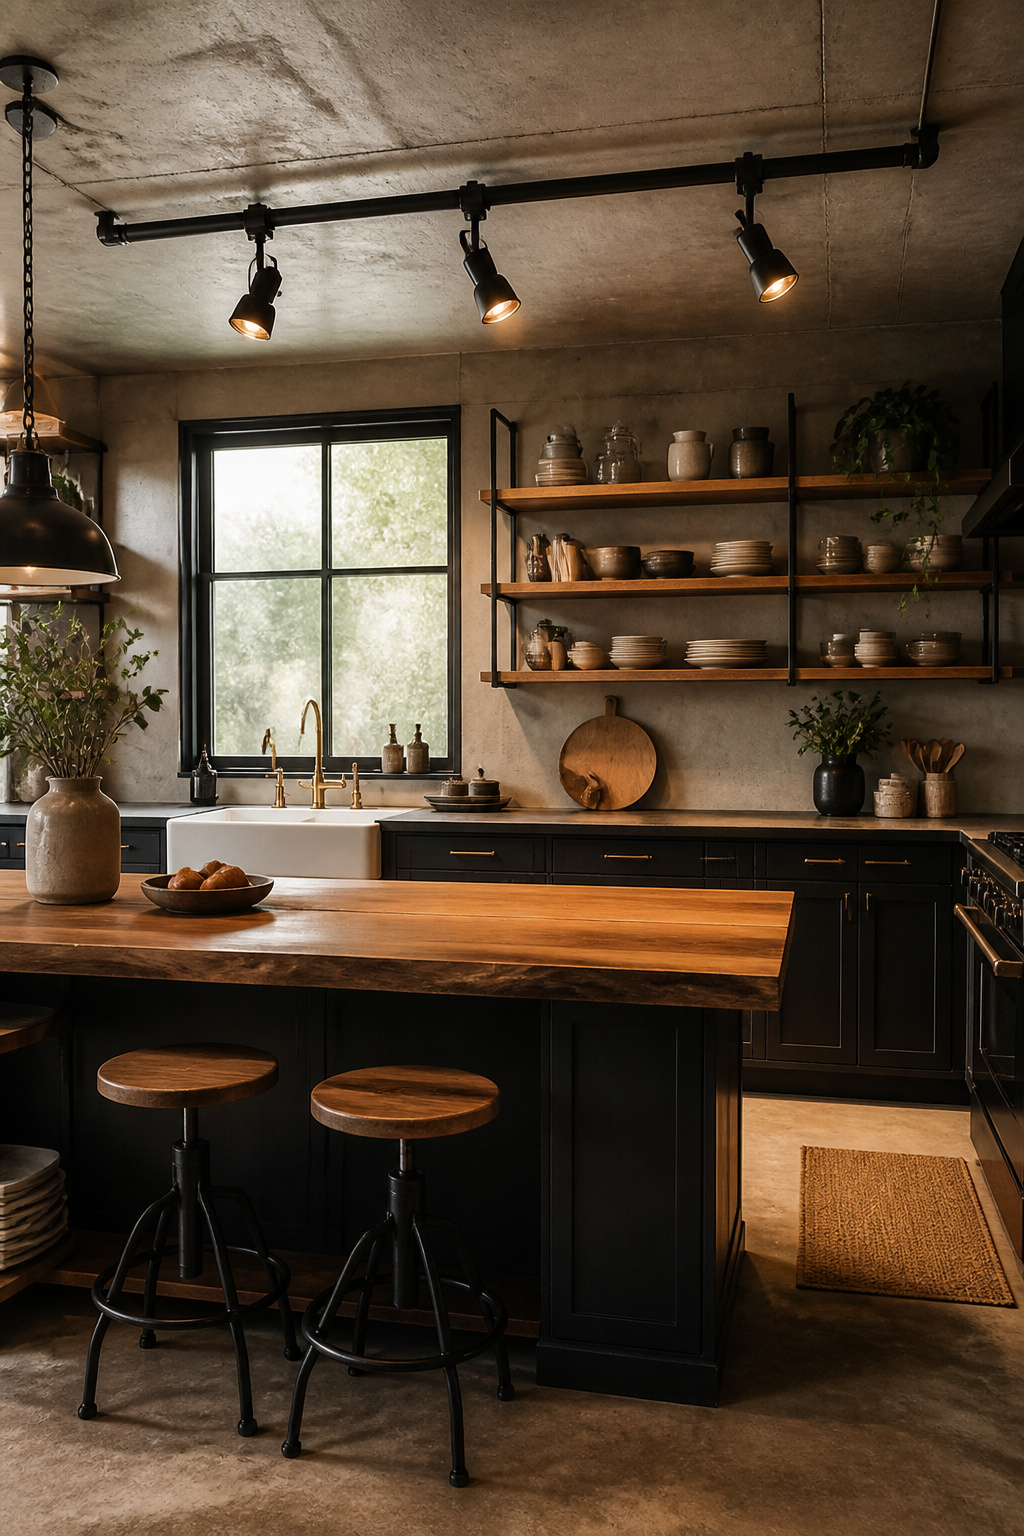
Pipe-style track heads — exposed conduit bodies, visible bulb, raw metal in matte black or aged bronze — suit kitchens that already have industrial or mixed-material elements. Concrete counters, open steel shelving, unlacquered brass hardware: these are the environments where a pipe-style head earns its place. In a cleaner Scandinavian or all-white kitchen, a low-profile minimal LED track head is the better choice — the fixture disappears and only the light is visible. Both approaches use the same track infrastructure; the head style is interchangeable.
Shadow management matters more than most people realise. The most common track lighting error is running the track directly over the island centreline and angling heads straight down — this creates a shadow of the person standing at the counter, which defeats the purpose of task lighting entirely. Instead, run the track parallel to the main counter, slightly in front of the cabinet face, and angle heads at about 30 degrees toward the work surface. Where possible, cross-light from two slightly different angles to cancel shadows altogether. Heads should be spaced 2–3 feet apart for general ambient coverage on an 8-foot ceiling.
Most residential kitchens have one layer of lighting: a central overhead fixture, or a grid of recessed lights, all on a single switch. This is functional the way a single-speed bicycle is functional — it covers the basics but lacks any capacity for nuance. The three-layer approach (ambient, task, accent) is how kitchen designers think, and once you’ve experienced the difference, the single-switch kitchen feels permanently incomplete.
Ambient lighting is the base — recessed LEDs or a central pendant that fills the room with general light. Task lighting is the functional layer — under-cabinet strips that eliminate the counter shadow, island pendants that bring focused light to prep surfaces. Accent lighting is purely atmospheric — cabinet interior LEDs, toe-kick strips, backsplash wash — the layer that makes a kitchen feel considered rather than merely equipped.
The question isn’t which layer to have. It’s which order to build them in. Task comes first, always — a bright, shadow-free counter is more useful than any atmospheric touch. Then ambient, then accent. Most importantly, each layer should have its own dedicated dimmer switch. An ambient circuit on a dimmer transforms a functional kitchen into a dinner-party space in seconds. The short version on dimmer compatibility: use dimmable LEDs rated for trailing-edge dimmers (they handle low-level output without flicker), and verify compatibility between the dimmer brand and the specific LED driver before purchasing. For ideas on how table-side kitchen lighting fits into this framework, kitchen lighting over a dining table covers the placement logic in detail.
As kitchen lighting fixtures go, rattan and woven fibre pendants deliver something glass and metal can’t, regardless of their quality or design: organic texture. They bring material warmth to the ceiling plane — a dimension that’s easy to underestimate until you compare a rattan pendant to a clean glass globe in the same kitchen. The rattan adds something the glass doesn’t have.
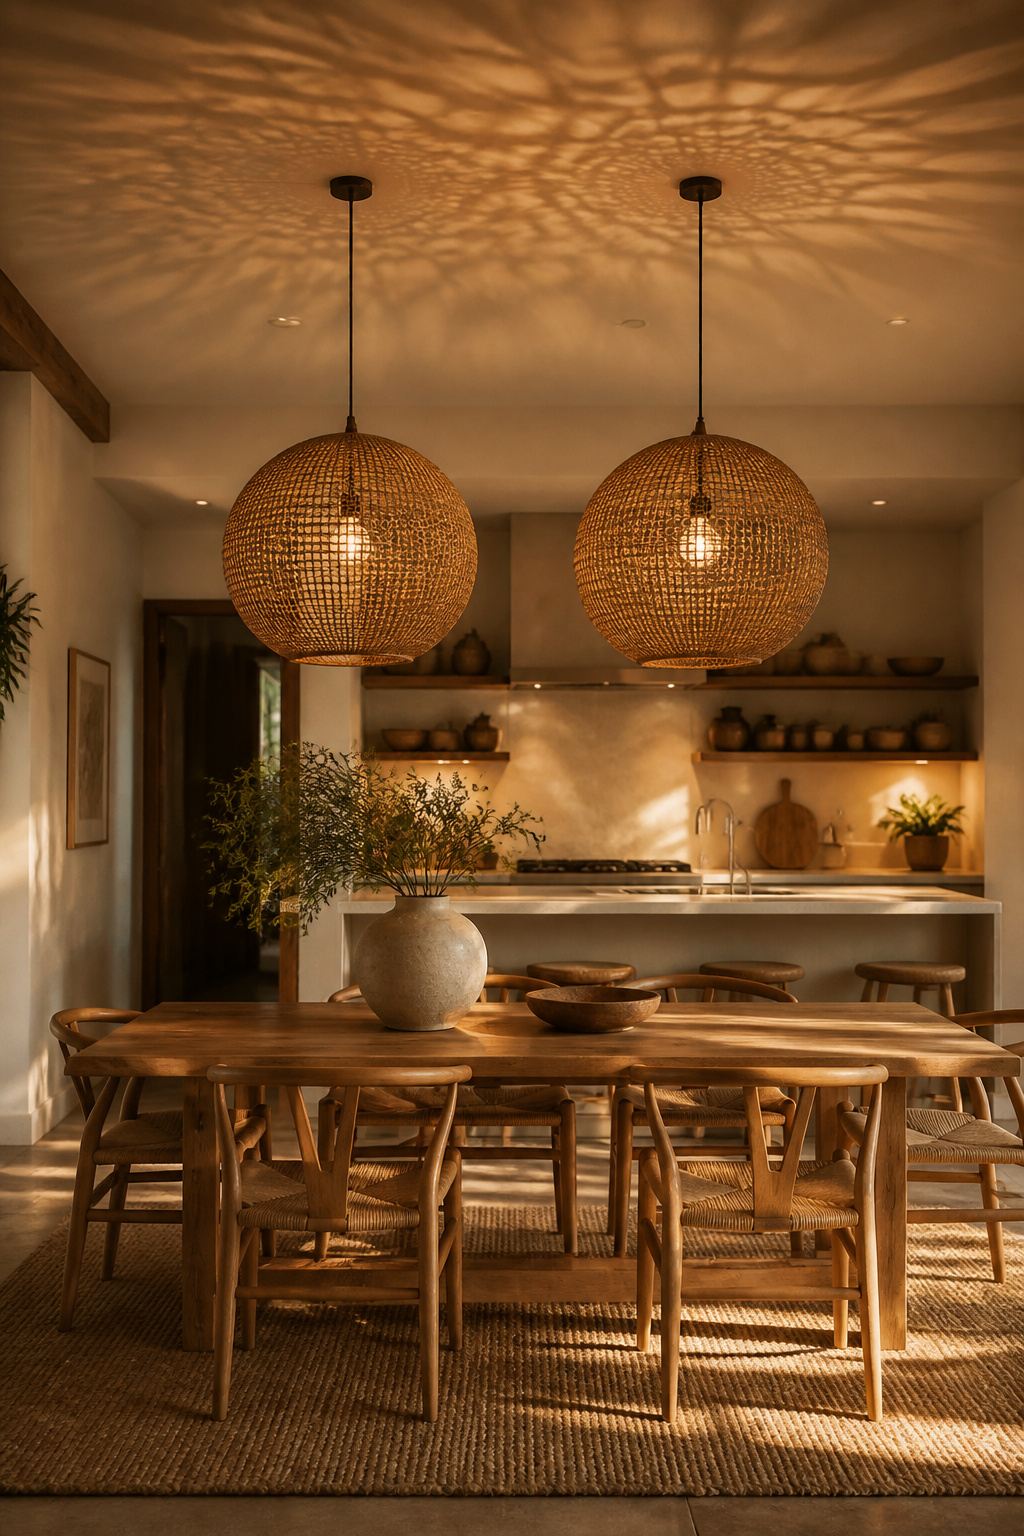
The open weave disperses light in multiple directions, casting gentle dappled patterns on the surrounding ceiling and upper walls. This secondary light effect is part of the appeal — the fixture becomes a presence in the room beyond its downward illumination, making the space feel inhabited rather than lit. The effect works particularly well over kitchen tables and breakfast nooks, where ambient mood matters more than task precision.
Rattan’s main kitchen concern is moisture and grease exposure over time. Sealed or lacquer-coated rattan handles kitchen steam far better than untreated fibre. Seagrass is tighter-woven and more moisture-resistant; bamboo is hardest and most humidity-stable, though its structural rigidity limits it to more architectural forms. Maintenance is simple: a monthly wipe with a soft cloth or light vacuuming prevents grease from settling into the weave — the main threat to longevity. Avoid positioning untreated rattan directly above a stovetop. An island or dining area placement keeps the fixture safely away from direct steam. For sizing: 16–24 inch diameter pendants for a medium kitchen, three pendants spaced 24–30 inches apart for a 6–8 foot island. When you’re choosing between two sizes, take the larger one.
Recessed downlights are as close as kitchen lighting fixtures can get to invisible. Done correctly, they produce even illumination across the entire kitchen with no visible hardware and no shadow zones. The fixture itself is almost irrelevant — a quality housing from any major manufacturer will perform equivalently. What determines the result is the placement grid, beam angle selection, and colour temperature.
The grid spacing formula is straightforward: space fixtures at half the ceiling height. For an 8-foot ceiling, that means 4 feet apart in both directions. For a 9-foot ceiling, 4.5 feet; for 10-foot, 5 feet. This prevents the uneven bright-spot-dark-pool pattern that results from either over-spacing or under-spacing. The critical error is placing fixtures directly above cabinet lines, which sends light onto cabinet faces rather than counter surfaces — push them slightly toward the room centre to angle the beam toward the work zone.
Beam angle determines whether recessed lights feel clinical or considered. A 30-degree angle is for accent work only — too narrow for ambient coverage. A 45-degree directional is the right choice near counters and work zones where you want focused output without glare. A flood angle (60 degrees or wider) suits general ambient coverage and allows wider spacing between fixtures. On colour temperature: 2700K produces the warm, candle-adjacent quality that Scandinavian designers almost universally specify for residential kitchens — it flatters food, wood, and stone simultaneously. 3000K is the practical sweet spot for most kitchens. 4000K is correct for professional kitchen environments; in a home kitchen, it makes food look less appealing and flattens the warmth out of natural materials.
Every kitchen designer who has worked extensively with homeowners will tell you the same thing: the fixture mentioned most in year-three reviews is the under-cabinet lighting. It’s installed, it transforms the prep experience immediately and permanently, and the owner says, without exception, “I wish I’d done this on day one.”
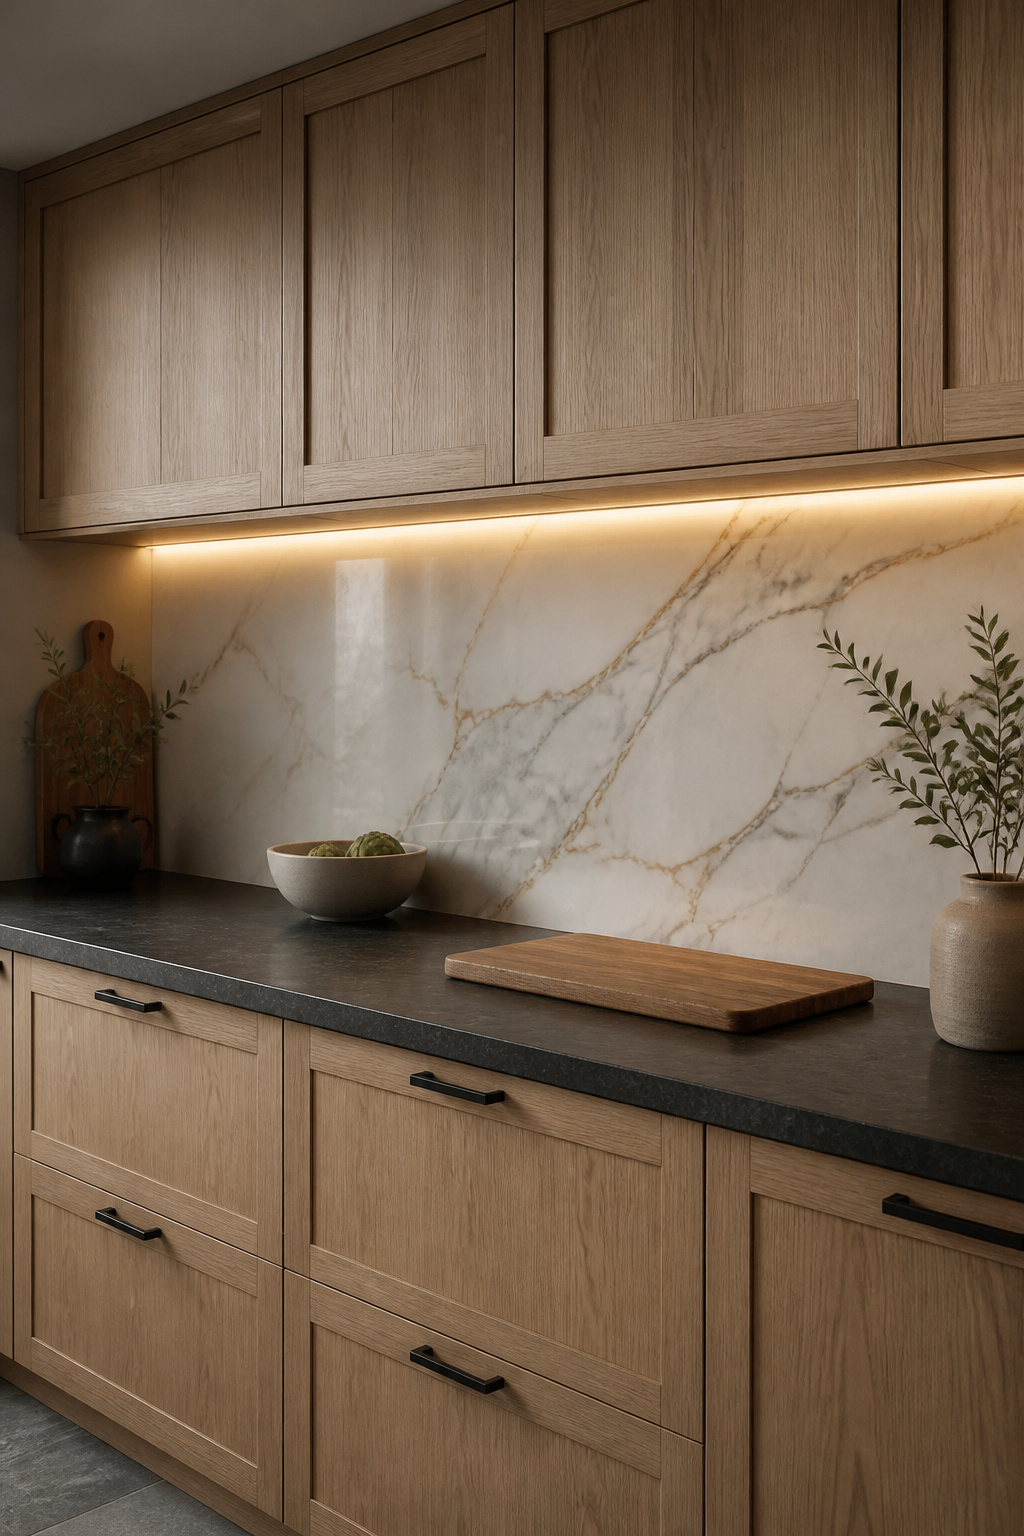
The reason is a simple physics problem. Overhead ambient light casts the user’s shadow directly onto the counter surface during food prep. Under-cabinet strips solve this by illuminating from the front rather than from above — the light source is between you and the counter, eliminating the shadow entirely. The effect on a dark-toned countertop, or on a backsplash with material texture, is significant: the surface comes to life in a way that overhead illumination doesn’t achieve. I’d prioritise this upgrade over a new pendant any day — the functional return is immediate and permanent. For guidance on how material selection and lighting interact at the counter level, kitchen countertop decor ideas covers the relationship in detail.
For installation: plug-in LED strips are the practical choice for most people — no electrician required, manageable cord routing along the cabinet underside to the nearest outlet, and easy to test before committing permanently. Hardwired is the cleaner long-term result, worth doing during a full renovation. Battery-operated options typically get abandoned within a year. The placement rule is consistent across all strip types: position the LED 1–2 inches back from the front face frame edge. This distributes the beam across the counter and backsplash rather than creating a visible glare line from a standing position. On reflective or dark countertops, a frosted LED extrusion channel eliminates the individual LED point sources and produces continuous smooth light.
The Sputnik chandelier earns its place in a kitchen by doing something most fixtures can’t: it reads as sculpture as much as light source. The radiating arm structure is visually open — you see through it rather than at a solid form — which means it occupies ceiling space without visually compressing it. In open-plan kitchens where the fixture is visible from the dining area, living room, or hallway, that quality matters considerably.
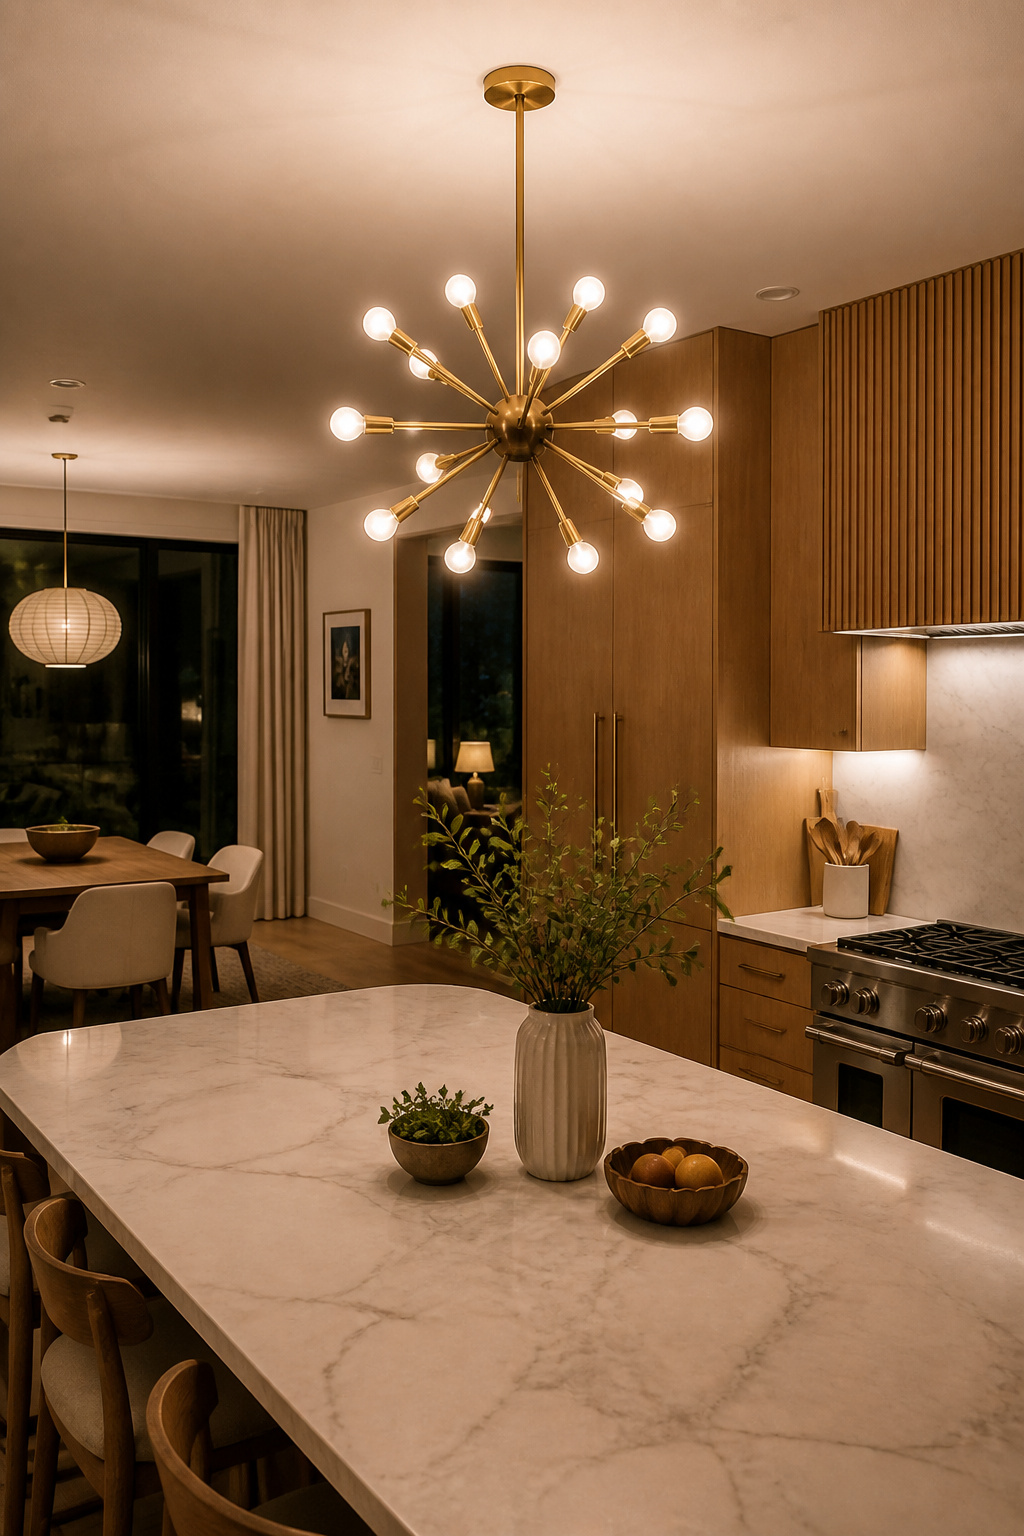
The form comes from mid-century modernism; the name comes from the 1957 Soviet satellite, whose visual similarity to multi-arm chandeliers of the era gave the style its enduring reference point. For kitchen use specifically, a compact 6–8 arm Sputnik in the 18–24 inch diameter range suits most islands and kitchen dining zones. The linear Sputnik variant — a horizontal bar of radiating arms rather than an omnidirectional sphere — is purpose-built for rectangular islands and runs 39–47 inches, which works well as a single statement over a long prep surface.
Scale matters here more than in most chandelier categories. The diameter formula designers use is to add the room’s length and width in feet, then use that sum in inches as the fixture diameter. For a 12×14 kitchen, that yields a 26-inch target. For island placement, maintain 30–40 inches of clearance from the counter. On finish: brushed brass pairs naturally with warm wood tones and current kitchen hardware trends; matte black works universally; chrome suits all-white and stainless-forward kitchens. The finish should reference something already present in the kitchen — drawer pulls, the range hood trim, or the faucet.
The space above the kitchen sink is one of the most neglected lighting opportunities in residential design. It’s typically either left unlit (relying on overhead ambient) or covered by a ceiling fixture that doesn’t specifically address the sink basin. A single glass pendant centred above the sink fixes this with minimal fuss — it adds a task light exactly where it’s needed and provides a moment of visual interest at a wall plane that otherwise offers nothing.
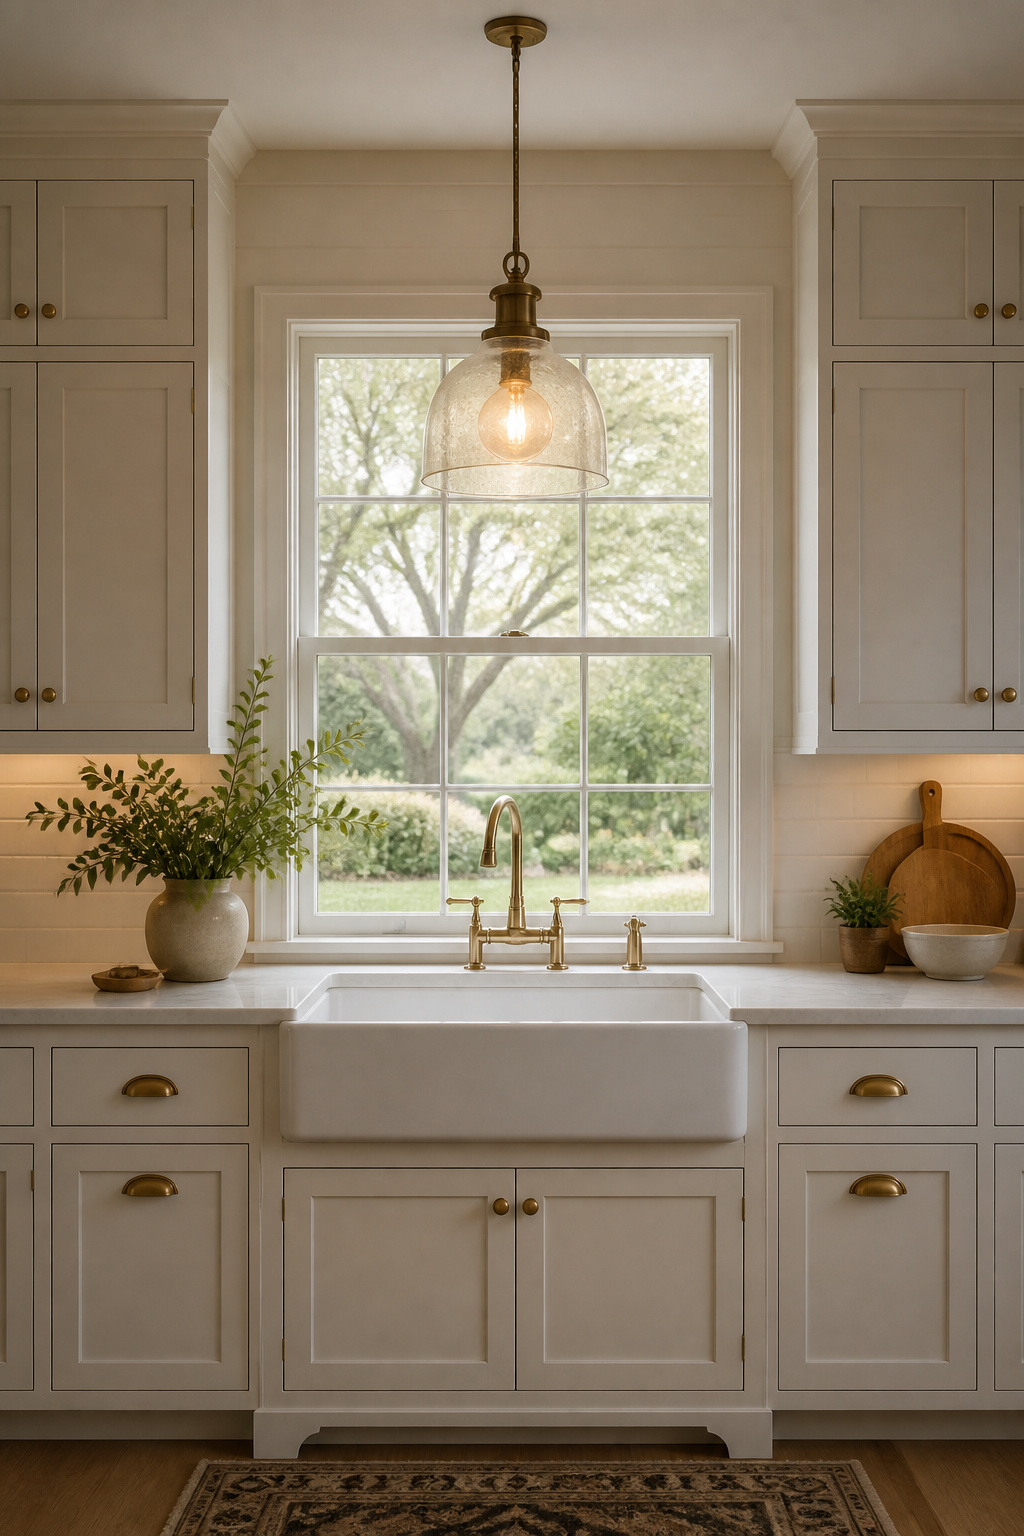
The bell jar form works because it directs most of its light downward through the open bottom, making it genuinely functional rather than merely decorative. The bottom of the pendant should sit 30–36 inches above the counter surface — close enough for useful illumination, high enough to stay clear of splashback reach. Bell jar pendants are generally rated as damp-location fixtures, meaning they’re code-compliant directly above a sink without additional protection.
On glass type: seeded glass is the most forgiving option for these kitchen lighting fixtures — the tiny trapped air bubbles create an antique, handblown appearance, diffuse the light softly, and hide the bulb’s character when switched off. Seeded glass also responds well to natural light from a window above the sink, appearing to shimmer as conditions change. Ribbed glass introduces more contemporary texture and creates linear light patterns on surrounding surfaces. Clear glass maximises light output and pairs well with a decorative filament bulb — but it shows dust readily and looks blank when switched off in a bright kitchen. On hardware finish: the pendant’s metal component doesn’t need to match the faucet exactly. A brushed nickel faucet and an aged brass pendant share warm metallic undertones without being identical — the slight variation reads as considered layering rather than mismatched procurement.
The cage pendant is one of the few fixtures where the shade structure itself is the design statement. The open metal frame — ribs and hoops in matte black — is the visual element, while the bulb inside becomes almost secondary, visible but contained. The appeal is the tension between the industrial material and the warm glow the bulb produces.

Whether a cage pendant belongs in a kitchen comes down to one question: does the kitchen already carry at least one other matte black element? Cabinet hardware, a faucet, an appliance finish — any matte black presence gives the pendant a reference point and makes it feel part of a composed scheme rather than a fixture transplanted from a different design story. In a kitchen that’s entirely warm-toned (cream cabinetry, brass hardware, wood accents), a matte black cage pendant introduces a note of contrast that can work — but it needs to be a single deliberate contrast, not a random element.
The combination of matte black and warm wood is particularly successful. White oak, walnut, and natural maple share warm yellow-brown undertones that neutralise the austerity of matte black metal — the result feels modern farmhouse rather than cold industrial. Avoid pairing cage pendants with grey or cool-toned wood stains; those combinations read as simultaneously cold and dark rather than contrasted. On light output: open cage pendants distribute light in all directions, including upward. This produces ambient ceiling wash as well as downward task light, which means these kitchen lighting fixtures work better over dining areas where atmosphere matters than over islands where focused task output is the priority.
Wall sconces are systematically underused in kitchens — the category is associated with bedrooms and bathrooms, and the kitchen tends to get skipped. But in a kitchen with open shelving, a breakfast nook, or a dining area adjacent to the cooking zone, a well-placed sconce fills gaps that no ceiling fixture addresses. They’re not a compromise — they’re the fixture type that makes certain wall planes look intentional.

The placements that work best are specific. Two symmetrical sconces flanking a bank of open shelving create gallery-wall framing and add side-lit task illumination to the shelf contents at the same time. A sconce above or beside a breakfast nook banquette, at roughly 52–60 inches from the floor, provides intimate warmth at seated eye level — the quality of light is entirely different from the overhead ambient, and that difference is felt immediately. Sconces beside a kitchen window frame the view after dark, when the unlit window becomes a black void that overhead fixtures only flatten further.
Brushed brass for the kitchen: the matte surface appears warmer and more natural than polished brass, which reads as formal and requires regular maintenance. Brushed brass shares undertones with warm wood — both occupy the yellow-brown palette — making it the most compatible metallic finish for kitchens with oak or walnut cabinetry. On installation: plug-in sconces are the practical route for most kitchens. Surface-mount cord covers in matching metallic finishes run the cord tidily along the wall — the result looks intentional when executed neatly, and avoids the cost of a hardwired electrician call.
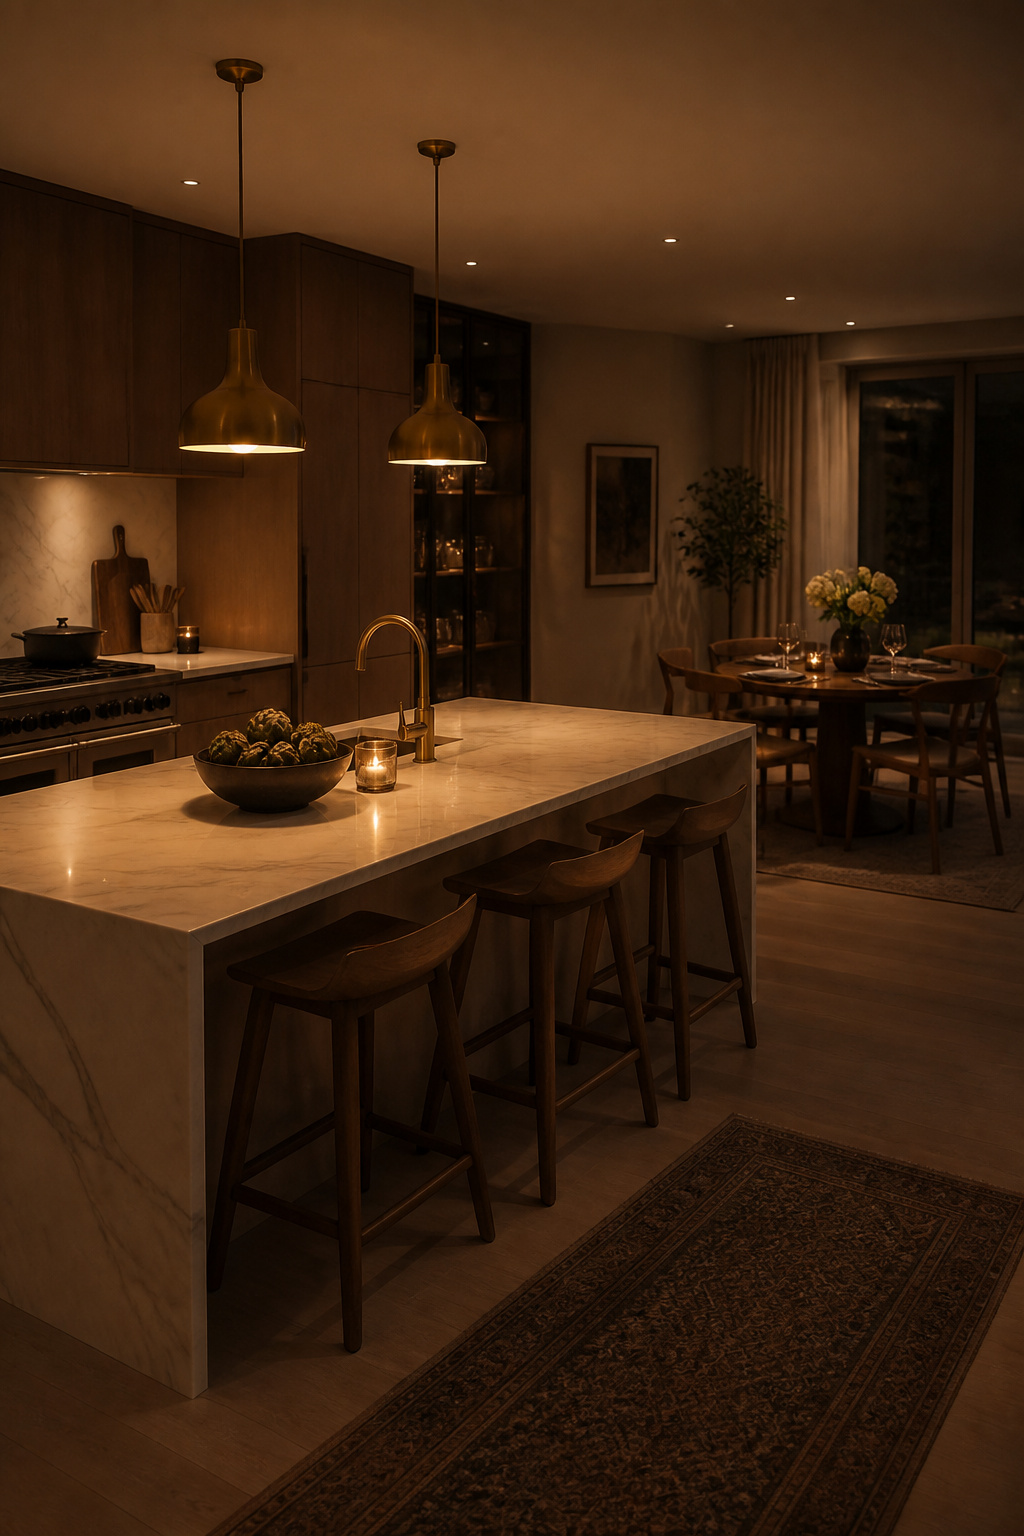
Three pendants over a long island is the default, but the default isn’t always the best answer. Each individual pendant requires independent positioning, and the spacing must be perfectly equal to avoid a visual error that becomes impossible to ignore. Linear pendants solve this entirely: one fixture, one suspension point, one alignment decision. The result is typically cleaner and more resolved — and for long islands especially, it’s the kitchen lighting choice I’d make first.
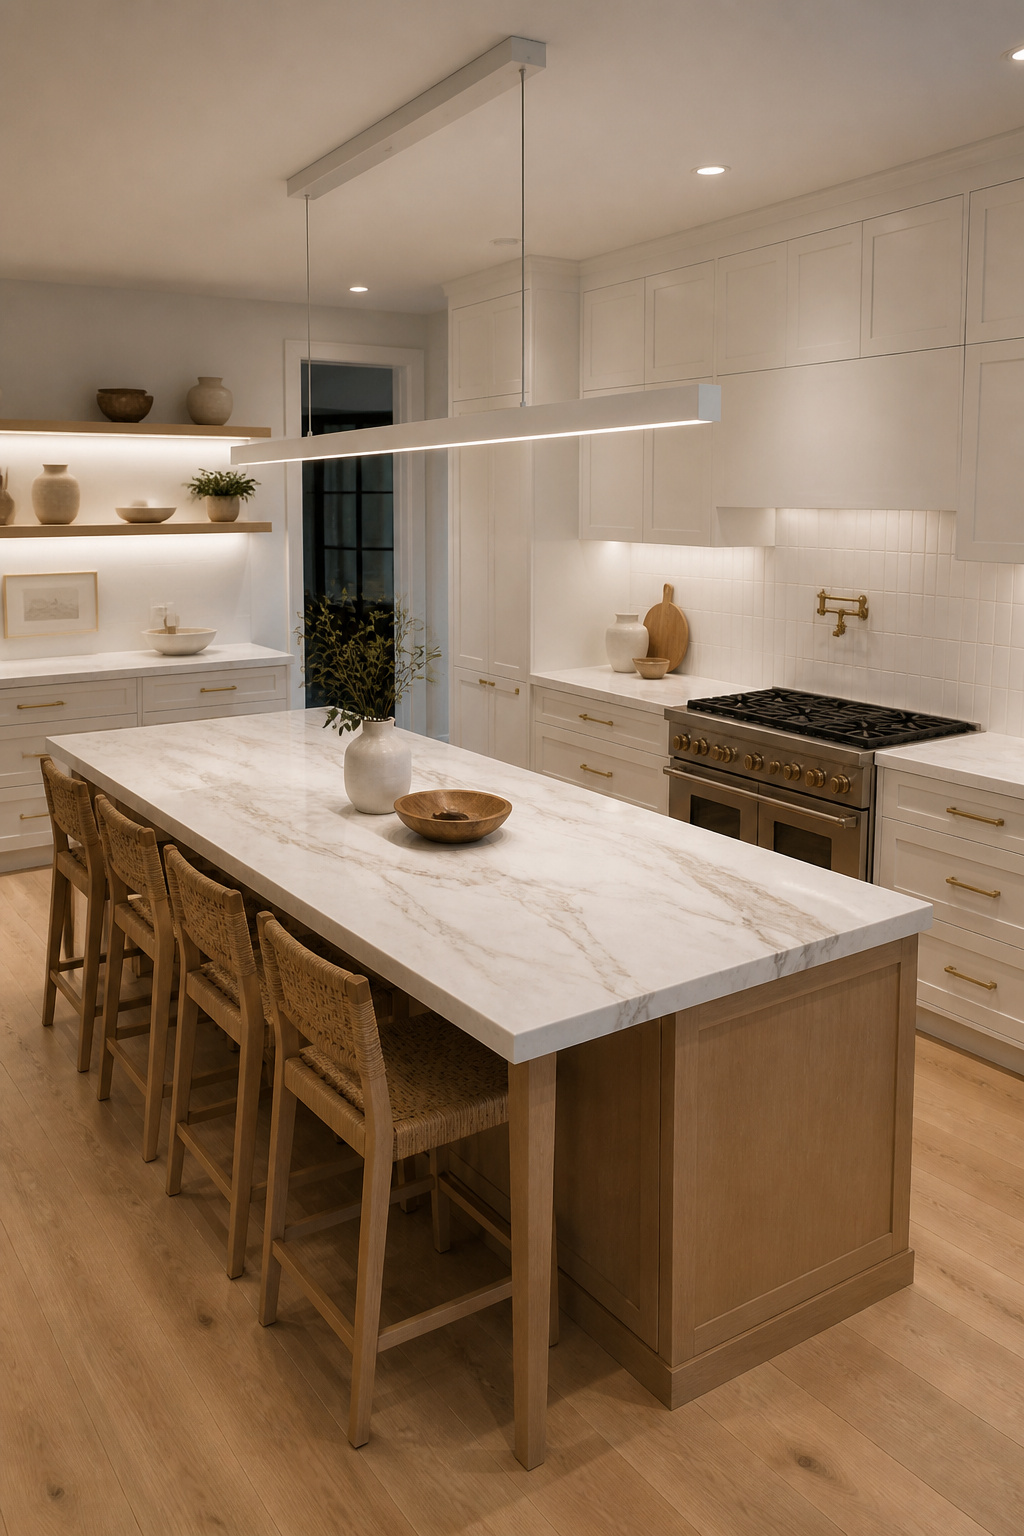
For islands up to about 9 feet, a single linear bar in the right proportion almost always looks better than three separate pendants. Beyond 9 feet, two linear fixtures often work better — still simpler to align than three individual pendants and without the visual strain of one oversized bar. The proportion rule is consistent: the pendant should be two-thirds to three-quarters the length of the island. A 6-foot island targets a 48–54 inch bar; an 8-foot island targets 60–72 inches. Leave 6–12 inches between each fixture end and the island edge — this prevents the bar from appearing to overflow the island boundary, which is the visual discomfort that happens when the proportions are slightly off.
An ultra-minimal linear bar — thin extruded metal, integrated LED, no visible hardware — almost disappears and leaves only the light. This suits Scandinavian, Japanese-influenced, and stripped-back contemporary kitchens. An architectural profile with a square tube section has presence without decoration — right for contemporary kitchens where the structure itself is the design. An industrial pipe-construction version in matte black adds material without the form becoming ornamental. In all cases, the finish of the bar should echo one element already present in the kitchen — the range hood trim, the faucet body, or a cabinet pull. For ideas on how the kitchen island storage solutions that work best treat the island as a total composition, the lighting is always part of that thinking.
The flush-mount has a reputational problem. For decades, the standard residential version was a plain frosted dome, available in white only, installed by builders to meet code at minimum cost. That era is over. The category now includes seeded glass domes in aged brass, geometric disc profiles in matte black, and drum shades in fabric and linen — materials and forms that would have appeared only in pendant fixtures twenty years ago. These kitchen lighting fixtures have earned their place in the considered home.
For kitchens with ceilings below 8 feet or galley layouts where pendant clearance is genuinely constrained, a quality flush-mount isn’t a compromise — it’s often the correct choice. The low-profile dome (4–6 inches total height from ceiling to shade bottom) maintains full headroom while delivering the warm ambient quality of a glass pendant. A dome with seeded glass reads almost identically to a frosted pendant from across the room; the main difference is the absence of a visible drop cord, not the light quality.
For galley kitchens specifically: a single centred flush-mount leaves dark zones at both ends of the narrow run. Three matching units, spaced over the three primary work zones (prep counter, sink, cooking area), produce even coverage without any clearance adjustments. Consistency between fixtures matters more in a galley than almost any other kitchen format — mismatched ceiling lights in a narrow corridor are unavoidably prominent, and the right answer is three identical units rather than three vaguely similar ones. Semi-flush models with a 4–8 inch drop work on ceilings of 8.5 feet or higher, adding a small amount of visual presence while maintaining safe head clearance.
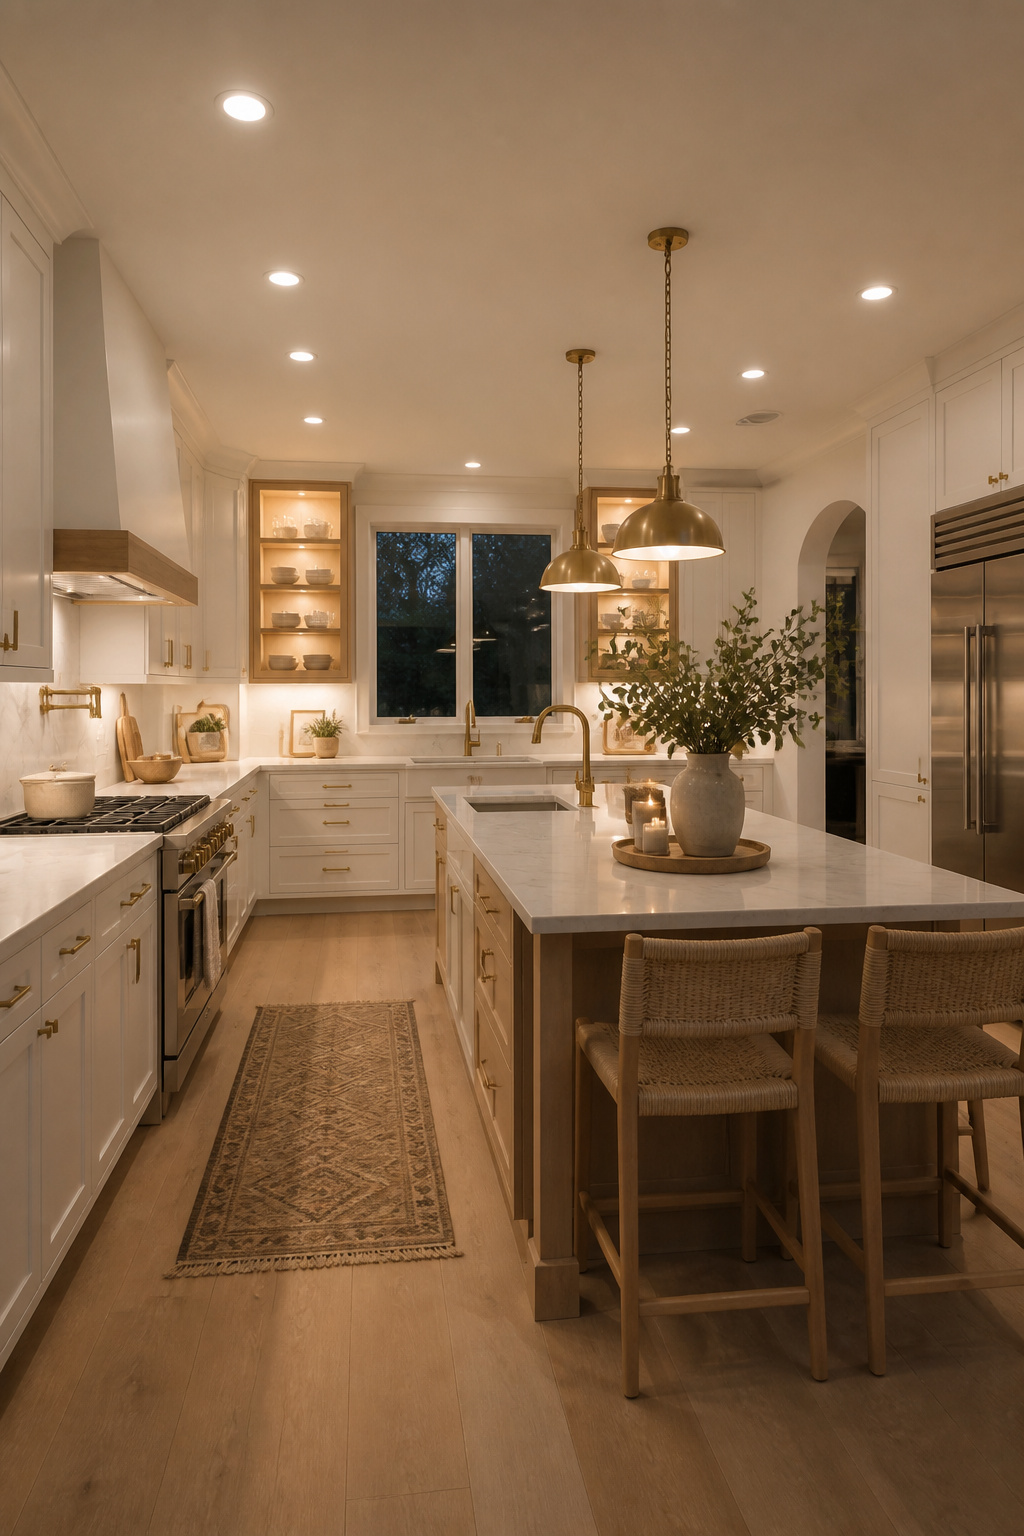
The practical value of smart kitchen lighting isn’t the voice control or the app integration — it’s the ability to define the kitchen’s mood for different moments of the day without adjusting multiple switches individually. A 7am scene (bright, functional) and a 7pm scene (warm, low, atmospheric) are both available with a single tap. This is the upgrade that makes guests ask if you’ve done a full renovation.
The morning kitchen serves preparation and efficiency. The evening kitchen serves conversation and relaxation. These two functions require completely different light levels and colour temperatures, and the only way to achieve both with the same fixtures is through layered dimming. Ambient recessed lights at 100% and 3000K for breakfast; island pendants at 70% warm white for dinner; under-cabinet strips off entirely when there’s no active cooking. Smart systems make these transitions programmable rather than manual.
The compatibility caveat is worth understanding clearly. Philips Hue smart bulbs and Lutron Caséta dimmers are not designed to work together on the same circuit. Caséta dimmers are designed for standard dimmable LED fixtures, not smart bulbs. The correct solution for using Hue bulbs with a physical switch is the Lutron Aurora, a dedicated smart bulb dimmer designed specifically for Hue compatibility. If you’re starting from scratch, the most reliable whole-kitchen approach is Lutron Caséta dimmers paired with quality dimmable LED fixtures — consistent performance, wide compatibility, and the Pico remote system provides wireless switch placement flexibility. For prioritising where to add smart dimming first: ambient recessed lights have the highest atmospheric impact; island pendants second; under-cabinet strips on a smart plug as a practical third step.
The farmhouse lantern draws from exterior architectural lighting — the form is familiar from porch and entryway applications, which gives it an immediate legibility that more abstract pendant shapes lack. In a kitchen, that familiarity translates into comfort: the fixture feels like it belongs rather than like a design decision that requires explanation. These are kitchen lighting fixtures with a pre-existing visual logic.
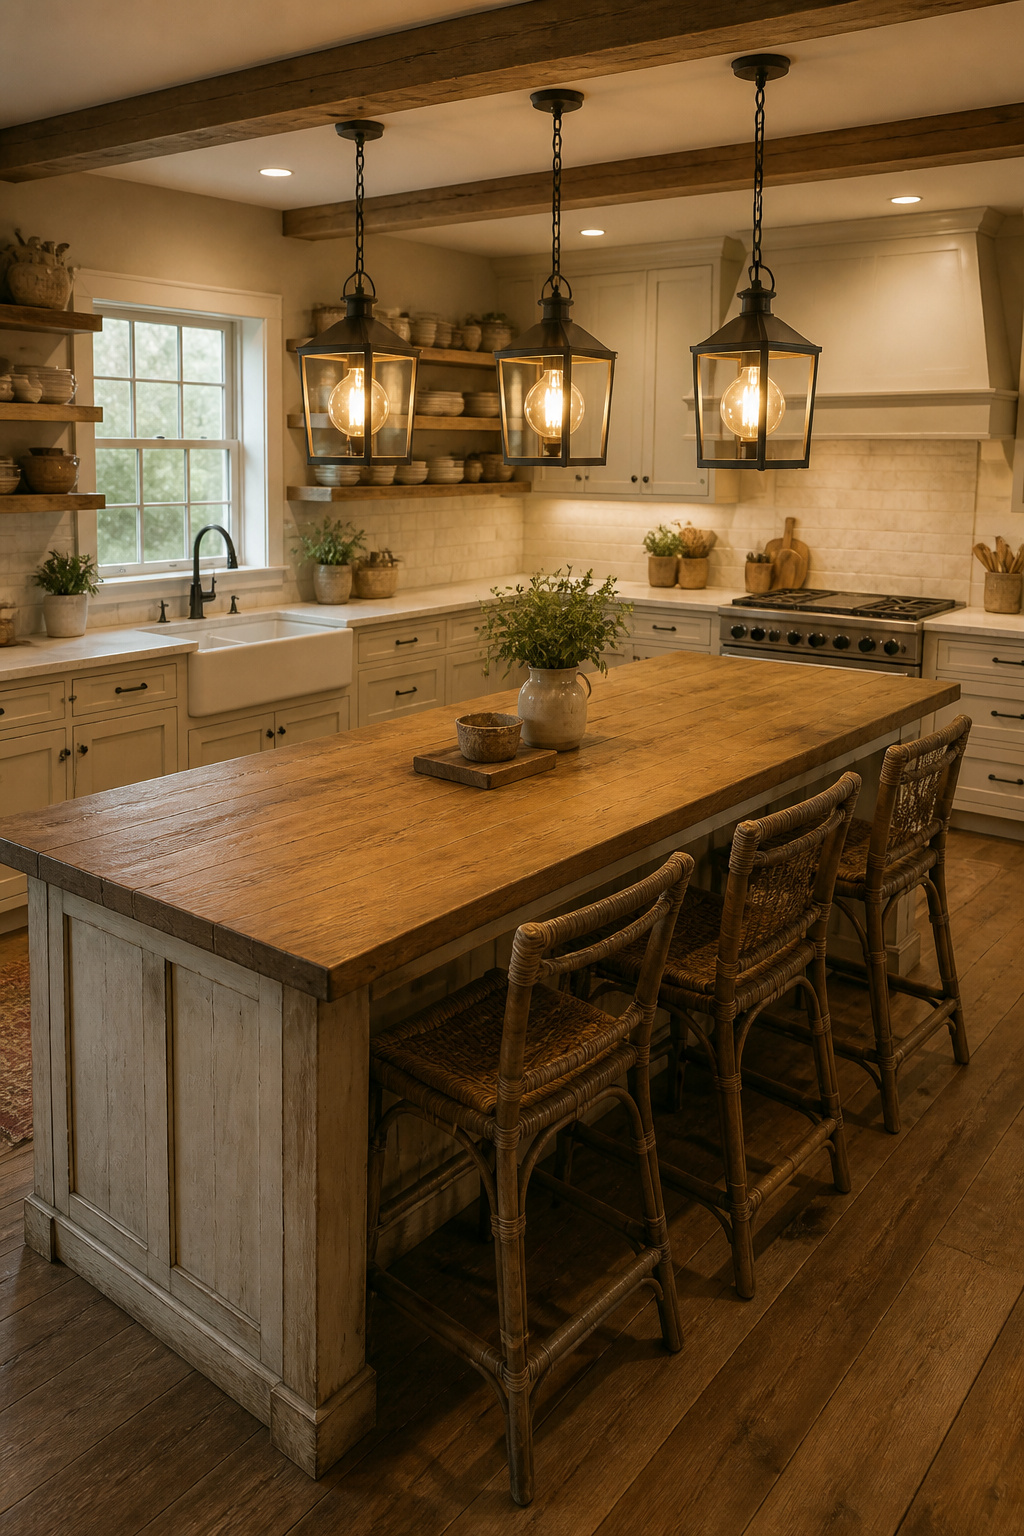
What makes lantern pendants work across both farmhouse and transitional kitchens is the neutrality of the form. A transitional kitchen — somewhere between traditional shaker and modern flat-panel — often lacks a clear fixture vocabulary. A lantern in aged iron or matte black sits between the two styles without committing to either, which is exactly what a transitional kitchen needs. Most enclosed lantern forms direct 60–70% of light downward, making them genuinely functional for island tasks rather than purely atmospheric. Many decorative pendants direct as little as 30–40% of their output downward, which looks beautiful but leaves the work surface underlit.
A metal cage lantern has maximum character and maximum light dispersal — the open frame sends light in all directions and requires a decorative bulb because the filament is fully visible. A glass-panel lantern (panes set in a metal frame) is more traditional, softer in output, and connects more clearly to the exterior-lighting heritage of the form. Seeded or aged glass panels suit farmhouse and cottage kitchens; clear glass panels pair well with large globe or tubular filament LEDs. On spacing: for a 6-foot island, two lanterns positioned one-third of the island length from each edge is the right composition. For a 7–9 foot island, three lanterns with centre-to-centre spacing of 24–30 inches. These aren’t aesthetic preferences — they’re the measurements that make the grouping look intentional rather than placed-by-accident. For how the fixtures fit within the broader design language of a farmhouse kitchen, farmhouse kitchen ideas for rustic renovation covers the full picture.
The Edison filament has a specific visual quality that no diffused LED achieves: the glowing wire itself is the point. The warm amber light (often as low as 2200K), the visible coil or zig-zag filament pattern, the absence of any shade or diffuser — these combine to produce a fixture that’s less about output and more about presence. The light it casts is warm and uneven in a way that feels unmistakably alive.
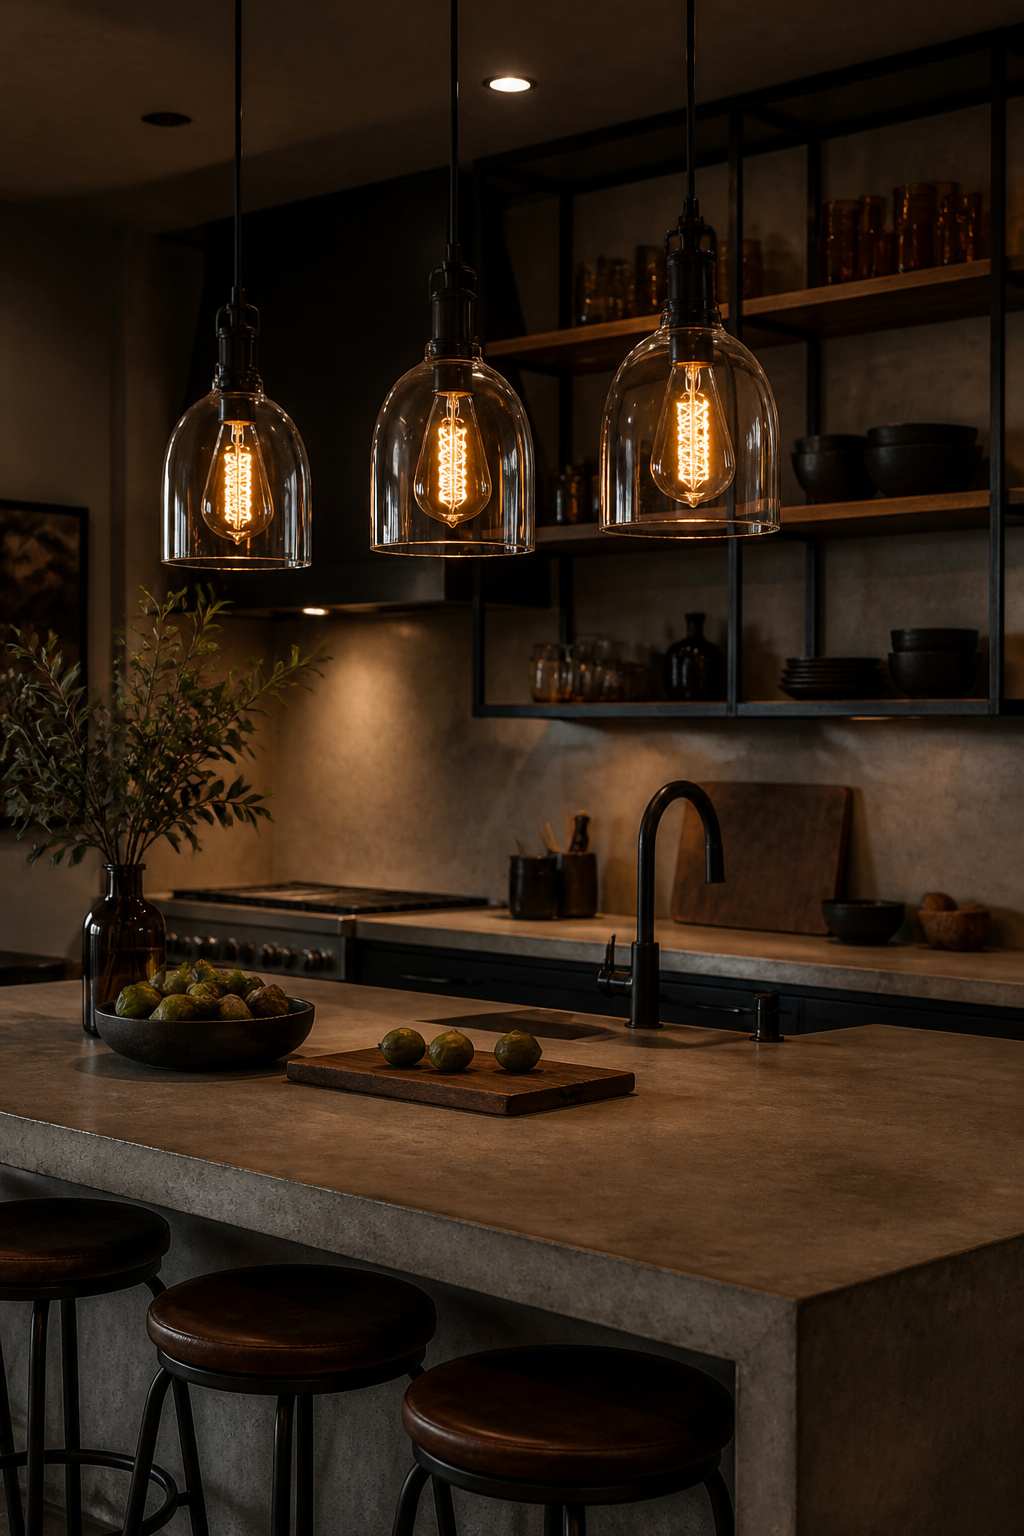
Understanding the difference between incandescent Edison bulbs and LED Edison-style bulbs matters for practical reasons. True incandescent Edison bulbs last about 3,000 hours and consume roughly 40W for approximately 145–220 lumens — low output, high character. LED filament bulbs that replicate the same visual appearance last 15,000+ hours and use 87% less energy at 4–6W. The LED versions have become good enough that in most applications, the practical choice is the LED filament. The 2200K versions achieve the amber quality that incandescent had — the visual difference is minimal in normal use.
On bulb shapes for these kitchen lighting fixtures: the ST64 teardrop is the most versatile — the pear silhouette reads classic in any pendant context. The G95 globe produces a glowing sphere of visible filament, best in a pendant with a large clear bell or globe shade. The tubular T45 has an elegant cylindrical format suited to multi-bulb clusters. The squirrel-cage filament — a zig-zag wire pattern in an elongated bulb — provides the most dramatic visible filament display and works particularly well in an open cage pendant where the entire structure is visible. One practical note: Edison pendants are atmosphere fixtures. At 145–220 lumens per bulb, they belong in a layered lighting scheme that includes adequate task light elsewhere — they can’t do the work of a functional island light by themselves.
Open kitchen shelving is a design choice that requires follow-through. Plates, bowls, and ceramics arranged on an open shelf look reasonable under ambient light. Under interior cabinet spotlights, the same arrangement either becomes a composed display or exposes every inconsistency in the collection. The lighting forces the decision: curate properly or close the cabinet doors.

That quality — that illumination imposes a higher standard — is also what makes lit shelving so effective as a design element. Objects that are deliberately chosen and well-lit create a gallery quality that no ambient ceiling fixture can produce. The technique is the same whether the objects are vintage ceramics, a wine glass collection, or cookbooks: bring the light source close to the objects, aim it toward them specifically, and control the output to feel intimate rather than retail.
Puck lights are concentrated beam sources — good for spotlighting specific objects but they create visible hotspots between placement points. LED tape is the best option for continuous even illumination along a full shelf run; it can be concealed behind a front lip or routed channel so the source is invisible and only the wash of light is visible. Linear LED bars are surface-mount and slightly more visible than recessed tape, but significantly easier to install cleanly. On colour temperature for these kitchen lighting fixtures: 2700K warm white is the right choice for display lighting in most kitchens. The warm frequency flatters earth tones, natural ceramics, amber glass, and wood grain. 4000K above a shelf of cream ceramics makes them appear slightly grey. Use selectable temperature strips if you’re uncertain — the 2026 market has many cost-effective options at mid-price points.
Fixed task lighting covers the predictable prep zone. An articulating arm light covers everything else — the awkward corner where under-cabinet strips don’t reach, the cookbook propped at an angle that needs side lighting, the prep table or island without overhead coverage. The ability to reposition the light source as the task changes is a different kind of usefulness than fixed kitchen lighting fixtures provide.
Most swing arms extend 10–24 inches from their wall mount. That reach covers a significant counter area from a wall-mounted position — more than a fixed under-cabinet strip, and from an angle that can be adjusted as needed. In kitchens with a standalone butcher block table or a peninsula that lacks a ceiling junction box directly above it, an articulating arm on a nearby wall provides targeted task light without any ceiling work. When not in use, most arms fold flat against the wall, disappearing visually rather than remaining a constant presence.
Plug-in is the practical installation choice for most kitchens. The cord routes from the fixture down the wall to a standard outlet — a surface-mount cord cover in a matching metal finish makes this look intentional rather than improvised. Hardwired installation produces the cleanest result but requires a wall junction box and an electrician visit; worth doing in a renovation, not for a standalone upgrade. Many quality models offer dual-mount flexibility — the same fixture installs either way. The double function is worth noting: positioned near a breakfast nook or kitchen table corner, an arm light can angle upward for soft ambient table lighting during meals and swing toward the counter for prep tasks. An on-fixture dimmer, available on most quality models, means independent brightness control without touching the wall switch.
Semi-flush ceiling lights occupy a design space that receives far less attention than it deserves. The 4–8 inch drop from the ceiling is enough to allow a dome, globe, or drum form with real visual presence — more than a flat disc, less than a pendant. For kitchens where ceiling height makes pendant clearance impractical, or where the design language calls for something quieter than a hanging fixture, semi-flush is the considered solution rather than the default choice. As everyday kitchen lighting fixtures go, they do more design work than their reputation suggests.
The drop distance has practical limits. At 4 inches, a semi-flush barely registers as a projection — it reads as a slim shadow line against the ceiling and works in 7.5-foot kitchens without any intrusion. At 6 inches, the most common dimension, there’s enough depth for a small dome or frosted globe shade that projects good ambient light while maintaining 7-foot clearance in an 8-foot kitchen. At 8 inches, the fixture can accommodate a larger dome form that delivers more light output and reads as a more considered design element. Always verify the total fixture height (including the canopy) against the manufacturer’s specifications — product photography rarely conveys scale reliably.
The current semi-flush market is significantly broader than it was a decade ago. Scandinavian profiles — clean geometric silhouettes, frosted acrylic diffusers, brass or matte white finishes — are widely available through Chandelierias, LightFixturesUSA, and Wayfair. Industrial semi-flush options (exposed cage over a filament bulb, matte black metalwork) bring the industrial character of a cage pendant into a flush-compatible format. Traditional drum shades in fabric or linen remain the most style-neutral option — compatible with almost any kitchen aesthetic and the easiest to integrate in a kitchen with mixed or transitional design vocabulary. Smart-compatible semi-flush fixtures with integrated LED, selectable colour temperature, and Zigbee or Caséta dimmer compatibility are now standard at mid-price points. The days of choosing between smart function and design character are effectively over.
The sequence matters more than any individual fixture choice. Task coverage comes first — under-cabinet strips and island pendants address the functional failures before anything atmospheric is added. Ambient layering is second: replace or improve the main ceiling fixture with something on a dimmer. Accent lighting is third — cabinet interiors, toe-kick LEDs, backsplash wash — the finishing layer that makes a kitchen feel considered after dark.
If you can only change one thing, start with under-cabinet LED strips. The return among all kitchen lighting fixtures — functional, visual, and atmospheric — is higher than any other single change you can make. The cost is $50–$200 for a typical kitchen, the installation is manageable without an electrician using plug-in strips, and the result is visible every single morning when you stand at the counter. Most people who make this change wonder immediately why it took them this long.
The second change with the highest impact-per-dollar is island pendants: visible from the entire kitchen and adjacent living areas, and the fixtures that most clearly communicate whether a kitchen was designed or assembled by default. The long-term investment — the one that transforms the ambient quality of the space for fifteen years without maintenance — is a dimmable recessed LED grid. It requires electrical work, but when combined with a quality dimmer and the right colour temperature, it makes every other kitchen lighting fixture decision look better.
Start where the kitchen is most broken. The rest follows naturally.