Physical Address
304 North Cardinal St.
Dorchester Center, MA 02124
Physical Address
304 North Cardinal St.
Dorchester Center, MA 02124
From Shaker to two-tone and natural wood, these kitchen island cabinet ideas cover every style — with the specific details that actually matter.
The kitchen island is the room’s centre of gravity. Everything else — the perimeter cabinets, the countertops, the lighting — organises itself around it. Of all the decisions you’ll make in a kitchen, the kitchen island cabinets carry the most weight: they define how the island reads visually, how it functions daily, and whether the room holds together as a whole. I’ve spent over a decade working with Nordic design principles, where functional cabinetry is treated as craft rather than afterthought, and the lesson that comes up again and again is that the island deserves the same quality of thinking as any fine piece of furniture.
These 17 ideas span the full range, from timeless Shaker construction to bold two-tone contrasts, open-leg floating designs to mixed-material combinations you wouldn’t expect to work but do. For each one, I’ve included the specific details that actually matter: joinery, slide ratings, wood species, paint specifications. Because the difference between an island that looks good in photographs and one that still feels right a decade later is almost always in those specifics.
The five-piece Shaker door — two vertical stiles, two horizontal rails, one flat recessed panel — endures because it knows what to leave out. It has just enough structure to register as considered, and just enough restraint to work beside almost any kitchen aesthetic: Scandinavian, farmhouse, transitional, contemporary. The profile doesn’t compete with the countertop, the backsplash, or the hardware. It holds the room together without announcing itself.
What separates quality Shaker kitchen island cabinets from flat-pack imitations is in the proportions and joinery. On a well-made door, stiles and rails measure 2.5 to 3 inches for standard widths, enough visual mass to read as furniture. The joinery matters: mortise-and-tenon is the traditional gold standard; modern cope-and-stick production joints hold well when the tolerances are tight. Avoid mitered corner Shaker doors if you’re painting. The 45-degree joint contracts and expands differently to the surrounding frame with every humidity change, and within a few years you’ll see hairline witness lines in the paint at every corner.
For painted island cabinets, the professional specification is a hybrid construction: solid hardwood frames for rigidity and hinge strength, with an MDF or HDF centre panel. MDF paints without grain telegraphing, which matters on the smooth expanse of a Shaker door. Follow with a bonding primer and two coats of waterborne alkyd enamel — Benjamin Moore Advance or Sherwin-Williams Emerald Urethane Trim Enamel in satin — both of which cure harder than standard wall paint and take daily kitchen contact without chalking or chipping. Full cure is 30 days. If you’re still deliberating over colour, gather physical paint samples and observe them in morning and evening light before committing.
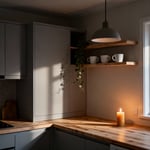
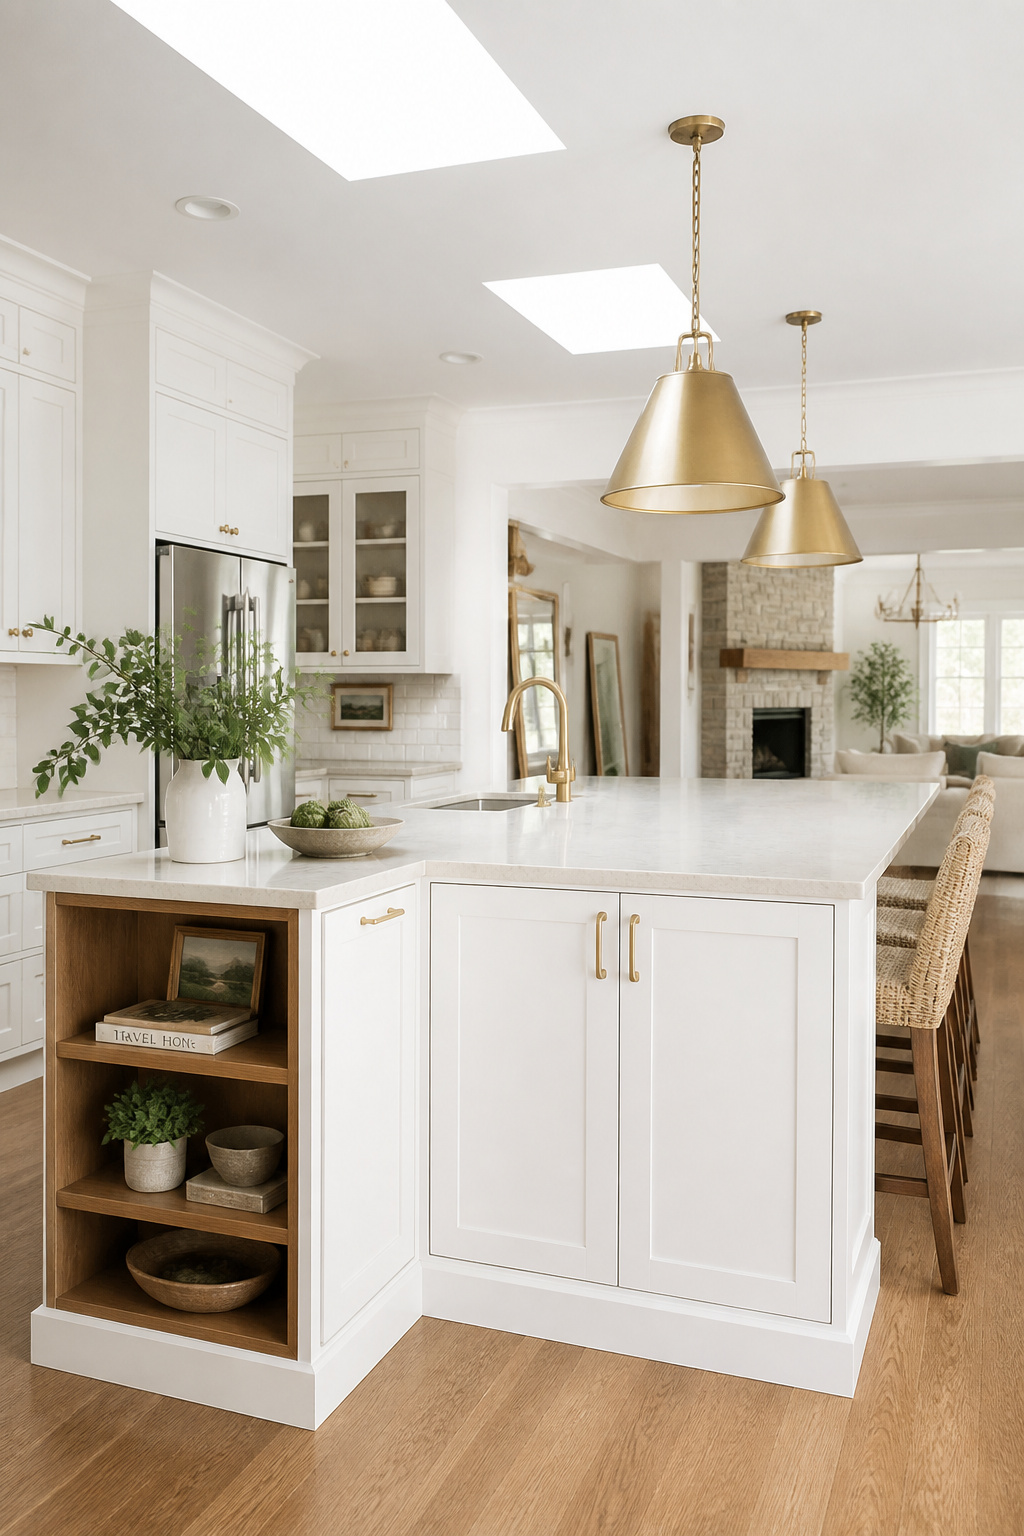
The most common mistake with open island shelving is treating it as additional storage. It isn’t. Open shelving is theatre, and everything on it is in the performance. The moment you start using those shelves for overflow pantry items or mismatched containers, the whole illusion collapses.
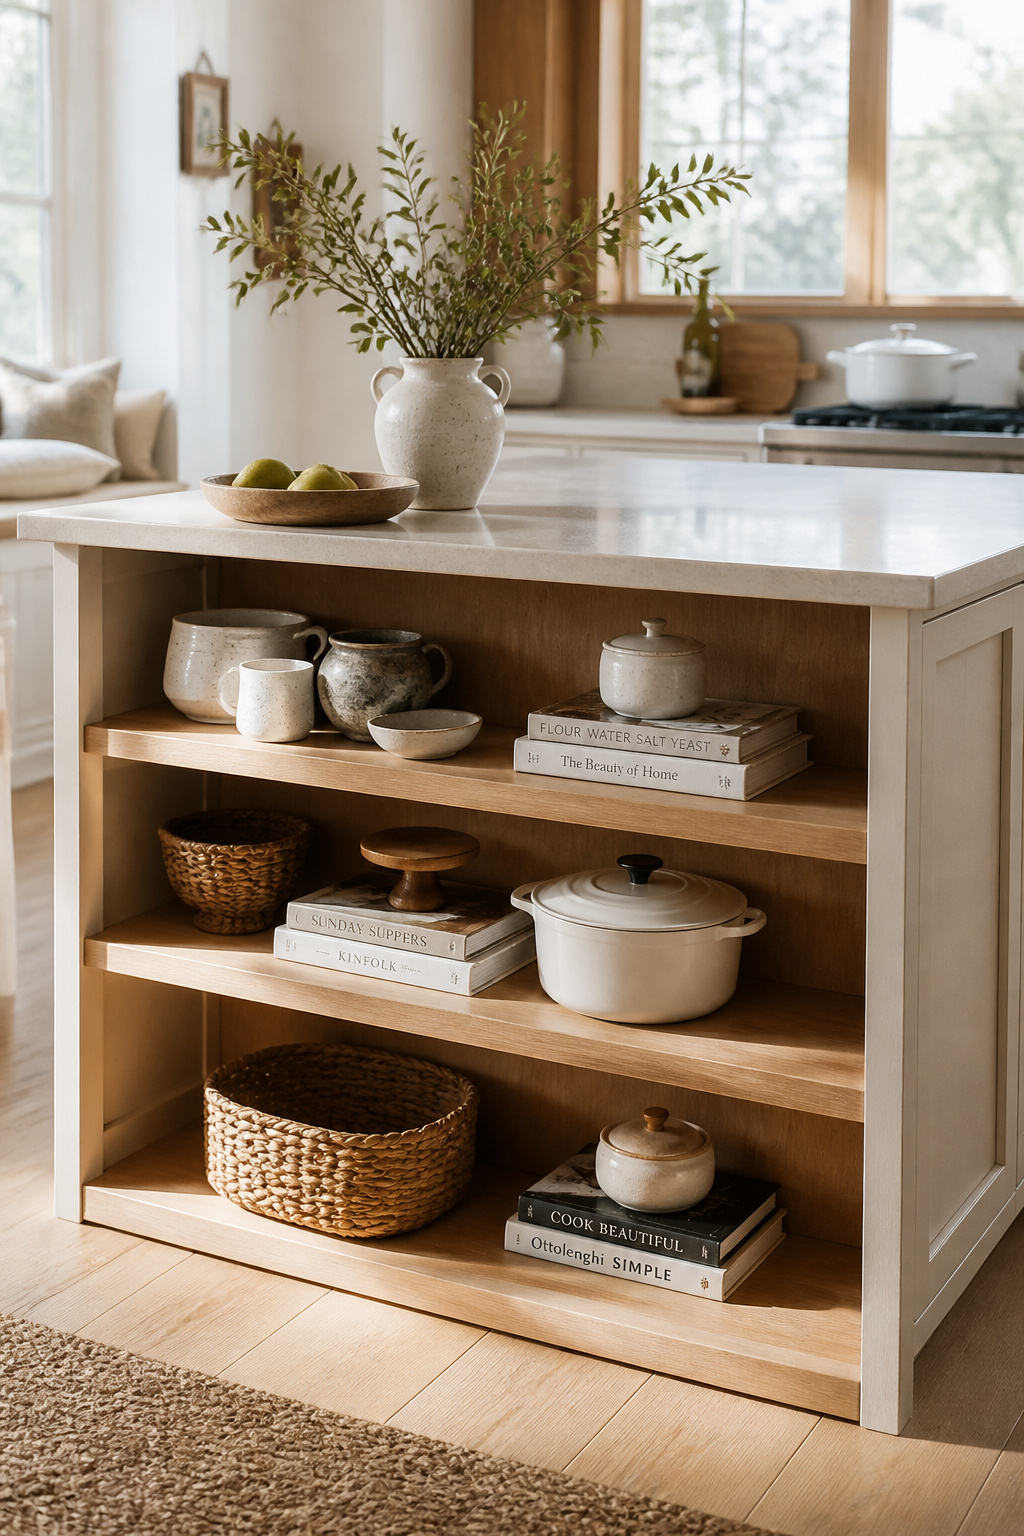
The setup that works consistently: closed cabinet doors and deep drawers on the kitchen-facing side where cooking happens, and open shelves on the seating or living-room-facing side where the island is on display. The closed side handles utility; the open side handles beauty. It’s a clear division of labour, and it keeps the open shelving from becoming a burden. Island open shelves typically run 10 to 12 inches deep — shallower than standard wall cabinets, because the island is approached from all sides and deep shelves on the perimeter accumulate visual clutter quickly.
What actually looks good on open island shelves: cookbooks with consistent spine colours, artisan ceramics you use regularly, woven baskets or wooden trays for loose items, and one or two statement pieces that hold the eye. Leave 12 to 18 inches between shelves so items breathe. The test for everything is simple: would it look at home in a design photograph? If not, it lives behind a door. Rotate seasonally — bring out what you’re using and store the rest. There are also kitchen island storage solutions worth exploring if you want to think through how open and closed sections work together across the full island plan.
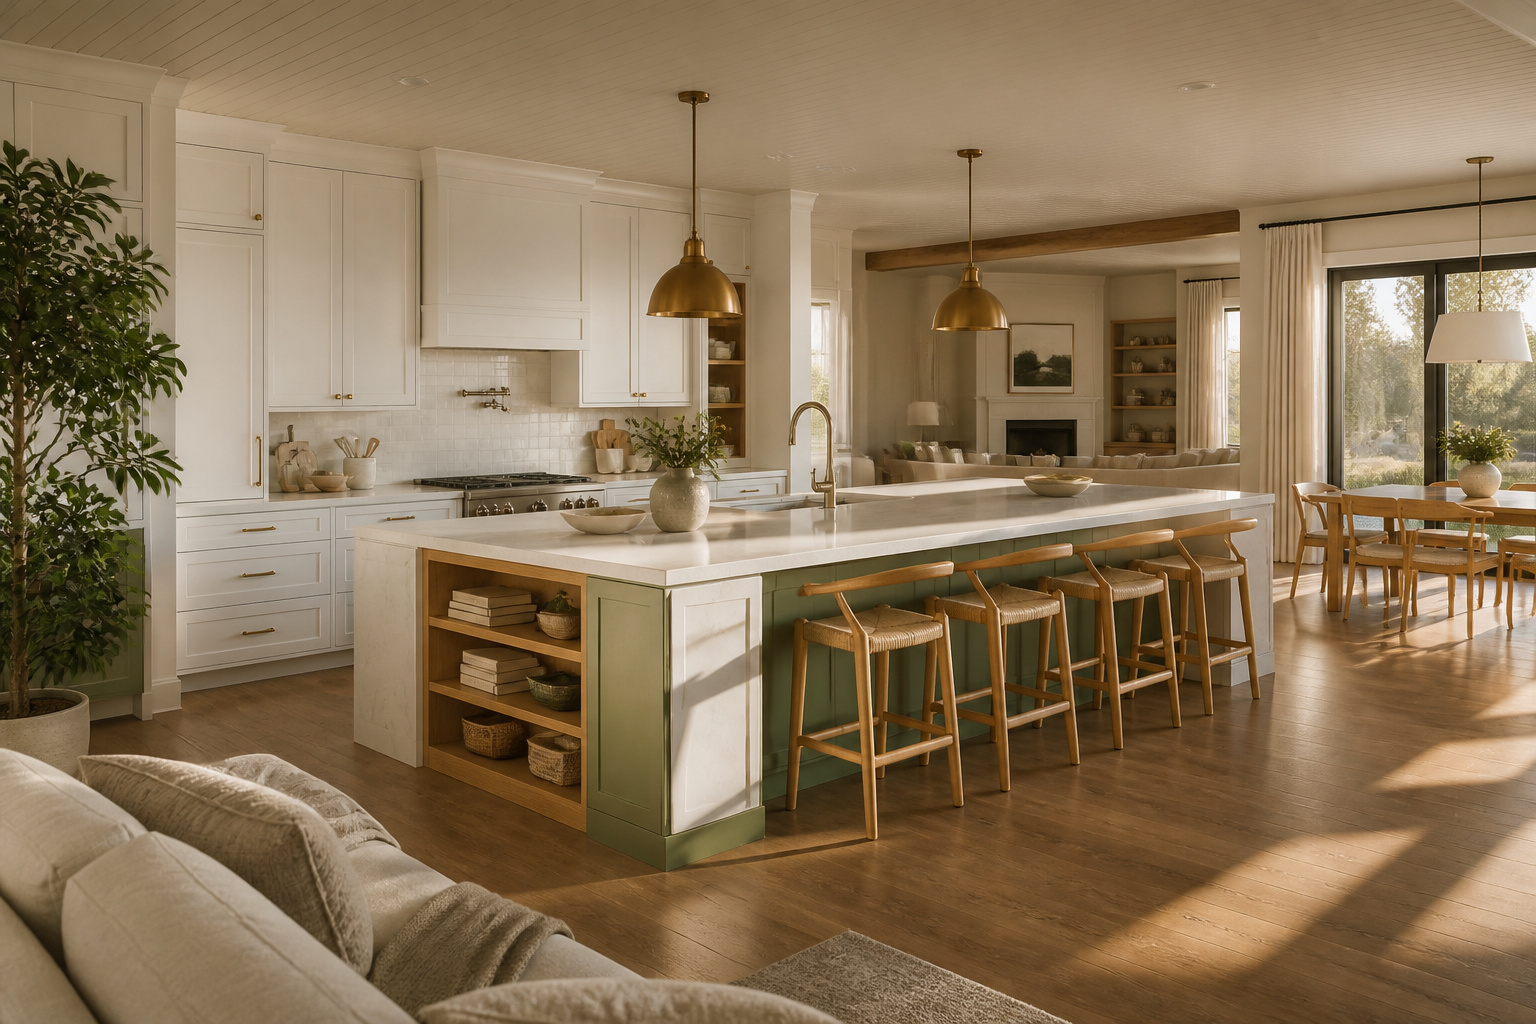
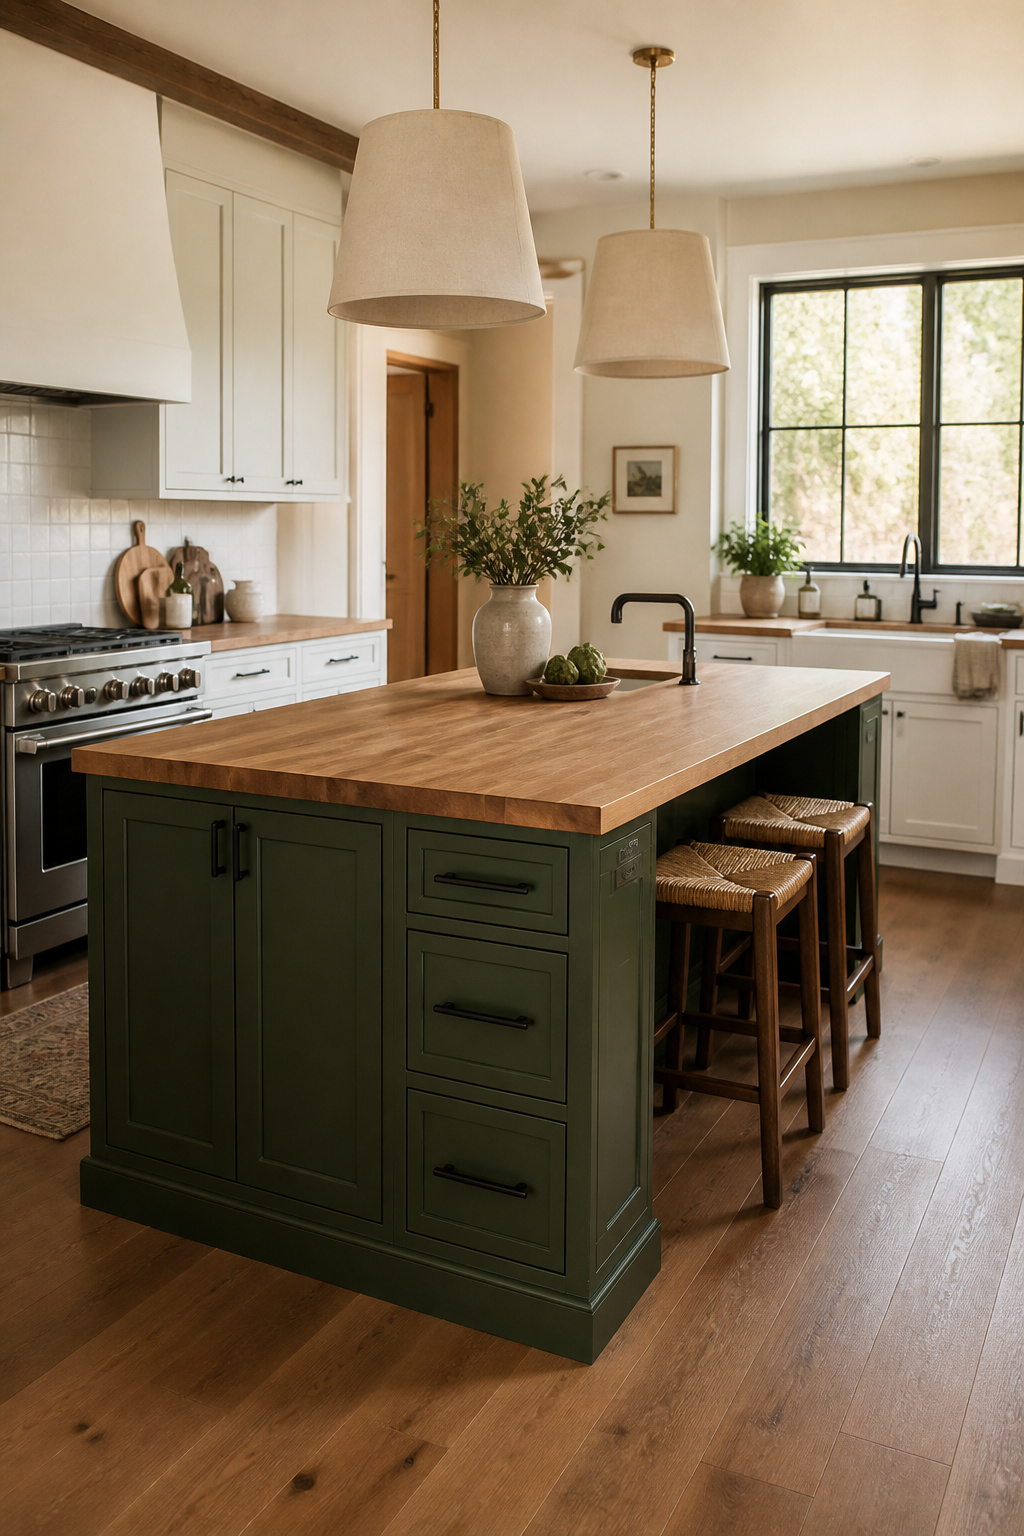
In an open-plan home, the kitchen island is visible from the dining table, the living area, sometimes from the hallway. A contrasting island colour makes the most of that visibility. It reads as furniture placed in the room rather than cabinetry built into a box. That shift in perception, from “kitchen installation” to “designed piece”, is what two-tone kitchen island cabinets achieve better than almost any other single decision.
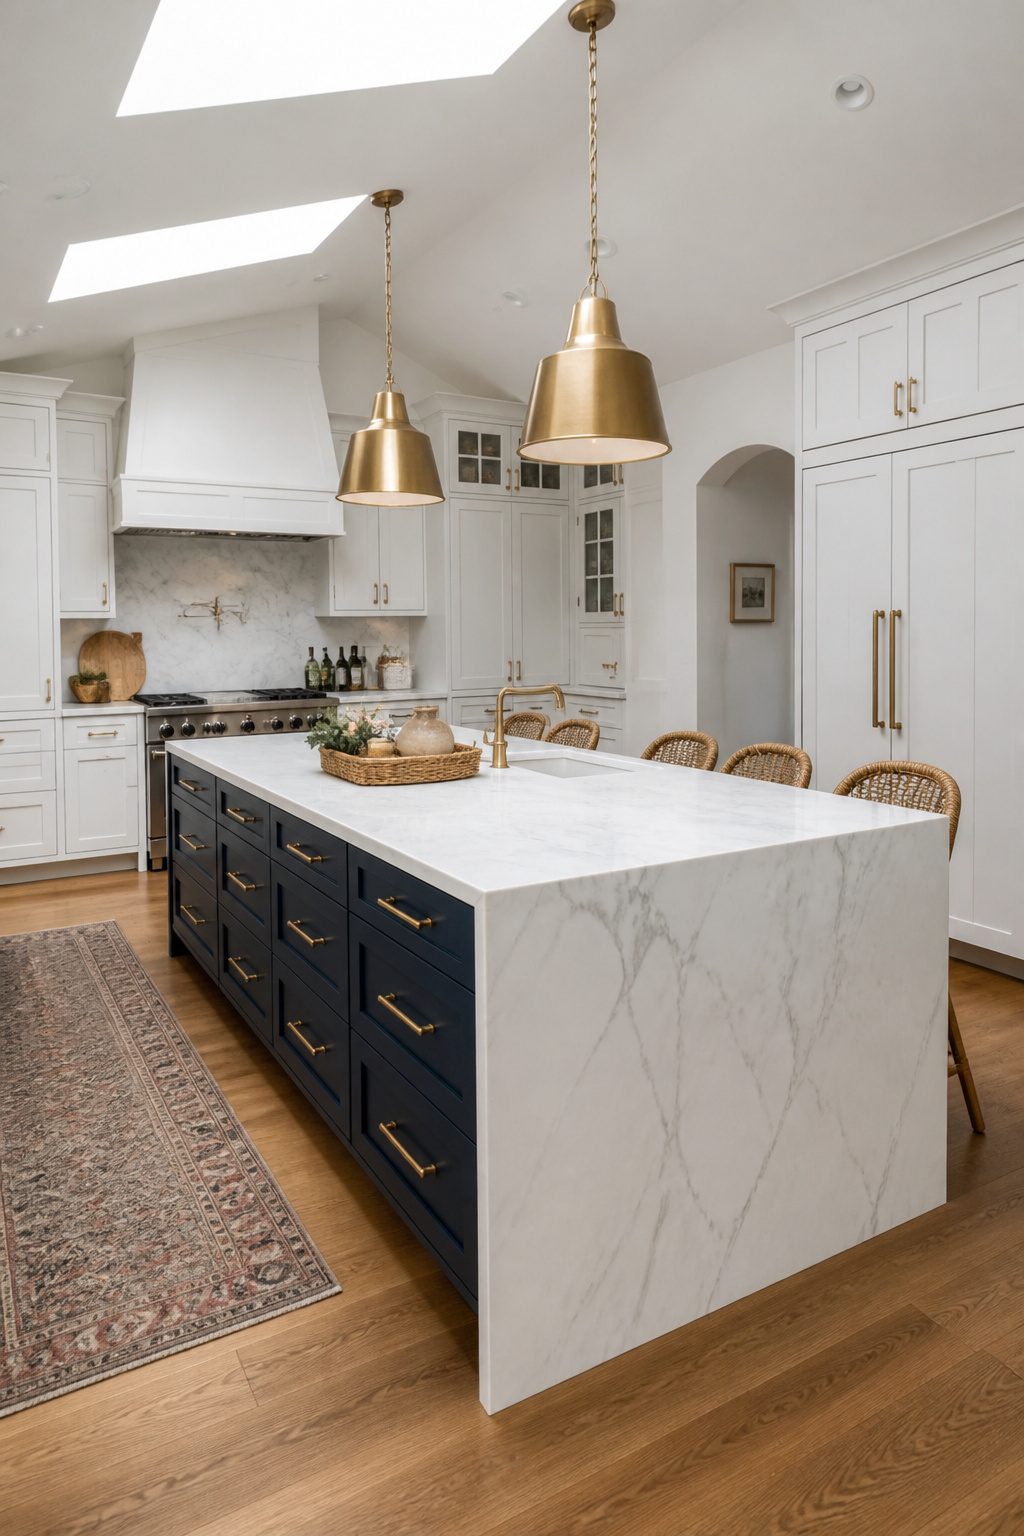
The approach with the lowest risk and highest return: keep the perimeter cabinetry in a neutral (white, cream, warm grey) and take the island dark or saturated. Navy island with white perimeter and brass hardware is the combination that has outlasted every trend it entered with. Forest green with cream and gold hardware is warmer, more current, and particularly effective alongside wood floors and natural stone countertops. Charcoal against white is the most contemporary reading, with less warmth but more architectural resolve.
The colour rule that matters most: both tones must share the same undertone family. Both warm, or both cool — never one of each. A warm forest green paired with a cool bright white will always look like an unfinished decision. If you’re working through the full range of possibilities, this collection of Scandinavian kitchen cabinet colour ideas can help you identify combinations that read as considered rather than contrived.
Hardware is the visual thread between two tones. Use one metal finish across both surfaces, not a separate finish for each. The hardware should connect the island to the perimeter, not mark the boundary between them.
Consider how many times you’ve crouched in front of a base cabinet, shifted a stockpot to reach the sauté pan underneath it, then shifted everything again to find the lid rack at the back. Deep drawers eliminate all of that. Everything is visible on a single horizontal plane. You pull the drawer out, you see exactly what’s there, and you take what you need.
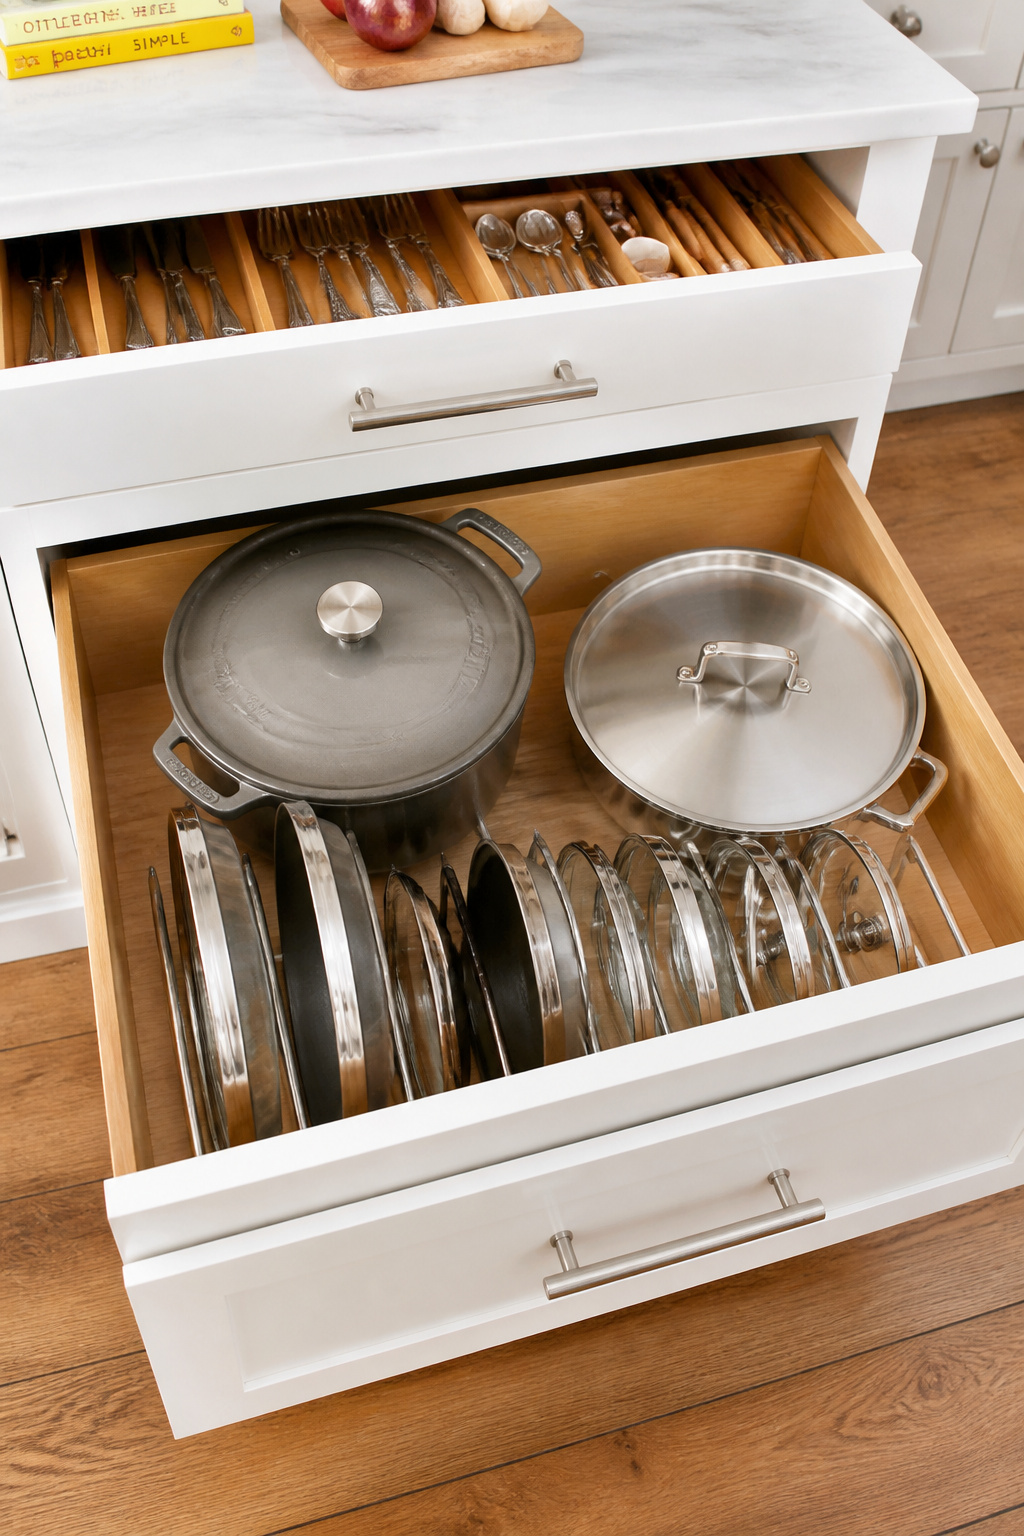
The standard pot-and-pan drawer stack in a kitchen island: two 10-inch-high drawers at the bottom for Dutch ovens, large skillets, and lids, plus a 4-inch shallow drawer at the top for utensils. Island cabinets often allow more depth than standard base cabinets. Where a perimeter cabinet limits drawer depth to 21 to 22 inches, a deeper island can accommodate 22 to 24 inches, which meaningfully accommodates larger pieces like roasting pans and woks. If you’re planning a new island build, specify the extra depth rather than accepting the standard.
The slide hardware is where the investment pays off for years. Blum Tandem Plus undermount slides — full-extension, soft-close, rated to 130 lbs per pair — are the professional specification. For cast iron, their heavy-duty Blumotion version handles the weight without the gradual loosening you see from lower-rated side-mount alternatives. Full-extension slides are non-negotiable: three-quarter extension means the back of the drawer is always a stretch-and-guess. For a broader look at how this fits into a full island storage plan, map out the full drawer configuration before ordering cabinetry — the layout decisions upstream determine what’s possible in the drawers.
Glass-front doors on a kitchen island do something that solid doors cannot: they let the eye move through the surface rather than stopping at it. In a kitchen with a lot of closed cabinetry, a single bank of glass-front island doors opens the room up without removing any storage capacity.
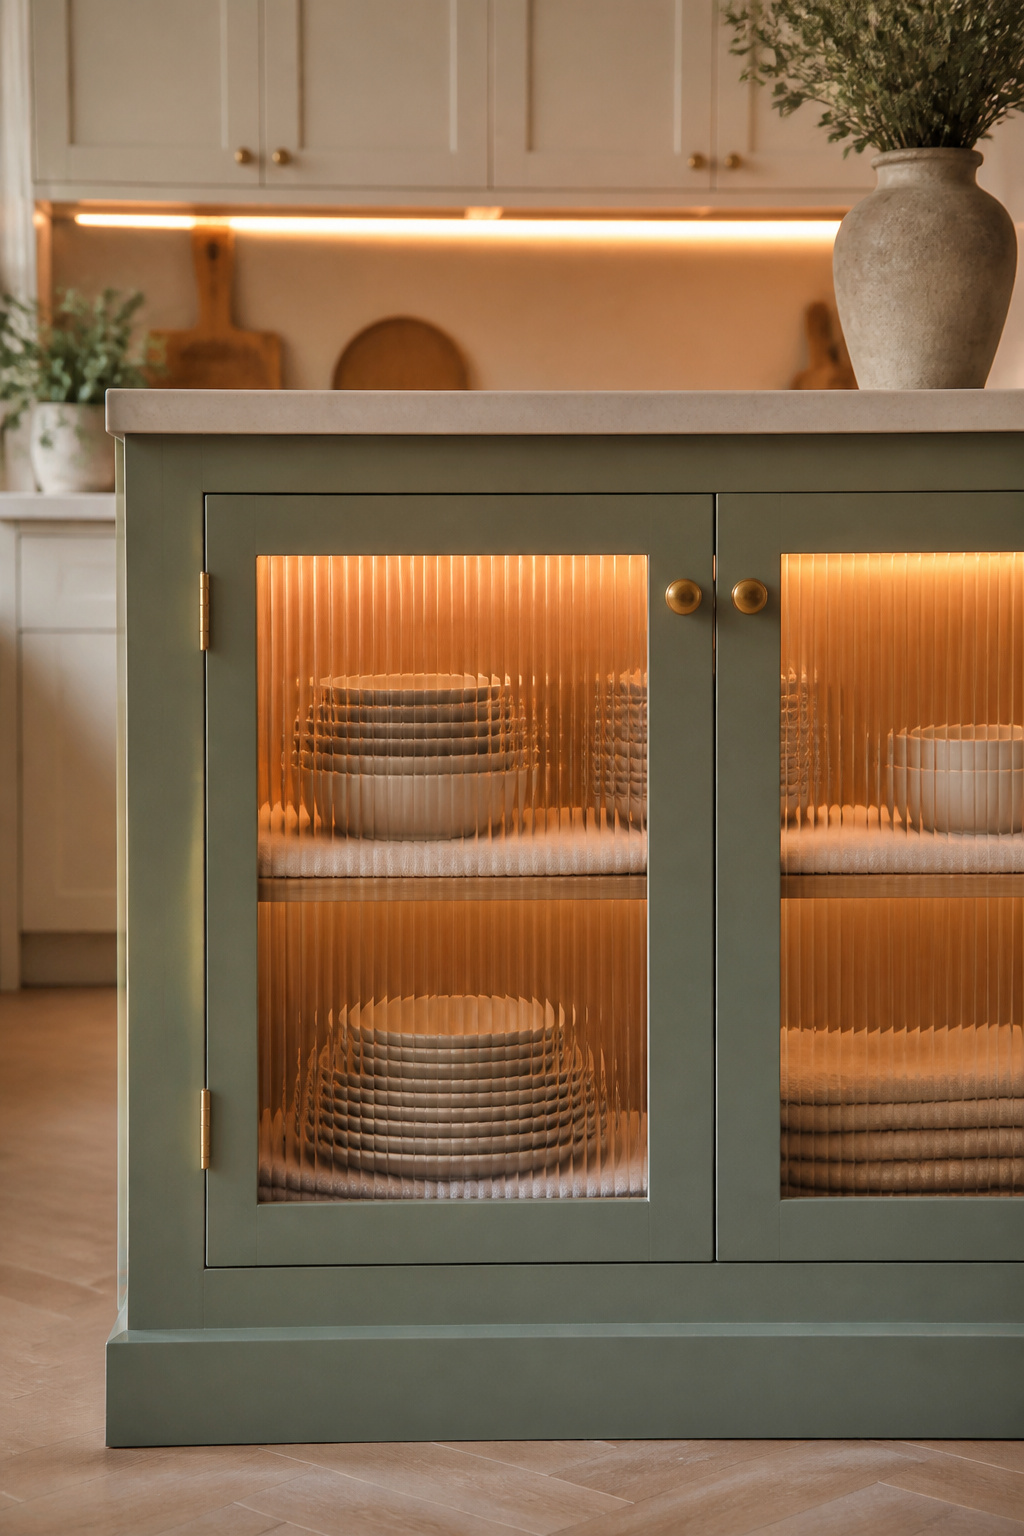
The glass type is the key decision, and it’s more consequential than most people realise. Clear glass shows everything: use it only when the contents are impeccably organised and consistently beautiful. Mismatched containers behind clear glass look worse than no glass at all. Reeded glass uses a roller-pressed pattern of vertical lines that obscures interior detail while allowing light to pass through, and it works in both contemporary and traditional kitchens. Seeded glass has a handblown, bubbled surface (typically $82 to $110 per panel) that suits farmhouse, Craftsman, and Nordic-influenced kitchens particularly well. Frosted glass gives the most concealment: a sandblasted matte surface that reveals colour and light from inside the cabinet but no detail whatsoever.
The interior finish matters as much as the glass itself. The back panel of a glass-front cabinet is the backdrop to every item inside it. A contrasting dark colour (navy, deep green) creates depth and makes the contents read as curated rather than stored. Warm LED strip lights or puck lights inside the cabinet (2700K to 3000K) bring the shelves to life at night and add genuine ambiance to the room. One designer approach worth noting: layer glass textures across adjacent cabinets — clear for everyday dishware display, reeded or seeded for pantry sections where you want the light without the contents fully revealed.
A single island painted in a strong colour against a neutral perimeter is one of the most cost-effective transformations in kitchen design. It costs far less than new cabinetry and less than a countertop replacement, and it can be repainted in the future if your taste changes. That reversibility makes it a useful design move: the commitment level is low even when the visual impact is high.
The colours with the longest track records on kitchen islands are navy blue (Sherwin-Williams Naval SW 6244, Benjamin Moore Hale Navy HC-154), forest green and hunter green (SW Jasper 6148, BM Tarrytown Green HC-112), and charcoal (SW Peppercorn 7674). These hold in both natural and artificial light without reading as trendy or time-stamped. Deep blues and greens are particularly effective in kitchens lit primarily by warm LED sources because they don’t shift towards grey or orange the way lighter colours can.
Before you commit, test a sample on the actual island surface — not just a swatch card — and observe it across morning and evening light. Darker colours change significantly between the two. The paint specification matters: kitchen island cabinetry needs a waterborne alkyd enamel, not standard wall paint. Benjamin Moore Advance or Sherwin-Williams Emerald Urethane Trim Enamel both cure to a hardness that withstands daily grease, moisture, and contact. The prep sequence: degrease thoroughly with TSP substitute, sand to scuff the surface, apply bonding primer, then two coats of satin enamel. Skip any step and you’ll see adhesion failures within 12 to 18 months.
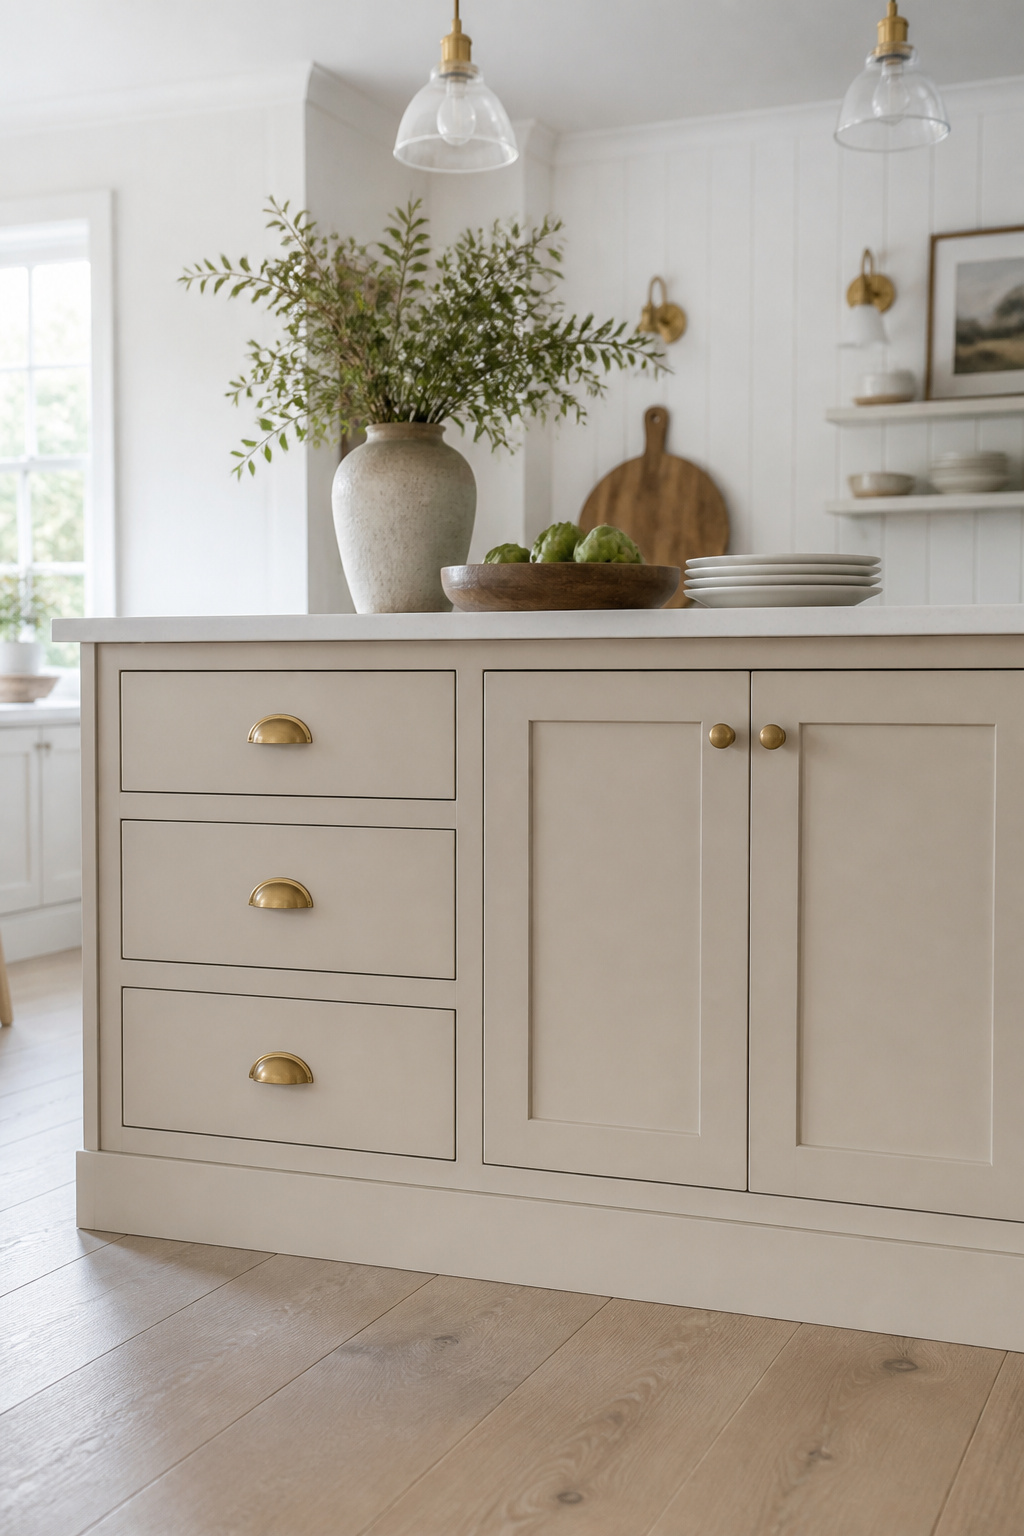
The visible difference between inset and overlay cabinet doors is immediate and unmistakable, but harder to articulate than you’d expect. Overlay doors sit on top of the face frame and conceal it. Inset doors sit flush within the frame opening: you see the face frame as a visible grid of horizontal and vertical elements, with the doors recessed into them like picture frames. The shadow lines that result — typically 1/16 to 3/32 of an inch — are what give inset cabinetry its quality signature.
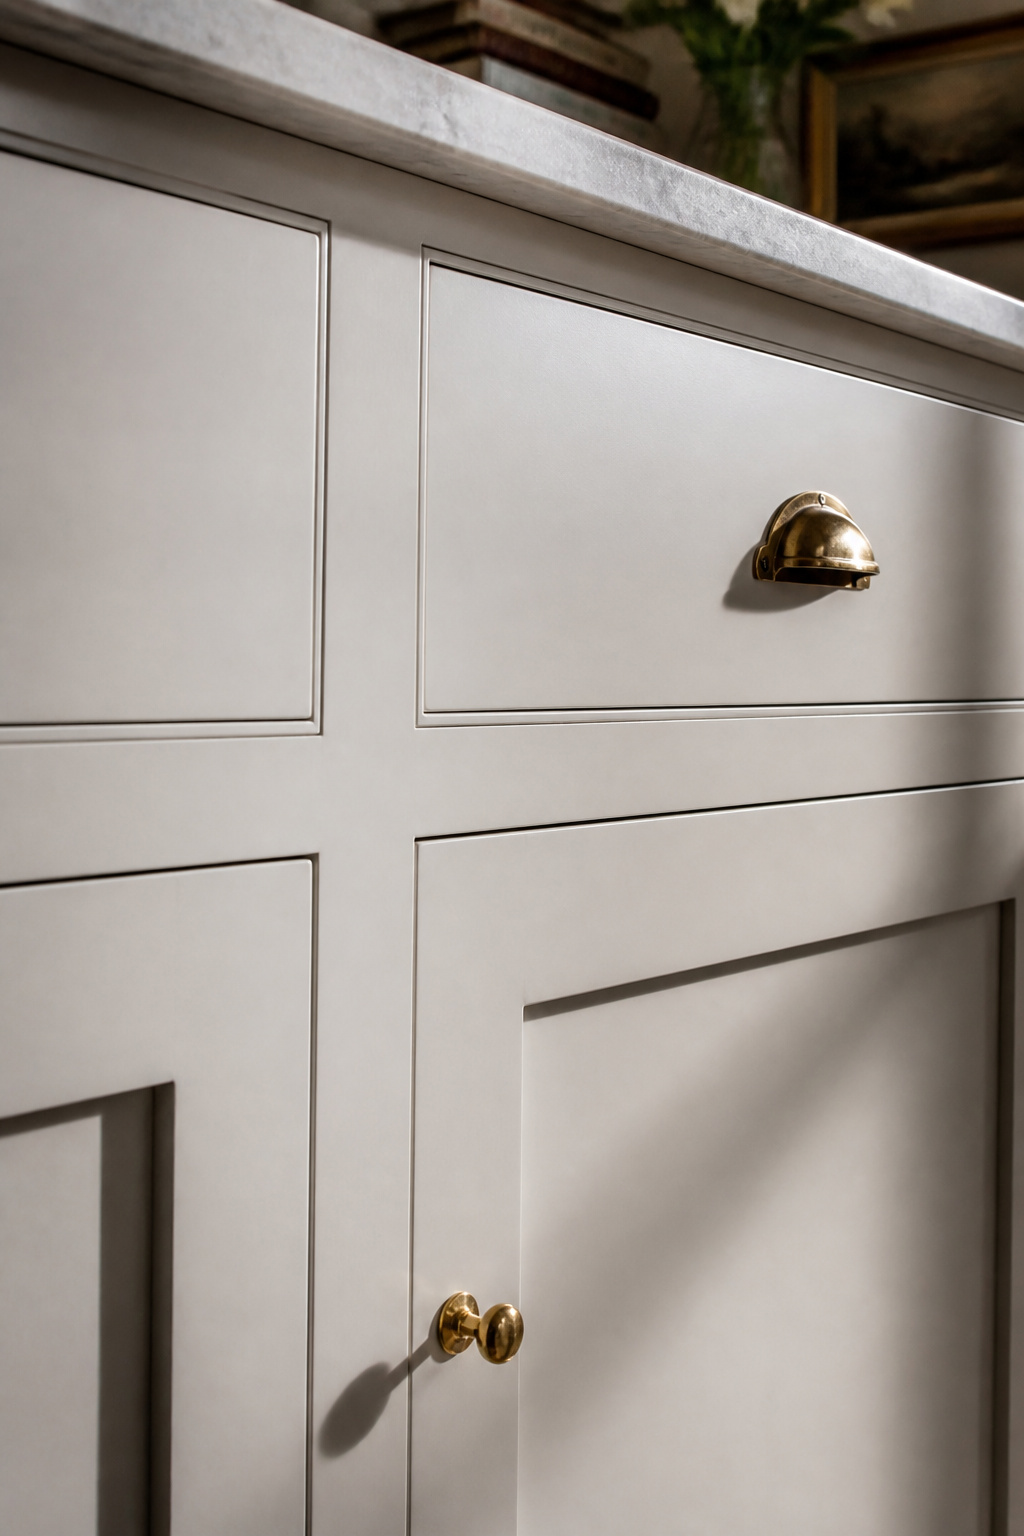
Why does inset cost more — typically 15 to 35% over comparable overlay? The tolerances. Inset doors must be sized to within 1/16 of an inch of the frame opening, and every variation in that reveal is immediately visible. This demands more accurate machinery, more skilled fitting, and more time. The cabinet carcass must be square and stable: any flex or seasonal movement registers directly as uneven reveals or stuck doors. For this reason, engineered-wood cores are preferred over solid wood in humid climates where seasonal wood movement is meaningful.
Inset cabinetry traces back to traditional American furniture-making, which is why it reads as inherently formal and high-quality. It’s better suited to transitional, Shaker, and heritage-influenced kitchens than to sleek contemporary spaces, where full-overlay frameless construction is the more coherent choice. Hardware pairing matters here: cup pulls on drawer fronts, knobs or substantial bail pulls on doors. Thin modern bar pulls look anachronistic against a face frame grid. Use Grass, Blum, or Hafele inset hinges specifically designed for the application — they provide the three-dimensional adjustment you’ll need to calibrate the reveal on every single door.
The appeal of an appliance garage in the island base is straightforward: the stand mixer, the food processor, the coffee machine — all plugged in, all ready to use, none of them taking up counter space. The planning details are where most appliance garages either succeed or fail.
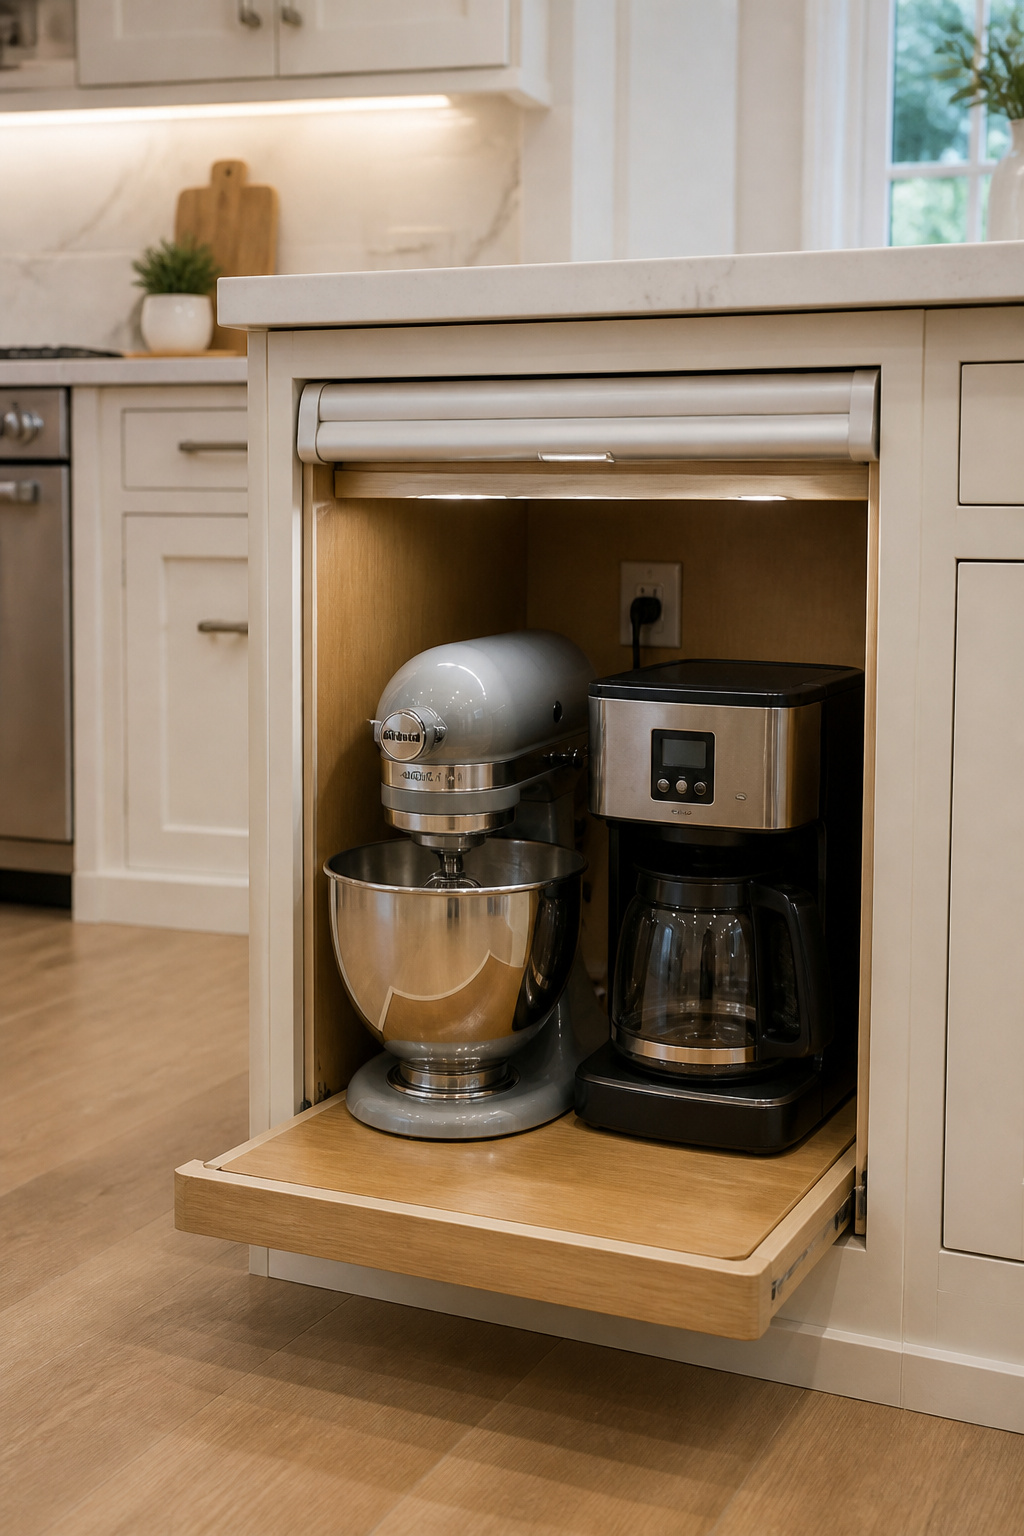
The first decision is which appliances actually belong inside. Counterintuitively, the heavier and more frequently used the appliance, the better the case for housing it in the garage: you don’t want to be lifting a 20-pound stand mixer in and out of a cupboard daily. But heat-producing appliances — toaster ovens, air fryers, anything with a heating element — need careful treatment. An enclosed cabinet space without ventilation allows heat to accumulate, damages the cabinet finish over time, and creates a fire risk. If you’re including anything that heats or steams during operation, plan the garage with rear louvres and ventilation clearance, or design a pull-out tray that slides the appliance forward to the counter surface before it’s switched on.
The electrical spec: at minimum, one dedicated double outlet inside the cabinet, properly installed by a licensed electrician. Two or three outlets are worth specifying if you’re housing multiple appliances. For the door mechanism, the options are tambour (rolling door, suits corners and tight spaces), pocket (swings and slides back into the cabinet sides — clean and sophisticated for wide openings), and lift-up bi-fold (modern face, full access, needs quality soft-close hardware from Blum or Grass to prevent the door dropping). Each solves a different spatial problem. The pocket door generally offers the best user experience when the opening is wide enough to accommodate the side recesses.
Hardware is the element most often chosen last and thought about least, which is precisely why it so often lets a kitchen down. The pull length on an island drawer front, the finish of a knob, the projection of a handle: these details register subconsciously every time someone uses the kitchen. Getting them right doesn’t announce itself. Getting them wrong quietly undermines everything around them.
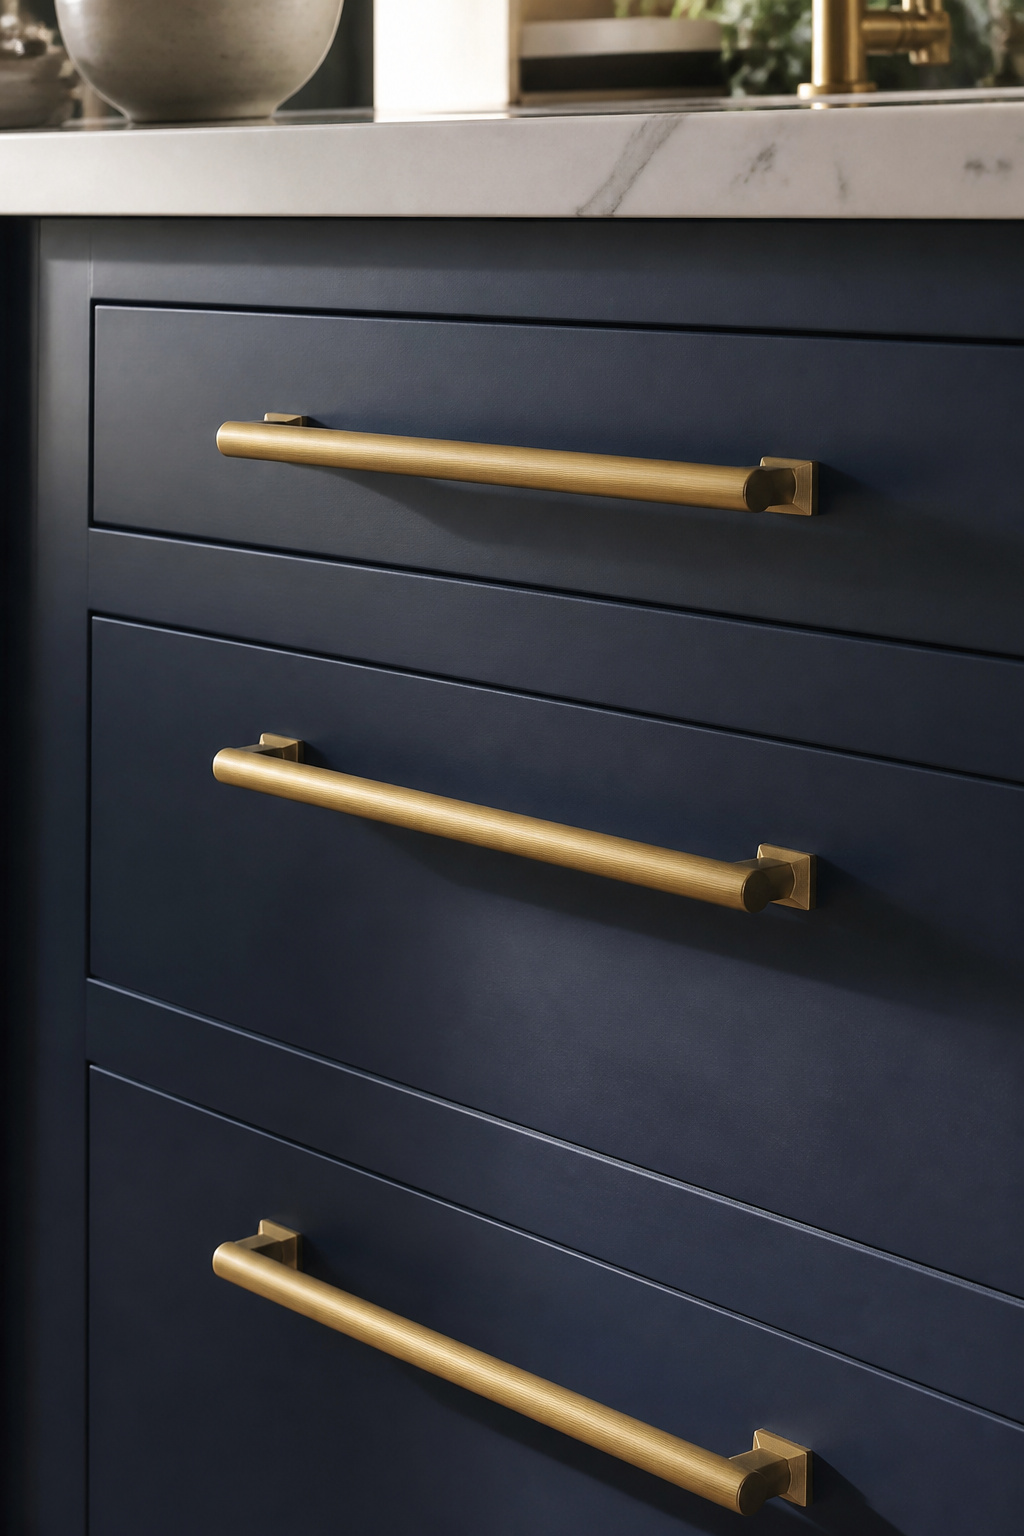
The sizing principle: pull length should be approximately one-third of the drawer front’s total width. For a standard 12-inch drawer, a 4-inch pull; for oversized 30 to 36-inch island drawers that deep-storage configurations often use, either one 10 to 12-inch pull (the contemporary professional recommendation, as it allows a one-handed pull on a heavy drawer) or two smaller pulls at the outer thirds. On vertical doors, place knobs or pulls 2 to 3 inches from the corner opposite the hinges.
Mixing metals is a more forgiving choice than the internet suggests, as long as you follow one rule: match the undertone, not the finish. All your metals should be either warm (gold, brass, bronze) or cool (chrome, brushed nickel). A brushed gold faucet and polished brass handles aren’t the same just because they’re both gold — their undertones differ and they’ll clash. The materials that age most gracefully in a working kitchen: unlacquered brass develops a patina that many consider an improvement on the original; matte black powder-coat on steel or solid brass hides fingerprints and pairs with almost any cabinet colour; brushed nickel is the most versatile neutral and changes least over time.
Beadboard works on a kitchen island because its vertical grooves add texture without overwhelming the room. The lines are regular and restrained: they read as handcrafted without demanding attention. On an island seen from all four sides, that quality matters even more than on a wall panel viewed only straight-on.
The application choice shapes the outcome significantly. Full beadboard door fronts — where the entire face of the island cabinet door is panelled — commits the island fully to the cottage or farmhouse aesthetic. This works beautifully alongside apron-front sinks, butcher block countertops, and antique brass hardware, but it closes off the more contemporary or transitional readings of the space. The more versatile approach is using beadboard as a recessed panel detail within a Shaker door: the five-piece Shaker structure remains, but the flat centre panel is replaced with a beadboard insert. The result has texture without the full cottage commitment, and it pairs naturally with painted island cabinets in sage green, soft navy, or warm white. MDF beadboard panels are the most practical substrate for painted applications — dimensionally stable, smooth-priming, and resistant to the humidity swelling that solid wood beadboard can develop in kitchen environments.
Satin or semi-gloss paint is the right finish choice: the grooves collect mild grease splatter in a working kitchen, and a flat finish makes these harder to wipe clean. Brushed gold or antique brass hardware pairs consistently well with painted beadboard island cabinetry — it adds warmth without competing with the texture. If you’re considering a wider kitchen refresh alongside the island, there are some useful Nordic kitchen makeover ideas that address how texture and colour decisions like this one connect to the rest of the room.
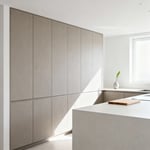
A waterfall countertop — where the stone material continues down the vertical face of the island to the floor — transforms the island from cabinetry into architecture. The effect is clean and striking, and it brings a different quality of permanence to the room than even the most refined traditional island. The cabinet design underneath needs to support that effect, not compete with it.

Which means the island cabinet doors become secondary. With a dramatically veined marble or bookmatched Calacatta, the correct response in the cabinetry is near-invisibility: flat-panel full-overlay doors in a matte or satin finish, frameless construction so there’s no visible face frame breaking the transition from stone to cabinet face, and ideally no hardware — a channel pull integrated into the top edge of each door, or push-to-open mechanisms. The stone is the design; the cabinet is the structure that holds it.
Quartz waterfall edges (Caesarstone, Cambria, Silestone) run $50 to $120 per square foot installed; marble runs $75 to $200. The waterfall premium is typically 35 to 60% over standard countertop pricing. The mitering technique determines the visual quality: a clean 45-degree miter cut meets at a corner with no visible end-grain and no gap. For a bookmatched waterfall, two consecutive slabs from the same block are opened like a book so the grain pattern mirrors across the junction — the most visually dramatic result, but requiring matched slab pairs and careful planning before any cuts are committed. Never skip a visit to the stone yard to approve the slab layout and vein alignment in person. For further inspiration on how countertop material choices play out, the range of kitchen countertop decor ideas is worth a look.
There’s a quality that kitchen islands with exposed legs have and closed-base islands don’t: lightness. The eye reads the open space underneath and understands that the island is a piece of furniture placed in the room, not a structural element anchored to it. In Scandinavian design, this distinction matters — there’s a long tradition of furniture whose visible structure communicates honesty about what it is. A floating-leg island carries that same sensibility.
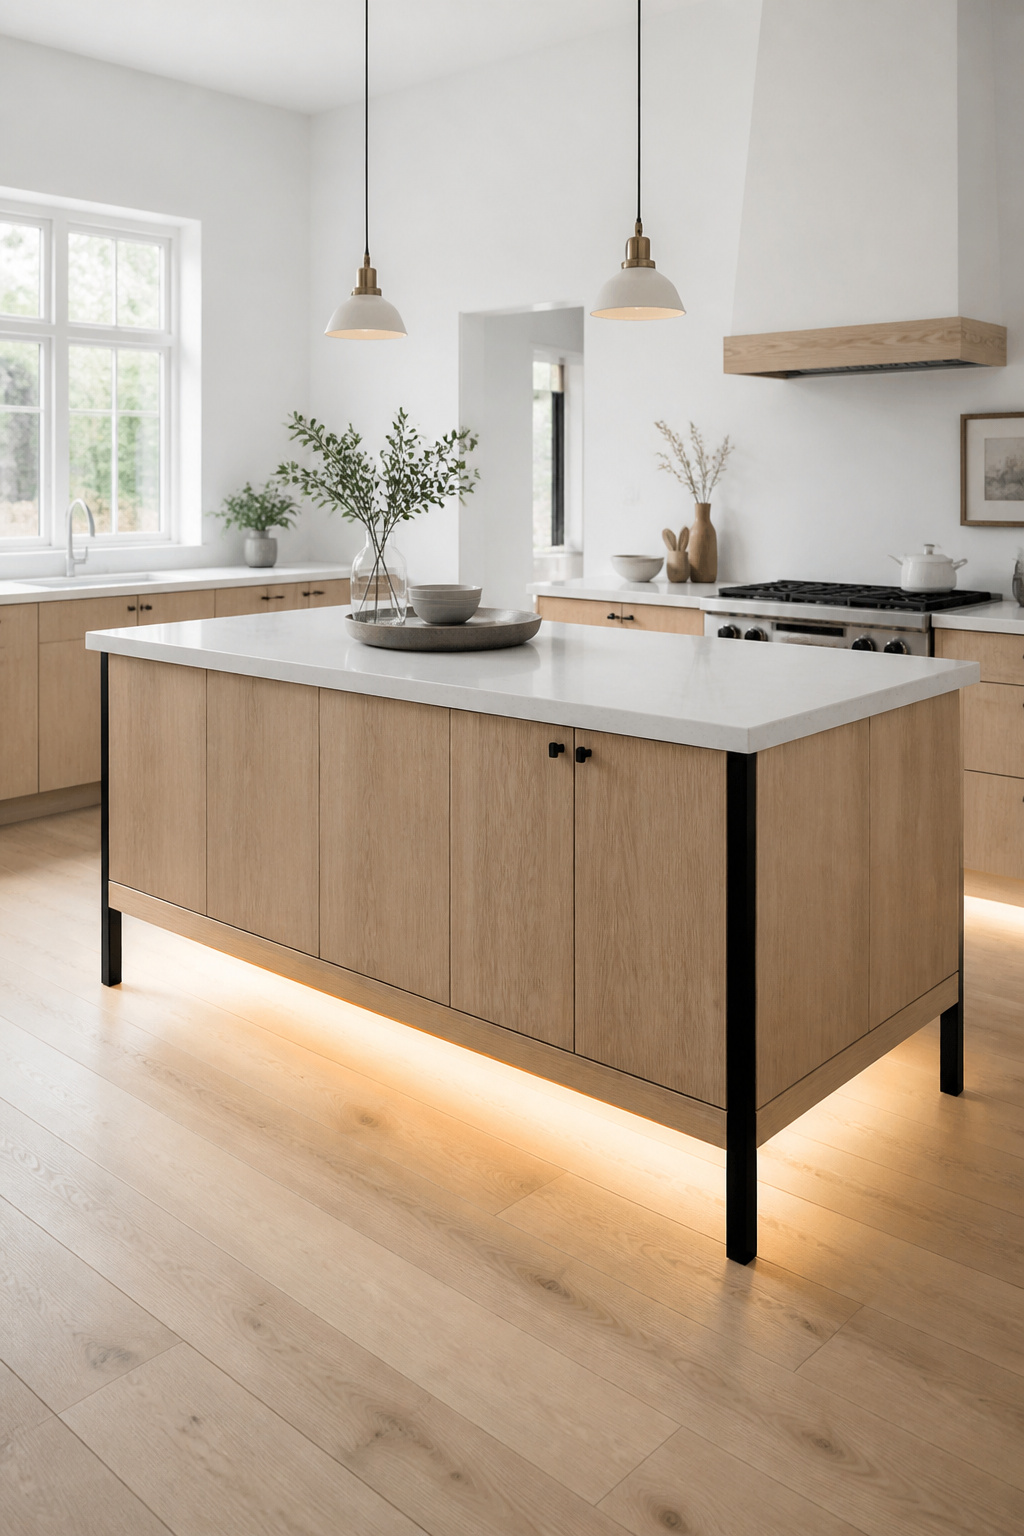
The leg material and proportions determine whether the effect reads as designed or accidental. Turned wood legs in oak, maple, or walnut with a diameter of 2 to 3 inches at the widest point and 5 to 7 inches of visible height are the traditional furniture interpretation. Tapered square legs in a Scandinavian register: 1.5 to 2 inches square tapering slightly toward the foot, in solid wood or painted steel. Metal tube legs in round or square profile are the most contemporary reading — matte black metal legs against a painted island cabinet can be particularly clean and considered. Whatever the material, the legs must be visible enough to read clearly as legs, not as an elongated toe kick. Under 4 to 5 inches of exposure, they register as detail rather than furniture.
The practical challenge: exposed legs reduce cabinet capacity at the base, since there’s no toe-kick-to-floor enclosure. The solution is to run the exposed legs on the seating or display-facing end only, keeping a full closed cabinet base on the kitchen-facing side. Or compensate with deeper drawers in the cabinet stack and back-to-back cabinet configurations where the island depth allows. If you’re rethinking the island as a whole, there are some strong kitchen island remodeling inspiration ideas that address how leg-base designs integrate with the full kitchen plan.
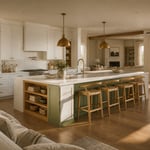
The kitchens that feel most deliberately designed tend not to be monolithic. They have a material logic: one finish dominates, another accents, and a third acts as a connecting line. Applied to a kitchen island, that principle produces combinations like a painted base with a natural wood open section and a metal edge detail — combinations that read as composed rather than collected.
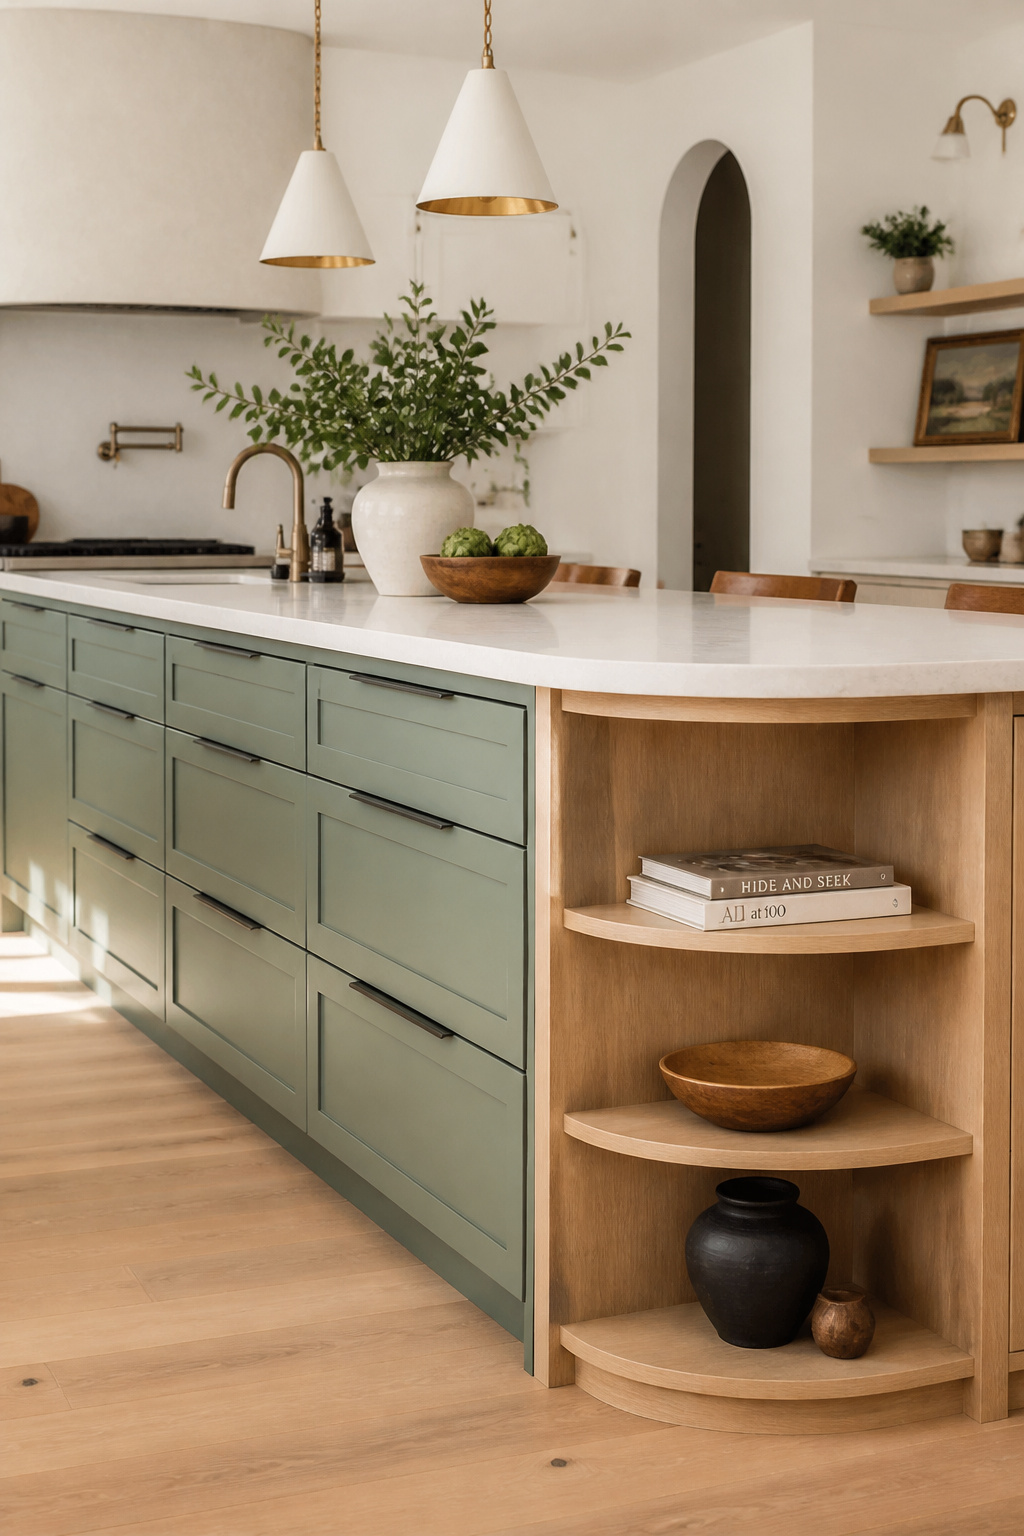
The most successful version: a painted island cabinet base in navy, forest green, or warm grey, with a natural white oak open shelf section on the display-facing end. The oak warms the island and breaks up the painted mass; the painted sections provide the visual weight that stops the island reading as lightweight. White oak is particularly effective here — its open grain adds texture, and its warm honey tone bridges painted colours and natural materials without effort. Walnut is the more refined alternative, its chocolate tones a stronger contrast with painted greens and whites.
Metal as accent rather than surface is the key to keeping this from tipping into visual noise. A channel pull integrated into the top rail of each painted drawer front — a recessed metal reveal that replaces separate hardware — is the kind of detail that reads as sophisticated restraint. A metal kick plate at the island base, metal corner caps on the exposed corners: these are line elements, not surface elements. The editing principle that makes mixed-material kitchen island cabinets succeed: one material dominant at 60 to 70% of the visual surface, one material as accent at 20 to 30%, and one material as line at 5 to 10%. When three materials feel like they’re fighting for equal attention, the solution is always to remove one of them, not to add a fourth.
The interior organisation of kitchen island cabinetry is where a well-designed island earns its place over the years. The aesthetics are what you see on the day of installation. The internal fittings are what you use, on average, several hundred times a year.
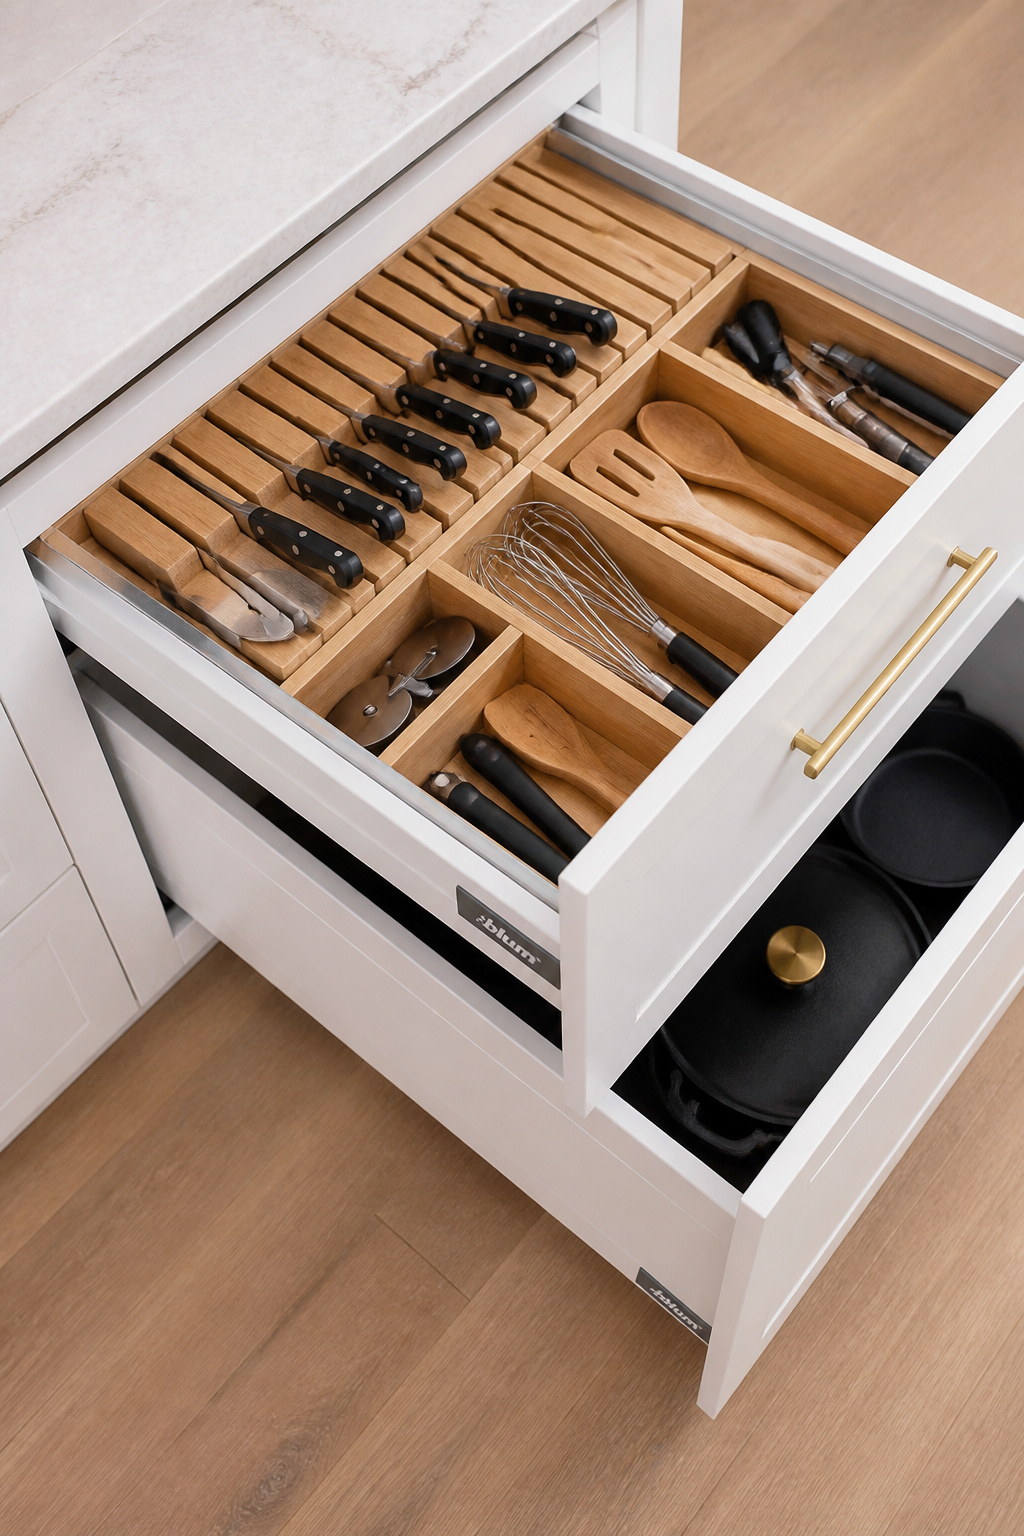
A pull-out waste bin station inside the island base positions the bin at the centre of food preparation, which is precisely where food waste is generated. Standard pull-out waste units fit inside a 15-inch-wide minimum cabinet opening and house two or three separate bins for waste and recycling. Position it on the kitchen-facing side of the island, accessible to the cook during prep but not visible from the seating side. In-drawer knife storage with angled slots protects blades and keeps them organised without dulling them against a countertop block.
Soft-close and full-extension slide hardware is the detail that pays the quietest ongoing dividend. Every drawer in the island should be full-extension: the drawer box must exit the cabinet completely so nothing is ever out of reach at the back. Three-quarter-extension leaves a permanent blind spot in every drawer. Blum Tandem Plus undermount slides are the professional standard: invisible inside the drawer box, soft-close, full-extension, rated to 130 lbs per pair, with a 10-year warranty. For cast iron applications, specify the heavy-duty Blumotion version. For all dividers and insert systems, choose adjustable rather than fixed configurations — what works for your current cookware will change over the years, and fixed compartments that can’t adapt become obstacles.
Natural wood island cabinets bring a biological warmth that paint and laminate cannot replicate. The grain moves. The colour shifts in different light. Over years of use, the surface develops a patina that belongs to that specific kitchen. In Scandinavian design, this quality of materials that age honestly rather than simply wearing out is a core principle. It’s why natural wood kitchen island cabinets feel right even in kitchens that are otherwise quite modern.
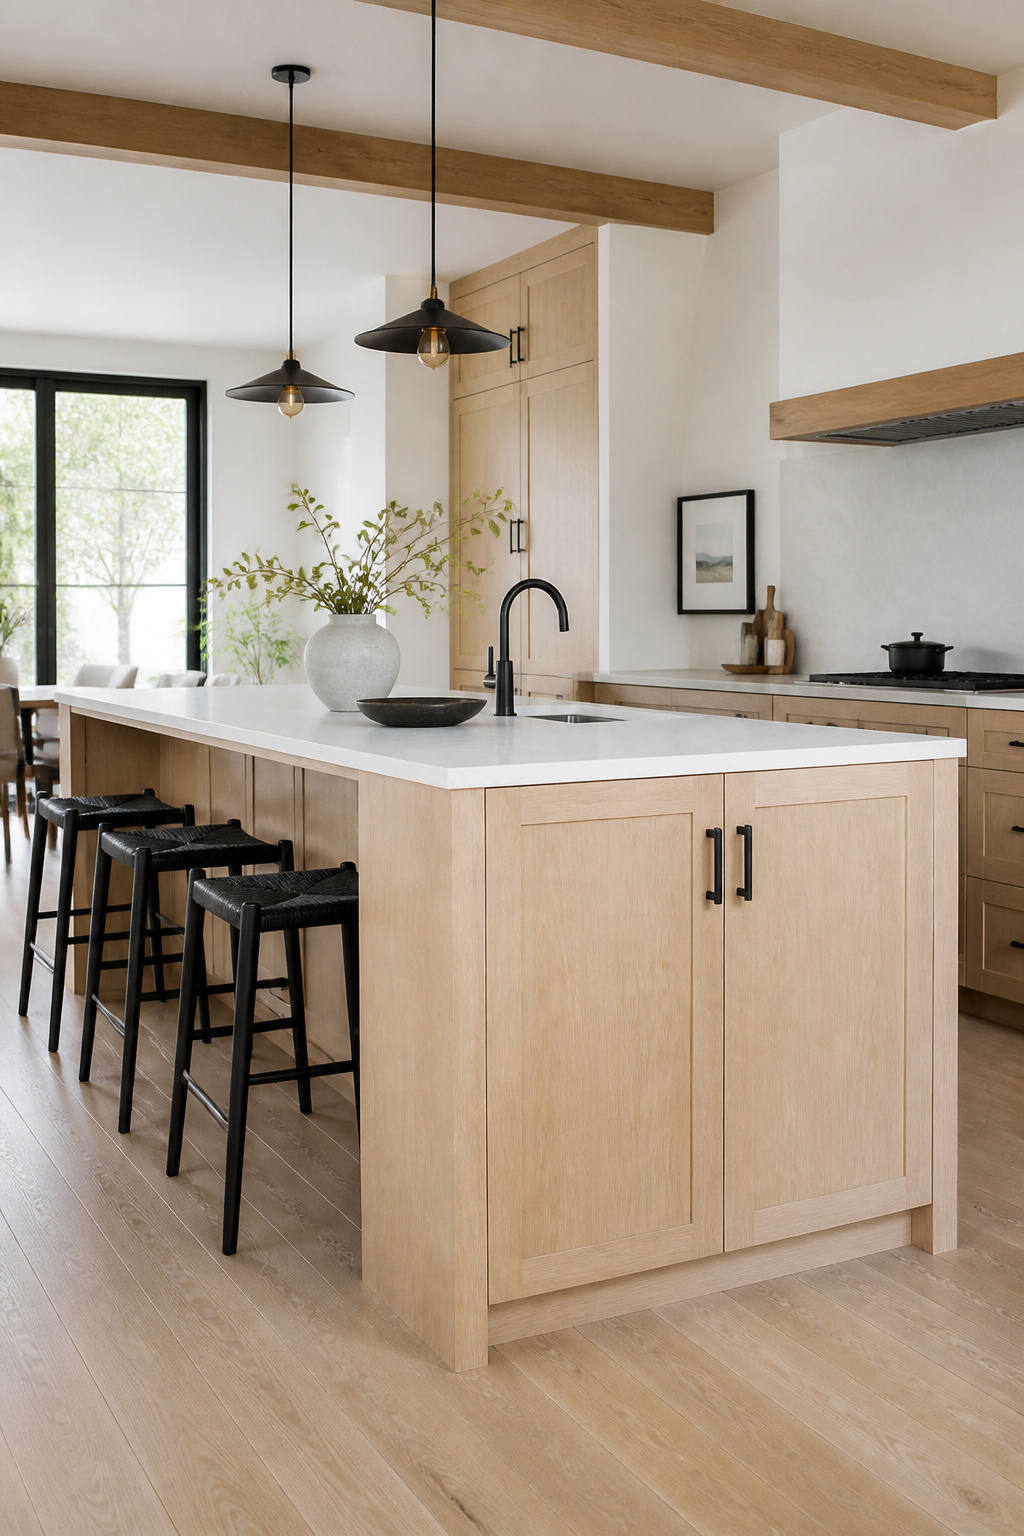
Species selection is the most consequential decision. White oak is currently the leading choice for kitchen island cabinetry, named by 51% of designers in recent NKBA surveys as the most popular wood. Its open ring-porous grain is visually rich and takes both stain and clear coats dramatically. Its Janka hardness of approximately 1,290 handles daily kitchen use, and it ages gracefully without dramatic colour shift. Walnut brings rich chocolate tones with a refined grain. Finish it clear with hardwax oil or waterborne lacquer, and don’t attempt to paint or dark-stain it. Hard maple, at Janka 1,450, is the hardest of the common cabinet species. It takes paint beautifully thanks to its tight grain, making it the natural choice for Scandinavian-influenced kitchens where the goal is a pale, almost luminous surface.
Finishing separates a wood island that matures beautifully from one that just ages. Hardwax oil (Rubio Monocoat, Osmo Polyx) is the current specification for Nordic-influenced wood kitchens. It penetrates the wood fibres rather than forming a surface film, leaves an almost invisible matte finish, and can be spot-repaired without refinishing the whole piece. Clear waterborne lacquer in matte works well on tight-grain species like maple, providing more moisture resistance than oil alone. Pairing a natural wood island with painted white or cream perimeter cabinetry allows both elements to read clearly. It’s one of the design moves most closely associated with contemporary Nordic kitchen design.
The kitchen island that includes wine and bar storage makes the island the anchor for both cooking and hosting simultaneously. The wine is where food is prepared; the glasses are where drinks are poured; the bar function happens at the island’s seating edge, close to the dining and living areas. It’s a genuinely practical configuration, and it’s only a design problem when the bar elements become visually cluttered rather than integrated.
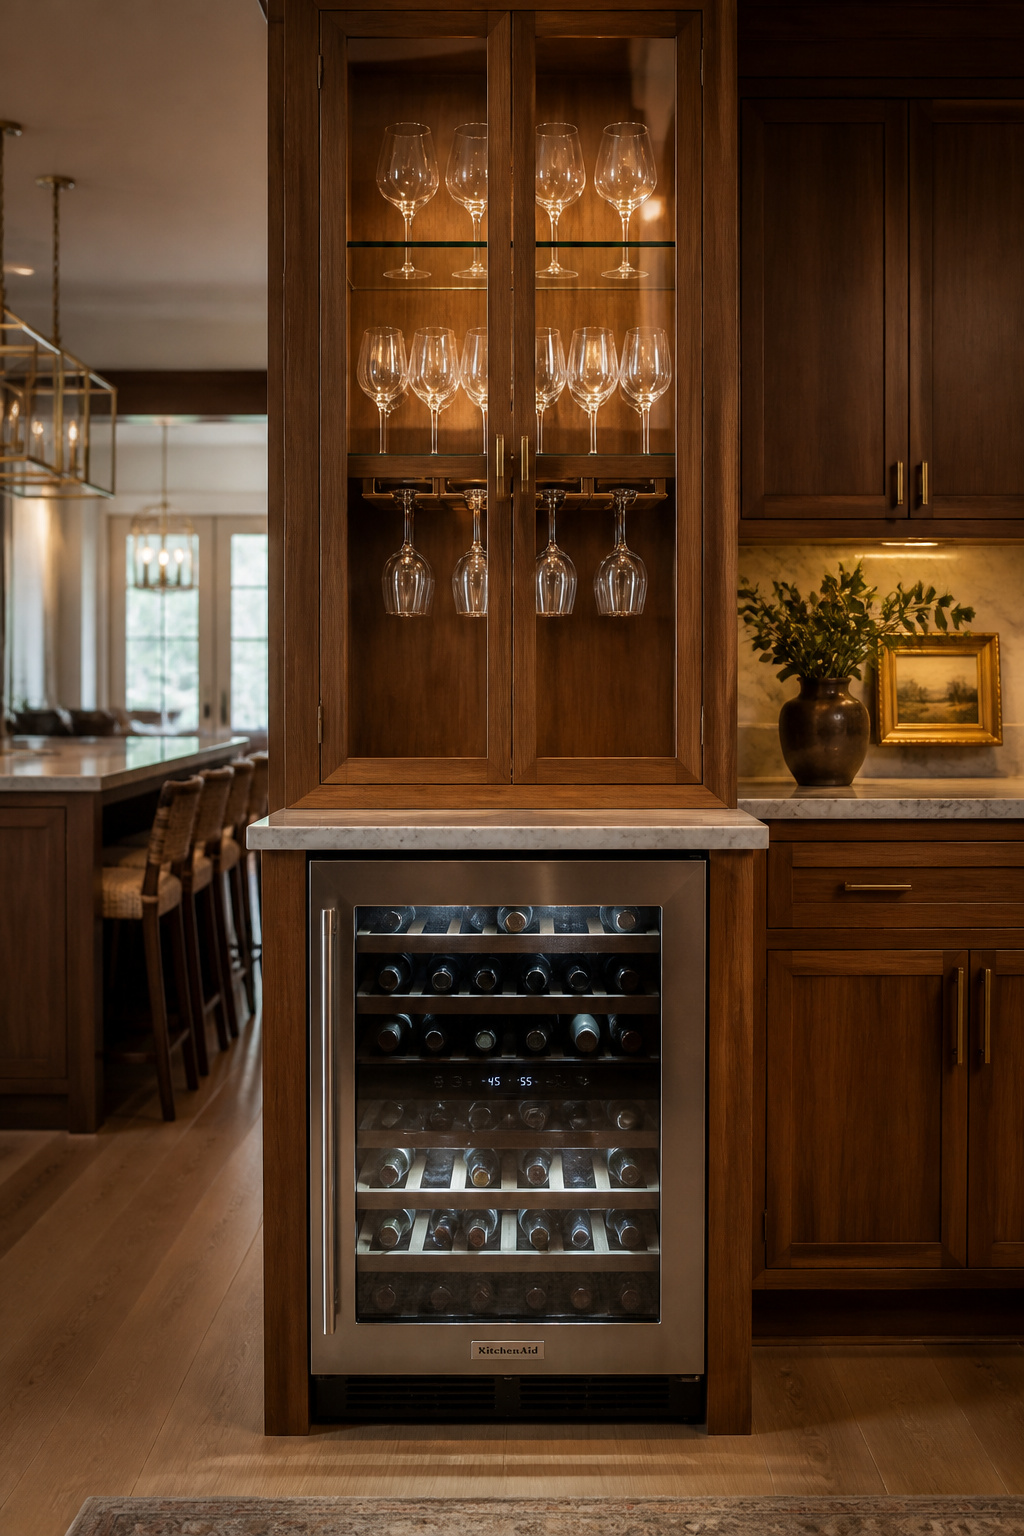
Under-counter wine fridges are almost always the better choice over open bottle racks for anyone storing wine beyond the immediate week. Temperature fluctuations in a working kitchen can affect wine significantly — a built-in wine cooler keeps reds at 54 to 58°F and whites at 44 to 54°F regardless of what’s happening on the cooktop nearby. Dual-zone units allow both to coexist in a single 24-inch cabinet opening. Specify front-vent wine fridges only for built-in applications: rear-vent and side-vent models overheat when enclosed and their lifespan drops dramatically. Measure the specific unit before specifying the cabinet opening — fridge dimensions vary enough between brands to create problems if you’re working from generic specs.
For open bottle storage — the cubbied grid on the island end panel that signals the bar zone visually — limit it to 12 to 18 bottles. More reads as chaotic rather than curated. Stemware rails mounted to the underside of a shelf above the bar zone suspend glasses upside down by the stem base, keeping them dust-free and within reach. Inside a glass-front upper section, a mounted stemware rack in natural wood or brushed metal combines display value with practical organisation. The electrical outlet at the bar end of the island — essential for the wine fridge — should be planned into the island build from the start, not added as an afterthought.
An L-shaped kitchen island sounds like an obvious solution for an L-shaped kitchen: mirror the room’s geometry with the island and create two defined work zones. In practice, it’s one of the more demanding island configurations to execute correctly, because the clearance requirements around a corner island are non-trivial, and the interior corner is one of the more technically awkward storage problems in cabinetry.
The NKBA minimum clearances are the starting point: 42 inches on every work aisle for a single-cook household, 48 inches for two-cook households, 36 inches on all walkways. In an L-shaped kitchen, these dimensions must be satisfied on every side of the island, around the bend. Before you design the island, mark out the footprint in tape on the floor and walk the space at cooking pace — it’s a reliable way to identify clearance problems before the cabinetry is ordered. The rule of thumb for L-shaped island sizing: island length should not exceed two-thirds of the shortest L-shaped room leg. If the room doesn’t have the footprint for an island that satisfies these clearances, a peninsula configuration is often the better answer. If it does, there’s no shortage of kitchen island remodelling ideas to work from once the dimensions are confirmed.
The interior corner is the storage problem. The same solutions that work on perimeter corner base cabinets apply here: a 360-degree kidney-shaped lazy Susan for rotational access; a blind corner pull-out that draws the back of the cabinet forward when you open the unit; or an open pass-through accessible from both sides. Countertop at the 90-degree junction requires a precise miter cut, and the fabricator needs the cabinet corner to be perfectly square before templating day. Clip or radius the outside corner of the island at the junction — it softens the traffic flow and removes the most common collision point in a corner island kitchen.
The difficulty with kitchen island cabinets isn’t that there are too few good choices — it’s that there are many, and most of them would improve the kitchen. The real question isn’t “which style is best?” but “which approach fits this specific kitchen, in this specific home, for the way this household actually lives?”
That question starts with layout, not aesthetics. Before you settle on Shaker versus flat-panel, or natural wood versus bold paint, mark out the island footprint and walk the clearances. A beautifully designed island that makes the kitchen feel cramped is a design failure regardless of how refined the joinery is. Get the dimensions right first, then make the aesthetic decisions.
When it comes to where to focus the budget, the consistent answer across every kitchen style is this: spend on what you use and touch every day. Quality drawer slides are used hundreds of times a year — the difference between Blum Tandem and a cheap side-mount slide is apparent within the first week and significant within the first year. The cabinet carcass is the foundation; a poorly built box cannot be corrected by better doors. The countertop is the island’s working surface and its most visible element. These three — slides, box, counter — are where the investment consistently pays off. Everything else can be adjusted or changed over time.
Kitchen island cabinets that are correctly sized, properly cleared, solidly built, and well-organised in their drawers will serve the kitchen well for decades. Whichever of these seventeen directions you take.