Physical Address
304 North Cardinal St.
Dorchester Center, MA 02124
Physical Address
304 North Cardinal St.
Dorchester Center, MA 02124
15 master bathroom remodel ideas for a spa-like retreat — rain showers, heated floors, natural stone, freestanding tubs, and Nordic-inspired palettes.
The master bathroom is the one room in your home that belongs entirely to you. It’s where the day begins and, if designed well, where it properly ends. Yet most master baths fall far short of that potential — functional enough, perhaps, but hardly restorative. After studying over 120 master bathroom renovations, I’ve found that the gap between a bathroom that works and one that genuinely restores you comes down to a handful of deliberate decisions. The principles behind them aren’t complicated; they’re rooted in the same Scandinavian thinking that has guided exceptional bath design for generations — warmth, quality, and the quiet luxury of knowing every element was chosen with care.
These 15 master bathroom remodel ideas move from the structural to the sensory, from the decisions that shape the whole room to the finishing touches that define how it feels on an ordinary Tuesday morning. Some will reshape your renovation budget; others cost nothing to implement today. All of them work together.
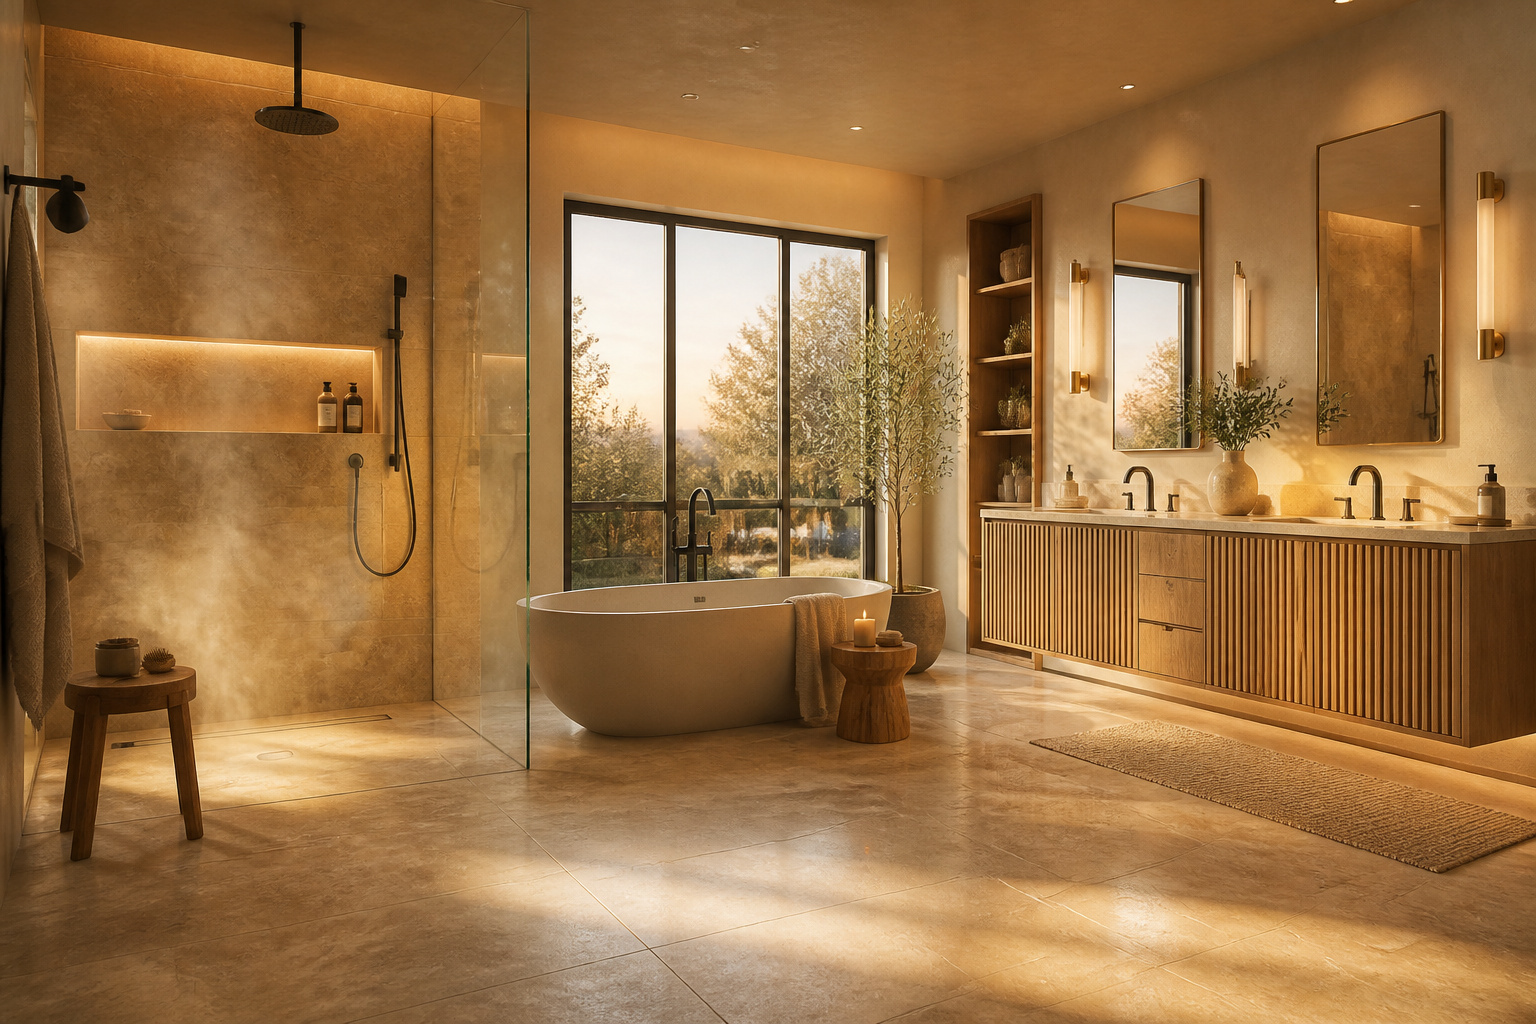
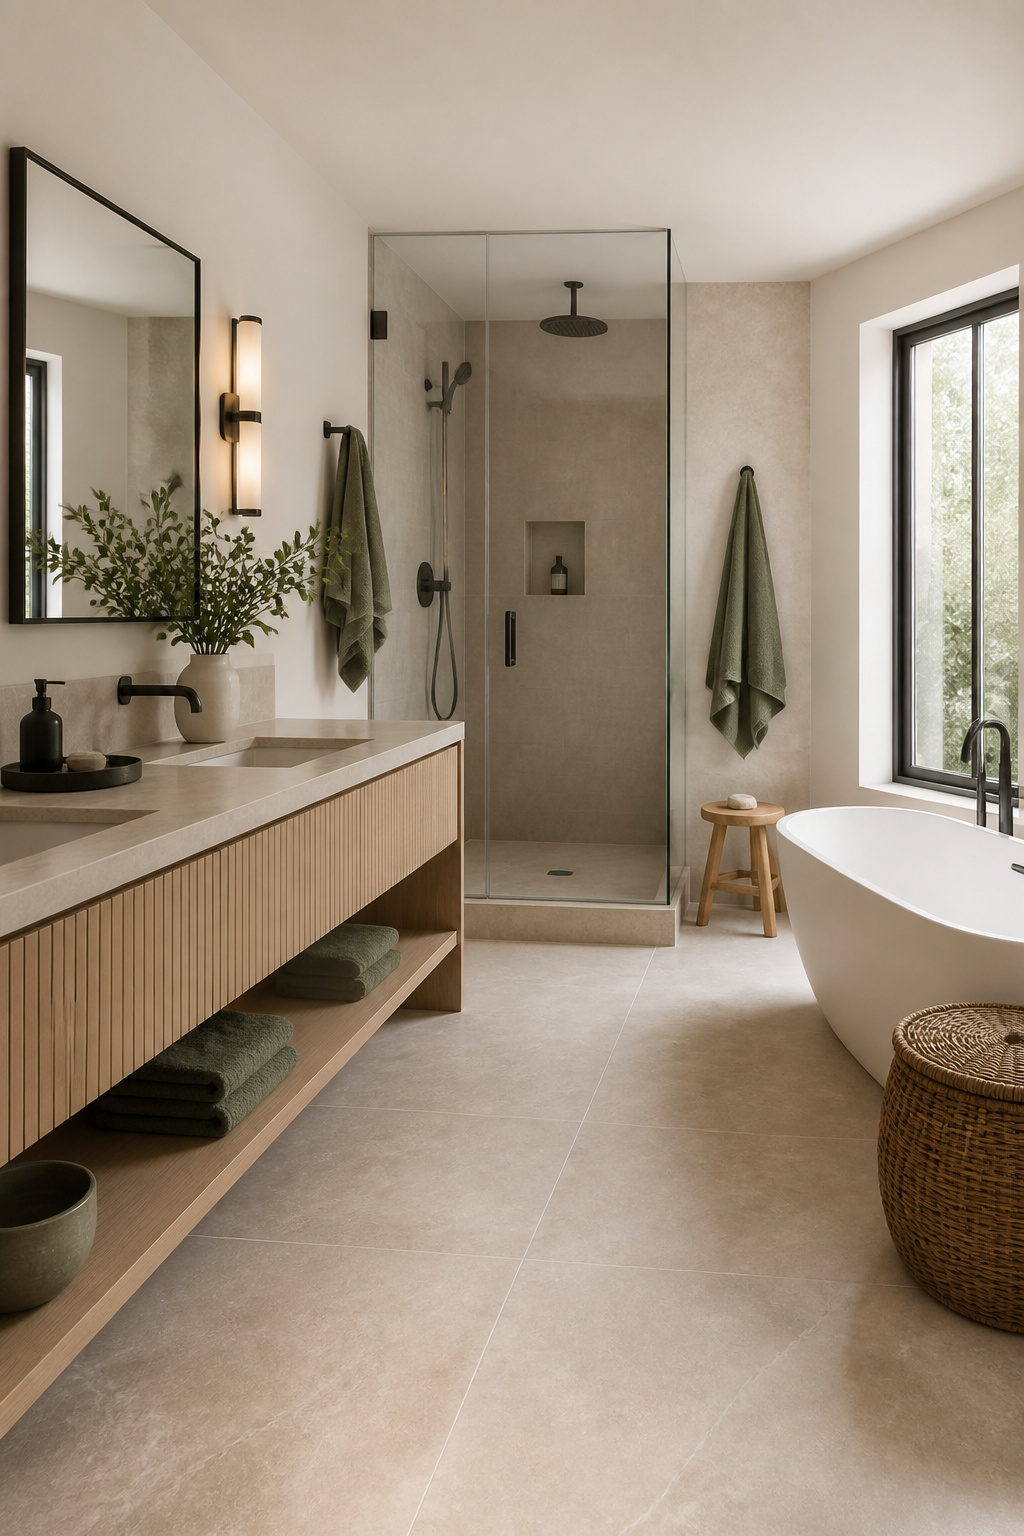
There’s a reason the rain shower has become the defining feature of the modern spa bathroom: it reframes the shower not as a quick necessity but as a thermal ritual. In Nordic bath culture, this kind of deliberate immersion is built into daily life — the transition from cold to warm, from busy to still — and a well-positioned rain shower delivers exactly that.
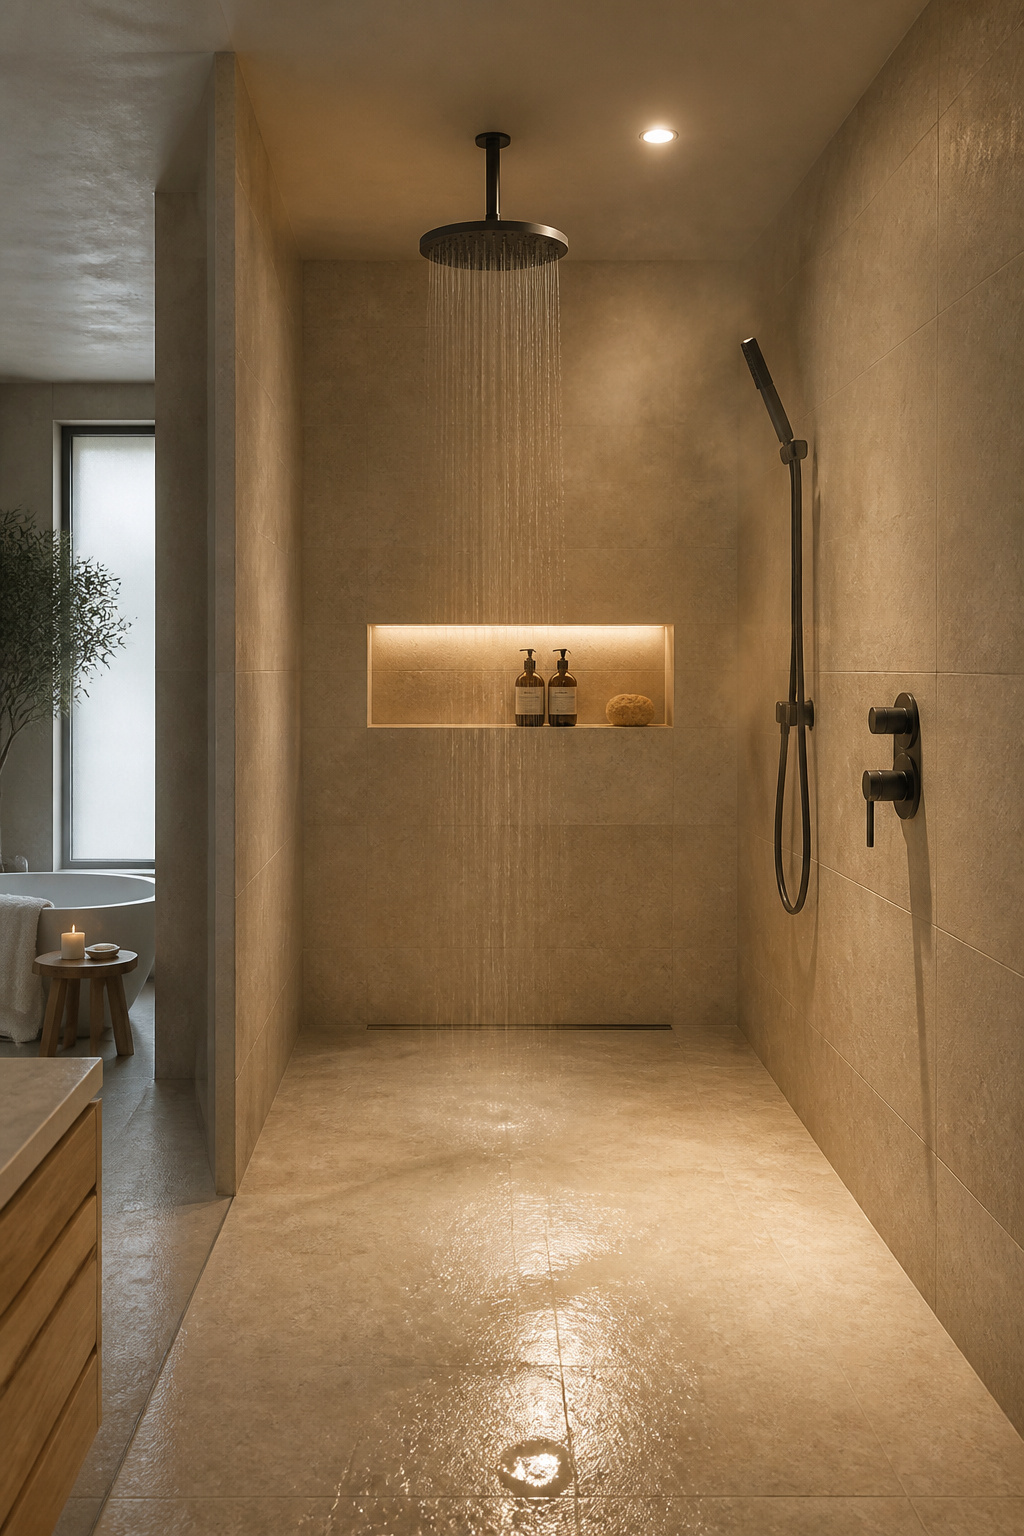
For ceiling-mount installation, position the head 84 to 96 inches from the floor for the truest rainfall effect; wall-arm mounts sit lower at 80 to 84 inches. The minimum comfortable footprint for a master bath rain shower is 48 by 48 inches, though 48 by 72 inches is the better target — anything smaller and you’re still having a normal shower with a different showerhead. The real transformation comes from a curbless, zero-threshold design with a linear drain running along one wall. This wet room approach means the tile runs continuously from floor to walls without the interruption of a shower pan — it makes the space feel significantly larger, and it makes the shower far easier to clean.
For hardware, choose a thermostatic valve over a simple pressure mixer. Thermostatic systems hold water temperature within a degree or two and let the shower pre-warm before you step in — the equivalent of a heated floor, but applied to water. Pair the ceiling head with a handheld wand at 72 inches on a separate volume control for a shower that’s functional for daily use rather than purely aesthetic. For those exploring beautiful bathroom shower designs, wet room layouts consistently produce the most spa-like results regardless of the overall bathroom size.
Before you select a single tile, open any design catalogue, or even decide whether you want a freestanding tub, settle the layout question. It is the most consequential decision in any master bathroom renovation, and getting it wrong costs money that no amount of beautiful stone can recover.
The central issue is plumbing. Keeping drain and supply lines in their existing locations is the single biggest cost lever in a master bathroom remodel — mid-range renovations run $18,000 to $35,000 when plumbing stays put, but that figure can climb past $50,000 once pipes begin to move. In most master bathrooms, the existing layout can be made to work beautifully with creative planning, so exhaust that possibility before committing to a structural change.
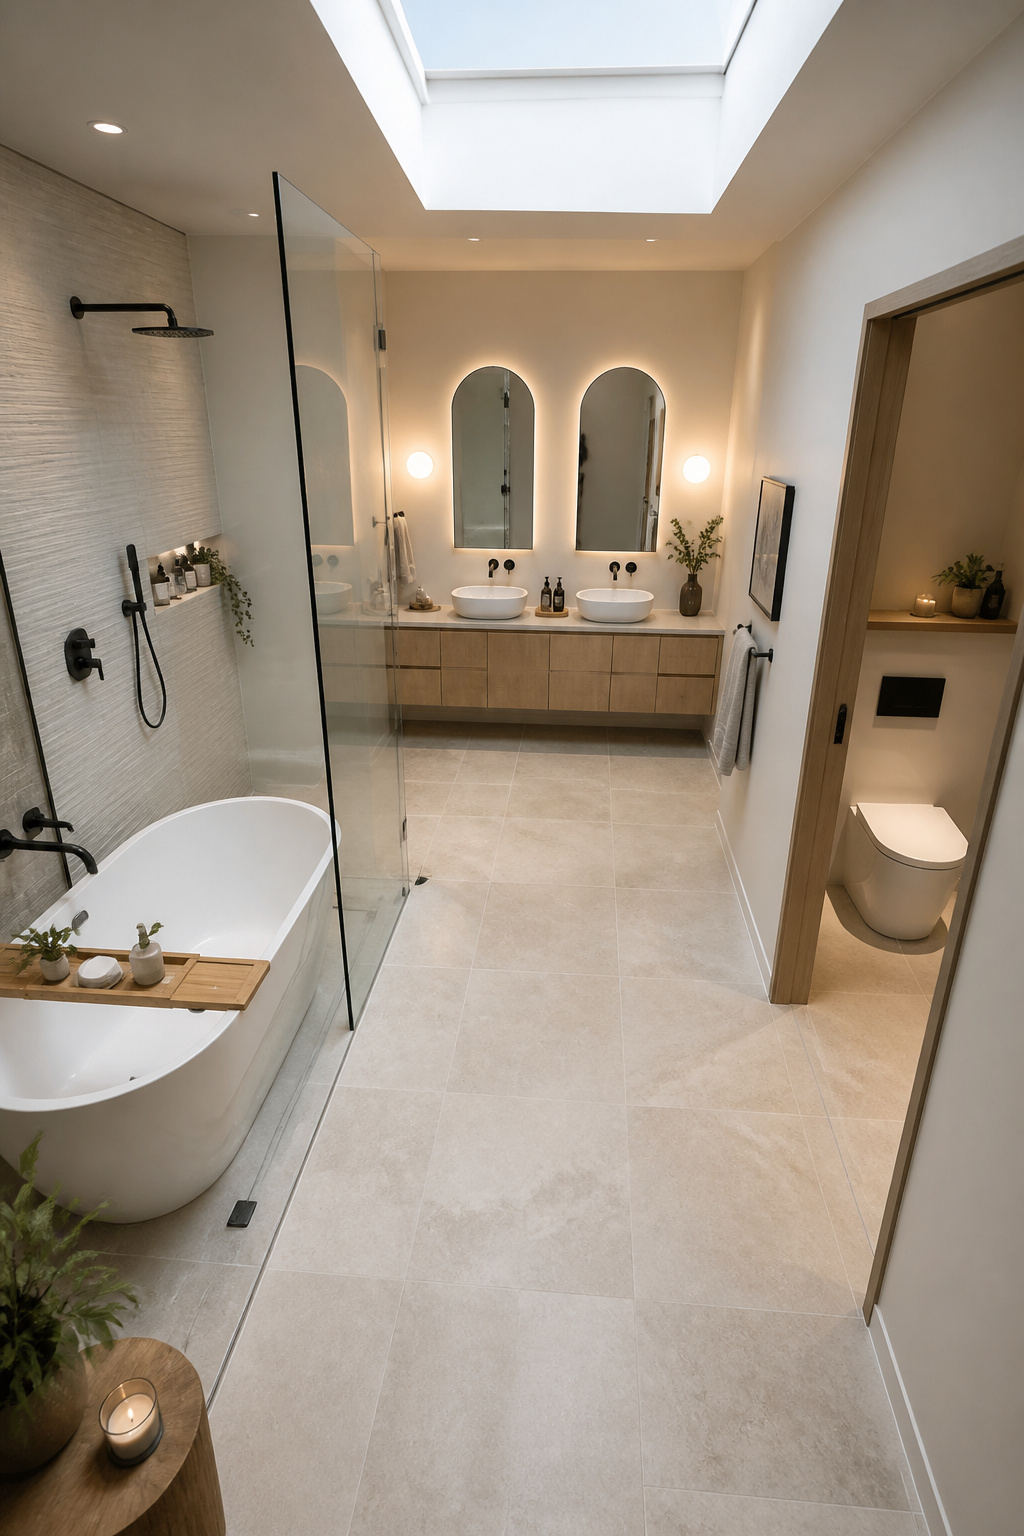
The three layouts that work best for master bathrooms are worth understanding clearly. A wet room configuration places the shower and soaking tub in a shared waterproofed zone — the most immersive approach, producing the cleanest visual result. A split layout divides the bathroom into two working zones on opposite sides of the room; it’s ideal for couples with different morning schedules. An open-plan layout achieves zone differentiation through flooring transitions and lighting changes rather than walls — the quintessential Nordic approach that maximises perceived space without sacrificing function. Whatever layout you choose, build in a 15% contingency for unexpected costs — 20% if the home is more than 20 years old.
A freestanding tub does something no built-in alcove tub can: it creates a presence in the room. The floor is visible on all sides, the space breathes around it, and whatever material you’ve chosen for the floor — stone, tile, wood — gets to be fully appreciated. That visual openness is partly why the freestanding tub has become so central to Nordic and Japanese-influenced bath design; both traditions treat the soaking tub as a dedicated ritual object, not simply a large container for water.
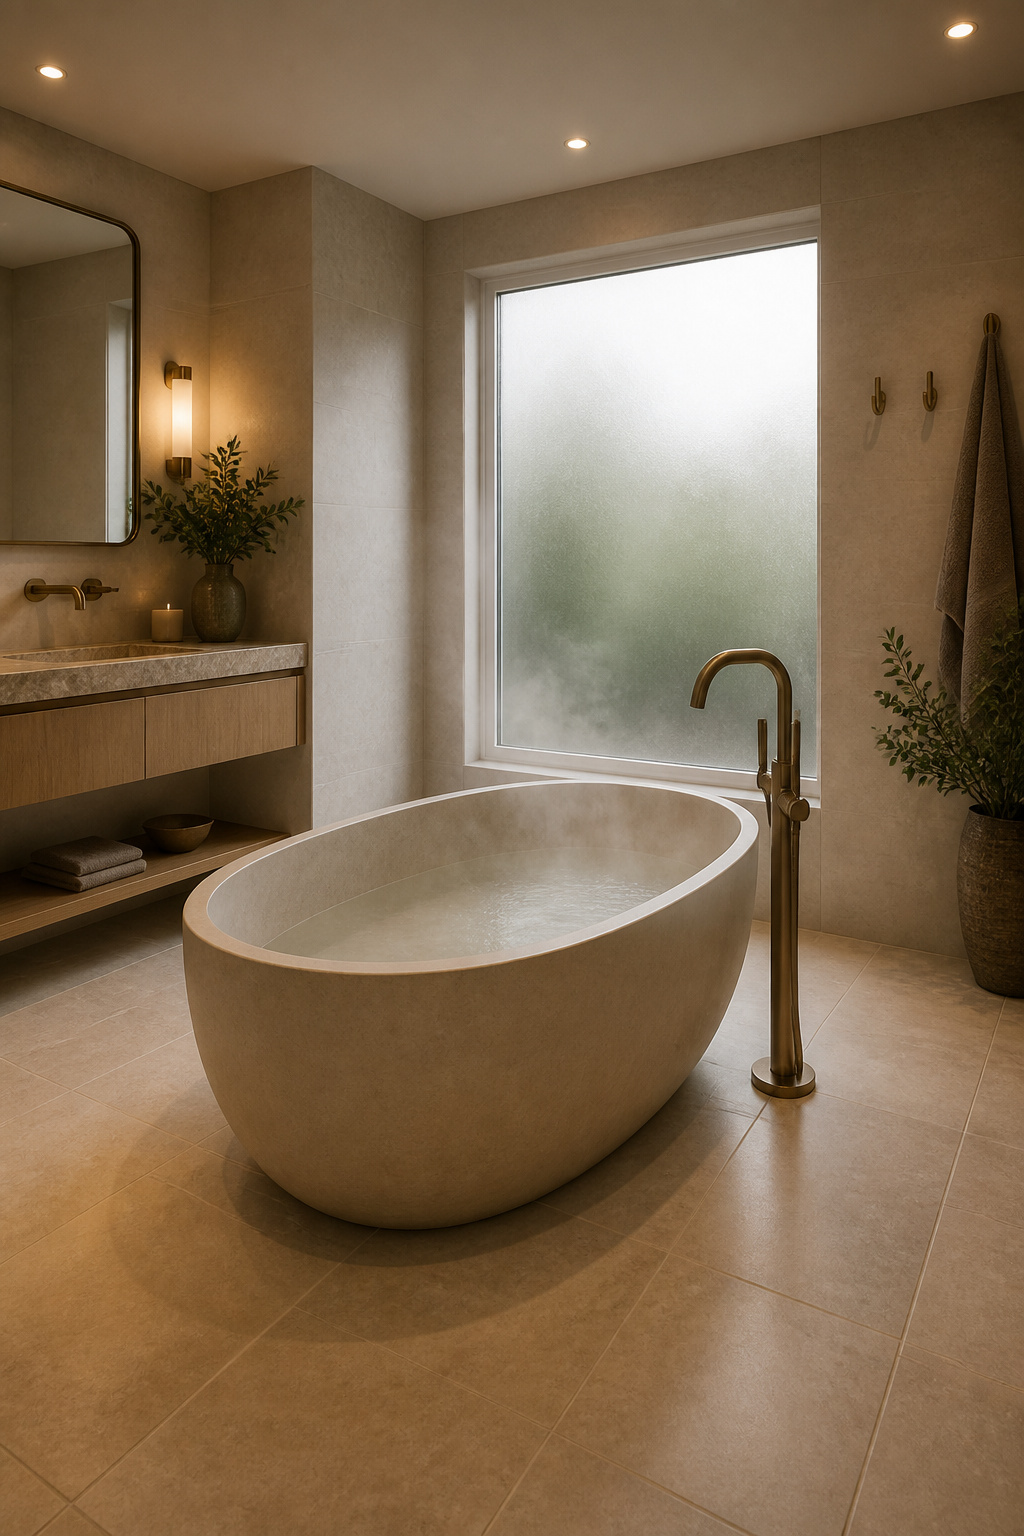
Choosing the right material matters more than most people realise. Stone resin — natural stone particles bonded in high-quality resin — is the premium choice for a spa-oriented master bathroom. It’s non-porous, resists chips and scratches, provides excellent heat retention, and has a warm matte surface that feels genuinely tactile rather than clinical. Minor damage can be sanded and refinished. The drawback is weight: a stone resin tub runs 200 to 400-plus pounds, which may require sub-floor reinforcement on an upper floor. For a complete guide to bathtub selection and care, material choice is the section worth reading most carefully before committing to a purchase.
Cast iron is the other serious option — it retains heat beautifully once warmed and reads as traditionally crafted in a way that suits Nordic sensibilities, but at 300 to 500 pounds it demands structural assessment as standard. Acrylic has the widest range of shapes at the lowest weight (50 to 100 lbs) and is a practical choice if budget is the deciding factor, though it cools faster and shows wear over decades. Whatever material you choose, allow a minimum 12 inches of clear floor space on all sides and specify a floor-mounted tub filler — it hides supply pipes cleanly and delivers the furniture-quality finish that a freestanding tub deserves.
The case for natural stone in a master bathroom is simple: it ages in a way that manufactured alternatives cannot. Worn travertine reads as lived-in luxury. Worn porcelain reads as past its best. In Scandinavian design, this quality of improving with time rather than degrading is considered one of the highest virtues a material can possess — which is why stone has been the default floor material in Nordic bathrooms for as long as the Nordic bathroom has existed.
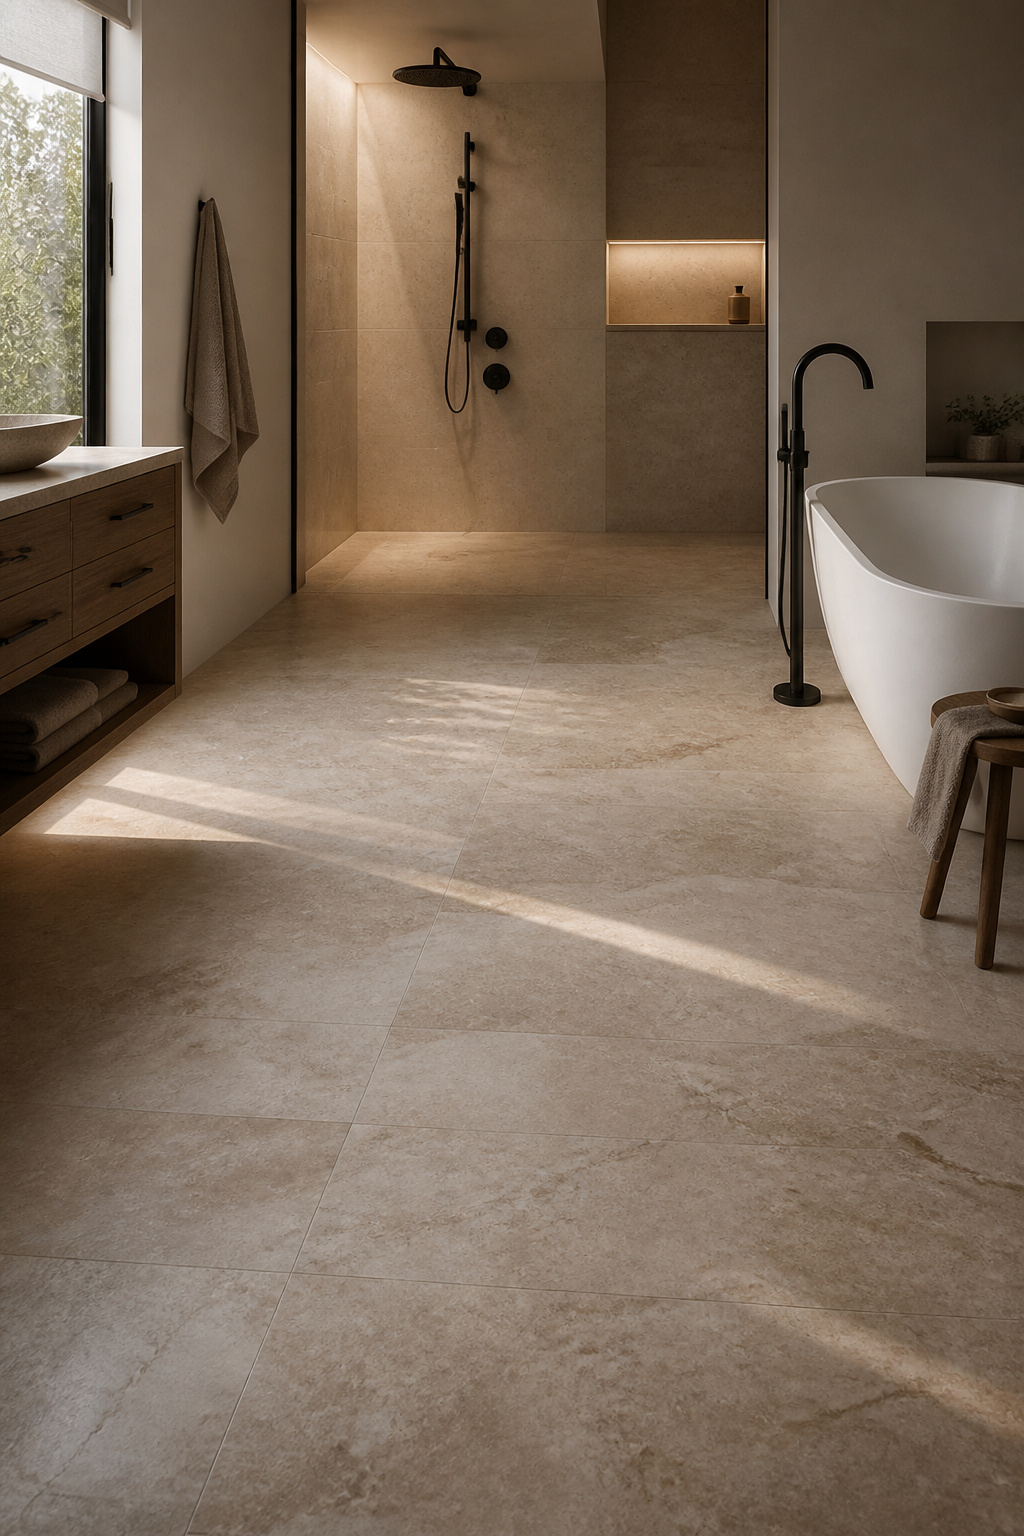
Of the commonly available options, slate is the safest choice for wet floors — its naturally split cleavage planes provide excellent slip resistance without additional treatment. Travertine is warmer in tone, particularly beautiful in honed or tumbled finishes that achieve a Static Coefficient of Friction of 0.50 to 0.70, well above the 0.42 wet-area minimum. Avoid polished travertine on bathroom floors; it drops to the 0.40 to 0.50 range, which is genuinely slippery underfoot. Limestone delivers the warmest visual palette — cream, dusty taupe, warm beige — but it’s more porous than the others and requires sealing every one to two years using a penetrating sealer, not a topical coat. Topical sealers build up, yellow over time, and are extremely difficult to remove without damaging the stone.
For grout, match the colour closely to the stone’s dominant background tone. The goal is a near-invisible joint line that allows the floor to read as a continuous material plane. Natural stone also pairs exceptionally well with electric underfloor heating — which brings us to one of the most impactful single upgrades available in any master bathroom renovation.
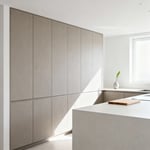
The vanity is the first thing you see when you enter a master bathroom and the last thing you look at before you leave. It sets the entire tonal register of the room — warm or cool, crafted or clinical, furniture or fixture. In 2026, that decision has become clearer than it’s been in years: natural wood has overtaken painted cabinetry as the material of choice, and the shift reflects something genuine rather than merely fashionable.

Nearly three quarters of homeowners choosing wood vanities in recent renovations opted for solid wood rather than veneer — driven by the desire to see and feel the grain, to own something that reads as made rather than manufactured. White oak and walnut are the workhorses. White oak’s cooler, tighter grain pairs beautifully with pale stone floors and matte black hardware; walnut delivers a deep, warm richness that suits more enveloping, intimate palette choices. The fluted wood front — ribbed vertical panels that add shadow and depth — is the texture detail appearing most consistently in well-executed master bath renovations right now, and it sits naturally within Nordic craft traditions.
On the floating versus floor-standing question: floating vanities expose the floor beneath and create breathing room in the composition, which is the clean Nordic preference. But they require a wall that can carry 100 to 200 pounds fully loaded, and they offer less storage than a full-height cabinet. Floor-standing furniture-style vanities remain the dominant choice (58% of remodelled bathrooms) and anchor large master bathrooms magnificently when scaled correctly. Install at 34 to 36 inches height and pair with an undermount basin in matte white ceramic for the cleanest result.
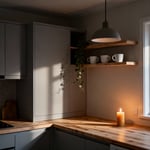
A single recessed downlight in the centre of a bathroom ceiling provides illumination in the most general sense, creates unflattering shadows across the face at the vanity, and gives you no ability to shift the mood of the room between the 6am shower and the 10pm bath. The Nordic approach to bathroom lighting treats these as two different rooms in time, and designs accordingly.
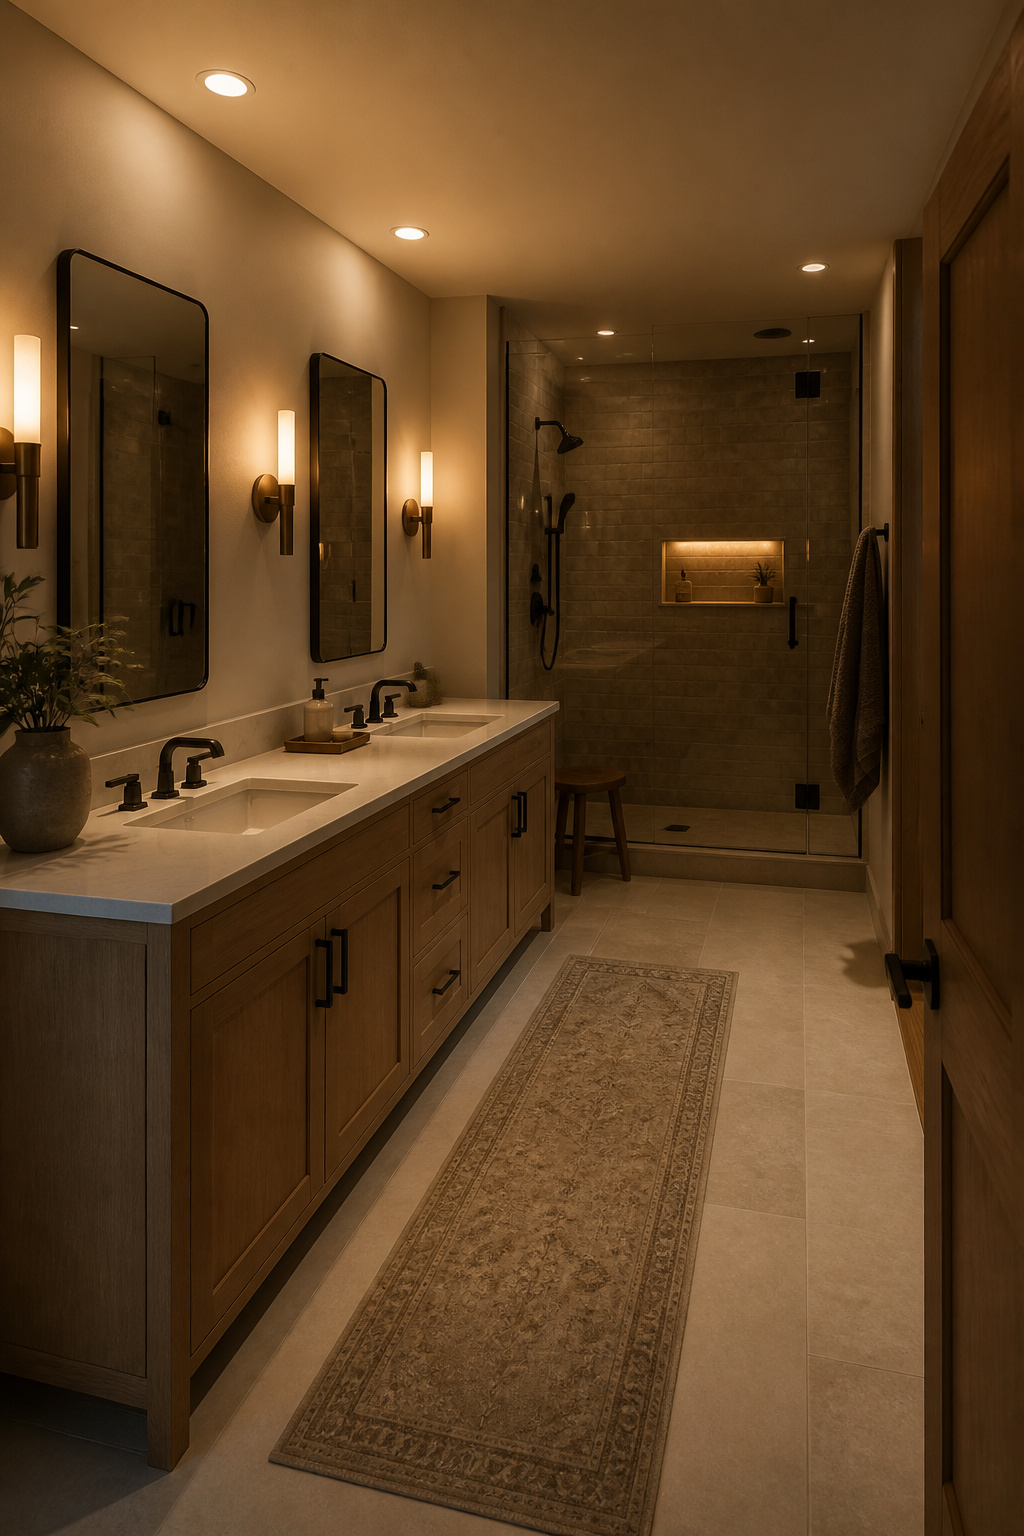
The system works in three independent circuits: task lighting at the vanity, ambient lighting from the ceiling, and accent lighting in niches or along the floor. Each circuit gets a dimmer. In the morning, task and ambient run at full brightness. In the evening, the task circuit switches off, the ambient drops to 20%, and the accent lighting in the shower niche becomes the dominant source. That single programming change transforms the character of the room completely.
For the vanity circuit, mount sconces at 60 to 65 inches from the floor, flanking the mirror on both sides — this eliminates the shadow cast by overhead light. The colour temperature for vanity lighting sits at 3000 to 3500K (neutral warm white); for the ambient and accent circuits, drop to 2700K, which replicates candlelight and is the warmth that defines the hygge atmosphere. All fixtures in zones 0 and 1 (inside and above the shower or bath) require IP65 or IP67 ratings — a safety standard, not an optional specification. The bathroom vanity lighting ideas that consistently deliver the best results follow this same layered logic regardless of the style of the room.
If you could add one element to a master bathroom renovation that would change how you feel in it every single morning for the next 20 years, it would be underfloor heating. Not a rain shower, not a freestanding tub, not a bookmatched marble wall. The warm floor is what people talk about. It’s the sensory baseline for comfort in every Scandinavian home that takes hygge seriously — and there’s a practical elegance to it: the floor does exactly what it’s supposed to do, but it also creates a relationship between the space and the body that no visual feature can replicate.
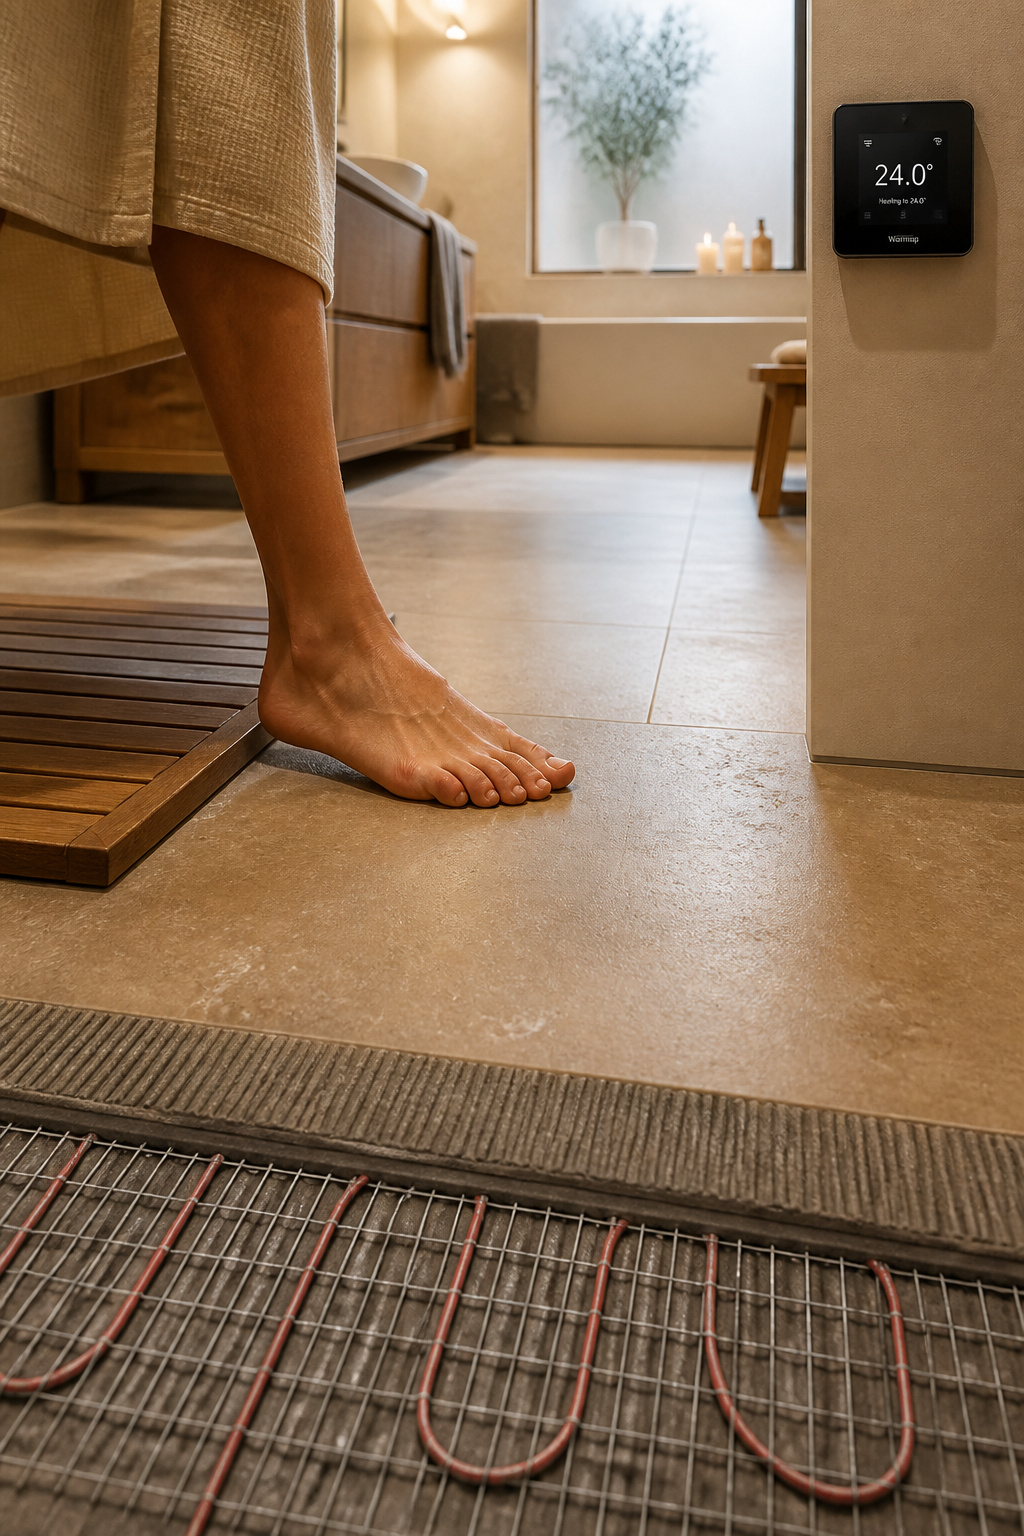
For a master bathroom retrofit, the choice is electric mat heating over hydronic. The cost comparison is clear: electric runs $10 to $25 per square foot installed; hydronic costs $4,000 to $5,000 for an equivalent bathroom space before considering the boiler integration. Beyond cost, electric mats raise the floor height by just 1/8 inch — compatible with any renovation without adjusting door clearances or tile transitions. Hydronic systems raise the floor by 2 or more inches and require full mechanical integration. For a single bathroom, the practical case for electric is overwhelming.
Electric systems heat natural stone floors in 30 to 60 minutes. With a WiFi thermostat — WarmlyYours, Warmup, and Nuheat all offer good app control — you programme the floor to reach 28 to 32 degrees Celsius 30 minutes before the morning alarm. The monthly running cost for a 40 square foot master bathroom at a few hours’ use per day sits between $0.60 and $13.50 depending on your electricity rate. In any practical sense, that’s free. For broader master bathroom remodel inspiration that explores the full range of wellness upgrades, 22 Essential Master Bathroom Remodeling Strategies covers the full picture well. One installation note worth keeping: always use a flexible polymer-modified tile adhesive rated for in-floor heating systems. Standard cement mortars crack with the thermal cycling within a season or two.
In Nordic design, clutter is the single most effective way to undermine every other element of a well-considered room. A beautiful natural stone floor disappears behind a collection of product bottles that couldn’t find another home. Storage in a master bathroom isn’t a secondary consideration — it’s what allows everything else to breathe.
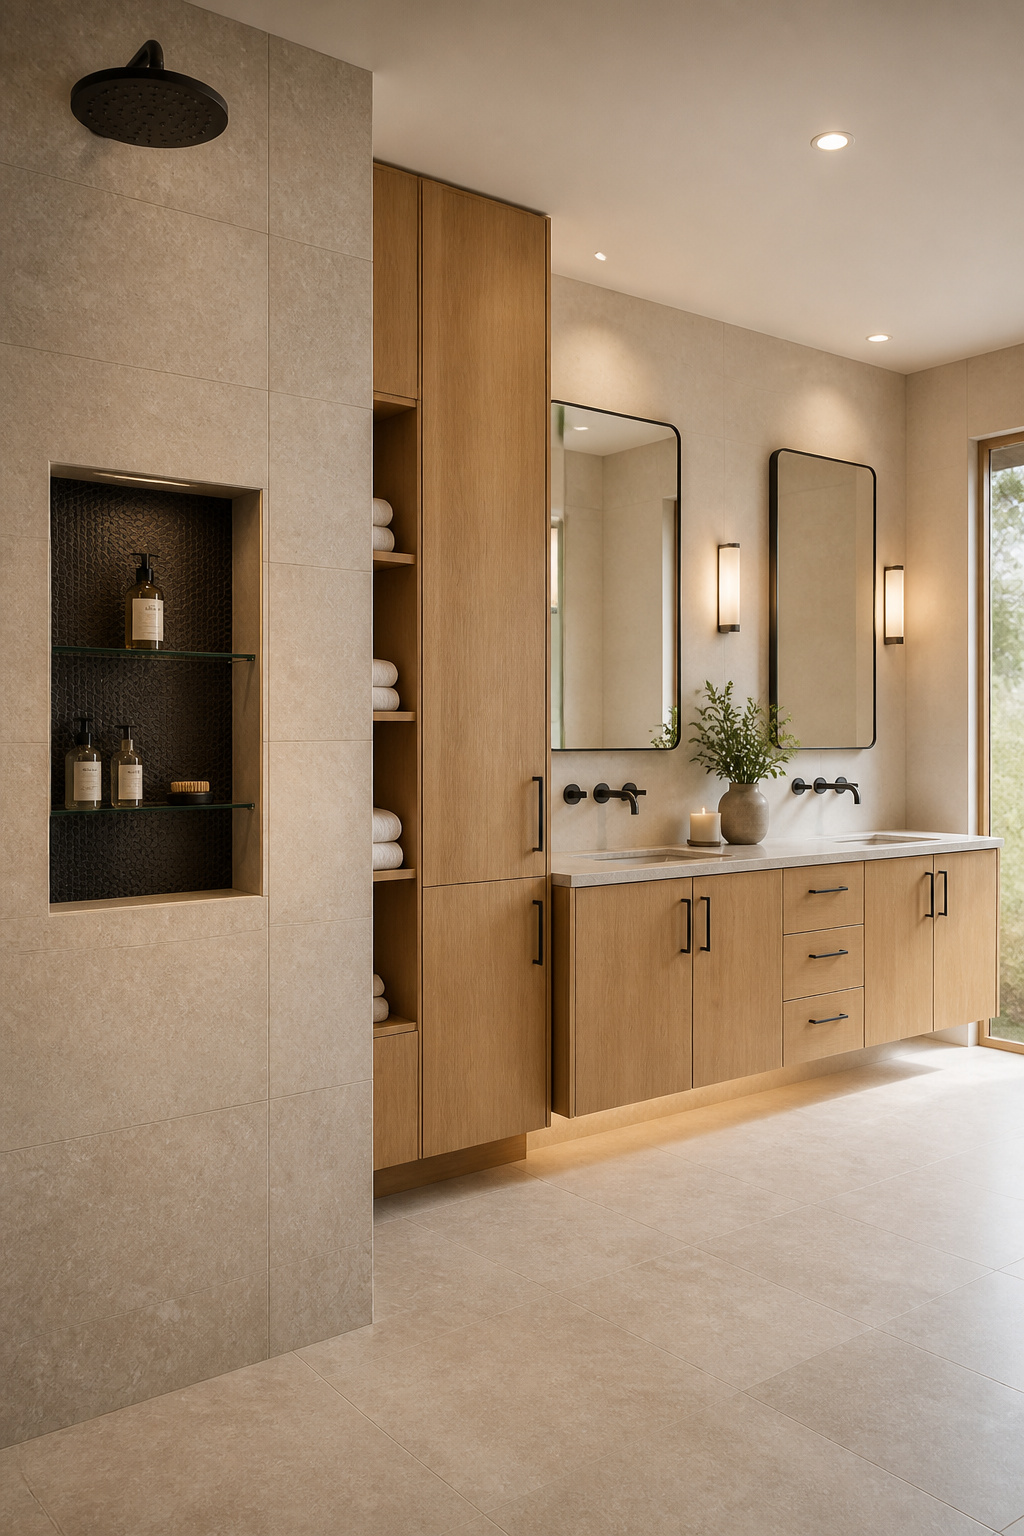
The recessed shower niche is the most impactful functional upgrade for visual cleanliness. Standard sizes run from 12 by 12 inches to 16 by 24 inches (the preferred dimension for a shared master bath). Depth is typically 3.5 to 5 inches, built between standard stud bays. Position at 48 to 60 inches from the floor and tile the niche continuously with the shower wall rather than inserting a prefabricated box — the integrated version reads as architecture, the inserted version reads as furniture.
For the vanity zone, recessed medicine cabinets built flush into the wall cavity deliver a flat wall plane that surface-mount cabinets never will. Pair with a full-height linen tower flanking the vanity to maximise vertical storage without consuming additional floor area. The bathroom storage solutions that consistently produce the cleanest results share one common principle: closed storage for 80% of contents, curated open display for 20%. On the open shelves — one plant, one candle, one folded towel. Not the overflow from the cabinet underneath. The Nordic lagom principle applied here means designing storage for what you actually use daily, not for everything you own.
The visual logic of large-format tiles is simple: fewer grout lines read as a more continuous surface, which reads as more space. In a 100 square foot master bathroom, switching from 300 by 300mm tiles to 600 by 1200mm tiles reduces the total length of grout lines by approximately 75%. That reduction does three things simultaneously — it expands the perceived room, it reduces the maintenance surface, and it allows vein patterns in marble-look porcelain to flow uninterrupted across entire walls.
The 600 by 1200mm format (24 by 48 inches) is the current residential sweet spot: large enough for the continuous-surface effect, manageable enough for experienced tilers without specialist lifting equipment. In pale tones — cream marble-look, warm white, light greige — polished large-format porcelain amplifies natural light across uninterrupted surfaces. This is especially valuable in master bathrooms with limited natural light. For shower walls, consider bookmatching — tile A and its mirror image designed in paired sets so the veining flows symmetrically across the join. Most manufacturers label bookmatching sets clearly; the installation sequence must be followed precisely to achieve the effect.
Installation quality is non-negotiable with large-format tiles. Rectified tiles (machine-cut to precise dimensions after firing) allow grout joints as small as 1/16 inch and must be installed with full-coverage thinset back-buttered onto each tile — any hollow section will crack under point loads or thermal movement. The substrate must be flat to within 1/8 inch over 10 feet; beyond that tolerance, lippage becomes visible at the tile edges. Use a 1/3 offset, not a 50% brick pattern — the larger the tile, the more a 50% offset amplifies any substrate irregularity.
A double vanity is, at its heart, a negotiated solution to a morning logistics problem. Two people, one bathroom, different schedules and different routines. Done well, it’s one of the most civilised things you can add to a master bathroom. Done carelessly — underdimensioned, poorly positioned, sharing a single mirror — it becomes a friction point rather than a solution.
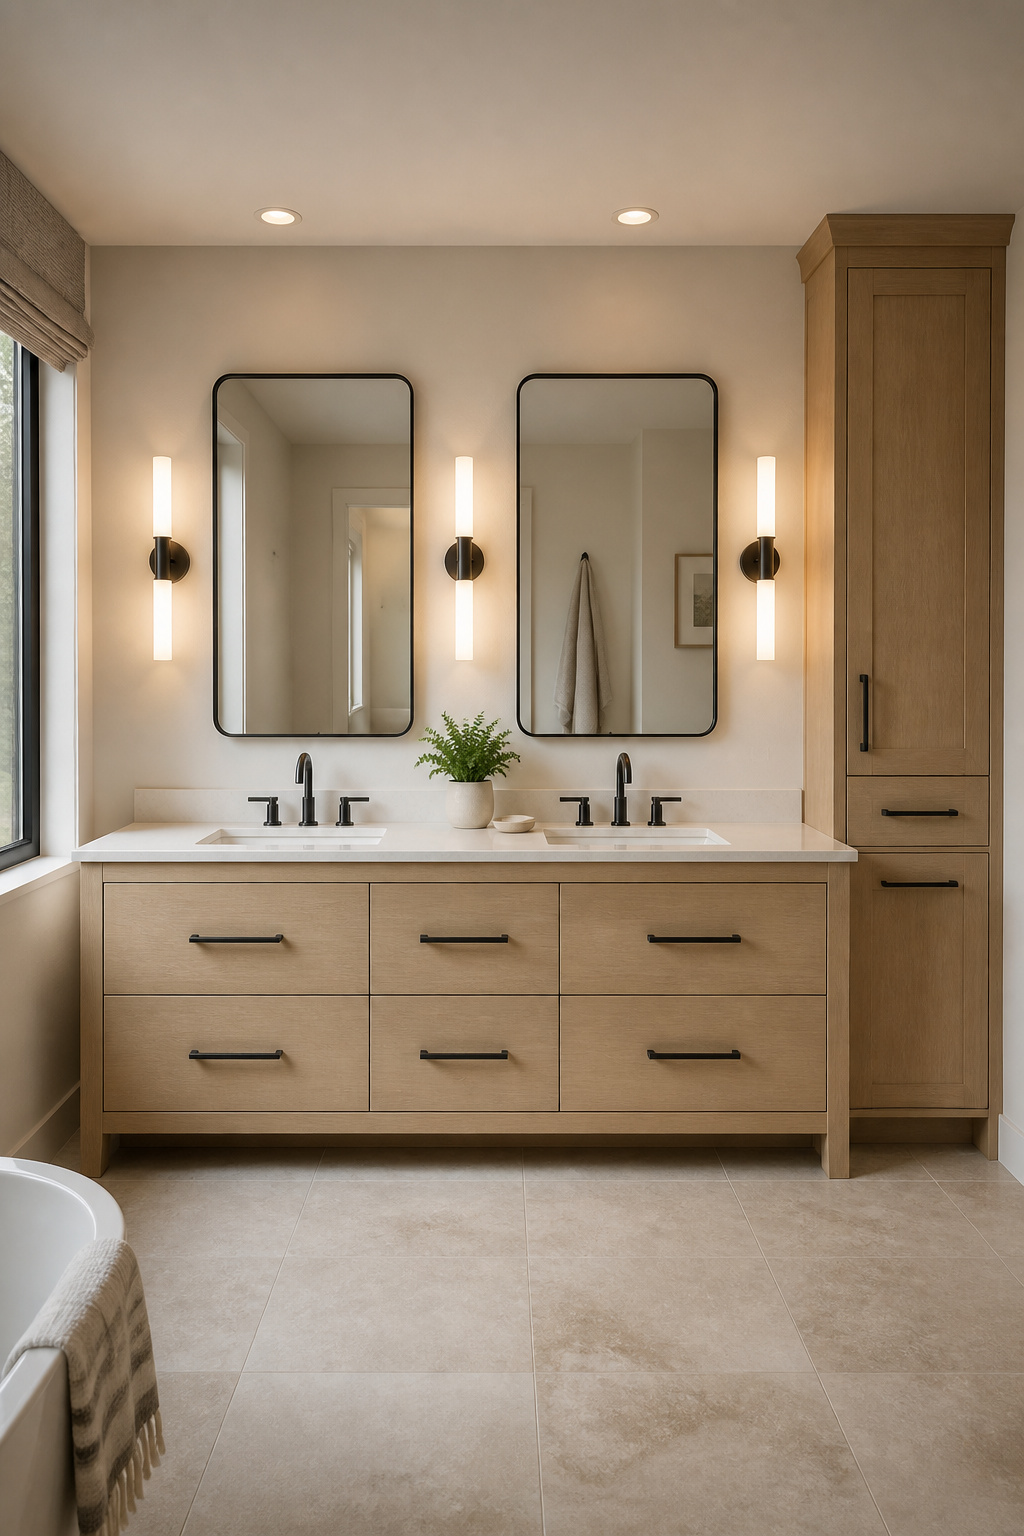
The minimum width for a genuine double vanity is 60 inches. At this size, two sinks fit, but counter space between and beside the basins feels compressed. The preferred specification for a shared master bathroom is 72 inches, which allows 30 inches of center-to-center sink spacing — the minimum comfortable working distance for two adults — plus useful counter space on either side. Heights of 84 inches and above offer genuine luxury, though they require a substantial bathroom footprint to avoid dominating the room.
Height matters more than most people account for: the modern comfort standard sits at 34 to 36 inches, which is 4 to 6 inches taller than the traditional specification. This removes the slight forward bend that becomes quietly uncomfortable over years of daily use. Combine with undermount basins for the cleanest counter surface.
Two individual recessed medicine cabinets centred over each basin are the Nordic designer’s preference over a single shared mirror. Individual zones reduce morning conflict and reinforce the sense that this bathroom was designed for two specific people rather than two abstract users. Allow a minimum 30 inches of clear floor space between the vanity front and any opposing fixture — building code may permit 21 inches, but 30 inches is the ergonomic standard that makes the difference between a bathroom that feels considered and one that merely complies.
No manufactured material provides what wood provides in a bathroom: irreplaceable warmth, organic variation, and the tactile quality that makes a room feel lived in rather than designed. The challenge — and it’s a real one — is specifying wood correctly for a high-humidity environment. The answer is not to avoid wood but to choose species and treatments that belong there.
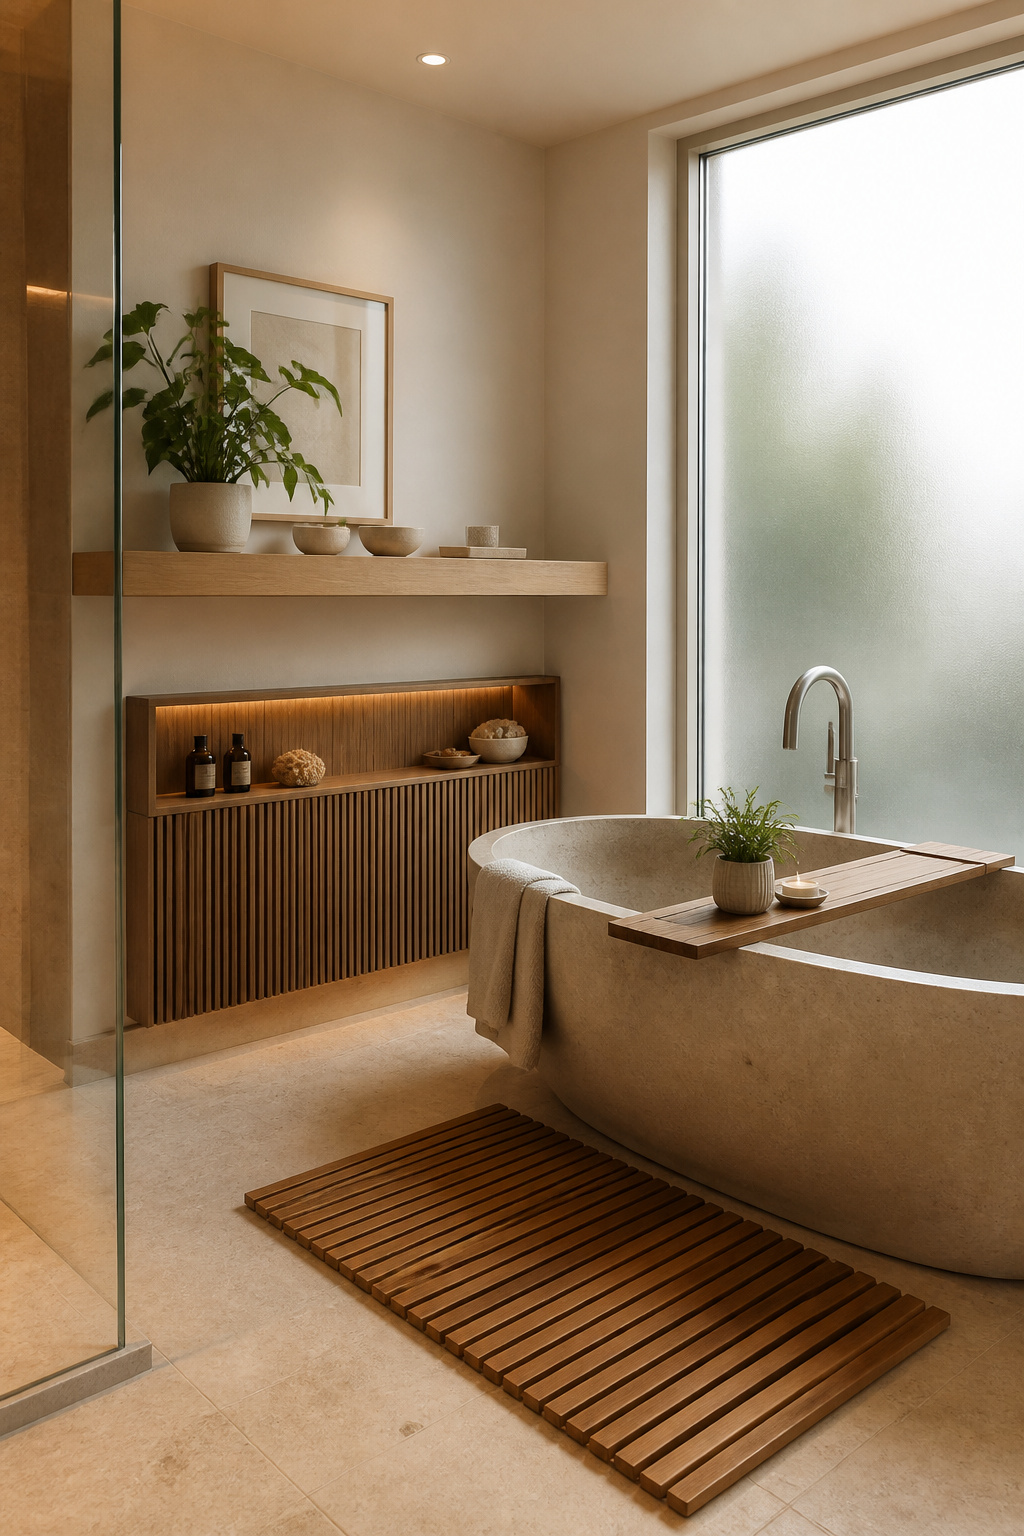
Teak is the benchmark. Its natural oils, particularly tectoquinone, resist water penetration, fungi, and insect damage without chemical treatment — which is precisely why teak has been standard in Scandinavian and Japanese spa bathrooms for decades. A teak bath caddy spanning the freestanding tub is the most immediately achievable wood accent in a Nordic master bathroom: it costs $40 to $200, requires no construction, and transforms the bathing experience from functional to genuinely restorative. Teak shower benches and slatted bath mats placed over heated stone floors are the next layer — stepping from warm limestone onto cool teak is a sensory signature of Nordic spa bathrooms that photographs poorly but feels extraordinary.
For built-in elements, thermally modified wood (ash or oak heat-treated to over 200 degrees Celsius in low-oxygen kilns) delivers the moisture resistance of tropical hardwood from FSC-certified species. The thermal process permanently alters the cellular structure, baking out the sugars and moisture that fungi feed on. Thermally modified ash in particular has a warm brown tone that pairs beautifully with pale stone palettes. The material balance matters: wood on the vanity front and one floating shelf; stone on the floor and one feature wall; white or greige on remaining surfaces. Annual maintenance with Danish oil or teak oil keeps wooden accessories in excellent condition without a surface build-up that obscures the grain.
Tapware is touched hundreds of times each year and seen from every angle in a master bathroom. The finish choice works as the jewellery of the room — it either pulls the material palette together or works against it. Chrome shows water spots within hours of wiping and has a cool, industrial reflectivity that fights against the warm natural materials that define a Nordic master bathroom.
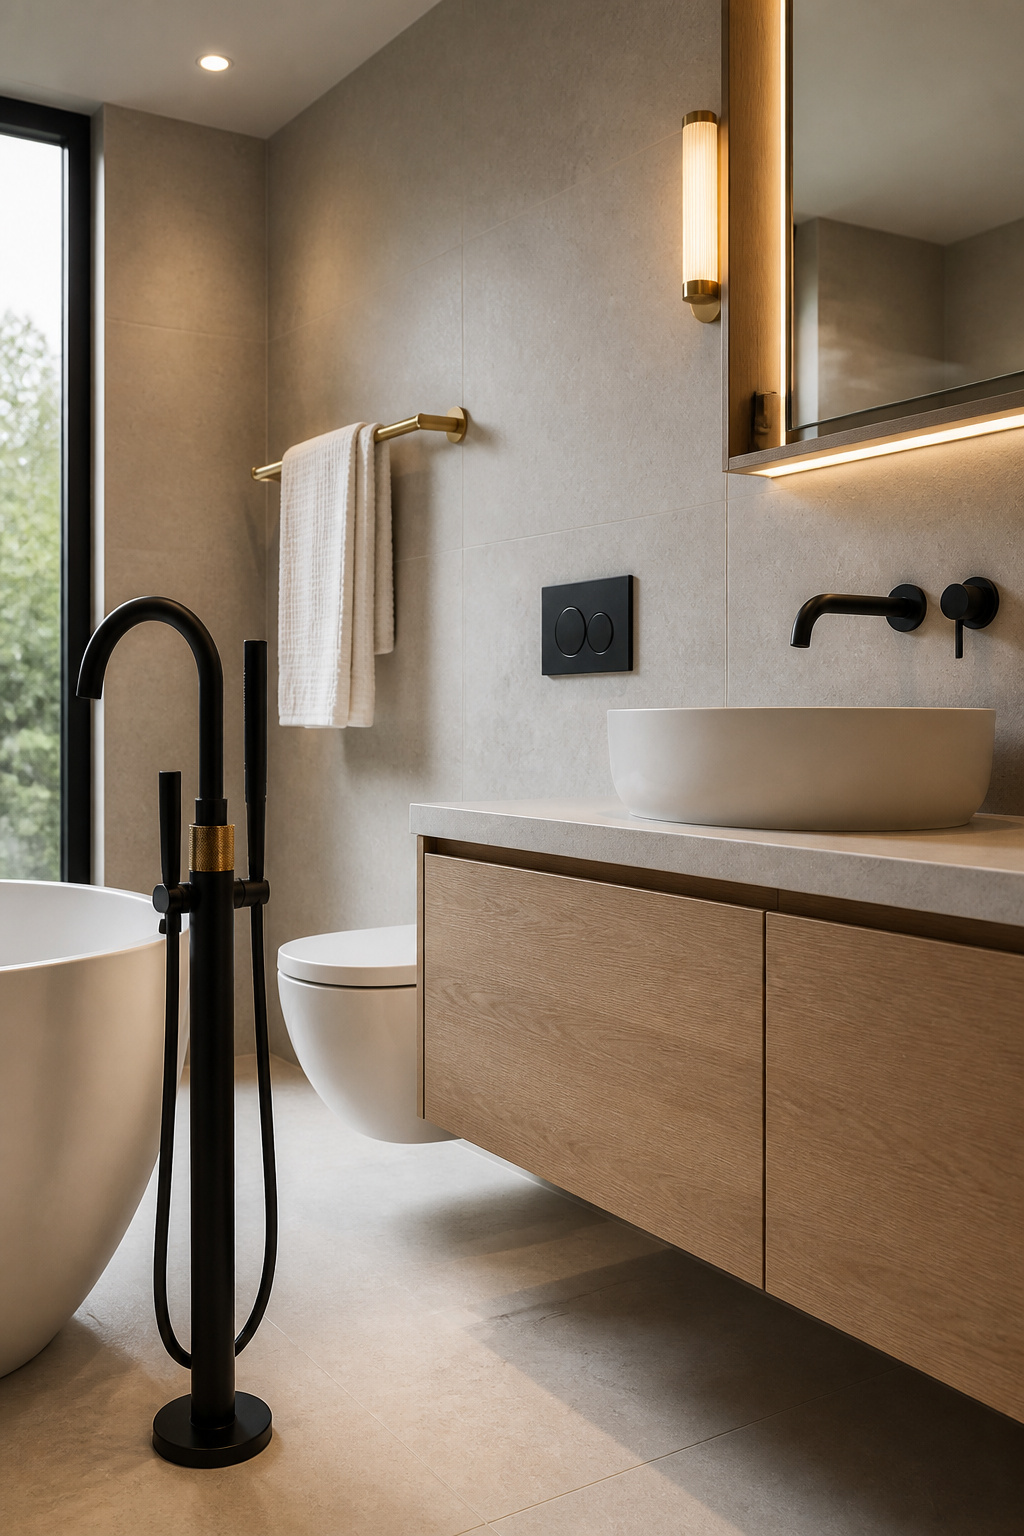
Matte black and brushed brass have collectively replaced chrome as the premium finish choice, and the reasons go beyond aesthetics. PVD (Physical Vapor Deposition) coating technology has transformed the durability of coloured tapware finishes. PVD-coated matte black achieves 8 to 10 on the Mohs hardness scale — comparable to hardened steel — and withstands 96-hour salt-spray testing without blistering, equivalent to over a decade of coastal humidity exposure. Premium manufacturers back these finishes with 12-year guarantees. Both matte black and brushed brass conceal water spots and fingerprints significantly better than chrome, which matters in a bathroom used twice daily.
The Nordic two-tone rule for mixing finishes: choose one dominant finish and one supporting finish, and introduce no third metal anywhere in the room. The pairing that works consistently is matte black with brushed brass — unified by their similar low-gloss reflectance levels. Matte black dominates in bathrooms with cooler stone palettes; brushed brass leads in warmer material environments with oak, travertine, and cream tile. Specify the entire hardware family — basin taps, shower valve, towel rails, toilet flush plate, and door hardware — from the same manufacturer’s range. A mismatched flush plate or towel ring can undermine an otherwise perfectly executed room.
The framed shower screen is not the enemy of good bathroom design, but it does insert a visual boundary where a frameless enclosure would allow the eye to travel continuously across the room. In a master bathroom where the floor tile, the stone walls, and the freestanding tub are all meant to be experienced together, a frameless glass screen is what allows the composition to cohere.
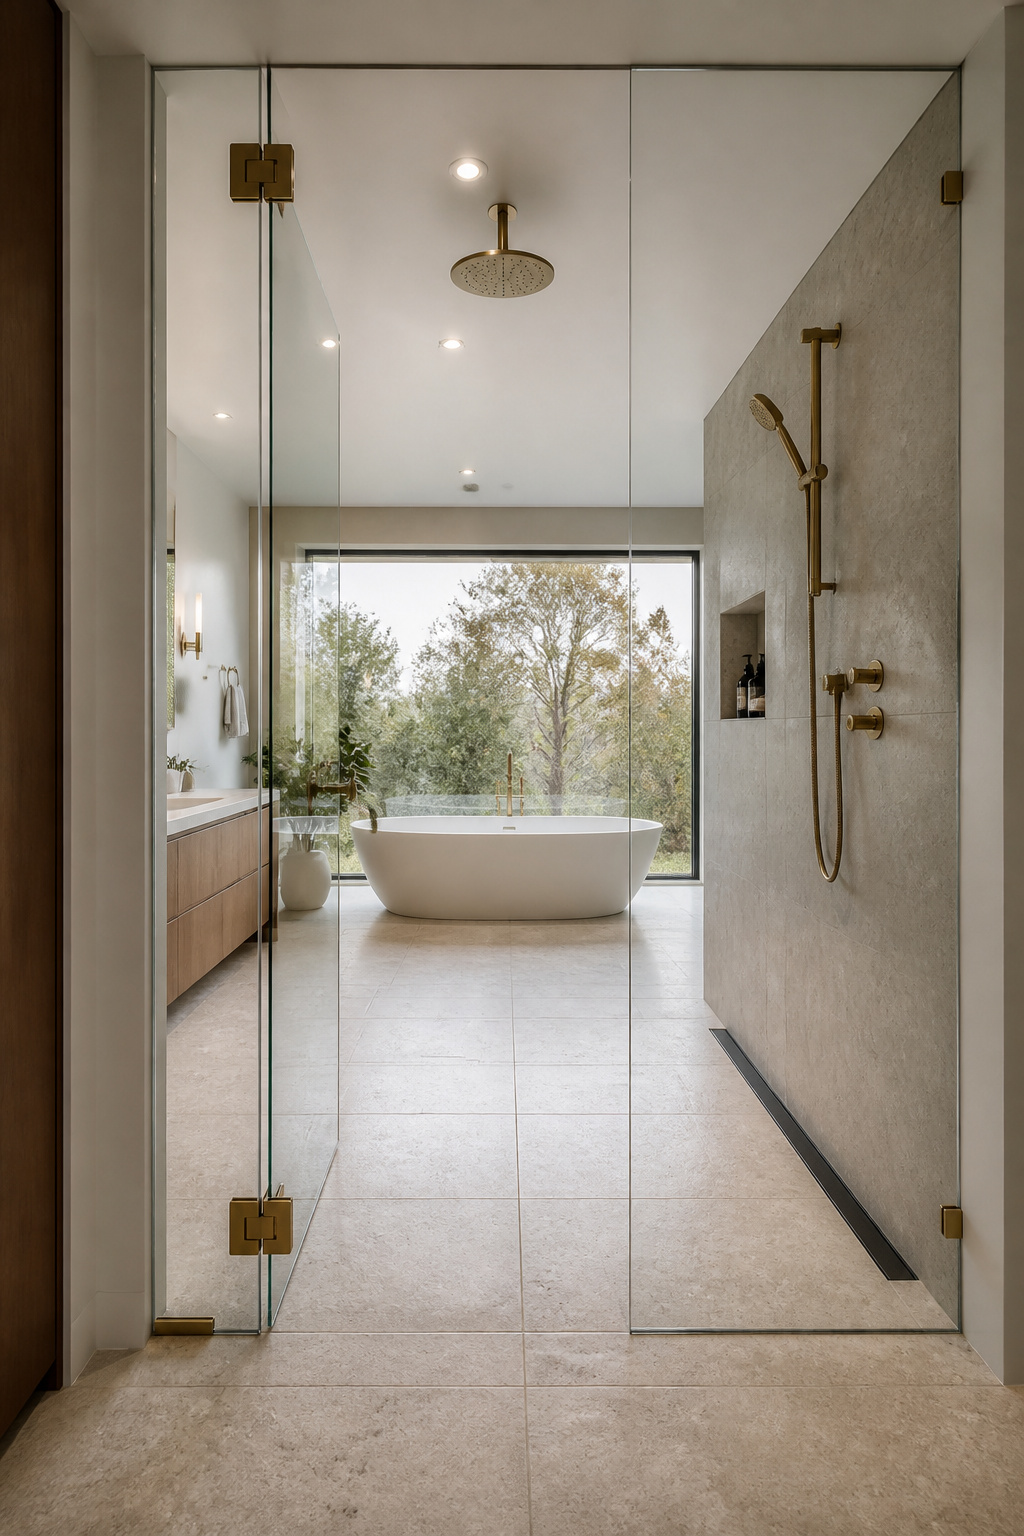
Clear, low-iron glass lets the full depth of the shower read from outside it. Floor tile continues uninterrupted beneath the glass. The visual pattern reads as a single field rather than a series of contained zones, and in a private master bathroom there is no reason for tinted, patterned, or obscure glass — those choices belong to public spaces or toilet compartments within shared ensuites.
On glass thickness: 10mm tempered glass is the professional standard for frameless shower doors. It swings with authority and exerts less rotational stress on wall anchors than 8mm equivalents. The premium over 8mm installations runs $400 to $800 for a fully installed frameless door — in the context of a $20,000 to $80,000 master bathroom renovation, this is not a compromise worth making. Solid brass hinges (not zinc alloy) are the other detail that separates installations that remain plumb for 20 years from ones that gradually sag open.
For bathrooms with sufficient width — typically 1500mm or more between the shower opening and the nearest opposing surface — a walk-in wetroom configuration with a single fixed deflector panel eliminates hinges, seals, and pivot mechanisms entirely. No door to clean, no hardware to maintain. It’s the Nordic preference when layout permits.
The most persistent characteristic of a genuinely well-designed master bathroom is that it engages the senses before you fully register why. The warmth underfoot (the heated stone), the quality of the light (dimmed, 2700K), the scent that greets you at the door, and the weight of the towel in your hand — none of these are visible in a photograph, and all of them define how you experience the room every single day.
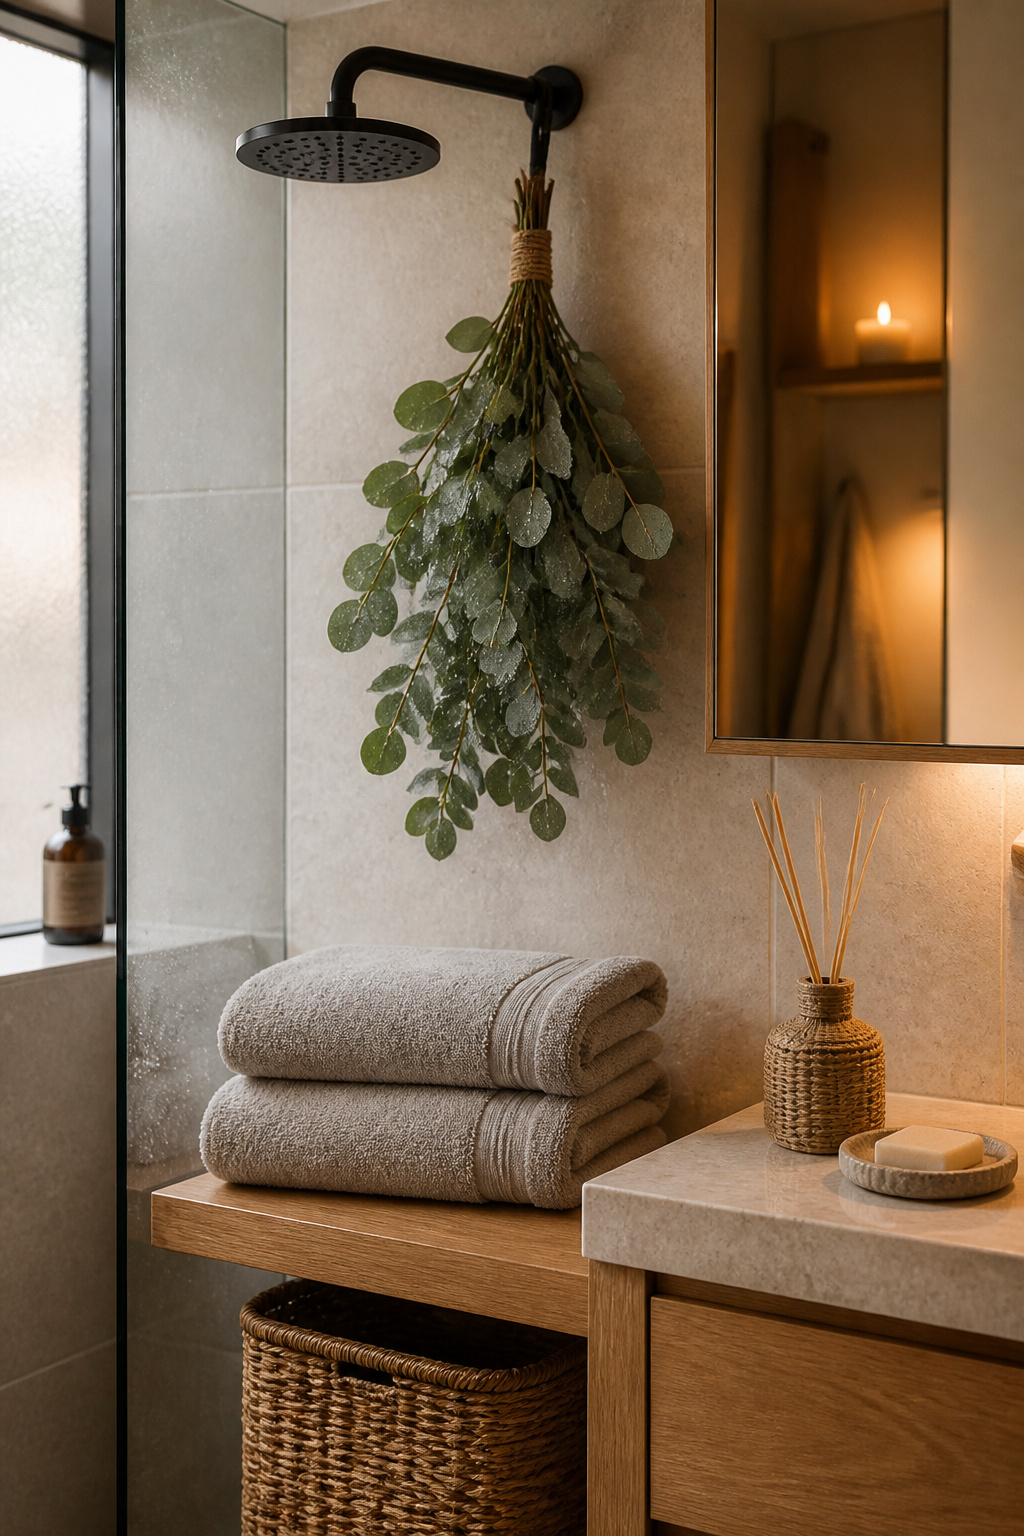
Towel quality is the finishing touch that delivers the most tangible daily return. Towel weight is expressed in GSM (grams per square metre): 400 to 500 GSM is functional everyday weight; 600 to 700 GSM is plush hotel weight; 700 to 900 GSM is spa weight — the kind that absorbs quickly and feels genuinely substantial. Turkish cotton (long-staple Aegean cotton) is the material of choice for daily-use master bathroom towels: it softens and becomes more absorbent with each wash. Two sets of 700 GSM Turkish cotton bath sheets cost $120 to $300 — a fraction of any other renovation element, and one of the most consistently appreciated upgrades homeowners report.
For scent, fresh eucalyptus bundles hung from the shower arm are the zero-cost, zero-maintenance option: the steam releases essential oils during the shower, they last two to three weeks, and the visual effect of greenery against pale tile is genuinely beautiful. Reed diffusers are more reliable for continuous background fragrance — a 60 to 200ml capacity diffuser in eucalyptus, hinoki wood, or cedar provides a consistent ambient note without the daily attention a candle requires and without the combustion risk in a damp environment.
One practical note on towel colour: off-white, linen, and oatmeal tones are more forgiving in stone-dominant bathrooms than bright white. Natural minerals in water and the residue of cleaning products have a way of finding white fibres eventually.
The Scandinavian colour palette is not a trend. It is a response to a specific set of environmental conditions — long winters, limited natural light, the psychological need for warmth in domestic space — and it has remained remarkably stable for decades precisely because those conditions haven’t changed. What has evolved is the specific tonal register within the palette, and in 2026 that evolution is worth understanding.
The foundational structure is 60/30/10: 60% warm white on walls and ceiling, 30% soft greige or warm grey on the floor tile and vanity, 10% accent in textiles and accessories. This ratio holds whether the room is 50 square feet or 150. What changes is how the neutrals are calibrated. The cold, blue-grey that defined minimalist bathrooms a decade ago is giving way to ‘taupe greige’ — a deeper neutral that layers warm beige and cool grey into something more complex and liveable. It reads as restful rather than clinical, and it ages without dating.
Warm white is non-negotiable, but not all whites are warm. Benjamin Moore’s White Dove, Farrow and Ball’s Pointing, and Dulux’s White Cotton are all tested performers — they have enough warmth to prevent the sterile feel of stark brilliant white without drifting into cream. On paint finish, eggshell is the standard for master bathroom walls: wipeable, moisture-resistant, and soft enough in sheen to suit the Nordic aesthetic. Semi-gloss on trim and eggshell on walls creates a subtle sheen differential that adds dimensionality without requiring a second colour.
For accents: dusty sage green has replaced millennial pink as the Nordic accent of the moment, and it’s a more lasting choice — muted, grey-influenced, and compatible with virtually every neutral palette. Deep slate blue works beautifully as a ceiling colour, borrowed from Swedish and Finnish country house design, where a lowered ceiling creates exactly the cocooning quality that makes a master bathroom feel like a genuine retreat. For those drawn to this aesthetic, the minimalist bathroom ideas that work best take the same disciplined approach to colour — restraint in range, depth in execution.
The most expensive mistake in a master bathroom renovation isn’t choosing the wrong tile or overpaying for fixtures — it’s making decisions in the wrong sequence. Each choice in a master bathroom remodel creates constraints for the decisions that follow. Get the sequence right and the renovation flows. Reverse it, and you spend the final weeks compromising on things you care about because earlier decisions left no room.
Here is the sequence that works: confirm the layout and plumbing positions first (this determines your entire cost structure); order tile and natural stone next — lead times for bookmatched stone slabs can run six to twelve weeks from quarry, and this is the element most difficult to change once installed; select the vanity and fixtures once you have confirmed stone samples in hand; choose tapware and hardware finishes after the vanity material is decided; specify lighting fixtures last among the fixed elements; arrive at textiles and accessories only after everything structural and decorative is resolved.
For budgeting, the three tiers look like this: an entry-level refresh ($8,000 to $15,000) gives you a new vanity, updated fixtures, fresh lighting, and paint without touching tile or plumbing; a mid-range master bathroom renovation ($18,000 to $35,000) delivers new tile floors and walls, a custom vanity, a new shower enclosure, and heated floors; a premium renovation ($35,000 to $80,000 and above) adds the wet room, freestanding tub, full natural stone, and a double vanity. If the budget forces a choice, the five upgrades with the clearest daily return — heated floors, layered lighting, frameless shower screen, natural wood vanity, large-format tile — are the ones to protect.
Build in 15% contingency on any renovation, and 20% on homes over 20 years old. A timeline of three to eight weeks is realistic from demolition to final inspection; wet rooms with full waterproofing membranes and natural stone tiles add one to two weeks of curing time that cannot be rushed. The best master bathrooms don’t happen quickly. They happen carefully.